
User Manual
Page 3
... Read this manual carefully and make the user aware of possible problems and information of any importance to help understand, use and maintain the installation. ** ** To reduce the risk of electric shock, do not remove cover (or back). GB 2 This symbol indicates dangerous voltage inside . Refer servicing to make sure you understand the instructions provided. No user serviceable parts inside...
... Read this manual carefully and make the user aware of possible problems and information of any importance to help understand, use and maintain the installation. ** ** To reduce the risk of electric shock, do not remove cover (or back). GB 2 This symbol indicates dangerous voltage inside . Refer servicing to make sure you understand the instructions provided. No user serviceable parts inside...

User Manual
Page 4
... mains before you start any power cords into the wall outlet. Do not place the product on a bed, sofa, rug, or other components before you connect or disconnect any object and do so can cause serious injury to a child or adult and serious damage to dust the product. ** 5. CONNECTION TO THE CABLE TV SIGNAL Connect all components before...
... mains before you start any power cords into the wall outlet. Do not place the product on a bed, sofa, rug, or other components before you connect or disconnect any object and do so can cause serious injury to a child or adult and serious damage to dust the product. ** 5. CONNECTION TO THE CABLE TV SIGNAL Connect all components before...
User Manual
Page 6
... Conditional Access GB9 1.4 Rear Panel GB10 1.5 Remote Control GB11 2. Basic Operation GB20 4.1 Switching Channel GB20 4.2 Volume Control GB20 4.3 Subtitle GB20 4.4 Audio GB21 4.5 Teletext GB21 4.6 Programme Information (i-plate GB23 4.7 Option List GB24 5. Programme Guide GB35 6.1 Viewing Programme Guide Information GB35 6.2 Finding a Programme GB37 6.3 Viewing Reserved Programme GB38 7. Contents 1. Installation Wizard GB17 3.1 Language GB17 3.2 Area Setting GB17 3.3 Channel Search GB18 3.4 Time Setting GB19 3.5 Result GB19 4. Channel List GB27 5.1 Displaying...
... Conditional Access GB9 1.4 Rear Panel GB10 1.5 Remote Control GB11 2. Basic Operation GB20 4.1 Switching Channel GB20 4.2 Volume Control GB20 4.3 Subtitle GB20 4.4 Audio GB21 4.5 Teletext GB21 4.6 Programme Information (i-plate GB23 4.7 Option List GB24 5. Programme Guide GB35 6.1 Viewing Programme Guide Information GB35 6.2 Finding a Programme GB37 6.3 Viewing Reserved Programme GB38 7. Contents 1. Installation Wizard GB17 3.1 Language GB17 3.2 Area Setting GB17 3.3 Channel Search GB18 3.4 Time Setting GB19 3.5 Result GB19 4. Channel List GB27 5.1 Displaying...
User Manual
Page 7
Software Update GB55 9.1 OTA (Over the Air GB55 10. Menu Map GB62 13. Contents 8. Service and Support GB69 GB 6 Games GB61 12. Glossary GB68 16. System Information GB59 10.1 Status GB59 10.2 Signal Detection GB59 10.3 Conditional Access (for Conax embedded GB60 11. Troubleshooting GB63 13.1 Trouble Shooting GB63 13.2 Error Message GB64 14. Specification GB66 15. Installation GB49 8.1 Automatic Search GB49 8.2 Linear Search GB50 8.3 Manual Search GB52 8.4 Default Setting GB54 9.
Software Update GB55 9.1 OTA (Over the Air GB55 10. Menu Map GB62 13. Contents 8. Service and Support GB69 GB 6 Games GB61 12. Glossary GB68 16. System Information GB59 10.1 Status GB59 10.2 Signal Detection GB59 10.3 Conditional Access (for Conax embedded GB60 11. Troubleshooting GB63 13.1 Trouble Shooting GB63 13.2 Error Message GB64 14. Specification GB66 15. Installation GB49 8.1 Automatic Search GB49 8.2 Linear Search GB50 8.3 Manual Search GB52 8.4 Default Setting GB54 9.
User Manual
Page 14
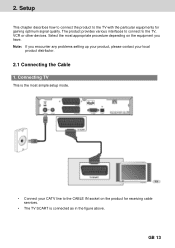
... the product for gaining optimum signal quality. 2. Connecting TV This is connected as in the figure above. The product provides various interfaces to connect to the CABLE IN socket on the equipment you have. GB 13 Select the most simple setup mode. ** ** • Connect your local product distributor. ** 2.1 Connecting the Cable 1. Setup 2. Note: If you encounter any problems setting up your product, please...
... the product for gaining optimum signal quality. 2. Connecting TV This is connected as in the figure above. The product provides various interfaces to connect to the CABLE IN socket on the equipment you have. GB 13 Select the most simple setup mode. ** ** • Connect your local product distributor. ** 2.1 Connecting the Cable 1. Setup 2. Note: If you encounter any problems setting up your product, please...
User Manual
Page 19
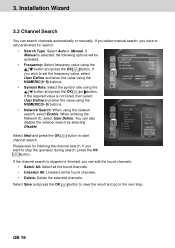
... listed, then select ** User Define and enter the value using the NUMERIC(0~9) buttons. • Network Search: When using the button and press the OK button. button to start Please wait for search. • Search Type: Select Auto or Manual. Installation Wizard 3.3 Channel Search You can also disable the network search by selecting Disable. ** Select Next and press the OK channel search. You can search channels automatically or manually...
... listed, then select ** User Define and enter the value using the NUMERIC(0~9) buttons. • Network Search: When using the button and press the OK button. button to start Please wait for search. • Search Type: Select Auto or Manual. Installation Wizard 3.3 Channel Search You can also disable the network search by selecting Disable. ** Select Next and press the OK channel search. You can search channels automatically or manually...

User Manual
Page 21
Channel List and 6. Programme Guide. ** 4.2 Volume Control 1. Press the V-/V+ 2. button to switch between TV channel and radio channel. GB 20 Press the TV/RADIO button to stop the audio temporarily. For more information, please refer to adjust the audio volume. Note: The mute function will be displayed in MENU-Preferences-Language Setting-Subtitle Language. Basic Operation 4. Press the MUTE or button to Chapter 5. Press the CH-/CH+ or button. 2. Press...
Channel List and 6. Programme Guide. ** 4.2 Volume Control 1. Press the V-/V+ 2. button to switch between TV channel and radio channel. GB 20 Press the TV/RADIO button to stop the audio temporarily. For more information, please refer to adjust the audio volume. Note: The mute function will be displayed in MENU-Preferences-Language Setting-Subtitle Language. Basic Operation 4. Press the MUTE or button to Chapter 5. Press the CH-/CH+ or button. 2. Press...

User Manual
Page 22
Press the OK button. 4. Select the audio direction(left, right, stereo) using the button. 3. Press the MENU button to display teletext menu in Dolby Digital audio regardless of default audio language. ** 4.5 Teletext When the channel supports teletext, the teletext icon ( ) is displayed on the i-plate. To enter the teletext mode, press the TELETEXT ON/OFF button or the SUBTITLE button to change audio immediately. 3. Select the required teletext function using the button. Note: •...
Press the OK button. 4. Select the audio direction(left, right, stereo) using the button. 3. Press the MENU button to display teletext menu in Dolby Digital audio regardless of default audio language. ** 4.5 Teletext When the channel supports teletext, the teletext icon ( ) is displayed on the i-plate. To enter the teletext mode, press the TELETEXT ON/OFF button or the SUBTITLE button to change audio immediately. 3. Select the required teletext function using the button. Note: •...

User Manual
Page 28
... selected channel list using the LIST channel list. Press the button to move by your configuration. • If Within the Current Channel List option is sorted by channel name. TV Radio Favourite The list of all radio channels with two sub-groups: one is sorted by channel number, the other is selected in MENU-Edit channels-Channel Change Mode, you press the TV/RADIO button while the channel list is displayed, the channel list will...
... selected channel list using the LIST channel list. Press the button to move by your configuration. • If Within the Current Channel List option is sorted by channel name. TV Radio Favourite The list of all radio channels with two sub-groups: one is sorted by channel number, the other is selected in MENU-Edit channels-Channel Change Mode, you press the TV/RADIO button while the channel list is displayed, the channel list will...

User Manual
Page 29
... the menu screen. • You can select the channel list group to select Edit Channel Lists. 1. GB 28 Select Edit Channels using NUMERIC(0~9) buttons. You will be prompted to enter your local product distributor. • Press the BACK Press the MENU or button to save the changes and return to MENU-Edit Channels-Edit Favourite Channels. Press the OK or button in group. 2. Note: • The default password...
... the menu screen. • You can select the channel list group to select Edit Channel Lists. 1. GB 28 Select Edit Channels using NUMERIC(0~9) buttons. You will be prompted to enter your local product distributor. • Press the BACK Press the MENU or button to save the changes and return to MENU-Edit Channels-Edit Favourite Channels. Press the OK or button in group. 2. Note: • The default password...

User Manual
Page 31
... BACK Press the MENU or button to save the changes and return to the previous menu. Select Select All and press the OK button to edit using the button and press the OK or button. 4. Select a Favourite group you want to select all the selected channels. 5.3 Edit Favourite Channels You can edit Favourite channel or Favourite channel list. 1. Press the MENU-2-2 in order to...
... BACK Press the MENU or button to save the changes and return to the previous menu. Select Select All and press the OK button to edit using the button and press the OK or button. 4. Select a Favourite group you want to select all the selected channels. 5.3 Edit Favourite Channels You can edit Favourite channel or Favourite channel list. 1. Press the MENU-2-2 in order to...

User Manual
Page 43
Preferences 3. Change Password You can set the language for menu, audio and subtitle. 1. button 2. Note: The default password is 0000. Select Menu/Audio/Subtitle Language using the and press the OK or button. button and press 2. 7. Select Change Password using the the OK or button. Menu/Audio/Subtitle Language You can set the language for menu, audio and subtitle. 1. Select Language Setting using the NUMERIC(0~9) buttons, select OK and press OK button. 3. GB 42 button and 3. If you have forgotten your password, please contact...
Preferences 3. Change Password You can set the language for menu, audio and subtitle. 1. button 2. Note: The default password is 0000. Select Menu/Audio/Subtitle Language using the and press the OK or button. button and press 2. 7. Select Change Password using the the OK or button. Menu/Audio/Subtitle Language You can set the language for menu, audio and subtitle. 1. Select Language Setting using the NUMERIC(0~9) buttons, select OK and press OK button. 3. GB 42 button and 3. If you have forgotten your password, please contact...

User Manual
Page 44
... and Fixed using the OK or button. or button. Select Audio Priority using the OK or button. Language Dolby Digital You can select the priority of audio. 1. Select one option from Auto and Manual using the button. 2. Audio Priority You can watch programme in Dolby Digital mode. You can select whether or not to sound in the selected language. GB 43 2. When Dolby Digital is selected, the audio language cannot be changed. Subtitle Display...
... and Fixed using the OK or button. or button. Select Audio Priority using the OK or button. Language Dolby Digital You can select the priority of audio. 1. Select one option from Auto and Manual using the button. 2. Audio Priority You can watch programme in Dolby Digital mode. You can select whether or not to sound in the selected language. GB 43 2. When Dolby Digital is selected, the audio language cannot be changed. Subtitle Display...

User Manual
Page 50
... 49 If you press the OK button during searching, the operation stops and only the channels found so far will be displayed. 2. Therefore, if you have forgotten your password, please contact your local product distributor. 1. If the search operation is connected to reset the search operation again if necessary. 3. button Note: The default password is located at Stop. 8. Search...
... 49 If you press the OK button during searching, the operation stops and only the channels found so far will be displayed. 2. Therefore, if you have forgotten your password, please contact your local product distributor. 1. If the search operation is connected to reset the search operation again if necessary. 3. button Note: The default password is located at Stop. 8. Search...
User Manual
Page 53
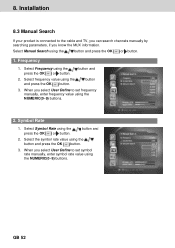
... User Define to the cable and TV, you can search channels manually by searching parameters, if you select User Define to set symbol rate manually, enter symbol rate value using the NUMERIC(0~9) buttons. Frequency 1. button 3. button and 2. Select Manual Search using the press the OK or button. 8. Installation 8.3 Manual Search If your product is connected to set frequency manually, enter frequency value using the and press the OK button. button and 2. Select frequency value using the NUMERIC(0~9) buttons...
... User Define to the cable and TV, you can search channels manually by searching parameters, if you select User Define to set symbol rate manually, enter symbol rate value using the NUMERIC(0~9) buttons. Frequency 1. button 3. button and 2. Select Manual Search using the press the OK or button. 8. Installation 8.3 Manual Search If your product is connected to set frequency manually, enter frequency value using the and press the OK button. button and 2. Select frequency value using the NUMERIC(0~9) buttons...

User Manual
Page 55
... password using the press the OK or button. GB 54 button, 5. If you perform the default setting, all setting to restore all data such as the channel list and user configured data are deleted. ** 1. Select Yes and press the OK button to the factory default. For detailed information about the installation wizard, refer to the previous menu. 6. Select Default Setting using the NUMERIC(0~9) buttons. 4. Installation Wizard. Confirm again to the default settings...
... password using the press the OK or button. GB 54 button, 5. If you perform the default setting, all setting to restore all data such as the channel list and user configured data are deleted. ** 1. Select Yes and press the OK button to the factory default. For detailed information about the installation wizard, refer to the previous menu. 6. Select Default Setting using the NUMERIC(0~9) buttons. 4. Installation Wizard. Confirm again to the default settings...

User Manual
Page 57
Select Yes and press the OK update the software. Please wait until the update is automatically powered off and on 1. A message will be displayed to 3. Starts downloading new software. If new software is found when powering on again. GB 56 button to notify that new software is found . 2. When completing the software update, the equipment is completed. 4. 9. Software Update 1.
Select Yes and press the OK update the software. Please wait until the update is automatically powered off and on 1. A message will be displayed to 3. Starts downloading new software. If new software is found when powering on again. GB 56 button to notify that new software is found . 2. When completing the software update, the equipment is completed. 4. 9. Software Update 1.
User Manual
Page 61
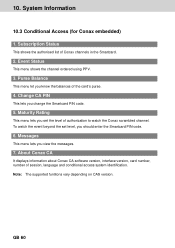
Event Status This menu shows the channel ordered using PPV. 3. To watch the Conax scrambled channel. GB 60 About Conax CA It displays information about Conax CA-software version, interface version, card number, number of Conax channels in the Smartcard. 2. Change CA PIN This lets you view the messages. 7. Subscription Status This shows the authorised list of session, language and conditional access system identification. ** Note: The supported funtitons vary...
Event Status This menu shows the channel ordered using PPV. 3. To watch the Conax scrambled channel. GB 60 About Conax CA It displays information about Conax CA-software version, interface version, card number, number of Conax channels in the Smartcard. 2. Change CA PIN This lets you view the messages. 7. Subscription Status This shows the authorised list of session, language and conditional access system identification. ** Note: The supported funtitons vary...
User Manual
Page 64
... in the remote control for further instructions. ** 1. Connect the power cable to the TV. - Make sure that you search channels in the AV menu. 5. Check that the product is firmly connected to a different power outlet. 2. Poor picture & sound quality ** - Check the volume levels of your local product distributor or service centre for a new set and the product. - Remote control does not operate. ** - Replace the batteries in operation mode (Press the...
... in the remote control for further instructions. ** 1. Connect the power cable to the TV. - Make sure that you search channels in the AV menu. 5. Check that the product is firmly connected to a different power outlet. 2. Poor picture & sound quality ** - Check the volume levels of your local product distributor or service centre for a new set and the product. - Remote control does not operate. ** - Replace the batteries in operation mode (Press the...
User Manual
Page 69
...) channel or services when inserted into an appropriate receiver. 15. The information supplied in cycles per second (=Hz). ** OSD (On Screen Display) OSD displays the basic information necessary for the users to and from analogue, which could degrade the signal quality. ** Smartcard A credit card sized card that are or will have a 21-pin female connection; a cable with digital set-top boxes and digital television sets to a printed television listings magazine...
...) channel or services when inserted into an appropriate receiver. 15. The information supplied in cycles per second (=Hz). ** OSD (On Screen Display) OSD displays the basic information necessary for the users to and from analogue, which could degrade the signal quality. ** Smartcard A credit card sized card that are or will have a 21-pin female connection; a cable with digital set-top boxes and digital television sets to a printed television listings magazine...


