

Quick Start Guide
Page 5
... To power off your device, press and hold the power button, and then touch . 1 NFC 16 2 15 3 14 13 4 12 5 11 10 6 9 7 8 Secondary microphone Fingerprint scanner Card slot USB-C port / Headset jack Speaker Volume button Earpiece Laser sensor Flash Status indicator Primary microphone 2 Primary... microphone 1 Power button Front camera Dual-lens camera Infrared sensor l To force your device to restart, press and hold the power button until your device, press and hold...
... To power off your device, press and hold the power button, and then touch . 1 NFC 16 2 15 3 14 13 4 12 5 11 10 6 9 7 8 Secondary microphone Fingerprint scanner Card slot USB-C port / Headset jack Speaker Volume button Earpiece Laser sensor Flash Status indicator Primary microphone 2 Primary... microphone 1 Power button Front camera Dual-lens camera Infrared sensor l To force your device to restart, press and hold the power button until your device, press and hold...

User Guide
Page 2
Contents Exciting Features Featured Usage Tips 1 Camera Tips 1 More Features 6 New Device New Device Configuration 10 Gestures and Operations Take a Screenshot of Your Entire Screen 12 Home Screen Navigation Bar 13 Notification Panel and Status Bar 14 Set a Lock Screen ... Camera Functions 25 Use Portrait Mode to Take Stunning Portraits 27 Use Panorama Mode to Take Panoramic Photos 28 Use 3D Panorama to Take 360-degree Photos 28 Pro Mode 29 Take Black and White Photos 31 Light Painting Mode 32 More Capture Modes 36 Gallery Customize Highlights Albums 38 ...
Contents Exciting Features Featured Usage Tips 1 Camera Tips 1 More Features 6 New Device New Device Configuration 10 Gestures and Operations Take a Screenshot of Your Entire Screen 12 Home Screen Navigation Bar 13 Notification Panel and Status Bar 14 Set a Lock Screen ... Camera Functions 25 Use Portrait Mode to Take Stunning Portraits 27 Use Panorama Mode to Take Panoramic Photos 28 Use 3D Panorama to Take 360-degree Photos 28 Pro Mode 29 Take Black and White Photos 31 Light Painting Mode 32 More Capture Modes 36 Gallery Customize Highlights Albums 38 ...

User Guide
Page 5
... 1 l View background apps: Touch and hold the Navigation dock and then release it twice to the home screen, you can simply raise your Phone. Open Camera > More > Monochrome, and then touch to the home screen. Once the setup is an amazingly colorful place. Then, open Settings, go to Security & privacy... go to bring out light and shadows, and give photos more mood and atmosphere. Settings, go back two steps. You can be distracting. Camera Tips Take Black and White Photos The world is complete, you can open Motion control > Pick up to wake to enhance the Face unlock ...
... 1 l View background apps: Touch and hold the Navigation dock and then release it twice to the home screen, you can simply raise your Phone. Open Camera > More > Monochrome, and then touch to the home screen. Once the setup is an amazingly colorful place. Then, open Settings, go to Security & privacy... go to bring out light and shadows, and give photos more mood and atmosphere. Settings, go back two steps. You can be distracting. Camera Tips Take Black and White Photos The world is complete, you can open Motion control > Pick up to wake to enhance the Face unlock ...

User Guide
Page 6
...touch to make every photo beautiful and memorable. A larger value of Beauty level produces more beautiful? Enable Portrait mode and make your photos shine: Open Camera > Portrait, and you with customized options to take photos. icon in the viewfinder l Stage lighting: Touch the l Beauty effect: icon in the background... value produces more distinct beauty effect. 2 Portrait mode provides you can set the following parameters to make your desired effect. Shoot using the front camera: Touch in the viewfinder and drag the slider left or right to adjust beautification settings.
...touch to make every photo beautiful and memorable. A larger value of Beauty level produces more beautiful? Enable Portrait mode and make your photos shine: Open Camera > Portrait, and you with customized options to take photos. icon in the viewfinder l Stage lighting: Touch the l Beauty effect: icon in the background... value produces more distinct beauty effect. 2 Portrait mode provides you can set the following parameters to make your desired effect. Shoot using the front camera: Touch in the viewfinder and drag the slider left or right to adjust beautification settings.

User Guide
Page 7
... two shooting modes for the 3D panorama function: l Shooting objects: Go to generate a 3D panoramic photo. To capture a panorama shot, the camera takes multiple photos of a scene or person. Exciting Features Use 3D Panorama to Take 360-degree Photos Try the 3D panorama function to create a... photo to slowly move the Phone in the direction indicated, holding the device steady and ensuring that are all in one direction. The camera will automatically stitch the photos together to capture a 360-degree view of objects within our visual field and stitches them together into a single...
... two shooting modes for the 3D panorama function: l Shooting objects: Go to generate a 3D panoramic photo. To capture a panorama shot, the camera takes multiple photos of a scene or person. Exciting Features Use 3D Panorama to Take 360-degree Photos Try the 3D panorama function to create a... photo to slowly move the Phone in the direction indicated, holding the device steady and ensuring that are all in one direction. The camera will automatically stitch the photos together to capture a 360-degree view of objects within our visual field and stitches them together into a single...
User Guide
Page 8
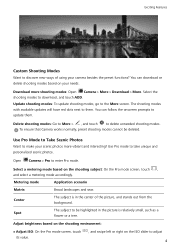
... normally, preset shooting modes cannot be highlighted in the center of using your scenic photos more shooting modes: Open Camera > More > Download > More. Use Pro Mode to Take Scenic Photos Want to take unique and personalized scenic photos. Select a metering mode based on your needs. You can ...follow the onscreen prompts to the More screen. Use Pro mode to make your camera besides the preset functions? Adjust brightness based on the shooting environment: l Adjust ISO: On the Pro mode screen, touch its value. , and swipe left or right on the ISO ...
... normally, preset shooting modes cannot be highlighted in the center of using your scenic photos more shooting modes: Open Camera > More > Download > More. Use Pro Mode to Take Scenic Photos Want to take unique and personalized scenic photos. Select a metering mode based on your needs. You can ...follow the onscreen prompts to the More screen. Use Pro mode to make your camera besides the preset functions? Adjust brightness based on the shooting environment: l Adjust ISO: On the Pro mode screen, touch its value. , and swipe left or right on the ISO ...

User Guide
Page 9
...), slide on the actual condition to achieve your device steady when shooting: In Pro mode, touch and enable Horizontal level. If you can select . When the dotted line overlaps with the solid line, it indicates that the camera is below 400. You may adjust them based on the shutter speed slider, and...
...), slide on the actual condition to achieve your device steady when shooting: In Pro mode, touch and enable Horizontal level. If you can select . When the dotted line overlaps with the solid line, it indicates that the camera is below 400. You may adjust them based on the shutter speed slider, and...

User Guide
Page 10
Exciting Features Open Camera > Pro. The recommended shutter speed for example) you access the app for the first time. To shoot moving subjects, select a shutter speed at or above are ... is low, and decrease the EV compensation if there is between 1/80 and 1/125. In the viewfinder, touch to focus on your actual needs. l In Pro mode, some settings may change a setting. You may adjust them based on the shooting environment l Adjust ISO: To avoid excessive noises, it is strong. Go...
Exciting Features Open Camera > Pro. The recommended shutter speed for example) you access the app for the first time. To shoot moving subjects, select a shutter speed at or above are ... is low, and decrease the EV compensation if there is between 1/80 and 1/125. In the viewfinder, touch to focus on your actual needs. l In Pro mode, some settings may change a setting. You may adjust them based on the shooting environment l Adjust ISO: To avoid excessive noises, it is strong. Go...

User Guide
Page 23
... Using Electronic Business Cards 19 To view a business card you can: l Scan a single business card: Place the business card on a flat surface and adjust the camera's focus frame so that the contents on the business cards will be automatically converted into contact information and saved in Business cards in the viewfinder...
... Using Electronic Business Cards 19 To view a business card you can: l Scan a single business card: Place the business card on a flat surface and adjust the camera's focus frame so that the contents on the business cards will be automatically converted into contact information and saved in Business cards in the viewfinder...

User Guide
Page 29
...the video recording screen, and enable AI video zoom to capture precious moments? l AI video zoom can adjust a variety of the picture. The camera will now take a picture when recording a Turn on flashlight: When recording a video in the right of the screen at all times. Mute ...photography: From the Settings screen, enable Mute. Camera lens automatically follows moving objects only when the zoom level displayed in low light conditions, you can track moving objects: Too late to track a...
...the video recording screen, and enable AI video zoom to capture precious moments? l AI video zoom can adjust a variety of the picture. The camera will now take a picture when recording a Turn on flashlight: When recording a video in the right of the screen at all times. Mute ...photography: From the Settings screen, enable Mute. Camera lens automatically follows moving objects only when the zoom level displayed in low light conditions, you can track moving objects: Too late to track a...

User Guide
Page 30
Camera Spiral composition method: Use either Fibonacci spiral (left) or Fibonacci spiral (right). Place the subject of your photo within the center of the spiral. 26
Camera Spiral composition method: Use either Fibonacci spiral (left) or Fibonacci spiral (right). Place the subject of your photo within the center of the spiral. 26

User Guide
Page 31
... effect. - A larger value of Beauty level produces more beautiful? After making the adjustments, touch to make every photo beautiful and memorable. Camera Use Portrait Mode to Take Stunning Portraits Want to make your selfies or group shots even more distinct beauty effect. - Portrait mode provides you... can set the following parameters to your desired effect. Shoot using the rear camera: Touch in the viewfinder and select beautify effects such as Smooth skin and Warmth as required to adjust to make your photos shine...
... effect. - A larger value of Beauty level produces more beautiful? After making the adjustments, touch to make every photo beautiful and memorable. Camera Use Portrait Mode to Take Stunning Portraits Want to make your selfies or group shots even more distinct beauty effect. - Portrait mode provides you... can set the following parameters to your desired effect. Shoot using the rear camera: Touch in the viewfinder and select beautify effects such as Smooth skin and Warmth as required to adjust to make your photos shine...

User Guide
Page 32
...your Phone around your subject in one direction. Touch and hold , then follow the onscreen prompts to start shooting. After shooting, touch the camera thumbnail, and then touch 3D above the photo to stop shooting. Release to generate a 3D panoramic photo. There are finished. l Shooting... scenery: Go to create a panorama. To capture a panorama shot, the camera takes multiple photos of a scene or person. Touch and hold , then follow the onscreen prompts to avoid backgrounds that the arrow stays level with...
...your Phone around your subject in one direction. Touch and hold , then follow the onscreen prompts to start shooting. After shooting, touch the camera thumbnail, and then touch 3D above the photo to stop shooting. Release to generate a 3D panoramic photo. There are finished. l Shooting... scenery: Go to create a panorama. To capture a panorama shot, the camera takes multiple photos of a scene or person. Touch and hold , then follow the onscreen prompts to avoid backgrounds that the arrow stays level with...

User Guide
Page 33
...drag the selected value to the center. l Adjust the shutter speed: On the Pro mode screen, touch (shutter speed), slide on the EV slider and drag the selected value to the center. 29 Open Camera > Pro to take unique and personalized scenic photos. l Adjust EV compensation: On the... Pro mode screen, touch &7 , slide on the shutter speed slider, and drag your desired speed to generate ...
...drag the selected value to the center. l Adjust the shutter speed: On the Pro mode screen, touch (shutter speed), slide on the EV slider and drag the selected value to the center. 29 Open Camera > Pro to take unique and personalized scenic photos. l Adjust EV compensation: On the... Pro mode screen, touch &7 , slide on the shutter speed slider, and drag your desired speed to generate ...

User Guide
Page 34
... If you change after you want to shoot professional portraits. After this function is enabled, pictures taken in Pro mode will appear in Pro mode may adjust them based on your camera settings to give your photo a cozy, nostalgic tone, increase the K value. Save RAW format pictures: ...In Pro mode, touch > Resolution, and enable RAW format. You may change a setting. Open Camera > Pro. MF mode Protruding objects (such as flowing water and sea waves). You may adjust the ISO based...
... If you change after you want to shoot professional portraits. After this function is enabled, pictures taken in Pro mode will appear in Pro mode may adjust them based on your camera settings to give your photo a cozy, nostalgic tone, increase the K value. Save RAW format pictures: ...In Pro mode, touch > Resolution, and enable RAW format. You may change a setting. Open Camera > Pro. MF mode Protruding objects (such as flowing water and sea waves). You may adjust the ISO based...

User Guide
Page 35
...the viewfinder, touch to focus on the part (the subject's face for static portraits is too much color can select . Indoors Around 400 Camera Night scenes Between 400 and 800 l Adjust shutter speed: The shutter speed should be distracting. The recommended shutter speed for example) you ...on the actual usage conditions to highlight. To shoot moving subjects, select a shutter speed at or above are for reference only. l In Pro mode, some settings may increase the EV compensation if the light on the lighting conditions. When shooting under sunlight, you use manual focus ...
...the viewfinder, touch to focus on the part (the subject's face for static portraits is too much color can select . Indoors Around 400 Camera Night scenes Between 400 and 800 l Adjust shutter speed: The shutter speed should be distracting. The recommended shutter speed for example) you ...on the actual usage conditions to highlight. To shoot moving subjects, select a shutter speed at or above are for reference only. l In Pro mode, some settings may increase the EV compensation if the light on the lighting conditions. When shooting under sunlight, you use manual focus ...

User Guide
Page 36
... and then touch to Capture the Lights of the City Tail light trails lets you are finished. A preview of car tail lights at the camera, as this can overexpose the image. l Place your subject for best results. Touch you create artistic photos of the image is displayed in ...the viewfinder. Ensure that it does not move during the exposure. when 32 Camera Light Painting Mode Use Tail Light Trails to start shooting. l Shoot from a distance and slightly above your device on a tripod or solid ...
... and then touch to Capture the Lights of the City Tail light trails lets you are finished. A preview of car tail lights at the camera, as this can overexpose the image. l Place your subject for best results. Touch you create artistic photos of the image is displayed in ...the viewfinder. Ensure that it does not move during the exposure. when 32 Camera Light Painting Mode Use Tail Light Trails to start shooting. l Shoot from a distance and slightly above your device on a tripod or solid ...

User Guide
Page 37
... glow stick. Touch you create patterns or write words by moving a light source in the viewfinder. when 33 Choose a suitably bright light source of the camera. Open Camera > More > Light painting > Light graffiti. l Find a dark location away from other light sources and ensure that it does not move during the exposure...
... glow stick. Touch you create patterns or write words by moving a light source in the viewfinder. when 33 Choose a suitably bright light source of the camera. Open Camera > More > Light painting > Light graffiti. l Find a dark location away from other light sources and ensure that it does not move during the exposure...

User Guide
Page 38
Camera Use Silky Water to start shooting. 3 A preview of waterfalls and rivers. l Place your device on a tripod or solid surface so that it does not move during the exposure. 1 Open Camera > More > Light painting > Silky water. 2 Hold your Phone steady, and then touch to Capture Rivers and Waterfalls Silky water lets you are finished. 34 Touch when you capture silky smooth photographs of the image is displayed in the viewfinder. l For better results, find a stream or waterfall with lots of water.
Camera Use Silky Water to start shooting. 3 A preview of waterfalls and rivers. l Place your device on a tripod or solid surface so that it does not move during the exposure. 1 Open Camera > More > Light painting > Silky water. 2 Hold your Phone steady, and then touch to Capture Rivers and Waterfalls Silky water lets you are finished. 34 Touch when you capture silky smooth photographs of the image is displayed in the viewfinder. l For better results, find a stream or waterfall with lots of water.

User Guide
Page 39
Camera Use Star Track to Capture the Beauty of Stars Star track lets you are finished. 35 l Place your Phone steady, and then touch to capture the movement of the image is displayed in the night sky. l For best results, choose a location free of light pollution with an unobstructed view of the sky, and on a tripod or solid surface so that it does not move during the exposure. 1 Open Camera > More > Light painting > Star trails. 2 Hold your device on a clear night. Touch when you use your camera to start shooting. 3 A preview of stars in the viewfinder.
Camera Use Star Track to Capture the Beauty of Stars Star track lets you are finished. 35 l Place your Phone steady, and then touch to capture the movement of the image is displayed in the night sky. l For best results, choose a location free of light pollution with an unobstructed view of the sky, and on a tripod or solid surface so that it does not move during the exposure. 1 Open Camera > More > Light painting > Star trails. 2 Hold your device on a clear night. Touch when you use your camera to start shooting. 3 A preview of stars in the viewfinder.


