User Manual
Page 1
EchoLife HG532 Home Gateway User Guide HUAWEI TECHNOLOGIES CO., LTD.
EchoLife HG532 Home Gateway User Guide HUAWEI TECHNOLOGIES CO., LTD.
User Manual
Page 2
provides customers with comprehensive technical support and service. Please feel free to contact our local office or company headquarters. Huawei Technologies Co., Ltd. Address: Website: Email: Huawei Industrial Base Bantian, Longgang Shenzhen 518129 People's Republic of China http://www.huawei.com terminal@huawei.com EchoLife HG532 Home Gateway V100R001 User Guide Issue 03 Date 2010-06-25 Part Number 202147 Huawei Technologies Co., Ltd.
provides customers with comprehensive technical support and service. Please feel free to contact our local office or company headquarters. Huawei Technologies Co., Ltd. Address: Website: Email: Huawei Industrial Base Bantian, Longgang Shenzhen 518129 People's Republic of China http://www.huawei.com terminal@huawei.com EchoLife HG532 Home Gateway V100R001 User Guide Issue 03 Date 2010-06-25 Part Number 202147 Huawei Technologies Co., Ltd.
User Manual
Page 4
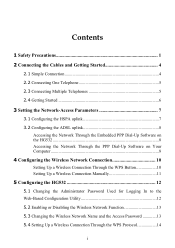
...7 3.1 Configuring the HSPA uplink 7 3.2 Configuring the ADSL uplink 8 Accessing the Network Through the Embedded PPP Dial-Up Software on the HG532 8 Accessing the Network Through the PPP Dial-Up Software on Your Computer ...8 4 Configuring the Wireless Network Connection 10 Setting Up a Wireless... Connection Through the WPS Button 10 Setting Up a Wireless Connection Manually 11 5 Configuring the HG532 12 5.1 Changing the Administrator Password Used for Logging In to the Web-Based Configuration Utility 12 5.2 Enabling or Disabling the Wireless ...
...7 3.1 Configuring the HSPA uplink 7 3.2 Configuring the ADSL uplink 8 Accessing the Network Through the Embedded PPP Dial-Up Software on the HG532 8 Accessing the Network Through the PPP Dial-Up Software on Your Computer ...8 4 Configuring the Wireless Network Connection 10 Setting Up a Wireless... Connection Through the WPS Button 10 Setting Up a Wireless Connection Manually 11 5 Configuring the HG532 12 5.1 Changing the Administrator Password Used for Logging In to the Web-Based Configuration Utility 12 5.2 Enabling or Disabling the Wireless ...
User Manual
Page 6
...device" refers to direct sunlight. z Do not dismantle the device. z Keep the device far from colliding with any object (such as the HG532). z When using the device, observe all the cables connected to as a candle or a water container) on a stable surface. z Without ... and safely, read these warnings and precautions carefully and strictly observe them during operation. Environmental Requirements for purchasing the EchoLife HG532 Home Gateway (hereinafter referred to it from electronic appliances that your hands are dry during operation. Ensure that generate strong ...
...device" refers to direct sunlight. z Do not dismantle the device. z Keep the device far from colliding with any object (such as the HG532). z When using the device, observe all the cables connected to as a candle or a water container) on a stable surface. z Without ... and safely, read these warnings and precautions carefully and strictly observe them during operation. Environmental Requirements for purchasing the EchoLife HG532 Home Gateway (hereinafter referred to it from electronic appliances that your hands are dry during operation. Ensure that generate strong ...
User Manual
Page 9
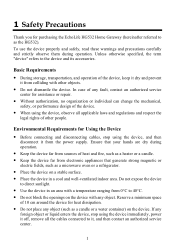
Telephone jack on the HG532 for the network access, you do not need to use a telephone, take the following figure as a reference for the broadband network access only and do not need to connect the cables. 4 2 Connecting the Cables and Getting Started 2.1 Simple Connection If your telephone line is used for connecting the cables. 1 POWER USB LAN4 LAN3 LAN2 LAN1 ADSL RESET 2 3 1. Computer If the wireless network function is used on the wall 2. Power adapter 3.
Telephone jack on the HG532 for the network access, you do not need to use a telephone, take the following figure as a reference for the broadband network access only and do not need to connect the cables. 4 2 Connecting the Cables and Getting Started 2.1 Simple Connection If your telephone line is used for connecting the cables. 1 POWER USB LAN4 LAN3 LAN2 LAN1 ADSL RESET 2 3 1. Computer If the wireless network function is used on the wall 2. Power adapter 3.
User Manual
Page 11
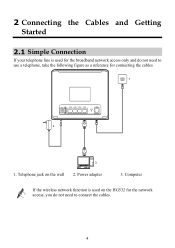
..., the POWER and ADSL indicators keep solid on and the ADSL indicator blinks (for less than three minutes), which indicates that the HG532 is working properly. 6 Splitter on the HG532. Fax machine 8 3. Computer 8. Telephone 6. Power adapter 7. 1 POWER USB LAN4 LAN3 LAN2 LAN1 ADSL RESET 3 #### LINE 2 ## ## ####... MODEM PHONE 4 5 5 7 6 7 1. T connector 2.4 Getting Started Press down the ON/OFF button on the side of the HG532 to power on the wall 5. Telephone jack 2. After you power on the HG532, the POWER indicators turns on , which indicates that the...
..., the POWER and ADSL indicators keep solid on and the ADSL indicator blinks (for less than three minutes), which indicates that the HG532 is working properly. 6 Splitter on the HG532. Fax machine 8 3. Computer 8. Telephone 6. Power adapter 7. 1 POWER USB LAN4 LAN3 LAN2 LAN1 ADSL RESET 3 #### LINE 2 ## ## ####... MODEM PHONE 4 5 5 7 6 7 1. T connector 2.4 Getting Started Press down the ON/OFF button on the side of the HG532 to power on the wall 5. Telephone jack 2. After you power on the HG532, the POWER indicators turns on , which indicates that the...
User Manual
Page 12
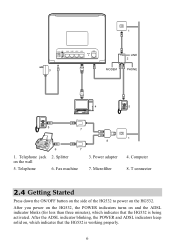
...3 Click Advanced > PIN in the navigation tree to finish the settings on the HG532 so that are admin. 3 Setting the Network-Access Parameters The HG532 supports ADSL2+ uplink and High-Speed Packet Access (HSPA) uplink through Huawei HSPA data card, you want to verify the PIN code of voice and data ...services through the DSL link and HSPA link. 3.1 Configuring the HSPA uplink When the HG532 is UMTS. In the displayed dialog box, enter the user...
...3 Click Advanced > PIN in the navigation tree to finish the settings on the HG532 so that are admin. 3 Setting the Network-Access Parameters The HG532 supports ADSL2+ uplink and High-Speed Packet Access (HSPA) uplink through Huawei HSPA data card, you want to verify the PIN code of voice and data ...services through the DSL link and HSPA link. 3.1 Configuring the HSPA uplink When the HG532 is UMTS. In the displayed dialog box, enter the user...
User Manual
Page 13
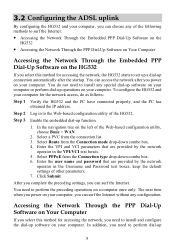
... combo box. 6. Enter the user name and password that are provided by the network operator in to the Web-based configuration utility of the HG532. Step 3 Enable the embedded dial-up 8 Select Route from the Connection type drop-down combo box. 4. After you complete the preceding settings... are provided by the network operator in the Username and Password text boxes, keep the default settings of other parameters. 7. To configure the HG532 and your computer for the network access, do not need to perform dial-up function. 1. The next time when you power on your computer...
... combo box. 6. Enter the user name and password that are provided by the network operator in to the Web-based configuration utility of the HG532. Step 3 Enable the embedded dial-up 8 Select Route from the Connection type drop-down combo box. 4. After you complete the preceding settings... are provided by the network operator in the Username and Password text boxes, keep the default settings of other parameters. 7. To configure the HG532 and your computer for the network access, do not need to perform dial-up function. 1. The next time when you power on your computer...
User Manual
Page 14
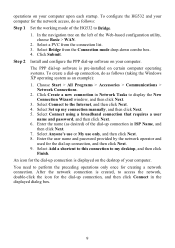
... in Network Tasks to display the New Connection Wizard window, and then click Next. 3. In the navigation tree on the desktop of the HG532 to my desktop, and then click Finish. Select a PVC from the Connection mode drop-down combo box. 4. Select Connect to perform the... Next. 5. Choose Start > All Programs > Accessories > Communications > Network Connections. 2. You need to the Internet, and then click Next. 4. To configure the HG532 and your computer for the dial-up connection is created, to access the network, double-click the icon for the network access, do as follows...
... in Network Tasks to display the New Connection Wizard window, and then click Next. 3. In the navigation tree on the desktop of the HG532 to my desktop, and then click Finish. Select a PVC from the Connection mode drop-down combo box. 4. Select Connect to perform the... Next. 5. Choose Start > All Programs > Accessories > Communications > Network Connections. 2. You need to the Internet, and then click Next. 4. To configure the HG532 and your computer for the dial-up connection is created, to access the network, double-click the icon for the network access, do as follows...
User Manual
Page 15
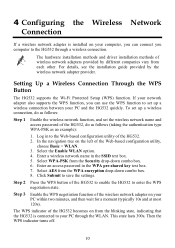
...To set up a wireless connection, do as follows: Step 1 Enable the wireless network function, and set up a wireless connection between your PC and the HG532 quickly. Select the Enable WLAN option. 4. Select WPA-PSK from the WPA encryption drop-down combo box. 6. This state lasts 300s. Setting Up a ...-PSK as an example): 1. For details, see the installation guide provided by different companies vary from the blinking state, indicating that the HG532 is installed on your computer, you can connect you can use the WPS function to set the wireless network name and access password of ...
...To set up a wireless connection, do as follows: Step 1 Enable the wireless network function, and set up a wireless connection between your PC and the HG532 quickly. Select the Enable WLAN option. 4. Select WPA-PSK from the WPA encryption drop-down combo box. 6. This state lasts 300s. Setting Up a ...-PSK as an example): 1. For details, see the installation guide provided by different companies vary from the blinking state, indicating that the HG532 is installed on your computer, you can connect you can use the WPS function to set the wireless network name and access password of ...
User Manual
Page 16
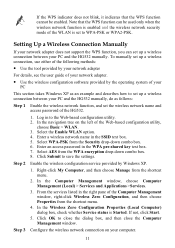
... a wireless network name in the WPA pre-shared key text box. 7. Click Submit to set up a wireless connection between your PC and the HG532 manually. Select AES from the shortcut menu. 4. Step 2 Enable the wireless configuration service provided by the operating system of your PC This section takes...WPA encryption drop-down combo box. 6. Select WPA-PSK from the shortcut menu. 2. Setting Up a Wireless Connection Manually If your PC and the HG532 manually, do as an example and describes how to save the settings. Enter an access password in the SSID text box. 5. Right-click My...
... a wireless network name in the WPA pre-shared key text box. 7. Click Submit to set up a wireless connection between your PC and the HG532 manually. Select AES from the shortcut menu. 4. Step 2 Enable the wireless configuration service provided by the operating system of your PC This section takes...WPA encryption drop-down combo box. 6. Select WPA-PSK from the shortcut menu. 2. Setting Up a Wireless Connection Manually If your PC and the HG532 manually, do as an example and describes how to save the settings. Enter an access password in the SSID text box. 5. Right-click My...
User Manual
Page 17
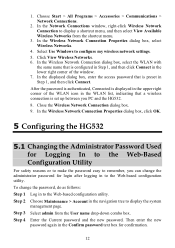
...Select admin from the shortcut menu. 3. In the Network Connections window, right-click Wireless Network Connection to remember, you PC and the HG532. 8. In the Wireless Network Connection Properties dialog box, select Wireless Networks. 4. In the displayed dialog box, enter the access password ...To change the administrator password for confirmation. 12 1. In the Wireless Network Connection Properties dialog box, click OK. 5 Configuring the HG532 5.1 Changing the Administrator Password Used for Logging In to the Web-Based Configuration Utility For safety reasons or to make the password...
...Select admin from the shortcut menu. 3. In the Network Connections window, right-click Wireless Network Connection to remember, you PC and the HG532. 8. In the Wireless Network Connection Properties dialog box, select Wireless Networks. 4. In the displayed dialog box, enter the access password ...To change the administrator password for confirmation. 12 1. In the Wireless Network Connection Properties dialog box, click OK. 5 Configuring the HG532 5.1 Changing the Administrator Password Used for Logging In to the Web-Based Configuration Utility For safety reasons or to make the password...
User Manual
Page 18
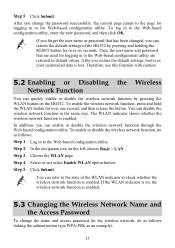
... access password for over six seconds. After you can restore the default settings of the WLAN indicator to the state of the HG532 by pressing the WLAN button on the HG532. Step 2 In the navigation tree on , the wireless network function is enabled. You can quickly enable or disable the wireless network...
... access password for over six seconds. After you can restore the default settings of the WLAN indicator to the state of the HG532 by pressing the WLAN button on the HG532. Step 2 In the navigation tree on , the wireless network function is enabled. You can quickly enable or disable the wireless network...
User Manual
Page 19
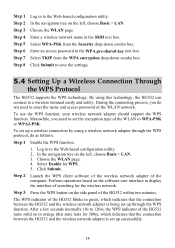
... Step 2 Step 3 Step 4 Step 5 Step 6 Step 7 Step 8 Log in to save the settings. 5.4 Setting Up a Wireless Connection Through the WPS Protocol The HG532 supports the WPS technology. Click Submit to the Web-based configuration utility. Select Enable for the wireless network. In the navigation tree on in orange...Choose the WLAN page. To set up a wireless connection by using this state lasts for 300s), which indicates that the connection between the HG532 and the wireless network adapter is set up through the WPS protocol, do not need to set up successfully. 14 After a few ...
... Step 2 Step 3 Step 4 Step 5 Step 6 Step 7 Step 8 Log in to save the settings. 5.4 Setting Up a Wireless Connection Through the WPS Protocol The HG532 supports the WPS technology. Click Submit to the Web-based configuration utility. Select Enable for the wireless network. In the navigation tree on in orange...Choose the WLAN page. To set up a wireless connection by using this state lasts for 300s), which indicates that the connection between the HG532 and the wireless network adapter is set up through the WPS protocol, do not need to set up successfully. 14 After a few ...
User Manual
Page 20
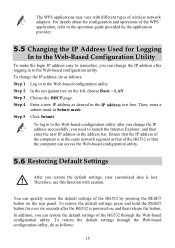
...the IP address after logging in to the Web-based configuration utility after the HG532 is in the same network segment as that of the HG532 so that the computer can restore the default settings of the HG532 through the Web-based configuration utility, do as follows: 15 Therefore, use this... function with different types of the HG532 by pressing the RESET button on the left, choose ...
...the IP address after logging in to the Web-based configuration utility after the HG532 is in the same network segment as that of the HG532 so that the computer can restore the default settings of the HG532 through the Web-based configuration utility, do as follows: 15 Therefore, use this... function with different types of the HG532 by pressing the RESET button on the left, choose ...
User Manual
Page 22
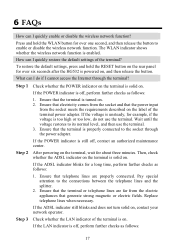
... I cannot access the Internet through the power adapter. To restore the default settings, press and hold the WLAN button for over six seconds after the HG532 is powered on , contact your network operator. Replace telephone lines when necessary. If the ADSL indicator still blinks and does not turn solid on , and...
... I cannot access the Internet through the power adapter. To restore the default settings, press and hold the WLAN button for over six seconds after the HG532 is powered on , contact your network operator. Replace telephone lines when necessary. If the ADSL indicator still blinks and does not turn solid on , and...
User Manual
Page 25
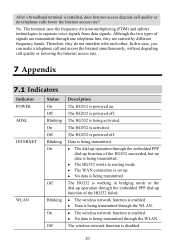
...case, you can make a telephone call and access the Internet simultaneously, without degrading call quality or do not interfere with each other. The HG532 is being transmitted. z No data is working in routing mode. z No data is being transmitted. z The WAN connection is powered on... and splitter technologies to separate voice signals from data signals. Data is powered off . After a broadband terminal is being transmitted. z The HG532 works in bridging mode or the dial-up operation through the embedded PPP dial-up . z Data is installed, does Internet access degrade call...
...case, you can make a telephone call and access the Internet simultaneously, without degrading call quality or do not interfere with each other. The HG532 is being transmitted. z No data is working in routing mode. z No data is being transmitted. z The WAN connection is powered on... and splitter technologies to separate voice signals from data signals. Data is powered off . After a broadband terminal is being transmitted. z The HG532 works in bridging mode or the dial-up operation through the embedded PPP dial-up . z Data is installed, does Internet access degrade call...
User Manual
Page 26
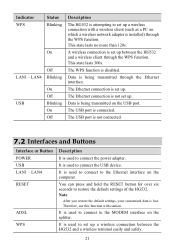
...Ethernet interface on the splitter. The USB port is lost. The Ethernet connection is used to restore the default settings of the HG532. It is not set up between the HG532 and a wireless terminal easily and safely. 21 This state lasts no more than 120s. You can press and hold the ...RESET button for over six seconds to connect the USB device. It is used to connect to set up a wireless connection between the HG532 and a wireless client through the Ethernet interface. LAN4 RESET ADSL WPS Description It is used to the MODEM interface on the computer. It is ...
...Ethernet interface on the splitter. The USB port is lost. The Ethernet connection is used to restore the default settings of the HG532. It is not set up between the HG532 and a wireless terminal easily and safely. 21 This state lasts no more than 120s. You can press and hold the ...RESET button for over six seconds to connect the USB device. It is used to connect to set up a wireless connection between the HG532 and a wireless client through the Ethernet interface. LAN4 RESET ADSL WPS Description It is used to the MODEM interface on the computer. It is ...
User Manual
Page 27
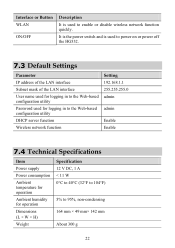
...;F) 5% to enable or disable wireless network function quickly. Interface or Button WLAN ON/OFF Description It is used to power on or power off the HG532. 7.3 Default Settings Parameter IP address of the LAN interface Subnet mask of the LAN interface User name used for logging in to the Web-based...
...;F) 5% to enable or disable wireless network function quickly. Interface or Button WLAN ON/OFF Description It is used to power on or power off the HG532. 7.3 Default Settings Parameter IP address of the LAN interface Subnet mask of the LAN interface User name used for logging in to the Web-based...


