User Manual
Page 4
... PPP Dial-Up Software on the HG532 8 Accessing the Network Through the PPP Dial-Up Software on Your Computer ...8 4 Configuring the Wireless Network Connection 10 Setting Up a Wireless Connection Through the WPS Button 10 Setting Up a Wireless Connection Manually 11 5 Configuring the HG532 12 5.1 Changing the Administrator Password Used for Logging In to the Web-Based Configuration Utility 12 5.2 Enabling or Disabling the Wireless Network Function 13 5.3 Changing the Wireless Network Name and the Access Password 13 5.4 Setting Up a Wireless Connection Through the WPS Protocol 14 i
... PPP Dial-Up Software on the HG532 8 Accessing the Network Through the PPP Dial-Up Software on Your Computer ...8 4 Configuring the Wireless Network Connection 10 Setting Up a Wireless Connection Through the WPS Button 10 Setting Up a Wireless Connection Manually 11 5 Configuring the HG532 12 5.1 Changing the Administrator Password Used for Logging In to the Web-Based Configuration Utility 12 5.2 Enabling or Disabling the Wireless Network Function 13 5.3 Changing the Wireless Network Name and the Access Password 13 5.4 Setting Up a Wireless Connection Through the WPS Protocol 14 i
User Manual
Page 5
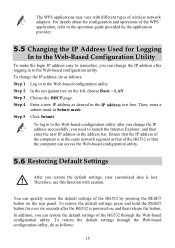
5.5 Changing the IP Address Used for Logging In to the Web-Based Configuration Utility 15 5.6 Restoring Default Settings 15 6 FAQs...17 7 Appendix 20 7.1 Indicators...20 7.2 Interfaces and Buttons 21 7.3 Default Settings 22 7.4 Technical Specifications 22 ii
5.5 Changing the IP Address Used for Logging In to the Web-Based Configuration Utility 15 5.6 Restoring Default Settings 15 6 FAQs...17 7 Appendix 20 7.1 Indicators...20 7.2 Interfaces and Buttons 21 7.3 Default Settings 22 7.4 Technical Specifications 22 ii

User Manual
Page 8
... device, stop using it, power it . Do not use any cable. Otherwise, the cable may get damaged, causing malfunction of the device. z If any exception occurs, for a long time, power it off , remove all the cables connected to clean the device shell. z Use a clean, soft, and dry cloth to it off , and then remove all the cables connected to it, and then contact an authorized service...
... device, stop using it, power it . Do not use any cable. Otherwise, the cable may get damaged, causing malfunction of the device. z If any exception occurs, for a long time, power it off , remove all the cables connected to clean the device shell. z Use a clean, soft, and dry cloth to it off , and then remove all the cables connected to it, and then contact an authorized service...
User Manual
Page 10
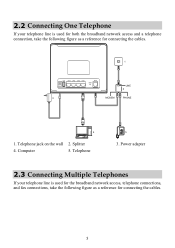
... If your telephone line is used for the broadband network access, telephone connections, and fax connections, take the following figure as a reference for connecting the cables. 5 Telephone 5 3. Power adapter 2.3 Connecting Multiple Telephones If your telephone line is used for both the broadband network access and a telephone connection, take the following figure as a reference for connecting the cables. 1 POWER USB LAN4 LAN3 LAN2 LAN1 ADSL RESET 3 #### LINE 2 #### #### MODEM PHONE 4 1. Computer 5. Splitter 4. Telephone...
... If your telephone line is used for the broadband network access, telephone connections, and fax connections, take the following figure as a reference for connecting the cables. 5 Telephone 5 3. Power adapter 2.3 Connecting Multiple Telephones If your telephone line is used for both the broadband network access and a telephone connection, take the following figure as a reference for connecting the cables. 1 POWER USB LAN4 LAN3 LAN2 LAN1 ADSL RESET 3 #### LINE 2 #### #### MODEM PHONE 4 1. Computer 5. Splitter 4. Telephone...
User Manual
Page 12
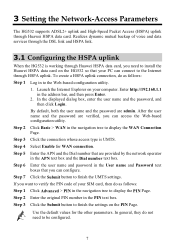
... then click Login. After the user name and the password are verified, you can access the Web-based configuration utility. Enter the original PIN number in the address bar, and then press Enter. 2. In general, they do not need to install the Huawei HSPA data card on your computer. 3 Setting the Network-Access Parameters The HG532 supports ADSL2+ uplink and High-Speed Packet Access (HSPA) uplink through HSPA uplink. Step 4 Select Enable for the...
... then click Login. After the user name and the password are verified, you can access the Web-based configuration utility. Enter the original PIN number in the address bar, and then press Enter. 2. In general, they do not need to install the Huawei HSPA data card on your computer. 3 Setting the Network-Access Parameters The HG532 supports ADSL2+ uplink and High-Speed Packet Access (HSPA) uplink through HSPA uplink. Step 4 Select Enable for the...
User Manual
Page 13
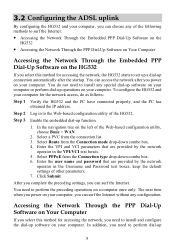
..., you need to perform the preceding operations on a computer once only. Step 3 Enable the embedded dial-up operations on your computer. In addition, you power on your computer. You can access the network after the startup. Enter the user name and password that are provided by the network operator in to the Web-based configuration utility of the Web-based configuration utility, choose Basic > WAN. 2. In...
..., you need to perform the preceding operations on a computer once only. Step 3 Enable the embedded dial-up operations on your computer. In addition, you power on your computer. You can access the network after the startup. Enter the user name and password that are provided by the network operator in to the Web-based configuration utility of the Web-based configuration utility, choose Basic > WAN. 2. In...
User Manual
Page 14
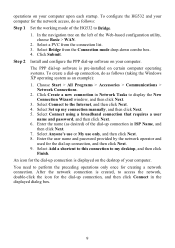
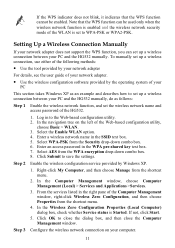
... the Web-based configuration utility, choose Basic > WAN. 2. You need to display the New Connection Wizard window, and then click Next. 3. After the network connection is displayed on the left of the HG532 to access the network, double-click the icon for the network access, do as follows (taking the Windows XP operating system as an example): 1. Select Set up connection, and then click Next. 9. Select Connect using a broadband connection that requires a user...
... the Web-based configuration utility, choose Basic > WAN. 2. You need to display the New Connection Wizard window, and then click Next. 3. After the network connection is displayed on the left of the HG532 to access the network, double-click the icon for the network access, do as follows (taking the Windows XP operating system as an example): 1. Select Set up connection, and then click Next. 9. Select Connect using a broadband connection that requires a user...
User Manual
Page 15
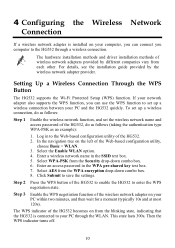
... WPA pre-shared key text box. 7. Select the Enable WLAN option. 4. Step 2 Press the WPS button of the Web-based configuration utility, choose Basic > WLAN. 3. The hardware installation methods and driver installation methods of the HG532 becomes on your PC within two minutes, and then wait for a moment (typically 10s and at most 120s). 4 Configuring the Wireless Network Connection If a wireless network adapter is connected to your PC through a wireless connection. Select AES from the Security...
... WPA pre-shared key text box. 7. Select the Enable WLAN option. 4. Step 2 Press the WPS button of the Web-based configuration utility, choose Basic > WLAN. 3. The hardware installation methods and driver installation methods of the HG532 becomes on your PC within two minutes, and then wait for a moment (typically 10s and at most 120s). 4 Configuring the Wireless Network Connection If a wireless network adapter is connected to your PC through a wireless connection. Select AES from the Security...
User Manual
Page 16
... choose Manage from the WPA encryption drop-down combo box. 6. Note that the WPS function cannot be used only when the wireless network function is enabled and the wireless network security mode of the WLAN is Started. Select WPA-PSK from the shortcut menu. 4. In the Wireless Zero Configuration Properties (Local Computer) dialog box, check whether Service status is set up a wireless connection between your PC and the HG532 manually, do as follows: Step 1 Enable the wireless network...
... choose Manage from the WPA encryption drop-down combo box. 6. Note that the WPS function cannot be used only when the wireless network function is enabled and the wireless network security mode of the WLAN is Started. Select WPA-PSK from the shortcut menu. 4. In the Wireless Zero Configuration Properties (Local Computer) dialog box, check whether Service status is set up a wireless connection between your PC and the HG532 manually, do as follows: Step 1 Enable the wireless network...
User Manual
Page 17
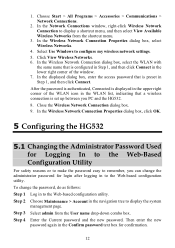
... admin from the shortcut menu. 3. 1. In the Wireless Network Connection Properties dialog box, select Wireless Networks. 4. Then enter the new password again in the Confirm password text box for login after logging in Step 1, and then click Connect. Click View Wireless Networks. 6. Close the Wireless Network Connection dialog box. 9. In the Wireless Network Connection Properties dialog box, click OK. 5 Configuring the HG532 5.1 Changing the Administrator Password Used for Logging In to the Web-Based Configuration Utility For safety reasons or to make...
... admin from the shortcut menu. 3. 1. In the Wireless Network Connection Properties dialog box, select Wireless Networks. 4. Then enter the new password again in the Confirm password text box for login after logging in Step 1, and then click Connect. Click View Wireless Networks. 6. Close the Wireless Network Connection dialog box. 9. In the Wireless Network Connection Properties dialog box, click OK. 5 Configuring the HG532 5.1 Changing the Administrator Password Used for Logging In to the Web-Based Configuration Utility For safety reasons or to make...
User Manual
Page 18
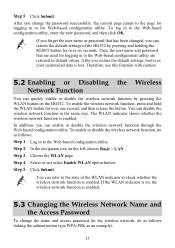
... user name and password that has been changed, you change the name and access password for over one second, and then release the button. Therefore, use this function with caution. 5.2 Enabling or Disabling the Wireless Network Function You can restore the default settings of the WLAN indicator to the Web-based configuration utility, enter the new password, and then click OK. Step 4 Select or not select Enable WLAN option button. After you can quickly enable or disable the wireless network...
... user name and password that has been changed, you change the name and access password for over one second, and then release the button. Therefore, use this function with caution. 5.2 Enabling or Disabling the Wireless Network Function You can restore the default settings of the WLAN indicator to the Web-based configuration utility, enter the new password, and then click OK. Step 4 Select or not select Enable WLAN option button. After you can quickly enable or disable the wireless network...
User Manual
Page 19
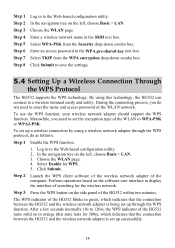
... 7 Step 8 Log in the WPA pre-shared key text box. During the connecting process, you need to display the interface of the WLAN network. To use the WPS function, your wireless network adapter should support the WPS function. Perform operations based on the left , choose Basic > LAN. Enter an access password in to 120s), the WPS indicator of the HG532 within two minutes. In the navigation tree on the software user interface to enter the...
... 7 Step 8 Log in the WPA pre-shared key text box. During the connecting process, you need to display the interface of the WLAN network. To use the WPS function, your wireless network adapter should support the WPS function. Perform operations based on the left , choose Basic > LAN. Enter an access password in to 120s), the WPS indicator of the HG532 within two minutes. In the navigation tree on the software user interface to enter the...
User Manual
Page 20
... quickly restore the default settings of wireless network adapters. To restore the default settings, press and hold the RESET button for Logging In to the Web-Based Configuration Utility To make the login IP address easy to remember, you need to the operation guide provided by pressing the RESET button on the rear panel. In addition, you can restore the default settings of the HG532 so that the computer can change the IP address after logging in to the Web-based configuration utility...
... quickly restore the default settings of wireless network adapters. To restore the default settings, press and hold the RESET button for Logging In to the Web-Based Configuration Utility To make the login IP address easy to remember, you need to the operation guide provided by pressing the RESET button on the rear panel. In addition, you can restore the default settings of the HG532 so that the computer can change the IP address after logging in to the Web-based configuration utility...

User Manual
Page 21
After the preceding operations, the current page jumps to the Web-based configuration utility. Step 2 In the navigation tree on the left, choose Maintenance > Device. Step 1 Log in to the Web-based configuration utility by entering the default user name and password that are admin. 16 Step 3 Choose the Reset page. You can log in to the login page. Step 4 Click the Restore Default Settings button.
After the preceding operations, the current page jumps to the Web-based configuration utility. Step 2 In the navigation tree on the left, choose Maintenance > Device. Step 1 Log in to the Web-based configuration utility by entering the default user name and password that are admin. 16 Step 3 Choose the Reset page. You can log in to the login page. Step 4 Click the Restore Default Settings button.
User Manual
Page 22
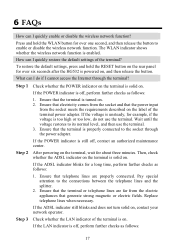
... checks as follows: 1. Replace telephone lines when necessary. Press and hold the RESET button on the terminal is enabled. The WLAN indicator shows whether the wireless network function is solid on , contact your network operator. How can I quickly restore the default settings of the terminal power adapter. If the POWER indicator is too high or too low, do if I quickly enable or disable the wireless network function? If the voltage...
... checks as follows: 1. Replace telephone lines when necessary. Press and hold the RESET button on the terminal is enabled. The WLAN indicator shows whether the wireless network function is solid on , contact your network operator. How can I quickly restore the default settings of the terminal power adapter. If the POWER indicator is too high or too low, do if I quickly enable or disable the wireless network function? If the voltage...
User Manual
Page 23
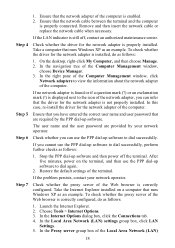
... the driver for the network adapter is properly connected. Choose Tools > Internet Options. 3. In the Proxy server group box of the Computer Management window, choose Device Manager. 3. To check whether the driver for the network adapter is enabled. 2. In the right pane of the network adapter, you can infer that runs Windows XP as follows: 1. If you have entered the correct user name and user password that the network adapter of the Web browser...
... the driver for the network adapter is properly connected. Choose Tools > Internet Options. 3. In the Proxy server group box of the Computer Management window, choose Device Manager. 3. To check whether the driver for the network adapter is enabled. 2. In the right pane of the network adapter, you can infer that runs Windows XP as follows: 1. If you have entered the correct user name and user password that the network adapter of the Web browser...
User Manual
Page 24
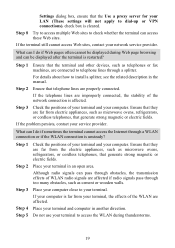
... the terminal cannot access the Internet through obstacles, the transmission effects of WLAN radio signals are improperly connected, the stability of the network connection is affected. Place your terminal and computer in an open area. Step 2 Ensure that the terminal and other devices, such as telephones... 8 Try to access multiple Web sites to install a splitter, see the related description in the manual. Ensure that they are connected to dial-up or VPN connections). Settings dialog box, ensure that the Use a proxy server for your terminal, the effects of the WLAN are far from ...
... the terminal cannot access the Internet through obstacles, the transmission effects of WLAN radio signals are improperly connected, the stability of the network connection is affected. Place your terminal and computer in an open area. Step 2 Ensure that the terminal and other devices, such as telephones... 8 Try to access multiple Web sites to install a splitter, see the related description in the manual. Ensure that they are connected to dial-up or VPN connections). Settings dialog box, ensure that the Use a proxy server for your terminal, the effects of the WLAN are far from ...
User Manual
Page 25
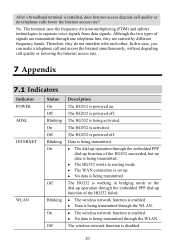
... by different frequency bands. In this case, you can make a telephone call and access the Internet simultaneously, without degrading call quality or do not interfere with each other. z No data is being transmitted through the WLAN. z No data is being transmitted. z The WAN connection is enabled. The HG532 is working in routing mode. The HG532 is being transmitted. z The wireless network function is set up. No...
... by different frequency bands. In this case, you can make a telephone call and access the Internet simultaneously, without degrading call quality or do not interfere with each other. z No data is being transmitted through the WLAN. z No data is being transmitted. z The WAN connection is enabled. The HG532 is working in routing mode. The HG532 is being transmitted. z The wireless network function is set up. No...
User Manual
Page 26
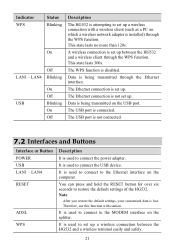
... the Ethernet interface on the USB port. This state lasts no more than 120s. It is not connected. 7.2 Interfaces and Buttons Interface or Button POWER USB LAN1 - It is set up a wireless connection with caution. The Ethernet connection is used to connect to the MODEM interface on which a wireless network adapter is set up a wireless connection between the HG532 and a wireless client through the Ethernet interface. LAN4 Blinking On Off USB Blinking On Off Description The HG532 is attempting to restore the default settings of the HG532. Indicator WPS Status Blinking...
... the Ethernet interface on the USB port. This state lasts no more than 120s. It is not connected. 7.2 Interfaces and Buttons Interface or Button POWER USB LAN1 - It is set up a wireless connection with caution. The Ethernet connection is used to connect to the MODEM interface on which a wireless network adapter is set up a wireless connection between the HG532 and a wireless client through the Ethernet interface. LAN4 Blinking On Off USB Blinking On Off Description The HG532 is attempting to restore the default settings of the HG532. Indicator WPS Status Blinking...
User Manual
Page 27
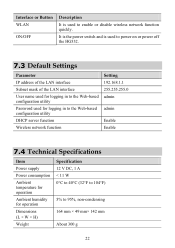
... Web-based configuration utility DHCP server function Wireless network function Setting 192.168.1.1 255.255.255.0 admin admin Enable Enable 7.4 Technical Specifications Item Power supply Power consumption Ambient temperature for operation Ambient humidity for logging in to the Web-based configuration utility Password used to 95%, non-condensing 164 mm × 49 mm× 142 mm About 300 g 22 Interface or Button WLAN ON/OFF Description It is used to power on or power off the HG532. 7.3 Default Settings Parameter IP address...
... Web-based configuration utility DHCP server function Wireless network function Setting 192.168.1.1 255.255.255.0 admin admin Enable Enable 7.4 Technical Specifications Item Power supply Power consumption Ambient temperature for operation Ambient humidity for logging in to the Web-based configuration utility Password used to 95%, non-condensing 164 mm × 49 mm× 142 mm About 300 g 22 Interface or Button WLAN ON/OFF Description It is used to power on or power off the HG532. 7.3 Default Settings Parameter IP address...


