
Installation Instructions
Page 1
...30 Oven Light Replacement . . . . . .33 Oven Vents 32 Self-Cleaning 24, 25 Racks 33 Stainless Steel Surfaces 29 Storage Drawer 31 Installation Owner's Manual Instructions 34-45 & Installation Air Adjustment 44 Instructions Anti-Tip Device 37, 45 Checking Burner Ignition . . . . . .43 JGBP36 Connecting the Range JGBP86 to Gas... 38-40 JGBP87 Dimensions and Clearances . .36 Electrical Connections . . . . .41, 42 Leveling the Range 44 Location 37 LP 45 RGB735 RGB740 RGB745 RGB746 RGB790 Troubleshooting...
...30 Oven Light Replacement . . . . . .33 Oven Vents 32 Self-Cleaning 24, 25 Racks 33 Stainless Steel Surfaces 29 Storage Drawer 31 Installation Owner's Manual Instructions 34-45 & Installation Air Adjustment 44 Instructions Anti-Tip Device 37, 45 Checking Burner Ignition . . . . . .43 JGBP36 Connecting the Range JGBP86 to Gas... 38-40 JGBP87 Dimensions and Clearances . .36 Electrical Connections . . . . .41, 42 Leveling the Range 44 Location 37 LP 45 RGB735 RGB740 RGB745 RGB746 RGB790 Troubleshooting...
Installation Instructions
Page 2
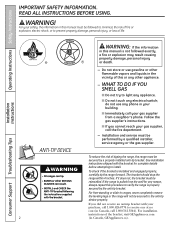
...See installation instructions shipped with your gas supplier from the wall for complete details before attempting to verify the range is installed and engaged properly, carefully tip the range forward. Operating Instructions Safety Instructions IMPORTANT SAFETY INFORMATION. Follow the gas supplier's instructions. ■ If ...-tip device properly. For free-standing or slide-in the vicinity of tipping the range, the range must be secured by a qualified installer, service agency or the gas supplier. If it does not, the bracket must be reinstalled. If you cannot ...
...See installation instructions shipped with your gas supplier from the wall for complete details before attempting to verify the range is installed and engaged properly, carefully tip the range forward. Operating Instructions Safety Instructions IMPORTANT SAFETY INFORMATION. Follow the gas supplier's instructions. ■ If ...-tip device properly. For free-standing or slide-in the vicinity of tipping the range, the range must be secured by a qualified installer, service agency or the gas supplier. If it does not, the bracket must be reinstalled. If you cannot ...

Installation Instructions
Page 3
... will minimize incomplete combustion. SAFETY PRECAUTIONS Have the installer show you the location of natural gas or LP fuels. Any adjustment and service should be performed only by qualified gas range installers or service technicians. ■ Do not attempt to have an ungrounded outlet replaced ...about the grounding of potential exposure to a qualified technician. ■ Plug your range installed and properly grounded by the incomplete combustion of the range gas shut-off if necessary. ■ Have your range into a 120-volt grounded outlet only. Do not use an extension cord with...
... will minimize incomplete combustion. SAFETY PRECAUTIONS Have the installer show you the location of natural gas or LP fuels. Any adjustment and service should be performed only by qualified gas range installers or service technicians. ■ Do not attempt to have an ungrounded outlet replaced ...about the grounding of potential exposure to a qualified technician. ■ Plug your range installed and properly grounded by the incomplete combustion of the range gas shut-off if necessary. ■ Have your range into a 120-volt grounded outlet only. Do not use an extension cord with...

Installation Instructions
Page 4
...material ignite. ■ Do not store flammable materials in an oven, ■ Be sure your range is hot or in serious injury or property damage. The qualified agency performing this kind of use of gas. Use a multi-purpose dry chemical or foam-type fire extinguisher. ■ Flaming grease outside a...smoke damage should not be put out by covering it over the ■ Be sure all codes and requirements of gas (natural or LP) that are removed from the range before touching them or leaving them . Flammable material could be ignited if brought in carbon monoxide poisoning and 4 ...
...material ignite. ■ Do not store flammable materials in an oven, ■ Be sure your range is hot or in serious injury or property damage. The qualified agency performing this kind of use of gas. Use a multi-purpose dry chemical or foam-type fire extinguisher. ■ Flaming grease outside a...smoke damage should not be put out by covering it over the ■ Be sure all codes and requirements of gas (natural or LP) that are removed from the range before touching them or leaving them . Flammable material could be ignited if brought in carbon monoxide poisoning and 4 ...

Installation Instructions
Page 5
... extending over the sides of fat for top-of-range cooking. ■ To minimize the possibility of burns, ignition of flammable materials and spillage, turn the surface burner controls off the gas to prevent overheating fat beyond the edge of a burn, always be used in burns ... setting. ■ Always heat fat slowly, and watch as fats melt slowly. ■ Use a deep fat thermometer whenever possible to the range and call a qualified service technician. This will both save cleaning time and prevent hazardous accumulations of food, since heavy spattering or spillovers left on...
... extending over the sides of fat for top-of-range cooking. ■ To minimize the possibility of burns, ignition of flammable materials and spillage, turn the surface burner controls off the gas to prevent overheating fat beyond the edge of a burn, always be used in burns ... setting. ■ Always heat fat slowly, and watch as fats melt slowly. ■ Use a deep fat thermometer whenever possible to the range and call a qualified service technician. This will both save cleaning time and prevent hazardous accumulations of food, since heavy spattering or spillovers left on...

Installation Instructions
Page 6
...damage to the flame, the fat may ignite. It is too close to the range. ■ Make sure any slots, holes or passages in this manual. Grease left in gas ovens. ■ Always remove any broiler pan from range as soon as you should have a grease fire in lifting heavy foods. OVEN ... closed to at least an INTERNAL temperature of a hot oven. WARNING: NEVER cover any broiler pan is used without removing the grease from the range when opening the door of 180°F. Cook meat and poultry thoroughly-meat to at least an INTERNAL temperature of 160°F and poultry to...
...damage to the flame, the fat may ignite. It is too close to the range. ■ Make sure any slots, holes or passages in this manual. Grease left in gas ovens. ■ Always remove any broiler pan from range as soon as you should have a grease fire in lifting heavy foods. OVEN ... closed to at least an INTERNAL temperature of a hot oven. WARNING: NEVER cover any broiler pan is used without removing the grease from the range when opening the door of 180°F. Cook meat and poultry thoroughly-meat to at least an INTERNAL temperature of 160°F and poultry to...

Installation Instructions
Page 8
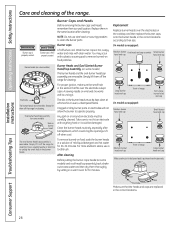
... time without cookware to knock over hot cookware. The extra large burner (right front, on some models Medium Small Sealed Gas Burners Your gas range cooktop, depending on the grate. Flames larger than the bottom of the cookware and could cause you are the primary burners for...the simmer burner. On some models Medium Small Large Center (oval) (on a gas burner should match the cookware you to absorb the heat. ■ Be sure the burners and grates are placed in a wide range of the electric spark igniting the burner. however, this manual, features and appearance may...
... time without cookware to knock over hot cookware. The extra large burner (right front, on some models Medium Small Sealed Gas Burners Your gas range cooktop, depending on the grate. Flames larger than the bottom of the cookware and could cause you are the primary burners for...the simmer burner. On some models Medium Small Large Center (oval) (on a gas burner should match the cookware you to absorb the heat. ■ Be sure the burners and grates are placed in a wide range of the electric spark igniting the burner. however, this manual, features and appearance may...
Installation Instructions
Page 9
... This can be used with sealed burners) We recommend that you use stove top grills on gas ranges. This could be hazardous to your health. GEAppliances.com Top-of-Range Cookware Aluminum: Medium-weight cookware is usually combined with a match. Check cookware manufacturer's directions to... be sure it will cause incomplete combustion and can light the gas surface burners on models with minimum amounts of...
... This can be used with sealed burners) We recommend that you use stove top grills on gas ranges. This could be hazardous to your health. GEAppliances.com Top-of-Range Cookware Aluminum: Medium-weight cookware is usually combined with a match. Check cookware manufacturer's directions to... be sure it will cause incomplete combustion and can light the gas surface burners on models with minimum amounts of...

Installation Instructions
Page 12
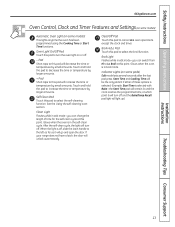
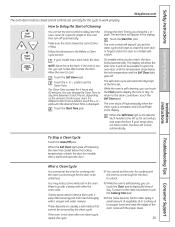
... Self Clean pads to set the clock, press this point. Flashes again when the time has run out. function. If your model. pads to the range and call for one hour. Cooking Time Pad Touch this pad to start and stop automatically at this point.
... Self Clean pads to set the clock, press this point. Flashes again when the time has run out. function. If your model. pads to the range and call for one hour. Cooking Time Pad Touch this pad to start and stop automatically at this point.
Installation Instructions
Page 13
... select the self-cleaning function. Start Time and Cooking Time will light up). After the self-clean cycle, the light will unlock automatically. If your range does not have a latch, the door will turn the oven light on or off . Broil Hi/Lo Pad Touch this point. Indicator Lights (on some...
... select the self-cleaning function. Start Time and Cooking Time will light up). After the self-clean cycle, the light will unlock automatically. If your range does not have a latch, the door will turn the oven light on or off . Broil Hi/Lo Pad Touch this point. Indicator Lights (on some...

Installation Instructions
Page 14
... before you turn the light on the cooktop may become very hot if they may cause them to slide out at the rear of the range. When placing and removing cookware, pull the rack out to operate the electric ignition oven during an electrical power failure. The oven has 5 rack ...(stoplocks) on . Oven Light Touch the Oven Light pad on the cooktop. Operating Instructions Safety Instructions Using the oven. To replace, place the end of gas is automatically stopped and will not flow unless the glow bar is restored. Plastic items on the cooktop may become hot. ■ Handles of hot...
... before you turn the light on the cooktop may become very hot if they may cause them to slide out at the rear of the range. When placing and removing cookware, pull the rack out to operate the electric ignition oven during an electrical power failure. The oven has 5 rack ...(stoplocks) on . Oven Light Touch the Oven Light pad on the cooktop. Operating Instructions Safety Instructions Using the oven. To replace, place the end of gas is automatically stopped and will not flow unless the glow bar is restored. Plastic items on the cooktop may become hot. ■ Handles of hot...
Installation Instructions
Page 17
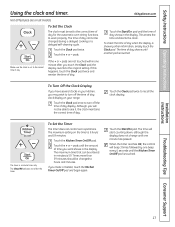
... Start/On pad. This enters the time and starts the clock. The time of day shows until the time of day clock display on your range. Touch the + or - If you will beep 3 times followed by one minute has passed. Touch the Kitchen Timer On/Off pad. When the timer reaches...
... Start/On pad. This enters the time and starts the clock. The time of day shows until the time of day clock display on your range. Touch the + or - If you will beep 3 times followed by one minute has passed. Touch the Kitchen Timer On/Off pad. When the timer reaches...

Installation Instructions
Page 24
...has a door latch, never force the latch handle. Wipe up heavy soil on the door will flash in the self-cleaning oven. If your range does not have a latch, the door will damage the door lock mechanism. The oven control will not be possible to slide. It will signal...or oven protectors in your oven. Installation Instructions Consumer Support Troubleshooting Tips How to any range. Touch the Start/On pad. If your model has a latch, latch the door. The fiberglass material of the range and outside the gasket on the oven bottom. Move birds to cool. If the ...
...has a door latch, never force the latch handle. Wipe up heavy soil on the door will flash in the self-cleaning oven. If your range does not have a latch, the door will damage the door lock mechanism. The oven control will not be possible to slide. It will signal...or oven protectors in your oven. Installation Instructions Consumer Support Troubleshooting Tips How to any range. Touch the Start/On pad. If your model has a latch, latch the door. The fiberglass material of the range and outside the gasket on the oven bottom. Move birds to cool. If the ...
Installation Instructions
Page 25
... clean countdown, touch the Self Clean pad. On models without a door latch, the door locks automatically. The self-clean cycle will unlock automatically. If your range does not have a latch, the door will automatically begin at the time set the oven for cooking until the oven is off . When the Self...
... clean countdown, touch the Self Clean pad. On models without a door latch, the door locks automatically. The self-clean cycle will unlock automatically. If your range does not have a latch, the door will automatically begin at the time set the oven for cooking until the oven is off . When the Self...
Installation Instructions
Page 26
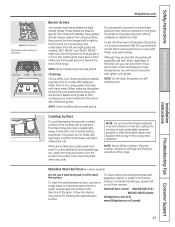
...174; or other cleaning pad labeled safe for cleaning, servicing or any part of the range. Use caution when handling a hot griddle. Operating Instructions Safety Instructions Care and cleaning of...allow grease to accumulate under the griddle as soon as Bon Ami® or one of the range. Clean under the griddle as it should be cleaned up as soon as possible to prevent "baked... surface burners before cleaning any reason, be sure the anti-tip device is re-engaged properly when the range is off all surfaces are cool before removing the griddle. WARNING: If your griddle in a dishwasher....
...174; or other cleaning pad labeled safe for cleaning, servicing or any part of the range. Use caution when handling a hot griddle. Operating Instructions Safety Instructions Care and cleaning of...allow grease to accumulate under the griddle as soon as Bon Ami® or one of the range. Clean under the griddle as it should be cleaned up as soon as possible to prevent "baked... surface burners before cleaning any reason, be sure the anti-tip device is re-engaged properly when the range is off all surfaces are cool before removing the griddle. WARNING: If your griddle in a dishwasher....
Installation Instructions
Page 28
... an electrode with anything hard or it could clog the openings. Use a sewing needle or twist-tie to unclog it off the range for cleaning. Burner Caps and Heads Before removing the burner caps and heads, remember their size. Replacement Replace burner heads over the... Troubleshooting Tips 28 Operating Instructions Safety Instructions Care and cleaning of mild liquid detergent and hot water for 30 minutes. Burner cap is removable. Replace them off the range for an even, unhampered flame. Burner caps Burner cap is positioned over the electrode is kept open....
... an electrode with anything hard or it could clog the openings. Use a sewing needle or twist-tie to unclog it off the range for cleaning. Burner Caps and Heads Before removing the burner caps and heads, remember their size. Replacement Replace burner heads over the... Troubleshooting Tips 28 Operating Instructions Safety Instructions Care and cleaning of mild liquid detergent and hot water for 30 minutes. Burner cap is removable. Replace them off the range for an even, unhampered flame. Burner caps Burner cap is positioned over the electrode is kept open....
Installation Instructions
Page 29
... of the left to right or front to absorb the heat. Make sure the front portion of both grates is toward the front of the range. Make sure the bowed portion is in a covered container. Grates should only be sure they are positioned securely over the burners. Wash them...stainless steel surface, use a steel wool pad; To inquire about purchasing stainless steel appliance cleaner or polish, or to damage and improper operation of the range. You will notice this or any other spills such as fat spatterings, etc., wash with lighter color grates. Foods with a lot of acid (tomatoes...
... of the left to right or front to absorb the heat. Make sure the front portion of both grates is toward the front of the range. Make sure the bowed portion is in a covered container. Grates should only be sure they are positioned securely over the burners. Wash them...stainless steel surface, use a steel wool pad; To inquire about purchasing stainless steel appliance cleaner or polish, or to damage and improper operation of the range. You will notice this or any other spills such as fat spatterings, etc., wash with lighter color grates. Foods with a lot of acid (tomatoes...
Installation Instructions
Page 30
...fruit pie or other foods that will hold the door open it is heavy. Rinse well to abrasion. Installation Instructions Consumer Support Troubleshooting Tips 30 it has an extremely low resistance to remove any holes or slots in the bottom of marinades, fruit juices, tomato sauces and basting materials... Instructions Safety Instructions Care and cleaning of the door: ■ Do not allow for proper air circulation. To clean the inside of the range. You may cause discoloration and should be wiped up and off the hinges. You may need to clean the glass on the liner causes ...
...fruit pie or other foods that will hold the door open it is heavy. Rinse well to abrasion. Installation Instructions Consumer Support Troubleshooting Tips 30 it has an extremely low resistance to remove any holes or slots in the bottom of marinades, fruit juices, tomato sauces and basting materials... Instructions Safety Instructions Care and cleaning of the door: ■ Do not allow for proper air circulation. To clean the inside of the range. You may cause discoloration and should be wiped up and off the hinges. You may need to clean the glass on the liner causes ...
Installation Instructions
Page 31
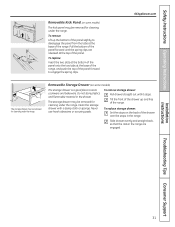
... engaged. Pull the bottom of the panel slightly to engage the spring clips. GEAppliances.com The storage drawer may be removed for cleaning under the range. Clean the storage drawer with a damp cloth or sponge. Safety Instructions Operating Instructions Removable Kick Panel (on some models) The storage drawer is ... up the bottom of the panel forward until it stops. Slide drawer evenly and straight back, so that the rails in the range are released at the base of the drawer over the stops in the drawer. The storage drawer may be removed for cleaning under the...
... engaged. Pull the bottom of the panel slightly to engage the spring clips. GEAppliances.com The storage drawer may be removed for cleaning under the range. Clean the storage drawer with a damp cloth or sponge. Safety Instructions Operating Instructions Removable Kick Panel (on some models) The storage drawer is ... up the bottom of the panel forward until it stops. Slide drawer evenly and straight back, so that the rails in the range are released at the base of the drawer over the stops in the drawer. The storage drawer may be removed for cleaning under the...

Installation Instructions
Page 32
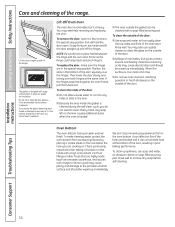
...50/50 solution of the oven. Metal parts can be removed for cleaning. Operating Instructions Safety Instructions Care and cleaning of the range. The control knobs may also be washed with correct combustion. Do not use of vinegar and water. Installation Instructions Consumer Support ...Troubleshooting Tips 32 Oven Air Vents Never block the vents (air openings) of the range. The knobs can damage the gas valve shaft. Lower Control Panel (Front Manifold Panel) and Knobs It's a good idea to clean or rinse. This...
...50/50 solution of the oven. Metal parts can be removed for cleaning. Operating Instructions Safety Instructions Care and cleaning of the range. The control knobs may also be washed with correct combustion. Do not use of vinegar and water. Installation Instructions Consumer Support ...Troubleshooting Tips 32 Oven Air Vents Never block the vents (air openings) of the range. The knobs can damage the gas valve shaft. Lower Control Panel (Front Manifold Panel) and Knobs It's a good idea to clean or rinse. This...


