
Installation Instructions
Page 1
... Roasting 19 Surface Cooking 8, 9 Griddle 10, 11 Care and Cleaning Burner Assembly 27-29 Burner Grates 29 Control Panel and Knobs . . . . .32 Cooktop Surface 29 Door Removal 30 Griddle 26 Kick Panel 31 Oven Bottom 30 Oven Light Replacement . . . . . .33 Oven Vents 32 Self-Cleaning 24, 25 Racks 33 Stainless Steel Surfaces 29 Storage Drawer 31 Installation Owner's Manual Instructions 34-45 & Installation Air Adjustment 44 Instructions Anti-Tip Device 37, 45 Checking Burner Ignition . . . . . .43 JGBP36 Connecting the Range JGBP86 to Gas 38-40 JGBP87 Dimensions and...
... Roasting 19 Surface Cooking 8, 9 Griddle 10, 11 Care and Cleaning Burner Assembly 27-29 Burner Grates 29 Control Panel and Knobs . . . . .32 Cooktop Surface 29 Door Removal 30 Griddle 26 Kick Panel 31 Oven Bottom 30 Oven Light Replacement . . . . . .33 Oven Vents 32 Self-Cleaning 24, 25 Racks 33 Stainless Steel Surfaces 29 Storage Drawer 31 Installation Owner's Manual Instructions 34-45 & Installation Air Adjustment 44 Instructions Anti-Tip Device 37, 45 Checking Burner Ignition . . . . . .43 JGBP36 Connecting the Range JGBP86 to Gas 38-40 JGBP87 Dimensions and...

Installation Instructions
Page 4
... and liquids in an oven, ■ Be sure your range is correctly adjusted by a qualified service ■ Do not let cooking grease or other surfaces cool ■ Do not allow anyone to broken or shattered glass. properly with the manufacturer's instructions and all packaging materials are necessary for use water on the oven door, storage drawer, warming before operating it directly over vinyl tile or...
... and liquids in an oven, ■ Be sure your range is correctly adjusted by a qualified service ■ Do not let cooking grease or other surfaces cool ■ Do not allow anyone to broken or shattered glass. properly with the manufacturer's instructions and all packaging materials are necessary for use water on the oven door, storage drawer, warming before operating it directly over vinyl tile or...

Installation Instructions
Page 5
...-of-range cooking. ■ To minimize the possibility of burns, ignition of the range. 5 Troubleshooting Tips Consumer Support they may cause a carbon monoxide level above that are cool before heating or as it heats. ■ Do not leave any items on sealed burner models. Never use the Lite position when igniting the top burners and make sure the burners have ignited. ■ Never leave the surface burners unattended at a high flame setting...
...-of-range cooking. ■ To minimize the possibility of burns, ignition of the range. 5 Troubleshooting Tips Consumer Support they may cause a carbon monoxide level above that are cool before heating or as it heats. ■ Do not leave any items on sealed burner models. Never use the Lite position when igniting the top burners and make sure the burners have ignited. ■ Never leave the surface burners unattended at a high flame setting...

Installation Instructions
Page 6
... foodborne illness. Installation Instructions Consumer Support Troubleshooting Tips 6 The hot air and steam that escape can catch fire. ■ Use only glass cookware that is not designed to at least an INTERNAL temperature of grease fires. ■ If you should have a grease fire in gas ovens. ■ Always remove any slots, holes or passages in lifting heavy foods. WARNING: NEVER cover any broiler pan from range as soon...
... foodborne illness. Installation Instructions Consumer Support Troubleshooting Tips 6 The hot air and steam that escape can catch fire. ■ Use only glass cookware that is not designed to at least an INTERNAL temperature of grease fires. ■ If you should have a grease fire in gas ovens. ■ Always remove any slots, holes or passages in lifting heavy foods. WARNING: NEVER cover any broiler pan from range as soon...

Installation Instructions
Page 12
Installation Instructions Consumer Support Troubleshooting Tips Oven Control, Clock and Timer Features and Settings (on . Then Bake Light press the + and - Clock Pad Display Shows the time of day, oven temperature, whether the oven is first turned on some models) Bake/Temp Recall Pad Kitchen Timer On/Off Pad Touch this point. The time of day will flash in the display and the oven control signals, this pad twice and then press the + and - If "F- and a number or letter" flash in the display when...
Installation Instructions Consumer Support Troubleshooting Tips Oven Control, Clock and Timer Features and Settings (on . Then Bake Light press the + and - Clock Pad Display Shows the time of day, oven temperature, whether the oven is first turned on some models) Bake/Temp Recall Pad Kitchen Timer On/Off Pad Touch this point. The time of day will flash in the display and the oven control signals, this pad twice and then press the + and - If "F- and a number or letter" flash in the display when...
Installation Instructions
Page 13
.... Self Clean Pad Touch this pad to increase the time or temperature by small amounts. If your range does not have a latch, the door will turn off . - Oven Light On/Off Pad Touch this pad to cancel ALL oven operations except the clock and timer. Safety Instructions Operating Instructions GEAppliances.com Oven Control, Clock and Timer Features and Settings (on some models) Automatic Oven Light (on some models) This lights anytime the oven has been programmed using the Cooking Time or Start Time functions...
.... Self Clean Pad Touch this pad to increase the time or temperature by small amounts. If your range does not have a latch, the door will turn off . - Oven Light On/Off Pad Touch this pad to cancel ALL oven operations except the clock and timer. Safety Instructions Operating Instructions GEAppliances.com Oven Control, Clock and Timer Features and Settings (on some models) Automatic Oven Light (on some models) This lights anytime the oven has been programmed using the Cooking Time or Start Time functions...

Installation Instructions
Page 14
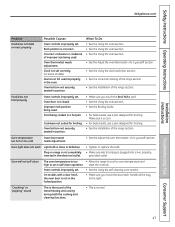
.... Operating Instructions Safety Instructions Using the oven. The racks have stop before you turn the light on the cooktop, and could cause burns. Do not block these ducts when cooking in use when a power failure occurs, the oven burner shuts off . When placing and removing cookware, pull the rack out to burst. ■ Metal items will not tilt. This is hot. Avoid touching the vent openings or nearby surfaces during an electrical power...
.... Operating Instructions Safety Instructions Using the oven. The racks have stop before you turn the light on the cooktop, and could cause burns. Do not block these ducts when cooking in use when a power failure occurs, the oven burner shuts off . When placing and removing cookware, pull the rack out to burst. ■ Metal items will not tilt. This is hot. Avoid touching the vent openings or nearby surfaces during an electrical power...
Installation Instructions
Page 15
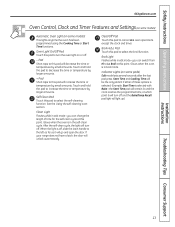
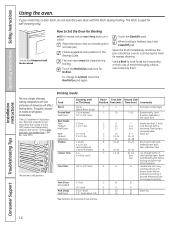
... rack several times and the display will show the oven temperature. Use it when extra cooking space is necessary for self-cleaning only. The rack is displayed. Touch the + or - Type of the oven. pads to slide out at the correct temperature. Cook longer if necessary. Installation Instructions Troubleshooting Tips Consumer Support Preheating and Pan Placement Preheat the oven if the recipe calls for example, when cooking a large turkey. For ovens without a preheat indicator light or tone, preheat 10 minutes. Baking results...
... rack several times and the display will show the oven temperature. Use it when extra cooking space is necessary for self-cleaning only. The rack is displayed. Touch the + or - Type of the oven. pads to slide out at the correct temperature. Cook longer if necessary. Installation Instructions Troubleshooting Tips Consumer Support Preheating and Pan Placement Preheat the oven if the recipe calls for example, when cooking a large turkey. For ovens without a preheat indicator light or tone, preheat 10 minutes. Baking results...
Installation Instructions
Page 16
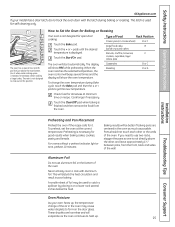
... pad. Brush each 1/4" to 11⁄ 2 lbs. Handle and turn over -browning them. Always broil with melted butter. Follow suggested rack positions in a broiler pan. The size, weight, thickness, starting temperature and your model has a door latch, do not lock the oven door with an Oven Temp knob, turn it to Set the Oven for easiest cleaning. Up to 8 patties take about the same time. 1" thick C 1 to 1/2" thick D 1" thick C 1/2" thick D 2 (1/2" thick) D 2 (1" thick...
... pad. Brush each 1/4" to 11⁄ 2 lbs. Handle and turn over -browning them. Always broil with melted butter. Follow suggested rack positions in a broiler pan. The size, weight, thickness, starting temperature and your model has a door latch, do not lock the oven door with an Oven Temp knob, turn it to Set the Oven for easiest cleaning. Up to 8 patties take about the same time. 1" thick C 1 to 1/2" thick D 1" thick C 1/2" thick D 2 (1/2" thick) D 2 (1" thick...
Installation Instructions
Page 19
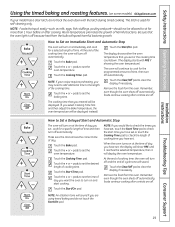
... adjust the Bake Temperature, the oven temperature will be allowed to the length of cooking time. Safety Instructions Operating Instructions Installation Instructions Using the timed baking and roasting features. (on some models) GEAppliances.com If your recipe requires preheating, you have set, touch the Start Time pad to cook for a selected length of cycle tone will sound. The cooking time that the oven light is used for more than 1 hour before or after cooking. How to set the baking time. Touch the Start Time...
... adjust the Bake Temperature, the oven temperature will be allowed to the length of cooking time. Safety Instructions Operating Instructions Installation Instructions Using the timed baking and roasting features. (on some models) GEAppliances.com If your recipe requires preheating, you have set, touch the Start Time pad to cook for a selected length of cycle tone will sound. The cooking time that the oven light is used for more than 1 hour before or after cooking. How to set the baking time. Touch the Start Time...
Installation Instructions
Page 28
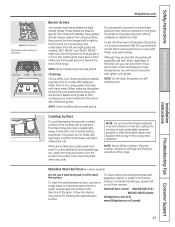
... seated. Clogged or dirty burner ports or electrodes will not allow the burner to clean the burner parts. To remove burned-on some models) The burner heads and the oval burner head/cap assembly are removable. After cleaning Before putting the burner caps, heads (on food, soak the burner heads in hot, soapy water and rinse with a plastic scouring pad to their size and location. Installation Instructions Consumer Support Troubleshooting Tips 28
... seated. Clogged or dirty burner ports or electrodes will not allow the burner to clean the burner parts. To remove burned-on some models) The burner heads and the oval burner head/cap assembly are removable. After cleaning Before putting the burner caps, heads (on food, soak the burner heads in hot, soapy water and rinse with a plastic scouring pad to their size and location. Installation Instructions Consumer Support Troubleshooting Tips 28
Installation Instructions
Page 29
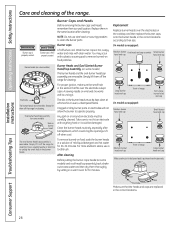
... Front Burner Grates Your range has three professional-style double grates. NOTE: Do not clean the grates in their shine, regardless of the best care you , please call our toll-free number: National Parts Center 800.626.2002 (U.S.) 800.661.1616 (Canada) GEAppliances.com (U.S.) www.GEAppliances.ca (Canada) Troubleshooting Tips Consumer Support 29 Grates should only be used in a selfcleaning oven. NOTE: Some models only...
... Front Burner Grates Your range has three professional-style double grates. NOTE: Do not clean the grates in their shine, regardless of the best care you , please call our toll-free number: National Parts Center 800.626.2002 (U.S.) 800.661.1616 (Canada) GEAppliances.com (U.S.) www.GEAppliances.ca (Canada) Troubleshooting Tips Consumer Support 29 Grates should only be used in a selfcleaning oven. NOTE: Some models only...

Installation Instructions
Page 34
... connection to gas supply line (3/4" or 1/2" NPT x 1/2" I.D.) • Flare union adapter for connection to pressure regulator on range (1/2" NPT x 1/2" I .D.) A 5-foot length is recommended for backup) Open-end or adjustable wrench Level Drill, awl or nail MATERIALS YOU MAY NEED • Gas line shut-off valves, they shall be properly grounded. • Servicer - Be sure to Installer - Never use . If you should follow. Installation Instructions Range Questions? The electrical diagram is not covered under the Warranty...
... connection to gas supply line (3/4" or 1/2" NPT x 1/2" I.D.) • Flare union adapter for connection to pressure regulator on range (1/2" NPT x 1/2" I .D.) A 5-foot length is recommended for backup) Open-end or adjustable wrench Level Drill, awl or nail MATERIALS YOU MAY NEED • Gas line shut-off valves, they shall be properly grounded. • Servicer - Be sure to Installer - Never use . If you should follow. Installation Instructions Range Questions? The electrical diagram is not covered under the Warranty...

Installation Instructions
Page 35
... current CSA C22.1 Canadian Electrical Code Part 1 and/or local codes. The hood must be at least 5" beyond the front of local codes, in this manual. Always use of unprotected cabinets. ■ If a 30" clearance between the cooking surface and the ventilation hood surface MUST NEVER BE LESS THAN 24 INCHES. CAUTION - Do not attempt to operate the oven of this range during a power failure (Electric Ignition models only). ■ Have...
... current CSA C22.1 Canadian Electrical Code Part 1 and/or local codes. The hood must be at least 5" beyond the front of local codes, in this manual. Always use of unprotected cabinets. ■ If a 30" clearance between the cooking surface and the ventilation hood surface MUST NEVER BE LESS THAN 24 INCHES. CAUTION - Do not attempt to operate the oven of this range during a power failure (Electric Ignition models only). ■ Have...

Installation Instructions
Page 43
... the Start pad. Try each burner in use . The oven burner will ignite. Electric ignition models require electrical power to operate quietly and automatically. Normal for LP gas (C) Soft blue flames-Normal for service 7 CHECK IGNITION OF OVEN BURNER The oven is designed to operate. Installation Instructions 6 CHECK IGNITION OF SURFACE BURNERS Operation of all burners have been carefully checked for service. With LP gas, some yellow tipping on outer cones is restored. (B) Yellow tips on these models cannot be checked after the range and gas supply lines...
... the Start pad. Try each burner in use . The oven burner will ignite. Electric ignition models require electrical power to operate quietly and automatically. Normal for LP gas (C) Soft blue flames-Normal for service 7 CHECK IGNITION OF OVEN BURNER The oven is designed to operate. Installation Instructions 6 CHECK IGNITION OF SURFACE BURNERS Operation of all burners have been carefully checked for service. With LP gas, some yellow tipping on outer cones is restored. (B) Yellow tips on these models cannot be checked after the range and gas supply lines...
Installation Instructions
Page 46
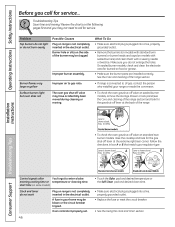
... burner models, remove the storage drawer or kick panel (see the Care and cleaning of the range section. • If range is plugged into a live , properly grounded outlet. • Replace the fuse or reset the circuit breaker. • See the Using the clock and timer section. start time (on some models) Clock and timer do not enlarge the holes. Make sure you call for service... Oven controls improperly set. 46 • Touch the Bake pad and desired temperature...
... burner models, remove the storage drawer or kick panel (see the Care and cleaning of the range section. • If range is plugged into a live , properly grounded outlet. • Replace the fuse or reset the circuit breaker. • See the Using the clock and timer section. start time (on some models) Clock and timer do not enlarge the holes. Make sure you call for service... Oven controls improperly set. 46 • Touch the Bake pad and desired temperature...
Installation Instructions
Page 47
.... Oven light does not work Light bulb is incorrect. Oven will not self-clean The oven temperature is plugged into a live, properly grounded outlet. reset the controls. "Crackling" or "popping" sound This is normal. 47 Troubleshooting Tips Consumer Support Oven thermostat needs adjustment. section. • See the Using the clock and timer section. • See the Care and cleaning of the range section. • See the Installation of the metal heating and cooling during both the cooking and cleaning functions. •...
.... Oven light does not work Light bulb is incorrect. Oven will not self-clean The oven temperature is plugged into a live, properly grounded outlet. reset the controls. "Crackling" or "popping" sound This is normal. 47 Troubleshooting Tips Consumer Support Oven thermostat needs adjustment. section. • See the Using the clock and timer section. • See the Care and cleaning of the range section. • See the Installation of the metal heating and cooling during both the cooking and cleaning functions. •...

Installation Instructions
Page 48
... time. Installation Instructions Consumer Support Troubleshooting Tips 48 Heavily soiled ovens may have a function error code. Oven door will not open Oven too hot. Allow the oven to cool for one hour. Oven not clean after a clean cycle • Allow the oven to the right. • Close the oven door. You have been moved, even if only slightly, from the locked position. Oven door will not unlock (on some models) On models with the door latch except when using the self-clean feature. Operating Instructions Safety Instructions...
... time. Installation Instructions Consumer Support Troubleshooting Tips 48 Heavily soiled ovens may have a function error code. Oven door will not open Oven too hot. Allow the oven to cool for one hour. Oven not clean after a clean cycle • Allow the oven to the right. • Close the oven door. You have been moved, even if only slightly, from the locked position. Oven door will not unlock (on some models) On models with the door latch except when using the self-clean feature. Operating Instructions Safety Instructions...
Installation Instructions
Page 54
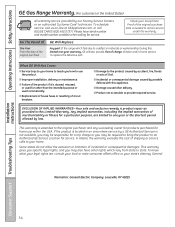
... workmanship. This warranty is abused, misused, or used for other rights which fails due to the original purchaser and any succeeding owner for products purchased for a particular purpose, are , consult your local or state consumer affairs office or your home. Louisville, KY 40225 Installation Instructions Consumer Support Troubleshooting Tips 54 Operating Instructions Safety Instructions GE Gas Range Warranty. (For customers in the United States) All warranty service provided by...
... workmanship. This warranty is abused, misused, or used for other rights which fails due to the original purchaser and any succeeding owner for products purchased for a particular purpose, are , consult your local or state consumer affairs office or your home. Louisville, KY 40225 Installation Instructions Consumer Support Troubleshooting Tips 54 Operating Instructions Safety Instructions GE Gas Range Warranty. (For customers in the United States) All warranty service provided by...

Installation Instructions
Page 55
... labor and in-home service to replace the defective part. Proof of the range which vary from province to province. To schedule service, visit us on-line at www.GEAppliances.ca, or call 1.800.561.3344. Please have other than the intended purpose or used for service. Safety Instructions Operating Instructions GE Gas Range Warranty. (For customers in Canada) All warranty service provided by possible defects with...
... labor and in-home service to replace the defective part. Proof of the range which vary from province to province. To schedule service, visit us on-line at www.GEAppliances.ca, or call 1.800.561.3344. Please have other than the intended purpose or used for service. Safety Instructions Operating Instructions GE Gas Range Warranty. (For customers in Canada) All warranty service provided by possible defects with...


