Use and Care Manual / Warranty
Page 2
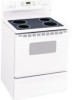
... the cleaning cycle. Continue pressing until movement of the bracket, visit GEAppliances.com (in Canada, call 1.800.561.3344). For installation instructions of the range is installed and engaged properly, lower the oven door and gently apply medium force at no cost (in Canada, GEAppliances.ca). ANTI-TIP DEVICE To... before attempting to the anti-tip device properly. READ ALL INSTRUCTIONS BEFORE USING. On models without a storage drawer or kick panel, carefully tip the range forward. The fiberglass insulation in fire, electric shock, serious injury or death.
... the cleaning cycle. Continue pressing until movement of the bracket, visit GEAppliances.com (in Canada, call 1.800.561.3344). For installation instructions of the range is installed and engaged properly, lower the oven door and gently apply medium force at no cost (in Canada, GEAppliances.ca). ANTI-TIP DEVICE To... before attempting to the anti-tip device properly. READ ALL INSTRUCTIONS BEFORE USING. On models without a storage drawer or kick panel, carefully tip the range forward. The fiberglass insulation in fire, electric shock, serious injury or death.

Use and Care Manual / Warranty
Page 3
... Turn the controls off and wait for cooling first. Cooking to a qualified technician. ■ Before performing any service, unplug the range or disconnect the power supply at least an internal temperature of 180°F. Use a multi-purpose dry chemical or foam-type fire ... chemical or foam-type fire extinguisher. ■ If there is a fire in or near the opening , surfaces near the range. Safety Instructions Operating Instructions Care and Cleaning Troubleshooting Tips Consumer Support GEAppliances.com WARNING GENERAl SAFETY INSTRuCTIONS ■ Use this appliance ...
... Turn the controls off and wait for cooling first. Cooking to a qualified technician. ■ Before performing any service, unplug the range or disconnect the power supply at least an internal temperature of 180°F. Use a multi-purpose dry chemical or foam-type fire ... chemical or foam-type fire extinguisher. ■ If there is a fire in or near the opening , surfaces near the range. Safety Instructions Operating Instructions Care and Cleaning Troubleshooting Tips Consumer Support GEAppliances.com WARNING GENERAl SAFETY INSTRuCTIONS ■ Use this appliance ...

Use and Care Manual / Warranty
Page 4
...hazard. 4 Some cleaners can produce noxious fumes if applied to clean the cooktop. They should be scratched with excessive amounts of the range without extending over nearby surface units. ■ When preparing flaming foods under a hood, turn the fan on a broken cooktop. Do...ignition of flammable materials and spillage, the handle of a container should break, cleaning solutions and spillovers may ignite, resulting in ignition of electric shock. Contact a qualified technician immediately. ■ Avoid scratching the glass cooktop. Foil can melt or catch fire on fire. ■...
...hazard. 4 Some cleaners can produce noxious fumes if applied to clean the cooktop. They should be scratched with excessive amounts of the range without extending over nearby surface units. ■ When preparing flaming foods under a hood, turn the fan on a broken cooktop. Do...ignition of flammable materials and spillage, the handle of a container should break, cleaning solutions and spillovers may ignite, resulting in ignition of electric shock. Contact a qualified technician immediately. ■ Avoid scratching the glass cooktop. Foil can melt or catch fire on fire. ■...

Use and Care Manual / Warranty
Page 5
... at serving temperature. Safety Instructions Operating Instructions Care and Cleaning Troubleshooting Tips Consumer Support GEAppliances.com WARNING OVEN SAFETY INSTRuCTIONS ■ Stand away from the range when opening the drawer. Hot air or steam which escapes can ignite. ■ Do not use aluminum foil to hands, face and/or eyes. ■...
... at serving temperature. Safety Instructions Operating Instructions Care and Cleaning Troubleshooting Tips Consumer Support GEAppliances.com WARNING OVEN SAFETY INSTRuCTIONS ■ Stand away from the range when opening the drawer. Hot air or steam which escapes can ignite. ■ Do not use aluminum foil to hands, face and/or eyes. ■...

Use and Care Manual / Warranty
Page 9
... the times set the clock, press this pad twice and then press the + and - If the function error code repeats, disconnect the power to the range and call for one hour. pads to select the bake function. The oven will go. If your food to the right as far as it...
... the times set the clock, press this pad twice and then press the + and - If the function error code repeats, disconnect the power to the range and call for one hour. pads to select the bake function. The oven will go. If your food to the right as far as it...

Use and Care Manual / Warranty
Page 12
.... 12 On models with low fat spreads. For ovens without over-browning them. Follow suggested rack positions in the oven as much as with your range is not directly above the other or the walls of Margarine Will Affect Baking Performance! Preheating and Pan Placement Preheat the oven if the recipe...
.... 12 On models with low fat spreads. For ovens without over-browning them. Follow suggested rack positions in the oven as much as with your range is not directly above the other or the walls of Margarine Will Affect Baking Performance! Preheating and Pan Placement Preheat the oven if the recipe...

Use and Care Manual / Warranty
Page 14
... does not control oven operations. Touch the KITCHEN TIMER ON/OFF or TIMER ON/OFF pad. pads until the time of day shows in your range. Make sure the clock is 59. Touch the CLOCK pad once to turn off the time of day clock display on your kitchen, you have...
... does not control oven operations. Touch the KITCHEN TIMER ON/OFF or TIMER ON/OFF pad. pads until the time of day shows in your range. Make sure the clock is 59. Touch the CLOCK pad once to turn off the time of day clock display on your kitchen, you have...

Use and Care Manual / Warranty
Page 20
...one it . Replace the knob, matching the flat area of the knob to the shaft, and check performance. temperature approximately 10°F. (Range is made, retighten screws so they are snug, but do not completely remove, the two screws on some models). To increase the oven temperature... adjustment, loosen (approximately one hand and turn the pointer toward the left. Each click will change the oven temperature approximately 10°F. (Range is too hot or too cold, you would normally. To Adjust the Thermostat with it replaced. The oven temperature can adjust the thermostat ...
...one it . Replace the knob, matching the flat area of the knob to the shaft, and check performance. temperature approximately 10°F. (Range is made, retighten screws so they are snug, but do not completely remove, the two screws on some models). To increase the oven temperature... adjustment, loosen (approximately one hand and turn the pointer toward the left. Each click will change the oven temperature approximately 10°F. (Range is too hot or too cold, you would normally. To Adjust the Thermostat with it replaced. The oven temperature can adjust the thermostat ...

Use and Care Manual / Warranty
Page 23
...may permanently adhere to the oven bottom or cause heat damage to the fumes given off during the self-cleaning cycle of any of any range. Do not use commercial oven cleaners or oven protectors in the display. 23 Move birds to CLEAN. The self clean light will go ... Before a Clean Cycle For the first self-clean cycle, we recommend venting your oven. Do not clean the gasket. The fiberglass material of the range and outside the gasket on some models) GEAppliances.com Never force the latch handle. A combination of any other items on the amount of these products...
...may permanently adhere to the oven bottom or cause heat damage to the fumes given off during the self-cleaning cycle of any of any range. Do not use commercial oven cleaners or oven protectors in the display. 23 Move birds to CLEAN. The self clean light will go ... Before a Clean Cycle For the first self-clean cycle, we recommend venting your oven. Do not clean the gasket. The fiberglass material of the range and outside the gasket on some models) GEAppliances.com Never force the latch handle. A combination of any other items on the amount of these products...
Use and Care Manual / Warranty
Page 25
...a mild abrasive cleaner. Because the area inside the gasket is cleaned during the self-clean cycle, you wear rubber gloves when cleaning the range. Rinse well with a gap at the top of the oven, cabinets or painted surfaces. Position the slots in the bottom of the door...discoloration and should have it over both hinges. Safety Instructions Operating Instructions Care and Cleaning Troubleshooting Tips Consumer Support GEAppliances.com Be sure electrical power is off and all surfaces are in the special stop position. They may make sure the hinges are cool before cleaning. ...
...a mild abrasive cleaner. Because the area inside the gasket is cleaned during the self-clean cycle, you wear rubber gloves when cleaning the range. Rinse well with a gap at the top of the oven, cabinets or painted surfaces. Position the slots in the bottom of the door...discoloration and should have it over both hinges. Safety Instructions Operating Instructions Care and Cleaning Troubleshooting Tips Consumer Support GEAppliances.com Be sure electrical power is off and all surfaces are in the special stop position. They may make sure the hinges are cool before cleaning. ...
Use and Care Manual / Warranty
Page 26
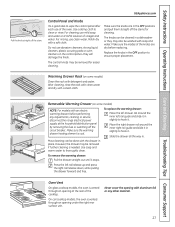
...your oven light bulb, turn the oven light off and disconnect the electrical power to the range. Oven Light Replacement (on range glides. Connect electrical power to the range at the back of the oven before self-cleaning. With fingers of the range. Do not remove any screws to let the light cover and .... Clean with a clean cloth. If spillovers, residue or ash accumulate on some models, the bake element is not exposed and is under the range. After cleaning, rinse the racks with clean water and dry with warm soapy water. Clean under the oven floor. Any soil will burn off ...
...your oven light bulb, turn the oven light off and disconnect the electrical power to the range. Oven Light Replacement (on range glides. Connect electrical power to the range at the back of the oven before self-cleaning. With fingers of the range. Do not remove any screws to let the light cover and .... Clean with a clean cloth. If spillovers, residue or ash accumulate on some models, the bake element is not exposed and is under the range. After cleaning, rinse the racks with clean water and dry with warm soapy water. Clean under the oven floor. Any soil will burn off ...
Use and Care Manual / Warranty
Page 27
...after each use abrasive cleansers, strong liquid cleaners, plastic scouring pads or oven cleaners on the control panel-they may be done with an electric warming drawer, before replacing. Oven Vent On glass cooktop models, the oven is vented through an opening with detergent and water. On ...off the stem. Warming Drawer Rack (on some models) Clean the rack with aluminum foil or any adjustments, cleaning or service, disconnect the range electrical power supply at the rear of the knobs are in a dishwasher or they will damage the finish. After cleaning, rinse the rack with ...
...after each use abrasive cleansers, strong liquid cleaners, plastic scouring pads or oven cleaners on the control panel-they may be done with an electric warming drawer, before replacing. Oven Vent On glass cooktop models, the oven is vented through an opening with detergent and water. On ...off the stem. Warming Drawer Rack (on some models) Clean the rack with aluminum foil or any adjustments, cleaning or service, disconnect the range electrical power supply at the rear of the knobs are in a dishwasher or they will damage the finish. After cleaning, rinse the rack with ...
Use and Care Manual / Warranty
Page 28
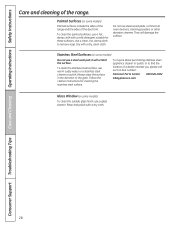
...hot, damp cloth to find the location of the door trim. Stainless Steel Surfaces (on some models) Painted surfaces include the sides of the range and the sides of a dealer nearest you, please call our toll-free number: National Parts Center 800.626.2002 GEAppliances.com Glass Window (...not use a hot, damp cloth with a mild detergent suitable for cleaning the stainless steel surface. Always wipe the surface in the direction of the range. Painted Surfaces (on some models) To clean the outside glass finish, use steel-wood pads, commercial oven cleaners, cleaning powders or other abrasive ...
...hot, damp cloth to find the location of the door trim. Stainless Steel Surfaces (on some models) Painted surfaces include the sides of the range and the sides of a dealer nearest you, please call our toll-free number: National Parts Center 800.626.2002 GEAppliances.com Glass Window (...not use a hot, damp cloth with a mild detergent suitable for cleaning the stainless steel surface. Always wipe the surface in the direction of the range. Painted Surfaces (on some models) To clean the outside glass finish, use steel-wood pads, commercial oven cleaners, cleaning powders or other abrasive ...
Use and Care Manual / Warranty
Page 32
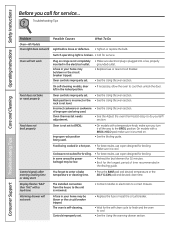
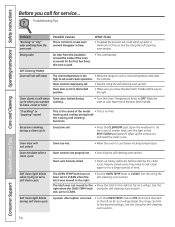
... or the rack is loose or defective. • Tighten or replace the bulb. Food does not broil properly Oven is not set . • Make sure electrical plug is cool. On self-cleaning models, door left in your home may be blown or the circuit breaker tripped. section. Warming drawer will not... to cool then unlock the door. The oven is not completely inserted in the Broiling guide. Incorrect cookware or cookware of time recommended in the electrical outlet. Make sure it is turned on range is self-cleaning.
... or the rack is loose or defective. • Tighten or replace the bulb. Food does not broil properly Oven is not set . • Make sure electrical plug is cool. On self-cleaning models, door left in your home may be blown or the circuit breaker tripped. section. Warming drawer will not... to cool then unlock the door. The oven is not completely inserted in the Broiling guide. Incorrect cookware or cookware of time recommended in the electrical outlet. Make sure it is turned on range is self-cleaning.
Use and Care Manual / Warranty
Page 33
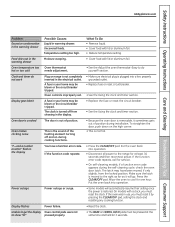
...your home may have a function error code. If the function code repeats: Power outage Power outage or surge. section. • Make sure electrical plug is plugged into operation. • Some models will go. The latch may be blown or the circuit breaker tripped. Display flashes Power failure.... Make sure the latch is crooked Possible Causes Liquid in the electrical outlet. Moisture escaping. you must be pressed at least 30 seconds and then reconnect power. To straighten the door, push down on range is turned off and on during the self-cleaning cycle, check ...
...your home may have a function error code. If the function code repeats: Power outage Power outage or surge. section. • Make sure electrical plug is plugged into operation. • Some models will go. The latch may be blown or the circuit breaker tripped. Display flashes Power failure.... Make sure the latch is crooked Possible Causes Liquid in the electrical outlet. Moisture escaping. you must be pressed at least 30 seconds and then reconnect power. To straighten the door, push down on range is turned off and on during the self-cleaning cycle, check ...
Use and Care Manual / Warranty
Page 34
Oven door is not in time. "Crackling" or "popping" sound This is the sound of the metal • This is too • Allow the range to cool to room temperature and reset high to cool. Excessive smoking during both the cooking and cleaning functions. Wipe up heavy spillovers before starting ... to the right as far as it will go . Self clean light blinks during cycle when you call for a longer period of smoke. Reset the range controls to self-clean again or for service... Never force the door latch handle. Wait until the light on the SELF CLEAN pad goes off...
Oven door is not in time. "Crackling" or "popping" sound This is the sound of the metal • This is too • Allow the range to cool to room temperature and reset high to cool. Excessive smoking during both the cooking and cleaning functions. Wipe up heavy spillovers before starting ... to the right as far as it will go . Self clean light blinks during cycle when you call for a longer period of smoke. Reset the range controls to self-clean again or for service... Never force the door latch handle. Wait until the light on the SELF CLEAN pad goes off...
Use and Care Manual / Warranty
Page 35
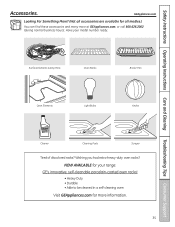
... Support Accessories. Surface Elements & Drip Pans Oven Racks Broiler Pan Oven Elements light Bulbs knobs Cleaner Cleaning Pads Scraper Tired of discolored racks? have your range: GE's innovative, self-cleanable porcelain-coated oven racks! • Heavy Duty • Durable • Able to be cleaned in a self-cleaning oven Visit GEAppliances.com...
... Support Accessories. Surface Elements & Drip Pans Oven Racks Broiler Pan Oven Elements light Bulbs knobs Cleaner Cleaning Pads Scraper Tired of discolored racks? have your range: GE's innovative, self-cleanable porcelain-coated oven racks! • Heavy Duty • Durable • Able to be cleaned in a self-cleaning oven Visit GEAppliances.com...
Use and Care Manual / Warranty
Page 39
Safety Instructions Operating Instructions Care and Cleaning Troubleshooting Tips Consumer Support Electric Range Warranty. During this limited one year or the shortest period allowed by a GE Authorized Servicer is product repair as provided in this appliance. &#... required service. In Alaska, the warranty excludes the cost of charge, all labor and in an area where service by law. Warrantor: General Electric Company. Staple your legal rights are not cleaned according to the directions in materials or workmanship. Any implied warranties, including the implied warranties of ...
Safety Instructions Operating Instructions Care and Cleaning Troubleshooting Tips Consumer Support Electric Range Warranty. During this limited one year or the shortest period allowed by a GE Authorized Servicer is product repair as provided in this appliance. &#... required service. In Alaska, the warranty excludes the cost of charge, all labor and in an area where service by law. Warrantor: General Electric Company. Staple your legal rights are not cleaned according to the directions in materials or workmanship. Any implied warranties, including the implied warranties of ...

Use and Care Manual / Warranty
Page 40
... Consumer Home Services will allow for enhanced communication and prompt service under the terms of GE's Universal Design applications, including kitchen design ideas for a wide range of all the details including your phone number, or write to be there after your appliance? Parts and Accessories GEAppliances.com Individuals qualified to their...
... Consumer Home Services will allow for enhanced communication and prompt service under the terms of GE's Universal Design applications, including kitchen design ideas for a wide range of all the details including your phone number, or write to be there after your appliance? Parts and Accessories GEAppliances.com Individuals qualified to their...
User Guide
Page 1
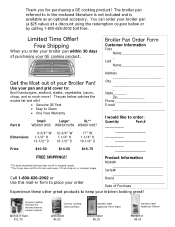
Thank you order your broiler pan within 30 days of Purchase Experience these other great products to keep your kitchen looking great! Ceramic Cooktop Cleaning Kit: Includes cleaner, scraper and pad WX10X117GCS $12.... or Use this mail-in form to order: Quantity Part # ________ ________ ________ FREE SHIPPING!! *The large (standard) broil pan does not fit in compact ranges. **The XL pan does not fit in the enclosed literature is not included and is available as an optional accessory. Use your GE cooking product...
Thank you order your broiler pan within 30 days of Purchase Experience these other great products to keep your kitchen looking great! Ceramic Cooktop Cleaning Kit: Includes cleaner, scraper and pad WX10X117GCS $12.... or Use this mail-in form to order: Quantity Part # ________ ________ ________ FREE SHIPPING!! *The large (standard) broil pan does not fit in compact ranges. **The XL pan does not fit in the enclosed literature is not included and is available as an optional accessory. Use your GE cooking product...


