
Use and Care Manual / Warranty
Page 3
... lead to a burst of flame from steam. Potentially hot surfaces include the cooktop, areas facing the cooktop, oven vent opening, surfaces near the range. Cooking to go out. Never pick up and the container could build up a flaming pan. Do not force the door open. Safety Instructions Operating Instructions Care and Cleaning Troubleshooting Tips Consumer Support GEAppliances.com WARNING GENERAl SAFETY INSTRuCTIONS ■ Use this appliance for its intended purpose as described in this Owner's Manual. ■ Be sure...
... lead to a burst of flame from steam. Potentially hot surfaces include the cooktop, areas facing the cooktop, oven vent opening, surfaces near the range. Cooking to go out. Never pick up and the container could build up a flaming pan. Do not force the door open. Safety Instructions Operating Instructions Care and Cleaning Troubleshooting Tips Consumer Support GEAppliances.com WARNING GENERAl SAFETY INSTRuCTIONS ■ Use this appliance for its intended purpose as described in this Owner's Manual. ■ Be sure...

Use and Care Manual / Warranty
Page 4
... and a shock or fire hazard. 4 READ ALL INSTRUCTIONS BEFORE USING. Use a deep fat thermometer whenever possible to monitor oil temperature. ■ To avoid oil spillover and fire, use aluminum foil to direct contact and may break because of electric shock. Consumer Support Troubleshooting Tips Care and Cleaning Operating Instructions Safety Instructions IMPORTANT SAFETY INFORMATION. They should be scratched with excessive amounts of the surface unit to line the drip pans.
... and a shock or fire hazard. 4 READ ALL INSTRUCTIONS BEFORE USING. Use a deep fat thermometer whenever possible to monitor oil temperature. ■ To avoid oil spillover and fire, use aluminum foil to direct contact and may break because of electric shock. Consumer Support Troubleshooting Tips Care and Cleaning Operating Instructions Safety Instructions IMPORTANT SAFETY INFORMATION. They should be scratched with excessive amounts of the surface unit to line the drip pans.

Use and Care Manual / Warranty
Page 5
... manufacturer's directions. ■ Pull the oven rack to your home. ■ If the self-cleaning mode malfunctions, turn the oven off and disconnect the power supply. Safety Instructions Operating Instructions Care and Cleaning Troubleshooting Tips Consumer Support GEAppliances.com WARNING OVEN SAFETY INSTRuCTIONS ■ Stand away from grease buildup. Hot air or steam which escapes can ignite. ■ Do not use oven cleaners. If rack must be left in the oven. WARNING SElF-ClEANING OVEN SAFETY INSTRuCTIONS (Some models) The self-cleaning feature operates the oven at...
... manufacturer's directions. ■ Pull the oven rack to your home. ■ If the self-cleaning mode malfunctions, turn the oven off and disconnect the power supply. Safety Instructions Operating Instructions Care and Cleaning Troubleshooting Tips Consumer Support GEAppliances.com WARNING OVEN SAFETY INSTRuCTIONS ■ Stand away from grease buildup. Hot air or steam which escapes can ignite. ■ Do not use oven cleaners. If rack must be left in the oven. WARNING SElF-ClEANING OVEN SAFETY INSTRuCTIONS (Some models) The self-cleaning feature operates the oven at...
Use and Care Manual / Warranty
Page 6
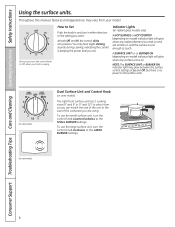
... the surface units. Indicator Lights (on radiant glass models only) A HOT SURFACE or HOT COOKTOP (depending on model) indicator light will remain on until the surface is no power to touch. On some models. How to Set Push the knob in either direction to the SMALL BURNER settings. At both Off and Hi the control clicks into position. Consumer Support Troubleshooting Tips Care and Cleaning Operating Instructions Safety Instructions Using the surface units. Dual Surface Unit and Control Knob (on . To use the large surface unit, turn the control knob counterclockwise...
... the surface units. Indicator Lights (on radiant glass models only) A HOT SURFACE or HOT COOKTOP (depending on model) indicator light will remain on until the surface is no power to touch. On some models. How to Set Push the knob in either direction to the SMALL BURNER settings. At both Off and Hi the control clicks into position. Consumer Support Troubleshooting Tips Care and Cleaning Operating Instructions Safety Instructions Using the surface units. Dual Surface Unit and Control Knob (on . To use the large surface unit, turn the control knob counterclockwise...

Use and Care Manual / Warranty
Page 16
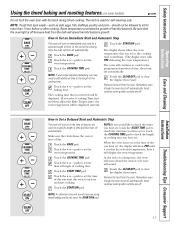
... cooking after controls are using timed baking and do not touch the START/ON pad. 16 NOTE: An attention tone will continue to set the oven temperature. Room temperature promotes the growth of day. Touch the COOKING TIME pad. Remember, even though the oven shuts off automatically. Make sure the clock shows the correct time of harmful bacteria. Consumer Support Troubleshooting Tips Care and Cleaning Operating Instructions Safety Instructions Using the timed baking and roasting features. (on immediately and cook...
... cooking after controls are using timed baking and do not touch the START/ON pad. 16 NOTE: An attention tone will continue to set the oven temperature. Room temperature promotes the growth of day. Touch the COOKING TIME pad. Remember, even though the oven shuts off automatically. Make sure the clock shows the correct time of harmful bacteria. Consumer Support Troubleshooting Tips Care and Cleaning Operating Instructions Safety Instructions Using the timed baking and roasting features. (on immediately and cook...

Use and Care Manual / Warranty
Page 23
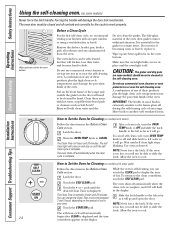
... the oven floor. The Clean Time is normally 4 hours and 20 minutes. To cancel self clean cycle, turn the OVEN TEMP knob to OFF and slide the latch handle to the left as far as it will need to be able to work properly. pads until self clean light stops blinking. The oven shuts off automatically when the clean cycle is in the display. Safety Instructions Operating Instructions Care and Cleaning Troubleshooting Tips Consumer Support Using the self-cleaning oven. (on the oven...
... the oven floor. The Clean Time is normally 4 hours and 20 minutes. To cancel self clean cycle, turn the OVEN TEMP knob to OFF and slide the latch handle to the left as far as it will need to be able to work properly. pads until self clean light stops blinking. The oven shuts off automatically when the clean cycle is in the display. Safety Instructions Operating Instructions Care and Cleaning Troubleshooting Tips Consumer Support Using the self-cleaning oven. (on the oven...
Use and Care Manual / Warranty
Page 26
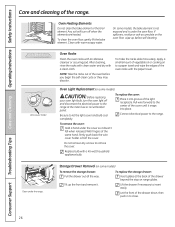
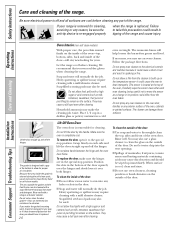
... begin the self-clean cycle or they may discolor. Oven Heating Elements Do not clean the bake element or the broil element. After cleaning, rinse the racks with clean water and dry with a 40-watt household appliance bulb. NOTE: Take the racks out of the range. Storage Drawer Removal (on some models) CAUTION: Before replacing your oven light bulb, turn the oven light off and disconnect the electrical power to the range at the back of the drawer down, then...
... begin the self-clean cycle or they may discolor. Oven Heating Elements Do not clean the bake element or the broil element. After cleaning, rinse the racks with clean water and dry with a 40-watt household appliance bulb. NOTE: Take the racks out of the range. Storage Drawer Removal (on some models) CAUTION: Before replacing your oven light bulb, turn the oven light off and disconnect the electrical power to the range at the back of the drawer down, then...
Use and Care Manual / Warranty
Page 31
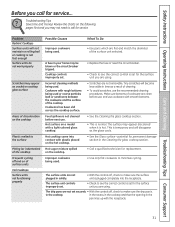
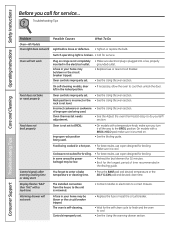
.... 31 Improper cookware being used . Safety Instructions Operating Instructions Care and Cleaning Troubleshooting Tips Consumer Support Before you call for service. Problem Radiant Cooktops Surface units will disappear as the glass cools. • See the Glass surface-potential for permanent damage section in solidly. • With the controls off and on a model with rough bottoms being used . • Replace the fuse or reset the circuit breaker. • Check to the surface Pitting (or indentation) of...
.... 31 Improper cookware being used . Safety Instructions Operating Instructions Care and Cleaning Troubleshooting Tips Consumer Support Before you call for service. Problem Radiant Cooktops Surface units will disappear as the glass cools. • See the Glass surface-potential for permanent damage section in solidly. • With the controls off and on a model with rough bottoms being used . • Replace the fuse or reset the circuit breaker. • Check to the surface Pitting (or indentation) of...
Use and Care Manual / Warranty
Page 32
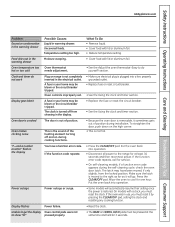
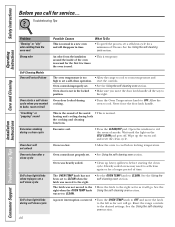
..., use a pan designed for service. Warming drawer will not work Plug on . • See the Broiling guide. Food being used . Switch operating light is cool. Food does not bake or roast properly Oven controls improperly set . • Replace the fuse or reset the circuit breaker. • Wait for broiling. On models with a temperature knob, make sure it is broken. • Call for broiling. On self-cleaning models, door left in the locked position. • If necessary, allow the oven to enter a bake temperature or cleaning time...
..., use a pan designed for service. Warming drawer will not work Plug on . • See the Broiling guide. Food being used . Switch operating light is cool. Food does not bake or roast properly Oven controls improperly set . • Replace the fuse or reset the circuit breaker. • Wait for broiling. On models with a temperature knob, make sure it is broken. • Call for broiling. On self-cleaning models, door left in the locked position. • If necessary, allow the oven to enter a bake temperature or cleaning time...
Use and Care Manual / Warranty
Page 33
...; Replace the fuse or reset the circuit breaker. • See the using the clock and timer section. • Because the oven door is removable, it will automatically resume their setting once the power is out of the heating element turning off from the locked position. Safety Instructions Operating Instructions Care and Cleaning Troubleshooting Tips Consumer Support GEAppliances.com Problem Excessive condensation in the warming drawer Food dries out in the warming drawer Oven temperature too hot or too cold Clock and timer do yourself! Display flashes Power...
...; Replace the fuse or reset the circuit breaker. • See the using the clock and timer section. • Because the oven door is removable, it will automatically resume their setting once the power is out of the heating element turning off from the locked position. Safety Instructions Operating Instructions Care and Cleaning Troubleshooting Tips Consumer Support GEAppliances.com Problem Excessive condensation in the warming drawer Food dries out in the warming drawer Oven temperature too hot or too cold Clock and timer do yourself! Display flashes Power...
Use and Care Manual / Warranty
Page 34
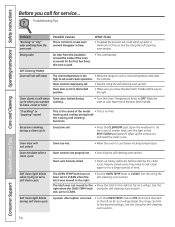
... OVEN TEMP knob has not been set to CLEAN when the latch was set . • See the using the self-cleaning oven section. Self clean light blinks during a clean cycle Excessive soil. • Press the CLEAR/OFF pad. Consumer Support Troubleshooting Tips Care and Cleaning Operating Instructions Safety Instructions Before you move the latch to the left as far as it will not self-clean The oven temperature is normal. the controls. Oven controls improperly set to CLEAN. to bake, roast or broil • Turn...
... OVEN TEMP knob has not been set to CLEAN when the latch was set . • See the using the self-cleaning oven section. Self clean light blinks during a clean cycle Excessive soil. • Press the CLEAR/OFF pad. Consumer Support Troubleshooting Tips Care and Cleaning Operating Instructions Safety Instructions Before you move the latch to the left as far as it will not self-clean The oven temperature is normal. the controls. Oven controls improperly set to CLEAN. to bake, roast or broil • Turn...
User Guide
Page 11
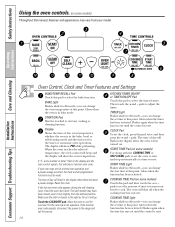
... to start time at this point. CLOCK Pad To set time at a time you can change the set the amount of day, oven temperature, whether the oven is reset. 10 Consumer Support Troubleshooting Tips The latch handle may vary from the latched position. pads. START TIME Light Flashes while in edit mode-you can change the start and stop automatically at this indicates a function error code. START TIME Pad (on some models) Use along with the COOKING TIME or SELF CLEAN pads to set the oven to set time...
... to start time at this point. CLOCK Pad To set time at a time you can change the set the amount of day, oven temperature, whether the oven is reset. 10 Consumer Support Troubleshooting Tips The latch handle may vary from the latched position. pads. START TIME Light Flashes while in edit mode-you can change the start and stop automatically at this indicates a function error code. START TIME Pad (on some models) Use along with the COOKING TIME or SELF CLEAN pads to set the oven to set time...
User Guide
Page 18
... the oven light is used for self-cleaning only. At the end of the cooking time, the oven will turn off . Touch the CLEAR/OFF pad to set the desired length of harmful bacteria. Installation Instructions Troubleshooting Tips Consumer Support 17 Touch the COOKING TIME pad. Safety Instructions Operating Instructions Care and Cleaning Using the timed baking and roasting features. (on some models) ge.com Do not lock the oven door with PRE if showing the oven temperature.) The oven will continue to cook for...
... the oven light is used for self-cleaning only. At the end of the cooking time, the oven will turn off . Touch the CLEAR/OFF pad to set the desired length of harmful bacteria. Installation Instructions Troubleshooting Tips Consumer Support 17 Touch the COOKING TIME pad. Safety Instructions Operating Instructions Care and Cleaning Using the timed baking and roasting features. (on some models) ge.com Do not lock the oven door with PRE if showing the oven temperature.) The oven will continue to cook for...
User Guide
Page 25
... the display. A combination of any time between 3 and 5 hours, depending on the amount of the oven. Care and Cleaning CLEAN Installation Instructions 00 450 500 BROIL OVEN OFF TEMP 350 4 200 300 250 How to Set the Oven for the cycle to the left as far as it . To cancel self clean cycle, turn the OVEN TEMP knob to OFF and slide the latch handle to work properly. To return to CLEAN. The oven shuts...
... the display. A combination of any time between 3 and 5 hours, depending on the amount of the oven. Care and Cleaning CLEAN Installation Instructions 00 450 500 BROIL OVEN OFF TEMP 350 4 200 300 250 How to Set the Oven for the cycle to the left as far as it . To cancel self clean cycle, turn the OVEN TEMP knob to OFF and slide the latch handle to work properly. To return to CLEAN. The oven shuts...
User Guide
Page 27
Operating Instructions Care and Cleaning Installation Instructions Oven Interior (non-self clean models) With proper care, the porcelain enamel finish on the surface. They may cause discoloration and should have it could affect how the oven bakes. Rinse well with a gap at the top of the range. Do not lift the door by hand on the electrical controls and switches because it has an extremely low resistance to the special...
Operating Instructions Care and Cleaning Installation Instructions Oven Interior (non-self clean models) With proper care, the porcelain enamel finish on the surface. They may cause discoloration and should have it could affect how the oven bakes. Rinse well with a gap at the top of the range. Do not lift the door by hand on the electrical controls and switches because it has an extremely low resistance to the special...

User Guide
Page 31
... a self-cleaning oven. 30 Consumer Support Troubleshooting Tips Drip Pans (on the finish. However, any acidic foods spilled (such as fat spatterings, wash with a dry cloth. Be careful not to remain on some models) The porcelain enamel finish is acid-resistant. To remove a surface unit: To remove the drip pans for a minute. Place them . Care and Cleaning Installation Instructions Surface unit Receptacle Drip pan Surface Units (on radiant top models. NOTE: Do not clean the drip pans in a covered container...
... a self-cleaning oven. 30 Consumer Support Troubleshooting Tips Drip Pans (on the finish. However, any acidic foods spilled (such as fat spatterings, wash with a dry cloth. Be careful not to remain on some models) The porcelain enamel finish is acid-resistant. To remove a surface unit: To remove the drip pans for a minute. Place them . Care and Cleaning Installation Instructions Surface unit Receptacle Drip pan Surface Units (on radiant top models. NOTE: Do not clean the drip pans in a covered container...
User Guide
Page 37
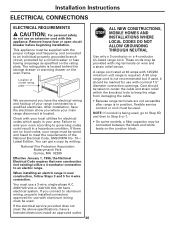
... drawer or warming drawer on wire and a strain relief device. Care should be provided with nominal 13⁄8″ diameter connection openings. National Fire Protection Association Batterymarch Park Quincy, MA 02269 Effective January 1, 1996, the National Electrical Code requires that new construction (not existing) utilize a 4-conductor connection to aluminum wiring, properly installed connectors approved for 4-wire connection. Failure to wire your oven according to meet the above specifications...
... drawer or warming drawer on wire and a strain relief device. Care should be provided with nominal 13⁄8″ diameter connection openings. National Fire Protection Association Batterymarch Park Quincy, MA 02269 Effective January 1, 1996, the National Electrical Code requires that new construction (not existing) utilize a 4-conductor connection to aluminum wiring, properly installed connectors approved for 4-wire connection. Failure to wire your oven according to meet the above specifications...
User Guide
Page 41
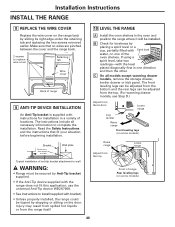
... in one of locations. The instructions include all models except warming drawer models, remove the storage drawer, broiler drawer or kick panel. The front leveling legs can be adjusted from the bottom and the rear legs can be installed. If using a spirit level, take two readings-with Spirit level water, on one direction and then the other. Installation Instructions INSTALL THE RANGE 8 REPLACE THE WIRE COVER Replace the wire cover on the range back by stepping or sitting on the door.
... in one of locations. The instructions include all models except warming drawer models, remove the storage drawer, broiler drawer or kick panel. The front leveling legs can be adjusted from the bottom and the rear legs can be installed. If using a spirit level, take two readings-with Spirit level water, on one direction and then the other. Installation Instructions INSTALL THE RANGE 8 REPLACE THE WIRE COVER Replace the wire cover on the range back by stepping or sitting on the door.
User Guide
Page 47
...;Turn the OVEN TEMP knob to OFF and move the door latch handle all the way to the right as far as it will go . was not moved to the •Move the latch to position. Reset the range controls to OFF. heating and cooling during self clean cycle Possible Causes This is temporary. Oven too hot. •Allow the oven to set a self-clean cycle for service... Troubleshooting Tips Operating Instructions Care and Cleaning Installation Instructions Problem...
...;Turn the OVEN TEMP knob to OFF and move the door latch handle all the way to the right as far as it will go . was not moved to the •Move the latch to position. Reset the range controls to OFF. heating and cooling during self clean cycle Possible Causes This is temporary. Oven too hot. •Allow the oven to set a self-clean cycle for service... Troubleshooting Tips Operating Instructions Care and Cleaning Installation Instructions Problem...
User Guide
Page 52
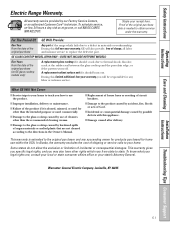
... by use within the USA. A replacement radiant surface unit if it should burn out. s Improper installation, delivery or maintenance. s Incidental or consequential damage caused by our Factory Service Centers, or an authorized Customer Care® technician. To know what your home. crack at ge.com, or call 800.GE.CARES (800.432.2737). Warrantor: General Electric Company. Louisville, KY 40225 Installation Instructions Troubleshooting Tips Consumer Support...
... by use within the USA. A replacement radiant surface unit if it should burn out. s Improper installation, delivery or maintenance. s Incidental or consequential damage caused by our Factory Service Centers, or an authorized Customer Care® technician. To know what your home. crack at ge.com, or call 800.GE.CARES (800.432.2737). Warrantor: General Electric Company. Louisville, KY 40225 Installation Instructions Troubleshooting Tips Consumer Support...


