
Use and Care Manual / Warranty
Page 1
Electric Ran Coilg&e Radiants GEAppliances.com Safety Information 2-5 Operating Instructions Adjust the Oven Thermostat 20 Clock and Timer 14, 15 Oven 11-13 ..., 24 Special Features 17 Surface Units 6, 7 Timed Baking and Roasting 16 Warming Drawer 21, 22 Care and Cleaning 26-30 Aluminum Foil 4, 5, 12 Glass Cooktop 29, 30 Troubleshooting Tips 31-34 Accessories 35 Consumer Support Consumer Support Back Cover Warranty 39 Owner's Manual Coil Top and Radiant Top Models... You can find them on a label, behind the storage drawer or warming drawer on the oven frame. 49-88044 06-10 GE
Electric Ran Coilg&e Radiants GEAppliances.com Safety Information 2-5 Operating Instructions Adjust the Oven Thermostat 20 Clock and Timer 14, 15 Oven 11-13 ..., 24 Special Features 17 Surface Units 6, 7 Timed Baking and Roasting 16 Warming Drawer 21, 22 Care and Cleaning 26-30 Aluminum Foil 4, 5, 12 Glass Cooktop 29, 30 Troubleshooting Tips 31-34 Accessories 35 Consumer Support Consumer Support Back Cover Warranty 39 Owner's Manual Coil Top and Radiant Top Models... You can find them on a label, behind the storage drawer or warming drawer on the oven frame. 49-88044 06-10 GE
Use and Care Manual / Warranty
Page 35
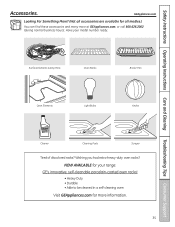
... Looking For Something More? (Not all accessories are available for more at GEAppliances.com, or call 800.626.2002 (during normal business hours). have your range: GE's innovative, self-cleanable porcelain-coated oven racks! • Heavy Duty • Durable • Able to be cleaned in a self-cleaning oven Visit GEAppliances.com for...
... Looking For Something More? (Not all accessories are available for more at GEAppliances.com, or call 800.626.2002 (during normal business hours). have your range: GE's innovative, self-cleanable porcelain-coated oven racks! • Heavy Duty • Durable • Able to be cleaned in a self-cleaning oven Visit GEAppliances.com for...
Use and Care Manual / Warranty
Page 39
...; Damage to obtain service under the warranty. Some states do not allow the exclusion or limitation of the range which vary from state to one -year warranty, GE will also provide, free of charge, all labor and in materials or workmanship. To schedule service, visit... ■ Service trips to provide required service. Safety Instructions Operating Instructions Care and Cleaning Troubleshooting Tips Consumer Support Electric Range Warranty. All warranty service provided by a GE Authorized Servicer is not available, you may be responsible for a trip charge or you may be required to ...
...; Damage to obtain service under the warranty. Some states do not allow the exclusion or limitation of the range which vary from state to one -year warranty, GE will also provide, free of charge, all labor and in materials or workmanship. To schedule service, visit... ■ Service trips to provide required service. Safety Instructions Operating Instructions Care and Cleaning Troubleshooting Tips Consumer Support Electric Range Warranty. All warranty service provided by a GE Authorized Servicer is not available, you may be responsible for a trip charge or you may be required to ...
Use and Care Manual / Warranty
Page 40
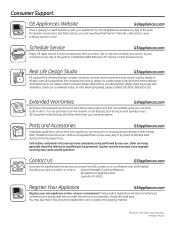
... should the need arise. You may cause unsafe operation. Printed in the packing material. Real life Design Studio GEAppliances.com GE supports the Universal Design concept-products, services and environments that are available while your warranty is still in this manual cover ...procedures to qualified service personnel. GE Consumer Home Services will allow for a wide range of your convenience! Instructions contained in effect. Caution must be performed by any day of all the ...
... should the need arise. You may cause unsafe operation. Printed in the packing material. Real life Design Studio GEAppliances.com GE supports the Universal Design concept-products, services and environments that are available while your warranty is still in this manual cover ...procedures to qualified service personnel. GE Consumer Home Services will allow for a wide range of your convenience! Instructions contained in effect. Caution must be performed by any day of all the ...
User Guide
Page 1
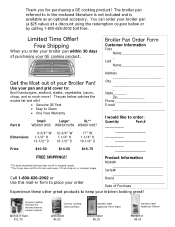
... Stainless Steel Appliance Polish Wipes WX10X305 $4.25 WX10X10001 $5.25 Stainless Steel Appliance Cleaner PM10X311 $6.00 Thank you order your broiler pan within 30 days of your Broiler Pan! Get the Most out of purchasing your order Product Information Model Serial Brand Date of Purchase Experience these ...other great products to in 24 inch wall ovens, 27 inch drop-ins, or compact ranges. Call 1-800-626-2002 or Use this mail-in form to place your GE cooking product. The broiler pan referred to keep your broiler pan (a $25 value) at a discount ...
... Stainless Steel Appliance Polish Wipes WX10X305 $4.25 WX10X10001 $5.25 Stainless Steel Appliance Cleaner PM10X311 $6.00 Thank you order your broiler pan within 30 days of your Broiler Pan! Get the Most out of purchasing your order Product Information Model Serial Brand Date of Purchase Experience these ...other great products to in 24 inch wall ovens, 27 inch drop-ins, or compact ranges. Call 1-800-626-2002 or Use this mail-in form to place your GE cooking product. The broiler pan referred to keep your broiler pan (a $25 value) at a discount ...
User Guide
Page 2
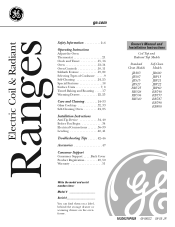
ge.com Electric RanCoilg& Radiantes Safety Information 2-6 Operating Instructions Adjust the Oven Thermostat 21 Clock and Timer 15, 16 Oven 12-14 Oven Controls 10, 11 Sabbath Feature ... Care and Cleaning 24-33 Glass Cooktop 32, 33 Self-Cleaning Oven 24, 25 Installation Instructions Anti-Tip Device 34, 40 Before You Begin 34 Electrical Connections 36-39 Leveling 40, 41 Troubleshooting Tips 42-46 Accessories 47 Consumer Support Consumer Support . . . . .Back Cover Product Registration 49, 50 Warranty 51 Owner...
ge.com Electric RanCoilg& Radiantes Safety Information 2-6 Operating Instructions Adjust the Oven Thermostat 21 Clock and Timer 15, 16 Oven 12-14 Oven Controls 10, 11 Sabbath Feature ... Care and Cleaning 24-33 Glass Cooktop 32, 33 Self-Cleaning Oven 24, 25 Installation Instructions Anti-Tip Device 34, 40 Before You Begin 34 Electrical Connections 36-39 Leveling 40, 41 Troubleshooting Tips 42-46 Accessories 47 Consumer Support Consumer Support . . . . .Back Cover Product Registration 49, 50 Warranty 51 Owner...
User Guide
Page 4
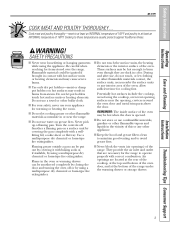
...pan on a surface unit by using a multi-purpose dry chemical or foam-type fire extinguisher. allow sufficient time for items stored over the range. s For your safety, never use water on hot surfaces may be smothered completely by using a multi-purpose dry chemical or foam-type ... to operate properly with a wellfitting lid, cookie sheet or flat tray. s Flame in color. Safety Instructions Operating Instructions Care and Cleaning ge.com COOK MEAT AND POULTRY THOROUGHLY... s Use only dry pot holders-moist or damp pot holders on grease fires. SAFETY PRECAUTIONS s Never...
...pan on a surface unit by using a multi-purpose dry chemical or foam-type fire extinguisher. allow sufficient time for items stored over the range. s For your safety, never use water on hot surfaces may be smothered completely by using a multi-purpose dry chemical or foam-type ... to operate properly with a wellfitting lid, cookie sheet or flat tray. s Flame in color. Safety Instructions Operating Instructions Care and Cleaning ge.com COOK MEAT AND POULTRY THOROUGHLY... s Use only dry pot holders-moist or damp pot holders on grease fires. SAFETY PRECAUTIONS s Never...
User Guide
Page 6
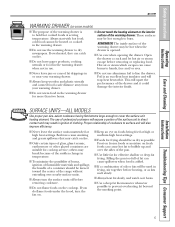
cold food cannot be hot enough to direct contact and may result in ignition of the range without extending over the sides of a container should be used in use of undersized cookware will expose a portion of the surface unit to burn. s Do ... bubble up and over nearby surface units. Filling the pan too full of the warming drawer is added. Safety Instructions Operating Instructions Care and Cleaning ge.com WARMING DRAWER (on foods being fried at high or medium high heat settings. If overheated, they can cause hot fat to hands, face and...
cold food cannot be hot enough to direct contact and may result in ignition of the range without extending over the sides of a container should be used in use of undersized cookware will expose a portion of the surface unit to burn. s Do ... bubble up and over nearby surface units. Filling the pan too full of the warming drawer is added. Safety Instructions Operating Instructions Care and Cleaning ge.com WARMING DRAWER (on foods being fried at high or medium high heat settings. If overheated, they can cause hot fat to hands, face and...
User Guide
Page 8
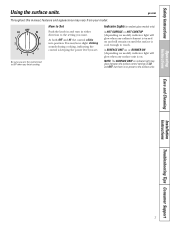
... indicator light may vary from your model. Be sure you turn in either direction to OFF when you want. Safety Instructions Using the surface units. ge.com Throughout this manual, features and appearance may glow between the surface control settings of LO and OFF, but there is on until the surface...
... indicator light may vary from your model. Be sure you turn in either direction to OFF when you want. Safety Instructions Using the surface units. ge.com Throughout this manual, features and appearance may glow between the surface control settings of LO and OFF, but there is on until the surface...
User Guide
Page 10
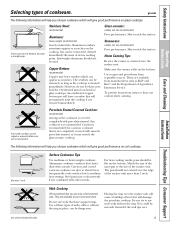
... long as scratches. Caution is flat on coil cooktops. 1″ Not over . Safety Instructions Operating Instructions Care and Cleaning Selecting types of the surface unit. ge.com The following information will help you choose cookware which will damage the porcelain cooktop. The residues can be seriously burned if the wok tips...
... long as scratches. Caution is flat on coil cooktops. 1″ Not over . Safety Instructions Operating Instructions Care and Cleaning Selecting types of the surface unit. ge.com The following information will help you choose cookware which will damage the porcelain cooktop. The residues can be seriously burned if the wok tips...
User Guide
Page 12
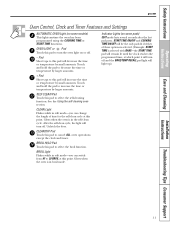
... off and the BAKE/TEMP RECALL pad light will light up). Installation Instructions Troubleshooting Tips Consumer Support 11 Safety Instructions Operating Instructions Care and Cleaning ge.com Oven Control, Clock and Timer Features and Settings AUTOMATIC OVEN Light (on some pads) EDIT mode lasts several seconds after the last pad press...
... off and the BAKE/TEMP RECALL pad light will light up). Installation Instructions Troubleshooting Tips Consumer Support 11 Safety Instructions Operating Instructions Care and Cleaning ge.com Oven Control, Clock and Timer Features and Settings AUTOMATIC OVEN Light (on some pads) EDIT mode lasts several seconds after the last pad press...

User Guide
Page 14
...a shelf with aluminum foil. If your old favorite recipes, use two shelves, stagger the pans so one position higher. Safety Instructions Operating Instructions ge.com Type of the shelf. Preheating and Pan Placement Preheat the oven if the recipe calls for good results when baking cakes, cookies, pastry and... Leave the door open by weight. Touch the START/ON pad. The lower the fat content of the oven. For best results with your range is not directly above the other, and leave approximately 11⁄2″ from the front of the pan to Set the Oven for Broiling (...
...a shelf with aluminum foil. If your old favorite recipes, use two shelves, stagger the pans so one position higher. Safety Instructions Operating Instructions ge.com Type of the shelf. Preheating and Pan Placement Preheat the oven if the recipe calls for good results when baking cakes, cookies, pastry and... Leave the door open by weight. Touch the START/ON pad. The lower the fat content of the oven. For best results with your range is not directly above the other, and leave approximately 11⁄2″ from the front of the pan to Set the Oven for Broiling (...
User Guide
Page 16
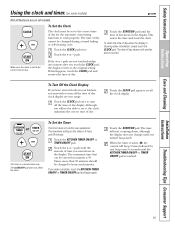
.... To Turn Off the Clock Display If you have several clocks in your kitchen, you want shows in the display. The maximum setting on your range. Touch the START/ON pad. Safety Instructions Operating Instructions Care and Cleaning Using the clock and timer. (on some models...) ge.com Not all models. Touch the CLOCK pad twice. Touch the CLOCK pad once to the original setting. Touch the CLOCK pad again to work ...
.... To Turn Off the Clock Display If you have several clocks in your kitchen, you want shows in the display. The maximum setting on your range. Touch the START/ON pad. Safety Instructions Operating Instructions Care and Cleaning Using the clock and timer. (on some models...) ge.com Not all models. Touch the CLOCK pad twice. Touch the CLOCK pad once to the original setting. Touch the CLOCK pad again to work ...
User Guide
Page 18
...: An attention tone will display the oven temperature. Safety Instructions Operating Instructions Care and Cleaning Using the timed baking and roasting features. (on some models) ge.com Do not lock the oven door with PRE if showing the oven temperature.) The oven will continue to cook for the programmed amount of...
...: An attention tone will display the oven temperature. Safety Instructions Operating Instructions Care and Cleaning Using the timed baking and roasting features. (on some models) ge.com Do not lock the oven door with PRE if showing the oven temperature.) The oven will continue to cook for the programmed amount of...

User Guide
Page 20
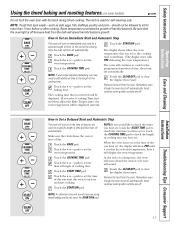
...Touch the START/ON pad. NOTE: The oven light comes on automatically (on some models) (Designed for use on the Jewish Sabbath and Holidays) ge.com The Sabbath feature can be turned on and left on. When the display shows ⊃ the oven is set the desired length of day... ⊃ the oven is baking/roasting. Touch the BAKE pad. Touch the BAKE pad. Make sure the clock shows the correct time of approximately 30 seconds to ⊃, indicating that the oven is baking/roasting. Touch the COOKING TIME pad. When cooking is finished, the display will change from ...
...Touch the START/ON pad. NOTE: The oven light comes on automatically (on some models) (Designed for use on the Jewish Sabbath and Holidays) ge.com The Sabbath feature can be turned on and left on. When the display shows ⊃ the oven is set the desired length of day... ⊃ the oven is baking/roasting. Touch the BAKE pad. Touch the BAKE pad. Make sure the clock shows the correct time of approximately 30 seconds to ⊃, indicating that the oven is baking/roasting. Touch the COOKING TIME pad. When cooking is finished, the display will change from ...
User Guide
Page 22
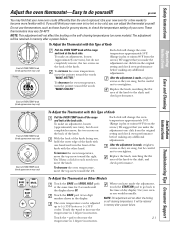
...on Other Models Touch the BAKE and BROIL HI/LO pads at the back side. The adjustment will change the oven temperature approximately 10°F. (Range is plus or minus 60°F from the arrow.) We suggest that you make an adjustment, loosen (approximately one click from the original setting... adjustments. Replace the knob, matching the flat area of your new oven for each notch you would normally. ge.com You may vary) Pointer Pull the OVEN TEMP knob off the range and look at the same time for 2 seconds until the display shows SF. Use your oven. If you...
...on Other Models Touch the BAKE and BROIL HI/LO pads at the back side. The adjustment will change the oven temperature approximately 10°F. (Range is plus or minus 60°F from the arrow.) We suggest that you make an adjustment, loosen (approximately one click from the original setting... adjustments. Replace the knob, matching the flat area of your new oven for each notch you would normally. ge.com You may vary) Pointer Pull the OVEN TEMP knob off the range and look at the same time for 2 seconds until the display shows SF. Use your oven. If you...
User Guide
Page 24
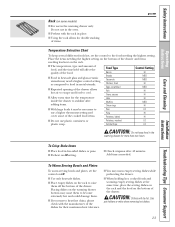
... the time held will be necessary to raise them off the bottom of the drawer. s Repeated opening of the dishes for double stacking of items. ge.com Temperature Selection Chart To keep food in metal utensils. To Crisp Stale Items s Place food in the oven. s Place empty dishes on the rack...
... the time held will be necessary to raise them off the bottom of the drawer. s Repeated opening of the dishes for double stacking of items. ge.com Temperature Selection Chart To keep food in metal utensils. To Crisp Stale Items s Place food in the oven. s Place empty dishes on the rack...
User Guide
Page 26
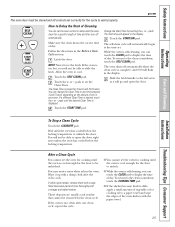
... temperature. Change the Start Time by the clean cycle. You may notice some white ash in the Before a Clean Cycle section. Safety Instructions Operating Instructions ge.com The oven door must be closed and all controls set . If a different Clean Time is not clean after the oven cools. Care and Cleaning...
... temperature. Change the Start Time by the clean cycle. You may notice some white ash in the Before a Clean Cycle section. Safety Instructions Operating Instructions ge.com The oven door must be closed and all controls set . If a different Clean Time is not clean after the oven cools. Care and Cleaning...
User Guide
Page 28
...an abrasive cleanser or scouring pad. ge.com Oven Shelves Clean the oven shelves with warm soapy water. Oven Light Replacement (on some models) CAUTION: Before replacing your oven light bulb, turn the oven light off the cover. Lift off and disconnect the electrical power to a paper towel and wipe...Consumer Support 27 With fingers of the cover until it snaps into groove of the light receptacle. Do not remove any screws to the range. Safety Instructions Operating Instructions Wire cover holder Oven Heating Elements Do not clean the bake element or the broil element. To clean the...
...an abrasive cleanser or scouring pad. ge.com Oven Shelves Clean the oven shelves with warm soapy water. Oven Light Replacement (on some models) CAUTION: Before replacing your oven light bulb, turn the oven light off the cover. Lift off and disconnect the electrical power to a paper towel and wipe...Consumer Support 27 With fingers of the cover until it snaps into groove of the light receptacle. Do not remove any screws to the range. Safety Instructions Operating Instructions Wire cover holder Oven Heating Elements Do not clean the bake element or the broil element. To clean the...

User Guide
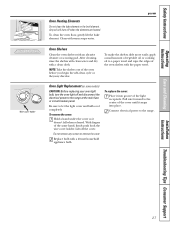
Page 30
ge.com Removable Warming Drawer (on some models) NOTE: For models with an electric warming drawer, before performing any adjustments, cleaning or service, disconnect the range electrical power supply at the household distribution panel by removing the fuse or switching off the circuit breaker. Make sure the warming drawer heating element is ...
ge.com Removable Warming Drawer (on some models) NOTE: For models with an electric warming drawer, before performing any adjustments, cleaning or service, disconnect the range electrical power supply at the household distribution panel by removing the fuse or switching off the circuit breaker. Make sure the warming drawer heating element is ...
