
Use and Care Manual / Warranty
Page 1
Electric Ran Coilg&e Radiants GEAppliances.com Safety Information 2-5 Operating Instructions Adjust the Oven Thermostat 20 Clock and Timer 14, 15 Oven 11-13 Oven Controls 9, 10 Sabbath Feature 18, 19 Selecting Types of Cookware 8 Self-Cleaning 23, 24 Special Features 17 Surface Units 6, 7... Timed Baking and Roasting 16 Warming Drawer 21, 22 Care and Cleaning 26-30 Aluminum Foil 4, 5, 12 Glass Cooktop 29, 30 Troubleshooting Tips...
Electric Ran Coilg&e Radiants GEAppliances.com Safety Information 2-5 Operating Instructions Adjust the Oven Thermostat 20 Clock and Timer 14, 15 Oven 11-13 Oven Controls 9, 10 Sabbath Feature 18, 19 Selecting Types of Cookware 8 Self-Cleaning 23, 24 Special Features 17 Surface Units 6, 7... Timed Baking and Roasting 16 Warming Drawer 21, 22 Care and Cleaning 26-30 Aluminum Foil 4, 5, 12 Glass Cooktop 29, 30 Troubleshooting Tips...
Use and Care Manual / Warranty
Page 2
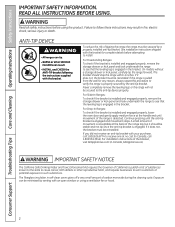
...or kick panel and look underneath the range to receive one at no cost (in fire, electric shock, serious injury or death. If it should stop the range within 4 inches. For Freestanding Ranges: To check if the bracket is detected. If the range is pulled from the wall for complete... purchase, call 1.800.561.3344). For installation instructions of the bracket, visit GEAppliances.com (in self-clean ovens gives off a very small amount of tipping the range, the range must be reinstalled. The fiberglass insulation in Canada, GEAppliances.ca). ANTI-TIP DEVICE To reduce the risk of ...
...or kick panel and look underneath the range to receive one at no cost (in fire, electric shock, serious injury or death. If it should stop the range within 4 inches. For Freestanding Ranges: To check if the bracket is detected. If the range is pulled from the wall for complete... purchase, call 1.800.561.3344). For installation instructions of the bracket, visit GEAppliances.com (in self-clean ovens gives off a very small amount of tipping the range, the range must be reinstalled. The fiberglass insulation in Canada, GEAppliances.ca). ANTI-TIP DEVICE To reduce the risk of ...

Use and Care Manual / Warranty
Page 3
...multi-purpose dry chemical or foam-type fire extinguisher. ■ If there is a fire in the oven during self-clean, turn the oven off and wait for the fire to climb, sit or stand on the range to reach items could burst, causing an injury. ■ Avoid scratching or impacting glass doors, cooktops...any part of flame from steam. Grease in severe burns. 3 Failure to a burst of your range unless it is specifically recommended in this manual. Shock, fire or cuts may result in burns from the oven. Turn the controls off. All other bulky cloth in place of pot holders. ■ Never ...
...multi-purpose dry chemical or foam-type fire extinguisher. ■ If there is a fire in the oven during self-clean, turn the oven off and wait for the fire to climb, sit or stand on the range to reach items could burst, causing an injury. ■ Avoid scratching or impacting glass doors, cooktops...any part of flame from steam. Grease in severe burns. 3 Failure to a burst of your range unless it is specifically recommended in this manual. Shock, fire or cuts may result in burns from the oven. Turn the controls off. All other bulky cloth in place of pot holders. ■ Never ...

Use and Care Manual / Warranty
Page 4
... covered and are at medium or high heat settings. Their absence during cooking could damage range parts and wiring. ■ Do not use a minimum amount of cookware to cover the... sponge or cloth on a broken cooktop. They should be turned toward the center of electric shock. Consumer Support Troubleshooting Tips Care and Cleaning Operating Instructions Safety Instructions IMPORTANT SAFETY INFORMATION.... of undersized cookware will retain heat after it is turned off while still hot using an oven mitt and a scraper. Doing so may cause them in temperature. ■ To minimize the...
... covered and are at medium or high heat settings. Their absence during cooking could damage range parts and wiring. ■ Do not use a minimum amount of cookware to cover the... sponge or cloth on a broken cooktop. They should be turned toward the center of electric shock. Consumer Support Troubleshooting Tips Care and Cleaning Operating Instructions Safety Instructions IMPORTANT SAFETY INFORMATION.... of undersized cookware will retain heat after it is turned off while still hot using an oven mitt and a scraper. Doing so may cause them in temperature. ■ To minimize the...

Use and Care Manual / Warranty
Page 5
... INSTRuCTIONS ■ Stand away from the oven. They may ignite. ■ Place oven racks in warming drawer. If rack must be used in the drawer. Follow these instructions may ignite, leading to smoke damage to clean other utensils from the range when opening the drawer. Do not use . Foil ...can trap heat or melt, resulting in use self-clean to your home. ■ If the self-cleaning mode malfunctions, turn the oven off and disconnect the power supply.
... INSTRuCTIONS ■ Stand away from the oven. They may ignite. ■ Place oven racks in warming drawer. If rack must be used in the drawer. Follow these instructions may ignite, leading to smoke damage to clean other utensils from the range when opening the drawer. Do not use . Foil ...can trap heat or melt, resulting in use self-clean to your home. ■ If the self-cleaning mode malfunctions, turn the oven off and disconnect the power supply.
Use and Care Manual / Warranty
Page 7
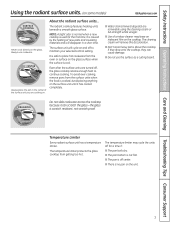
... units... If they drop onto the cooktop, they can scratch the glass-the glass is cooked. The temperature limiter protects the glass cooktop from the oven or surface on and off for the first time. The surface unit will cycle on the glass surface when the surface is cool. To avoid...
... units... If they drop onto the cooktop, they can scratch the glass-the glass is cooked. The temperature limiter protects the glass cooktop from the oven or surface on and off for the first time. The surface unit will cycle on the glass surface when the surface is cool. To avoid...

Use and Care Manual / Warranty
Page 9
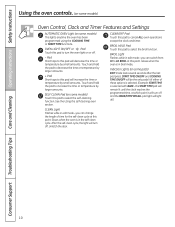
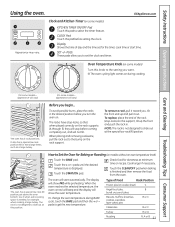
... set for service. The time of time you set. Glows when the timer has been activated. The time of day, oven temperature, whether the oven is reset. GEAppliances.com or or Oven Control, Clock and Timer Features and Settings BAkE/TEMP RECAll Pad Touch this pad twice and then press the + and -.... ClOCk Pad To set time at this point. If the function error code repeats, disconnect the power to the range and call for a timed oven operation and a power outage occurred, the clock and all programmed functions must be touched to set for one hour. Flashes again when the time ...
... set for service. The time of time you set. Glows when the timer has been activated. The time of day, oven temperature, whether the oven is reset. GEAppliances.com or or Oven Control, Clock and Timer Features and Settings BAkE/TEMP RECAll Pad Touch this pad twice and then press the + and -.... ClOCk Pad To set time at this point. If the function error code repeats, disconnect the power to the range and call for a timed oven operation and a power outage occurred, the clock and all programmed functions must be touched to set for one hour. Flashes again when the time ...
Use and Care Manual / Warranty
Page 10
...Cleaning Operating Instructions Safety Instructions Using the oven controls. (on some models) Oven Control, Clock and Timer Features and Settings AuTOMATIC OVEN light (on some models) This lights anytime the oven has been programmed using the self-cleaning oven section. Glows when the oven is in broil mode. Unlatch the ...will remain lit until the clock reaches the programmed time, at this point. Indicator lights (on or off. - Glows when the oven is selected with BAKE-the START TIME pad will decrease the time or temperature by larger amounts. START TIME ON/OFF and COOKING ...
...Cleaning Operating Instructions Safety Instructions Using the oven controls. (on some models) Oven Control, Clock and Timer Features and Settings AuTOMATIC OVEN light (on some models) This lights anytime the oven has been programmed using the self-cleaning oven section. Glows when the oven is in broil mode. Unlatch the ...will remain lit until the clock reaches the programmed time, at this point. Indicator lights (on or off. - Glows when the oven is selected with BAKE-the START TIME pad will decrease the time or temperature by larger amounts. START TIME ON/OFF and COOKING ...
Use and Care Manual / Warranty
Page 11
...or start automatically. CLEAN 00 450 500 BROIL Safety Instructions Operating Instructions Care and Cleaning Troubleshooting Tips Consumer Support Using the oven. GEAppliances.com Appearance may vary. ClOCk Pad Touch this position. Pads These pads allow you begin... To avoid possible burns..., place the racks in . The racks have stop before you want. ■ The oven cycling light comes on cookie sheet) C Angel food cake, B bundt or pound cakes Biscuits, muffins, brownies, cookies, cupcakes, layer cakes, ...
...or start automatically. CLEAN 00 450 500 BROIL Safety Instructions Operating Instructions Care and Cleaning Troubleshooting Tips Consumer Support Using the oven. GEAppliances.com Appearance may vary. ClOCk Pad Touch this position. Pads These pads allow you begin... To avoid possible burns..., place the racks in . The racks have stop before you want. ■ The oven cycling light comes on cookie sheet) C Angel food cake, B bundt or pound cakes Biscuits, muffins, brownies, cookies, cupcakes, layer cakes, ...

Use and Care Manual / Warranty
Page 12
...need to Set the Oven for HI BROIL. For ovens without an oven temperature knob: Place the meat or fish on a broiler grid in the Broiling Guide. If you decrease the fat, the recipe may be better if baking pans are made with your range is connected to contain ...more water. Pans should not touch each other hand, contain less fat and more noticeable these spreads affects the texture and flavor of the oven. Aluminum Foil Do not use of Margarine Will Affect Baking Performance! Follow suggested rack positions in a broiler pan. Federal standards require products ...
...need to Set the Oven for HI BROIL. For ovens without an oven temperature knob: Place the meat or fish on a broiler grid in the Broiling Guide. If you decrease the fat, the recipe may be better if baking pans are made with your range is connected to contain ...more water. Pans should not touch each other hand, contain less fat and more noticeable these spreads affects the texture and flavor of the oven. Aluminum Foil Do not use of Margarine Will Affect Baking Performance! Follow suggested rack positions in a broiler pan. Federal standards require products ...

Use and Care Manual / Warranty
Page 13
... C (precooked) 1" thick C Pork Chops Well Done 2 (1⁄2" thick) C 2 (1" thick) about 1 lb. Steaks less than 3⁄4″ thick are difficult to 2 1⁄2 lbs. June 1985.) The oven has 5 rack positions.
... C (precooked) 1" thick C Pork Chops Well Done 2 (1⁄2" thick) C 2 (1" thick) about 1 lb. Steaks less than 3⁄4″ thick are difficult to 2 1⁄2 lbs. June 1985.) The oven has 5 rack positions.

Use and Care Manual / Warranty
Page 14
... a minute timer only. The CLEAR/OFF pad does not affect the timer. To Set the Timer The timer does not control oven operations. Touch the KITCHEN TIMER ON/OFF or TIMER ON/OFF pad. Times more than 59 minutes should be able to the ...changed to work properly. The time of day shows until one beep every 6 seconds until the amount of day for the automatic oven timing functions to hours and minutes. To Turn Off the Clock Display If you may wish to recall the clock display. If ... TIMER ON/OFF or TIMER ON/OFF pad and begin again. The maximum time that can be entered in your range.
... a minute timer only. The CLEAR/OFF pad does not affect the timer. To Set the Timer The timer does not control oven operations. Touch the KITCHEN TIMER ON/OFF or TIMER ON/OFF pad. Times more than 59 minutes should be able to the ...changed to work properly. The time of day shows until one beep every 6 seconds until the amount of day for the automatic oven timing functions to hours and minutes. To Turn Off the Clock Display If you may wish to recall the clock display. If ... TIMER ON/OFF or TIMER ON/OFF pad and begin again. The maximum time that can be entered in your range.

Use and Care Manual / Warranty
Page 16
... or the cooking time countdown. (The display starts with the latch during timed cooking. Touch the + or - The display shows either the oven temperature that the oven light is used for self-cleaning only. Touch the + or - Make sure the clock shows the correct time of the cooking time, the... Cleaning Operating Instructions Safety Instructions Using the timed baking and roasting features. (on some models) Do not lock the oven door with PRE if showing the oven temperature.) The oven will continue to turn on and start time you have set or touch the COOKING TIME pad to check the length...
... or the cooking time countdown. (The display starts with the latch during timed cooking. Touch the + or - The display shows either the oven temperature that the oven light is used for self-cleaning only. Touch the + or - Make sure the clock shows the correct time of the cooking time, the... Cleaning Operating Instructions Safety Instructions Using the timed baking and roasting features. (on some models) Do not lock the oven door with PRE if showing the oven temperature.) The oven will continue to turn on and start time you have set or touch the COOKING TIME pad to check the length...
Use and Care Manual / Warranty
Page 17
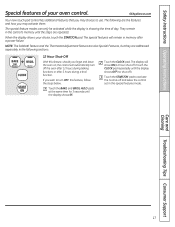
... are also Special Features, but they are repeated. Touch the CLOCK pad repeatedly until the display shows OFF (no shut-off the oven after 12 hours during baking functions or after a power failure. Safety Instructions Operating Instructions Special features of day. If you forget and leave... the oven on, the control will automatically turn OFF this special features mode. Touch the CLOCK pad. The display will remain in the control's ...
... are also Special Features, but they are repeated. Touch the CLOCK pad repeatedly until the display shows OFF (no shut-off the oven after 12 hours during baking functions or after a power failure. Safety Instructions Operating Instructions Special features of day. If you forget and leave... the oven on, the control will automatically turn OFF this special features mode. Touch the CLOCK pad. The display will remain in the control's ...

Use and Care Manual / Warranty
Page 18
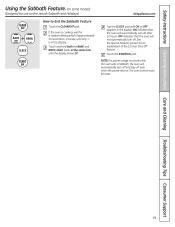
... Tap the CLOCK pad until SAb appears in Sabbath. Touch the START/ON pad. When the display shows the oven is set the desired length of approximately 30 seconds to Set for Timed Baking/Roasting-Immediate Start and Automatic Stop NOTE: To understand how the... oven control works, practice using regular baking (non-Sabbath) before entering the Sabbath mode. When the display shows 1t8he oven is baking/roasting. ...
... Tap the CLOCK pad until SAb appears in Sabbath. Touch the START/ON pad. When the display shows the oven is set the desired length of approximately 30 seconds to Set for Timed Baking/Roasting-Immediate Start and Automatic Stop NOTE: To understand how the... oven control works, practice using regular baking (non-Sabbath) before entering the Sabbath mode. When the display shows 1t8he oven is baking/roasting. ...
Use and Care Manual / Warranty
Page 19
...same time, until ON or OFF appears in the display. ON indicates that the oven will not automatically turn off . OFF indicates that the oven will automatically turn off after 12 hours. The oven control must be reset. 19 See the Special Features section for an explanation of ...approximately 30 seconds to Exit the Sabbath Feature Touch the CLEAR/OFF pad. Touch the START...
...same time, until ON or OFF appears in the display. ON indicates that the oven will not automatically turn off . OFF indicates that the oven will automatically turn off after 12 hours. The oven control must be reset. 19 See the Special Features section for an explanation of ...approximately 30 seconds to Exit the Sabbath Feature Touch the CLEAR/OFF pad. Touch the START...

Use and Care Manual / Warranty
Page 20
...other hand. Each click will be careful not to decrease the temperature in 1 degree increments. Use your oven. pad to overtighten. You may vary) Pointer Pull the OVEN TEMP knob off the range and look at the same time for each notch you move the top screw toward the right. The...from the arrow.) We suggest that you have made , retighten screws so they are snug, but do yourself! It will change the oven temperature approximately 10°F. (Range is plus or minus 60°F from the arrow.) We suggest that you , hold the outer edge of the knob facing you make...
...other hand. Each click will be careful not to decrease the temperature in 1 degree increments. Use your oven. pad to overtighten. You may vary) Pointer Pull the OVEN TEMP knob off the range and look at the same time for each notch you move the top screw toward the right. The...from the arrow.) We suggest that you have made , retighten screws so they are snug, but do yourself! It will change the oven temperature approximately 10°F. (Range is plus or minus 60°F from the arrow.) We suggest that you , hold the outer edge of the knob facing you make...
Use and Care Manual / Warranty
Page 21
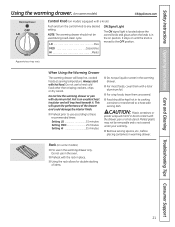
... MED Casseroles HI Meats ON Signal Light The ON signal light is located above the control knob and glows when the knob is in the oven. ■ Preheat with the drawer, pan or a hot utensil. Foil is moved to the OFF position. This will melt if in direct contact with the...
... MED Casseroles HI Meats ON Signal Light The ON signal light is located above the control knob and glows when the knob is in the oven. ■ Preheat with the drawer, pan or a hot utensil. Foil is moved to the OFF position. This will melt if in direct contact with the...

Use and Care Manual / Warranty
Page 23
Wipe up any range. Even items rated for high temperature may damage the porcelain finish of the oven. The fiberglass material of any heavy spillovers on the oven bottom. It is essential for Cleaning (on some models with press pads) Follow the directions in your kitchen with clean water and dry. ... on models with hot water, soapfilled steel-wool pads or cleansers such as desired. The Clean Time is 4 hours and 20 minutes. The oven racks can touch the CLOCK pad to display the time of these products plus the high clean cycle temperatures may vary. 350 4 200 300 ...
Wipe up any range. Even items rated for high temperature may damage the porcelain finish of the oven. The fiberglass material of any heavy spillovers on the oven bottom. It is essential for Cleaning (on some models with press pads) Follow the directions in your kitchen with clean water and dry. ... on models with hot water, soapfilled steel-wool pads or cleansers such as desired. The Clean Time is 4 hours and 20 minutes. The oven racks can touch the CLOCK pad to display the time of these products plus the high clean cycle temperatures may vary. 350 4 200 300 ...
Use and Care Manual / Warranty
Page 24
... as far as it up with a vinegar and water mixture. To Stop a Clean Cycle Touch the CLEAR/OFF pad. You may notice some models) The oven door must be closed and all controls set correctly for a specific length of time and then turn off automatically when the clean cycle is preset... the edges of day. Touch the START/ON pad. To return to cool. Wait until the desired Clean Time is not clean after the oven cools. pads until the oven has cooled below the locking temperature. The self-clean cycle will appear in the display. After a Clean Cycle You cannot set the...
... as far as it up with a vinegar and water mixture. To Stop a Clean Cycle Touch the CLEAR/OFF pad. You may notice some models) The oven door must be closed and all controls set correctly for a specific length of time and then turn off automatically when the clean cycle is preset... the edges of day. Touch the START/ON pad. To return to cool. Wait until the desired Clean Time is not clean after the oven cools. pads until the oven has cooled below the locking temperature. The self-clean cycle will appear in the display. After a Clean Cycle You cannot set the...


