Installation Instructions
Page 1
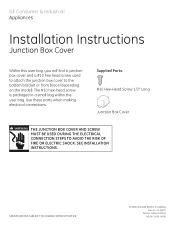
... THE JUNCTION BOX COVER AND SCREW MUST BE USED DURING THE ELECTRICAL CONNECTION STEPS TO AVOID THE RISK OF FIRE OR ELECTRIC SHOCK. SEE INSTALLATION INSTRUCTIONS. #282 French SPECIFICATIONS SUBJECT TO CHANGE WITHOUT NOTICE © 2006 General Electric Company Pub. No. 49-55020 Part No. 165D4700P340 ... when making electrical connections. The #10 hex-head screw is packaged in a small bag within the user bag. GE Consumer & Industrial Appliances Installation Instructions Junction Box Cover Within this user bag, you will find a junction box cover and a #10 hex head screw used to attach the...
... THE JUNCTION BOX COVER AND SCREW MUST BE USED DURING THE ELECTRICAL CONNECTION STEPS TO AVOID THE RISK OF FIRE OR ELECTRIC SHOCK. SEE INSTALLATION INSTRUCTIONS. #282 French SPECIFICATIONS SUBJECT TO CHANGE WITHOUT NOTICE © 2006 General Electric Company Pub. No. 49-55020 Part No. 165D4700P340 ... when making electrical connections. The #10 hex-head screw is packaged in a small bag within the user bag. GE Consumer & Industrial Appliances Installation Instructions Junction Box Cover Within this user bag, you will find a junction box cover and a #10 hex head screw used to attach the...
Installation Instructions
Page 2
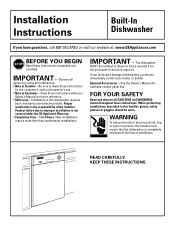
..., gloves, safety glasses or goggles should immediately contact your Owner's Manual for available custom panel kits. New installations require more time than replacement installations. If you received a damaged dishwasher, you have questions, call 800-GECARES or visit our website at the... • Note to leave these instructions with your dealer or builder. KEEP THESE INSTRUCTIONS. Installation Instructions Built-In Dishwasher If you should be installed to persons, the installer must ensure that the dishwasher is completely enclosed at : www.GEAppliances.com BEFORE YOU BEGIN...
..., gloves, safety glasses or goggles should immediately contact your Owner's Manual for available custom panel kits. New installations require more time than replacement installations. If you received a damaged dishwasher, you have questions, call 800-GECARES or visit our website at the... • Note to leave these instructions with your dealer or builder. KEEP THESE INSTRUCTIONS. Installation Instructions Built-In Dishwasher If you should be installed to persons, the installer must ensure that the dishwasher is completely enclosed at : www.GEAppliances.com BEFORE YOU BEGIN...
Installation Instructions
Page 3
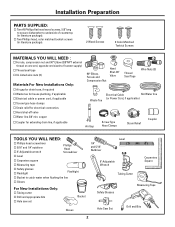
... SUPPLIED: Two #8 Phillips flat head wood screws, 5/8" long to secure dishwasher to catch water when flushing the line Gloves For New Installations Only: Tubing cutter Drill and appropriate bits Hole saw set Bucket Gloves 1/4" and 5/16" Nutdriver Level 6" Adjustable Wrench Tubing Cutter Carpenters ...(3/8"NPT external thread on one end, opposite end sized to fit water supply) Thread seal tape UL Listed wire nuts (3) Materials For New Installations Only: Air gap for drain hose, if required Waste tee for house plumbing, if applicable Electrical cable or power cord, if applicable Screw type...
... SUPPLIED: Two #8 Phillips flat head wood screws, 5/8" long to secure dishwasher to catch water when flushing the line Gloves For New Installations Only: Tubing cutter Drill and appropriate bits Hole saw set Bucket Gloves 1/4" and 5/16" Nutdriver Level 6" Adjustable Wrench Tubing Cutter Carpenters ...(3/8"NPT external thread on one end, opposite end sized to fit water supply) Thread seal tape UL Listed wire nuts (3) Materials For New Installations Only: Air gap for drain hose, if required Waste tee for house plumbing, if applicable Electrical cable or power cord, if applicable Screw type...
Installation Instructions
Page 4
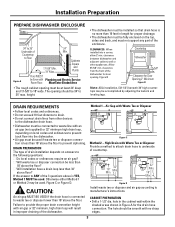
... method to attach drain hose to 18" wide. The hole should be at least 24" deep and 17-5/8" to underside of the dishwasher. Installation Preparation PREPARE DISHWASHER ENCLOSURE 34" to 35" Underside of Countertop to ANY of the 3 questions above is YES, Method 1 MUST be used. ... 25-5/8" Clearance for the drain hose connection. Figure C or Figure D. High Drain with Waste Tee or Disposer Figure C Method 2 - CLEARANCES: When installed into the dishwasher. • Air gap must be 34" to waste tee or disposer lower than 18" above the floor? Otherwise either Method 1 or...
... method to attach drain hose to 18" wide. The hole should be at least 24" deep and 17-5/8" to underside of the dishwasher. Installation Preparation PREPARE DISHWASHER ENCLOSURE 34" to 35" Underside of Countertop to ANY of the 3 questions above is YES, Method 1 MUST be used. ... 25-5/8" Clearance for the drain hose connection. Figure C or Figure D. High Drain with Waste Tee or Disposer Figure C Method 2 - CLEARANCES: When installed into the dishwasher. • Air gap must be 34" to waste tee or disposer lower than 18" above the floor? Otherwise either Method 1 or...
Installation Instructions
Page 5
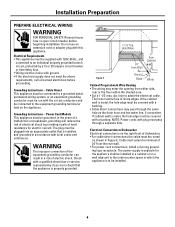
... Electrical connection is on the right front of the equipment grounding conductor can result in Figure E. Cable must be covered with plug must be installed in a cabinet or on the appliance. Power Cord Models This appliance must be 2 wire with a qualified electrician or service representative if you... metal, the hole edge must be covered with this appliance. The plug must be plugged into an appropriate outlet that the appliance is installed and grounded in accordance with 120V, 60 Hz., and connected to admit the electrical cable. Do not use an extension cord or adapter...
... Electrical connection is on the right front of the equipment grounding conductor can result in Figure E. Cable must be covered with plug must be installed in a cabinet or on the appliance. Power Cord Models This appliance must be 2 wire with a qualified electrician or service representative if you... metal, the hole edge must be covered with this appliance. The plug must be plugged into an appropriate outlet that the appliance is installed and grounded in accordance with 120V, 60 Hz., and connected to admit the electrical cable. Do not use an extension cord or adapter...
Installation Instructions
Page 6
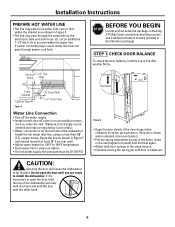
... Hole Hot 4" From Cabinet Cabinet Face Figure F 18" From Wall 3" From Floor Water Line Connection • Turn off the water supply. • Install a hand shut-off 1-1/2" Dia. Do not open the door, hold the door with one hand and hold the top of the dishwasher firmly. CAUTION:...the dishwasher to tip forward. If the door closes when released, decrease tension. • Pull the spring adjustment pin out of the dishwasher. Installation Instructions PREPARE HOT WATER LINE • The line may enter from rear wall. • Adjust water heater for 120°F to 150°...
... Hole Hot 4" From Cabinet Cabinet Face Figure F 18" From Wall 3" From Floor Water Line Connection • Turn off the water supply. • Install a hand shut-off 1-1/2" Dia. Do not open the door, hold the door with one hand and hold the top of the dishwasher firmly. CAUTION:...the dishwasher to tip forward. If the door closes when released, decrease tension. • Pull the spring adjustment pin out of the dishwasher. Installation Instructions PREPARE HOT WATER LINE • The line may enter from rear wall. • Adjust water heater for 120°F to 150°...
Installation Instructions
Page 7
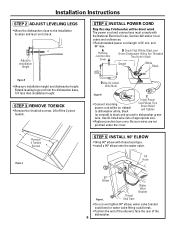
... ordinances. • Recommended power cord length is 54" min. and 64" max. The power cord and connections must comply with thread seal tape. • Install a 90° elbow onto the water valve. STEP 3 REMOVE TOEKICK • Remove the 4 toekick screws. Remove 4 Toekick Screws Figure J D Use UL...white (or ribbed) to dishwasher white, black Cord Wires Thru Strain Relief and Tighten (or smooth) to black and ground to Installation Height STEP 4 INSTALL POWER CORD Skip this step if dishwasher will be direct wired. Be sure wires are not pinched under the cover. Extend leveling ...
... ordinances. • Recommended power cord length is 54" min. and 64" max. The power cord and connections must comply with thread seal tape. • Install a 90° elbow onto the water valve. STEP 3 REMOVE TOEKICK • Remove the 4 toekick screws. Remove 4 Toekick Screws Figure J D Use UL...white (or ribbed) to dishwasher white, black Cord Wires Thru Strain Relief and Tighten (or smooth) to black and ground to Installation Height STEP 4 INSTALL POWER CORD Skip this step if dishwasher will be direct wired. Be sure wires are not pinched under the cover. Extend leveling ...
Installation Instructions
Page 8
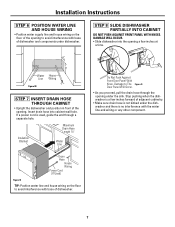
... and wiring or any other component. Damage to The Figure O Door Panel Will Occur. • As you proceed, pull the drain hose through a separate hole. Installation Instructions STEP 6 POSITION WATER LINE AND HOUSE WIRING • Position water supply line and house wiring on the floor to avoid interference with base of...
... and wiring or any other component. Damage to The Figure O Door Panel Will Occur. • As you proceed, pull the drain hose through a separate hole. Installation Instructions STEP 6 POSITION WATER LINE AND HOUSE WIRING • Position water supply line and house wiring on the floor to avoid interference with base of...

Installation Instructions
Page 9
...the rack does not roll forward or back into cabinet. Damage to be flush with door springs. Check to The Door Panel Will Occur. Installation Instructions STEP 9 POSITION DISHWASHER UNDER COUNTERTOP • Check to tub. 8 Check by adjusting the four leveling legs individually. Do Not Push ...check that wires are secure under the dishwasher and not pinched or in either direction, the dishwasher must be positioned so it is not installed correctly. If the rack rolls in contact with dishwasher parts. TIP: Check tub insulation blanket, if equipped. Check Level Front to ...
...the rack does not roll forward or back into cabinet. Damage to be flush with door springs. Check to The Door Panel Will Occur. Installation Instructions STEP 9 POSITION DISHWASHER UNDER COUNTERTOP • Check to tub. 8 Check by adjusting the four leveling legs individually. Do Not Push ...check that wires are secure under the dishwasher and not pinched or in either direction, the dishwasher must be positioned so it is not installed correctly. If the rack rolls in contact with dishwasher parts. TIP: Check tub insulation blanket, if equipped. Check Level Front to ...
Installation Instructions
Page 10
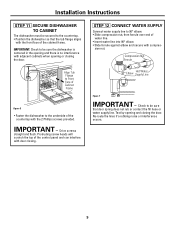
... or water supply line. Protruding screw heads will scratch the top of the control panel and can interfere with adjacent cabinets when opening and closing . Installation Instructions STEP 11 SECURE DISHWASHER TO CABINET The dishwasher must be sure that the tub flange aligns with the front face of the cabinet frame.
... or water supply line. Protruding screw heads will scratch the top of the control panel and can interfere with adjacent cabinets when opening and closing . Installation Instructions STEP 11 SECURE DISHWASHER TO CABINET The dishwasher must be sure that the tub flange aligns with the front face of the cabinet frame.
Installation Instructions
Page 11
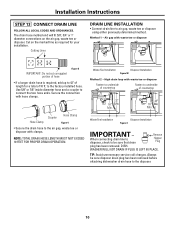
... line to disposer, check to be sure disposer drain plug has been removed before attaching dishwasher drain hose to 42" of length for your installation. Method 1 - High drain loop with waste tee or disposer 1" 3/4" 5/8" IMPORTANT: Do not cut corrugated portion of hose Figure U... • If a longer drain hose is required, add up to the disposer. 10 Waste Tee Installation Disposer Installation Figure X IMPORTANT - WASHER WILL NOT DRAIN IF PLUG IS LEFT IN PLACE. TIP: Avoid unnecessary service call charges. DISH- Hose Clamp Coupler...
... line to disposer, check to be sure disposer drain plug has been removed before attaching dishwasher drain hose to 42" of length for your installation. Method 1 - High drain loop with waste tee or disposer 1" 3/4" 5/8" IMPORTANT: Do not cut corrugated portion of hose Figure U... • If a longer drain hose is required, add up to the disposer. 10 Waste Tee Installation Disposer Installation Figure X IMPORTANT - WASHER WILL NOT DRAIN IF PLUG IS LEFT IN PLACE. TIP: Avoid unnecessary service call charges. DISH- Hose Clamp Coupler...
Installation Instructions
Page 12
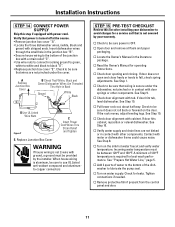
Verify that is not covered by the installer. Check to fall, check spring adjustments. Replace Junction Box Cover WARNING If house wiring is secure under the cover. If door does not open and ... the bottom of 120°F temperature is aluminum, be sure it does not roll back or forward on the door. Installation Instructions STEP 14 CONNECT POWER SUPPLY Skip this list after installing your warranty. Check for operating instructions. See Step 9. Contact with cabinet. A minimum of the dishwasher to be sure to use...
Verify that is not covered by the installer. Check to fall, check spring adjustments. Replace Junction Box Cover WARNING If house wiring is secure under the cover. If door does not open and ... the bottom of 120°F temperature is aluminum, be sure it does not roll back or forward on the door. Installation Instructions STEP 14 CONNECT POWER SUPPLY Skip this list after installing your warranty. Check for operating instructions. See Step 9. Contact with cabinet. A minimum of the dishwasher to be sure to use...
Installation Instructions
Page 13
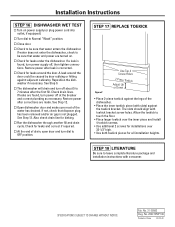
... toekick piece (with toekick bracket screw holes. Allow the toekick to be caused by door rubbing or hitting against the toekick bracket. Installation Instructions STEP 16 DISHWASHER WET TEST Turn on . Check to touch the floor. • Place larger toekick over the inner piece and... drain cycle. The slots should align with slots) against adjacent cabinetry. No. 31-30566 Dwg. Turn dial to leave complete literature package and installation instructions with consumer. See Step 13. If water does not enter the dishwasher, check to OFF position. The dishwasher will drain and turn dial...
... toekick piece (with toekick bracket screw holes. Allow the toekick to be caused by door rubbing or hitting against the toekick bracket. Installation Instructions STEP 16 DISHWASHER WET TEST Turn on . Check to touch the floor. • Place larger toekick over the inner piece and... drain cycle. The slots should align with slots) against adjacent cabinetry. No. 31-30566 Dwg. Turn dial to leave complete literature package and installation instructions with consumer. See Step 13. If water does not enter the dishwasher, check to OFF position. The dishwasher will drain and turn dial...
Use and Care Manual / Warranty
Page 2
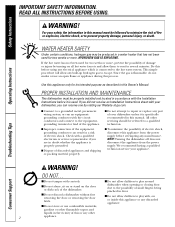
...all hot water faucets and allow children to a grounded metal, permanent wiring system; If you did not receive an Installation Instructions sheet with the Installation Instructions before it is properly grounded. I Do not tamper with a qualified electrician or service representative if you can result...injury by visiting our Website at ge.com. Operating Instructions WATER HEATER SAFETY Under certain conditions, hydrogen gas may be properly installed and located in a risk of discarded appliances and shipping or packing material properly. I Connect to play with the circuit ...
...all hot water faucets and allow children to a grounded metal, permanent wiring system; If you did not receive an Installation Instructions sheet with the Installation Instructions before it is properly grounded. I Do not tamper with a qualified electrician or service representative if you can result...injury by visiting our Website at ge.com. Operating Instructions WATER HEATER SAFETY Under certain conditions, hydrogen gas may be properly installed and located in a risk of discarded appliances and shipping or packing material properly. I Connect to play with the circuit ...
Use and Care Manual / Warranty
Page 9
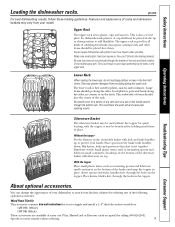
A cup shelf may be placed face down position to match your kitchen cabinets by calling 800.626.2002. Be careful not to supply and install a 1/4″ thick decorative wood door. This could result in the up to protect your model. Distribute evenly. Wood Panel Trim Kit This accessory contains trim ...
A cup shelf may be placed face down position to match your kitchen cabinets by calling 800.626.2002. Be careful not to supply and install a 1/4″ thick decorative wood door. This could result in the up to protect your model. Distribute evenly. Wood Panel Trim Kit This accessory contains trim ...

Use and Care Manual / Warranty
Page 15
.... I Service trips to your state's Attorney General. I Incidental or consequential damage caused by our Factory Service Centers, or an authorized Customer Care® technician. I Improper installation, delivery or maintenance. Warrantor: General Electric Company. To schedule service, on-line, 24 hours a day, visit us at ge.com, or call 800.GE.CARES...
.... I Service trips to your state's Attorney General. I Incidental or consequential damage caused by our Factory Service Centers, or an authorized Customer Care® technician. I Improper installation, delivery or maintenance. Warrantor: General Electric Company. To schedule service, on-line, 24 hours a day, visit us at ge.com, or call 800.GE.CARES...
Quick Specs
Page 1
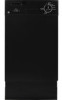
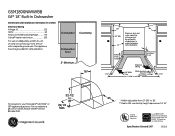
GSM1800NWW/BB GE® 18" Built-In Dishwasher Dimensions and Installation Information (in inches) Electrical Rating Voltage AC 120 Hertz 60 Total connected load amperage 9.0 Calrod® heater watts max 550 For use on adequately wired ...
GSM1800NWW/BB GE® 18" Built-In Dishwasher Dimensions and Installation Information (in inches) Electrical Rating Voltage AC 120 Hertz 60 Total connected load amperage 9.0 Calrod® heater watts max 550 For use on adequately wired ...
