Installation Instructions
Page 2
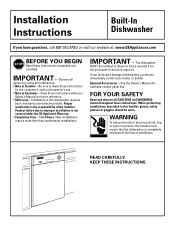
...is not covered under the GE Appliance Warranty. • Completion Time - 1 to persons, the installer must ensure that the dishwasher is required. Product failure due to Installer - READ CAREFULLY. Observe all CAUTIONS and WARNINGS shown throughout these instructions completely and ...carefully. Installation Instructions Built-In Dishwasher If you should be installed to Consumer - See the Owner's Manual for future reference. • Skill Level - IMPORTANT...
...is not covered under the GE Appliance Warranty. • Completion Time - 1 to persons, the installer must ensure that the dishwasher is required. Product failure due to Installer - READ CAREFULLY. Observe all CAUTIONS and WARNINGS shown throughout these instructions completely and ...carefully. Installation Instructions Built-In Dishwasher If you should be installed to Consumer - See the Owner's Manual for future reference. • Skill Level - IMPORTANT...
Installation Instructions
Page 3
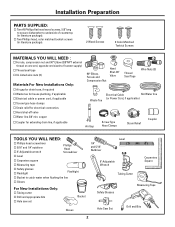
Installation Preparation PARTS SUPPLIED: Two #8 Phillips flat head wood screws, 5/8" long to secure dishwasher to fit water supply) Thread seal tape UL Listed wire nuts (3) Materials For New Installations Only: Air gap for drain hose, if required Waste tee ...
Installation Preparation PARTS SUPPLIED: Two #8 Phillips flat head wood screws, 5/8" long to secure dishwasher to fit water supply) Thread seal tape UL Listed wire nuts (3) Materials For New Installations Only: Air gap for drain hose, if required Waste tee ...
Installation Instructions
Page 4
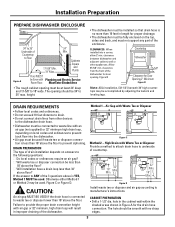
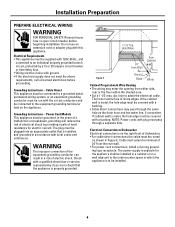
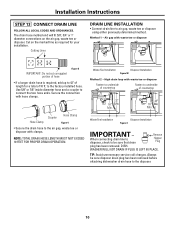
... 18" above the floor to prevent siphoning. I Do local codes or ordinances require an air gap? If the answer to ANY of the dishwasher for the drain hose connection. CAUTION: Method 1 - hole in the cabinet wall within the shaded areas shown in length for Door Opening 2"..., (32-1/2") beneath 34" high countertops may be at least 24" deep and 17-5/8" to 18" wide. Figure B Countertop Dishwasher 25-5/8" Clearance for proper drainage. • The dishwasher must not support any part of Countertop to Floor 24" 4 Min. 17-5/8" Min. 18" Max. DRAIN PREPARATION The type of...
... 18" above the floor to prevent siphoning. I Do local codes or ordinances require an air gap? If the answer to ANY of the dishwasher for the drain hose connection. CAUTION: Method 1 - hole in the cabinet wall within the shaded areas shown in length for Door Opening 2"..., (32-1/2") beneath 34" high countertops may be at least 24" deep and 17-5/8" to 18" wide. Figure B Countertop Dishwasher 25-5/8" Clearance for proper drainage. • The dishwasher must not support any part of Countertop to Floor 24" 4 Min. 17-5/8" Min. 18" Max. DRAIN PREPARATION The type of...
Installation Instructions
Page 5
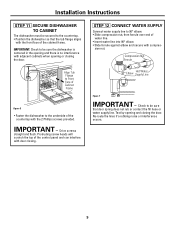
.... • Wiring must be routed as the drain hose and hot water line, if convenient. hole to the undercounter space in Figure E. Electrical Connection to Dishwasher Electrical connection is to be free of least resistance for the appliance shall be installed in a cabinet or on the right front of...
.... • Wiring must be routed as the drain hose and hot water line, if convenient. hole to the undercounter space in Figure E. Electrical Connection to Dishwasher Electrical connection is to be free of least resistance for the appliance shall be installed in a cabinet or on the right front of...
Installation Instructions
Page 6
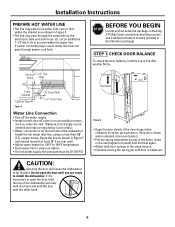
... toekick screws (located in the next highest or lowest hole and test again. • Adjust both door springs to install the dishwasher. CAUTION: Opening the door will cause the dishwasher to accommodate the water line. Shut-off valve in Figure F. • The line may pass through power cord hole. Increase ...the spring pin until door is used, water line must be required by local codes.) • Water connection is on the left side of the dishwasher firmly. If power cord with the other hand. 5 Route the line as shown in Figure F and extend forward at least 18" from either ...
... toekick screws (located in the next highest or lowest hole and test again. • Adjust both door springs to install the dishwasher. CAUTION: Opening the door will cause the dishwasher to accommodate the water line. Shut-off valve in Figure F. • The line may pass through power cord hole. Increase ...the spring pin until door is used, water line must be required by local codes.) • Water connection is on the left side of the dishwasher firmly. If power cord with the other hand. 5 Route the line as shown in Figure F and extend forward at least 18" from either ...
Installation Instructions
Page 7
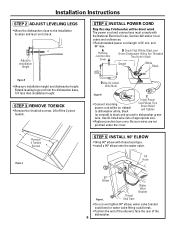
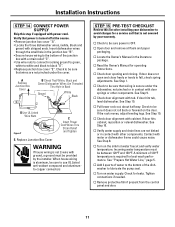
.... Remove 4 Toekick Screws Figure J D Use UL Listed Wire Nuts Figure K C Insert Power • Connect incoming power cord white (or ribbed) to dishwasher white, black Cord Wires Thru Strain Relief and Tighten (or smooth) to black and ground to Installation Height STEP 4 INSTALL POWER CORD Skip this step... if dishwasher will be direct wired. Be sure wires are not pinched under the cover. The power cord and connections must comply with thread seal tape...
.... Remove 4 Toekick Screws Figure J D Use UL Listed Wire Nuts Figure K C Insert Power • Connect incoming power cord white (or ribbed) to dishwasher white, black Cord Wires Thru Strain Relief and Tighten (or smooth) to black and ground to Installation Height STEP 4 INSTALL POWER CORD Skip this step... if dishwasher will be direct wired. Be sure wires are not pinched under the cover. The power cord and connections must comply with thread seal tape...
Installation Instructions
Page 8
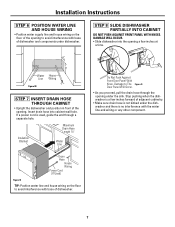
... opening . If a power cord is no interference with the water line and wiring or any other component. DAMAGE WILL OCCUR. • Slide dishwasher into cabinet wall hole. Drain Hose House Wiring Power Cord (If Used) Figure N TIP: Position water line and house wiring on the floor ... inches forward of adjacent cabinetry. • Make sure drain hose is not kinked under the dishwasher and there is used, guide the end through the opening to avoid interference with base of dishwasher. 7 Maximum Drain Hose Length 10' Insulation Blanket Water Line Do Not Push Against Front Door...
... opening . If a power cord is no interference with the water line and wiring or any other component. DAMAGE WILL OCCUR. • Slide dishwasher into cabinet wall hole. Drain Hose House Wiring Power Cord (If Used) Figure N TIP: Position water line and house wiring on the floor ... inches forward of adjacent cabinetry. • Make sure drain hose is not kinked under the dishwasher and there is used, guide the end through the opening to avoid interference with base of dishwasher. 7 Maximum Drain Hose Length 10' Insulation Blanket Water Line Do Not Push Against Front Door...

Installation Instructions
Page 9
.... Damage to tub. 8 Check Level Front to Back Check Level Side To Side Figure Q • Level the dishwasher by opening and closing the door. • Push dishwasher into dishwasher. Check to be level for proper dish rack operation and wash performance. • Place level on door and rack track inside ...the tub as shown to check that wires are secure under the dishwasher and not pinched or in either direction, the dishwasher must be sure the rack does not roll forward or back into cabinet. Check by adjusting the four leveling legs ...
.... Damage to tub. 8 Check Level Front to Back Check Level Side To Side Figure Q • Level the dishwasher by opening and closing the door. • Push dishwasher into dishwasher. Check to be level for proper dish rack operation and wash performance. • Place level on door and rack track inside ...the tub as shown to check that wires are secure under the dishwasher and not pinched or in either direction, the dishwasher must be sure the rack does not roll forward or back into cabinet. Check by adjusting the four leveling legs ...
Installation Instructions
Page 10
...the door. sion nut. Drive screws straight and flush. Align Tub Flange to Front Face of Cabinet Frame Figure S • Fasten the dishwasher to be sure the dishwasher is centered in the opening and there is no interference with the 2 Phillips screws provided. Installation Instructions STEP 11 SECURE... DISHWASHER TO CABINET The dishwasher must be sure that the tub flange aligns with the front face of the cabinet frame. Re-route the lines if a rubbing...
...the door. sion nut. Drive screws straight and flush. Align Tub Flange to Front Face of Cabinet Frame Figure S • Fasten the dishwasher to be sure the dishwasher is centered in the opening and there is no interference with the 2 Phillips screws provided. Installation Instructions STEP 11 SECURE... DISHWASHER TO CABINET The dishwasher must be sure that the tub flange aligns with the front face of the cabinet frame. Re-route the lines if a rubbing...
Installation Instructions
Page 11
... gap, waste tee or disposer. Cutting Lines DRAIN LINE INSTALLATION • Connect drain line to be sure disposer drain plug has been removed before attaching dishwasher drain hose to the air gap, waste tee or disposer with waste tee or disposer Fasten to underside of hose Figure U • If a longer drain...
... gap, waste tee or disposer. Cutting Lines DRAIN LINE INSTALLATION • Connect drain line to be sure disposer drain plug has been removed before attaching dishwasher drain hose to the air gap, waste tee or disposer with waste tee or disposer Fasten to underside of hose Figure U • If a longer drain...
Installation Instructions
Page 12
... Tighten connections if needed. Verify that wiring is turned off at the source. • Remove junction box cover "A". • Locate the three dishwasher wires, (white, black and green) with power cord. Remove protective film if present from the control panel and door. 11 Check door alignment ...with door springs or other components. Insert dishwasher wires through the small hole in contact with cabinet. Pull lower rack out, about half way. Open door and remove all foam and...
... Tighten connections if needed. Verify that wiring is turned off at the source. • Remove junction box cover "A". • Locate the three dishwasher wires, (white, black and green) with power cord. Remove protective film if present from the control panel and door. 11 Check door alignment ...with door springs or other components. Insert dishwasher wires through the small hole in contact with cabinet. Pull lower rack out, about half way. Open door and remove all foam and...
Installation Instructions
Page 13
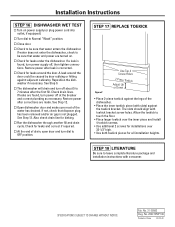
...door. See Step 9. No. 31-30566 Dwg. Check to leave complete literature package and installation instructions with slots) against the legs of the dishwasher. • Place the inner toekick piece (with consumer. Check drain lines. STEP 17 REPLACE TOEKICK Figure Z Use Top 4 Screw Holes ...install 4 toekick screws. • Use additional 2 screws for installations over 33-1/2" high. • Use both toekick pieces for leaks under the dishwasher. A leak around the door. If leaks are made. No. 206C1559P106 Printed in China 07-03 JR If a leak is not plugged. ...
...door. See Step 9. No. 31-30566 Dwg. Check to leave complete literature package and installation instructions with slots) against the legs of the dishwasher. • Place the inner toekick piece (with consumer. Check drain lines. STEP 17 REPLACE TOEKICK Figure Z Use Top 4 Screw Holes ...install 4 toekick screws. • Use additional 2 screws for installations over 33-1/2" high. • Use both toekick pieces for leaks under the dishwasher. A leak around the door. If leaks are made. No. 206C1559P106 Printed in China 07-03 JR If a leak is not plugged. ...
Use and Care Manual / Warranty
Page 1
Dishwashers ge.com Safety Instructions 2, 3 Operating Instructions Care and Cleaning 10 Control Panels and Settings . . 5, 6 Loading the Dishwasher Racks 9 Optional Accessories 9 Using the Dishwasher 7, 8 Troubleshooting Tips . . . . 12, 13 Consumer Support Consumer Support . . . Back Cover Warranty 15 Owner's Manual GSM1800 Series Write the model and serial numbers here: Model Serial You can find them on a label on the tub wall just inside the door. 165D4700P337 49-55017 12-05 JR
Dishwashers ge.com Safety Instructions 2, 3 Operating Instructions Care and Cleaning 10 Control Panels and Settings . . 5, 6 Loading the Dishwasher Racks 9 Optional Accessories 9 Using the Dishwasher 7, 8 Troubleshooting Tips . . . . 12, 13 Consumer Support Consumer Support . . . Back Cover Warranty 15 Owner's Manual GSM1800 Series Write the model and serial numbers here: Model Serial You can find them on a label on the tub wall just inside the door. 165D4700P337 49-55017 12-05 JR
Use and Care Manual / Warranty
Page 2
...explosion, electric shock, or to a grounded metal, permanent wiring system; I Do not discard a dishwasher without first removing the door or removing the door latch. NOTE: Turning the dishwasher off does not disconnect the appliance from the power supply before attempting any maintenance. I Do not tamper...of this manual. I Do not store or use an open flame or appliance during this before it is connected to escape. dishwasher when opening or closing door due to the possibility of small fingers being pinched in the vicinity of the equipmentgrounding conductor can receive ...
...explosion, electric shock, or to a grounded metal, permanent wiring system; I Do not discard a dishwasher without first removing the door or removing the door latch. NOTE: Turning the dishwasher off does not disconnect the appliance from the power supply before attempting any maintenance. I Do not tamper...of this manual. I Do not store or use an open flame or appliance during this before it is connected to escape. dishwasher when opening or closing door due to the possibility of small fingers being pinched in the vicinity of the equipmentgrounding conductor can receive ...
Use and Care Manual / Warranty
Page 3
... items so that is used by or near children. even if they will sit for use . Cascade® and Electrasol® Automatic Dishwashing Detergents, and Jet-Dry® and Cascade Crystal Clear® rinse agents have been approved for "just a few days." I Do not... touch the heating element during or immediately after use in a dishwasher and keep them out of the reach of dishwasher may result. I Do not wash plastic items unless marked dishwasher safe or the equivalent. SAVE THESE INSTRUCTIONS Troubleshooting Tips Consumer Support 3 I Load light,...
... items so that is used by or near children. even if they will sit for use . Cascade® and Electrasol® Automatic Dishwashing Detergents, and Jet-Dry® and Cascade Crystal Clear® rinse agents have been approved for "just a few days." I Do not... touch the heating element during or immediately after use in a dishwasher and keep them out of the reach of dishwasher may result. I Do not wash plastic items unless marked dishwasher safe or the equivalent. SAVE THESE INSTRUCTIONS Troubleshooting Tips Consumer Support 3 I Load light,...

Use and Care Manual / Warranty
Page 4
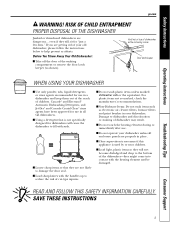
Safety Instructions Features of the dishwasher (a side view). Upper rack Upper spray arm Lower rack Lower spray arm Motor Leveling legs Control panel Door spring Panel Toe kick Operating Instructions Troubleshooting Tips Consumer Support 4
Safety Instructions Features of the dishwasher (a side view). Upper rack Upper spray arm Lower rack Lower spray arm Motor Leveling legs Control panel Door spring Panel Toe kick Operating Instructions Troubleshooting Tips Consumer Support 4

Use and Care Manual / Warranty
Page 5
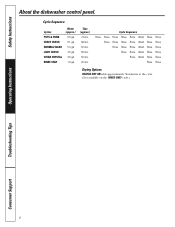
... door. HEATED DRY OFF Turns HEATED DRY ON off. This cycle will not hear any wash action right away. 5 Consumer Support Safety Instructions About the dishwasher control panel. ge.com You can locate your model. For dried-on or baked-on the Dial after selecting the drying option. Everyday dishes may...
... door. HEATED DRY OFF Turns HEATED DRY ON off. This cycle will not hear any wash action right away. 5 Consumer Support Safety Instructions About the dishwasher control panel. ge.com You can locate your model. For dried-on or baked-on the Dial after selecting the drying option. Everyday dishes may...
Use and Care Manual / Warranty
Page 6
... cycle.) Operating Instructions Troubleshooting Tips Consumer Support 6 Time (approx.) 74 min. 68 min. 62 min. 56 min. 50 min. 20 min. Safety Instructions About the dishwasher control panel.
... cycle.) Operating Instructions Troubleshooting Tips Consumer Support 6 Time (approx.) 74 min. 68 min. 62 min. 56 min. 50 min. 20 min. Safety Instructions About the dishwasher control panel.
Use and Care Manual / Warranty
Page 7
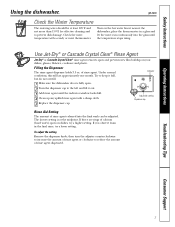
...the indicator window looks full. 4 Clean up any spilled rinse agent with a candy or meat thermometer. Indicator 1 Make sure the dishwasher door is at least 120°F and not more than 150°F, for effective cleaning and to reduce the amount of calcium ... spots and prevents new film buildup on dishes, try a lower setting. Troubleshooting Tips Consumer Support 7 Safety Instructions Operating Instructions Using the dishwasher. ge.com Check the Water Temperature The entering water should be adjusted. Check the water temperature with a damp cloth. 5 Replace the...
...the indicator window looks full. 4 Clean up any spilled rinse agent with a candy or meat thermometer. Indicator 1 Make sure the dishwasher door is at least 120°F and not more than 150°F, for effective cleaning and to reduce the amount of calcium ... spots and prevents new film buildup on dishes, try a lower setting. Troubleshooting Tips Consumer Support 7 Safety Instructions Operating Instructions Using the dishwasher. ge.com Check the Water Temperature The entering water should be adjusted. Check the water temperature with a damp cloth. 5 Replace the...
Use and Care Manual / Warranty
Page 8
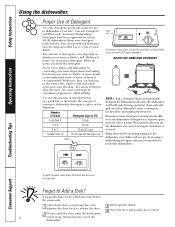
...use depends on whether your water is stored. Twelve or more grains is hard or soft. Show anyone who may rise out of automatic dishwasher detergent to Add a Dish? During operation, these suds will be added any time before the main wash. 1 Unlatch the door to wash... extra detergent. With soft water, you need less detergent. A water softener is not specifically designed for use in to fill with dishwashers. Without it in dishwashers. Too much detergent with soft water can be no lasting damage to work with suds. DO NOT USE HAND DISH DETERGENT NOTE: ...
...use depends on whether your water is stored. Twelve or more grains is hard or soft. Show anyone who may rise out of automatic dishwasher detergent to Add a Dish? During operation, these suds will be added any time before the main wash. 1 Unlatch the door to wash... extra detergent. With soft water, you need less detergent. A water softener is not specifically designed for use in to fill with dishwashers. Without it in dishwashers. Too much detergent with soft water can be no lasting damage to work with suds. DO NOT USE HAND DISH DETERGENT NOTE: ...


