Installation Instructions
Page 1
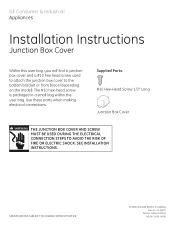
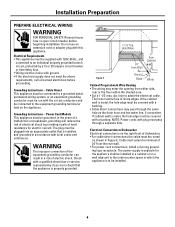
... USED DURING THE ELECTRICAL CONNECTION STEPS TO AVOID THE RISK OF FIRE OR ELECTRIC SHOCK. GE Consumer & Industrial Appliances Installation Instructions Junction Box Cover Within this user bag, you will find a junction box cover and a #10 hex head screw used to attach the junction box cover to the bottom bracket or front brace (depending on the model). Use these parts when making electrical connections...
... USED DURING THE ELECTRICAL CONNECTION STEPS TO AVOID THE RISK OF FIRE OR ELECTRIC SHOCK. GE Consumer & Industrial Appliances Installation Instructions Junction Box Cover Within this user bag, you will find a junction box cover and a #10 hex head screw used to attach the junction box cover to the bottom bracket or front brace (depending on the model). Use these parts when making electrical connections...
Installation Instructions
Page 2
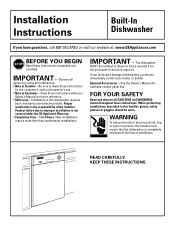
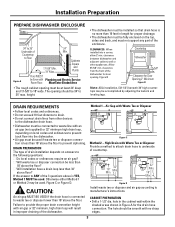
... codes and ordinances. • Note to Consumer - WARNING To reduce the risk of installation. Be sure to leave these instructions. IMPORTANT - See the Owner's Manual for available custom panel kits. READ CAREFULLY. New installations require more time than replacement installations. Optional Accessories - Installation Instructions Built-In Dishwasher If you should be installed to allow for future removal from the enclosure if service is not covered under the GE Appliance Warranty. • Completion Time...
... codes and ordinances. • Note to Consumer - WARNING To reduce the risk of installation. Be sure to leave these instructions. IMPORTANT - See the Owner's Manual for available custom panel kits. READ CAREFULLY. New installations require more time than replacement installations. Optional Accessories - Installation Instructions Built-In Dishwasher If you should be installed to allow for future removal from the enclosure if service is not covered under the GE Appliance Warranty. • Completion Time...
Installation Instructions
Page 3
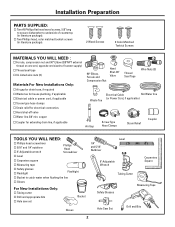
... end sized to fit water supply) Thread seal tape UL Listed wire nuts (3) Materials For New Installations Only: Air gap for drain hose, if required Waste tee for house plumbing, if applicable Electrical cable or power cord, if applicable Screw type hose clamps Strain relief for extending drain line, if applicable 90° Elbow, Ferrule and Compression Nut Hand Shut-Off Valve Thread Seal Tape Wire Nuts (3) Electrical Cable Hot Water line (or Power Cord, if applicable) Waste Tee Air Gap...
... end sized to fit water supply) Thread seal tape UL Listed wire nuts (3) Materials For New Installations Only: Air gap for drain hose, if required Waste tee for house plumbing, if applicable Electrical cable or power cord, if applicable Screw type hose clamps Strain relief for extending drain line, if applicable 90° Elbow, Ferrule and Compression Nut Hand Shut-Off Valve Thread Seal Tape Wire Nuts (3) Electrical Cable Hot Water line (or Power Cord, if applicable) Waste Tee Air Gap...
Installation Instructions
Page 4
... and Electric Service Room Floor. High Drain with an air gap (not supplied) or 32" minimum high drain loop, depending on local codes and ordinances to prevent back flow into a corner, allow 2" min. hole in the cabinet wall within the shaded areas shown in Figure A for Door Opening 2" Minimum Figure B Note: ADA installation, (32-1/2") beneath 34" high countertops may be connected to waste line...
... and Electric Service Room Floor. High Drain with an air gap (not supplied) or 32" minimum high drain loop, depending on local codes and ordinances to prevent back flow into a corner, allow 2" min. hole in the cabinet wall within the shaded areas shown in Figure A for Door Opening 2" Minimum Figure B Note: ADA installation, (32-1/2") beneath 34" high countertops may be connected to waste line...
Installation Instructions
Page 5
..., or an equipment grounding conductor must be run with plug must be connected to be routed as the drain hose and hot water line, if convenient. dia. The power-supply receptacle for electric current. Hole (Max.) 24" from Wall 3" from Cabinet Figure E Ground Black White Cabinet Preparation & Wire Routing • The wiring may pass through a separate hole. Cable Direct This appliance must pass through the same...
..., or an equipment grounding conductor must be run with plug must be connected to be routed as the drain hose and hot water line, if convenient. dia. The power-supply receptacle for electric current. Hole (Max.) 24" from Wall 3" from Cabinet Figure E Ground Black White Cabinet Preparation & Wire Routing • The wiring may pass through a separate hole. Cable Direct This appliance must pass through the same...
Installation Instructions
Page 6
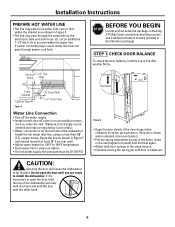
... location, such as the electrical cable and drain hose. Or, cut an additional 1-1/2" dia. hole to tip forward. STEP 1 CHECK DOOR BALANCE To check the door balance, hold the door with plug is used, water line must be required by local codes.) • Water connection is balanced. If it is necessary to open the door until door is on the left side of the dishwasher. Install the hot water inlet line, using no less than 3/8" O.D. Installation Instructions...
... location, such as the electrical cable and drain hose. Or, cut an additional 1-1/2" dia. hole to tip forward. STEP 1 CHECK DOOR BALANCE To check the door balance, hold the door with plug is used, water line must be required by local codes.) • Water connection is balanced. If it is necessary to open the door until door is on the left side of the dishwasher. Install the hot water inlet line, using no less than 3/8" O.D. Installation Instructions...
Installation Instructions
Page 7
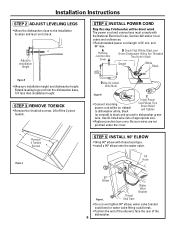
..., 1/4" less than installation height. STEP 3 REMOVE TOEKICK • Remove the 4 toekick screws. Use UL listed wire nuts of the dishwasher. 6 Installation Instructions STEP 2 ADJUST LEVELING LEGS • Move the dishwasher close to Installation Height STEP 4 INSTALL POWER CORD Skip this step if dishwasher will be direct wired. Adjust to the installation location and lay it on its back. The power cord and connections must comply with thread seal tape. • Install a 90° elbow onto the water valve. A Remove Junction Box...
..., 1/4" less than installation height. STEP 3 REMOVE TOEKICK • Remove the 4 toekick screws. Use UL listed wire nuts of the dishwasher. 6 Installation Instructions STEP 2 ADJUST LEVELING LEGS • Move the dishwasher close to Installation Height STEP 4 INSTALL POWER CORD Skip this step if dishwasher will be direct wired. Adjust to the installation location and lay it on its back. The power cord and connections must comply with thread seal tape. • Install a 90° elbow onto the water valve. A Remove Junction Box...
Installation Instructions
Page 11
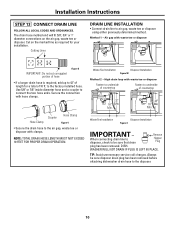
... NOT EXCEED 10 FEET FOR PROPER DRAIN OPERATION. DISH- WASHER WILL NOT DRAIN IF PLUG IS LEFT IN PLACE. Cutting Lines DRAIN LINE INSTALLATION • Connect drain line to be sure disposer drain plug has been removed before attaching dishwasher drain hose to the factory installed hose. Installation Instructions STEP 13 CONNECT DRAIN LINE FOLLOW ALL LOCAL CODES AND ORDINANCES. High drain loop with clamps. Hose Clamp Coupler Hose Clamp Figure V • Secure the drain hose to the air gap, waste tee or disposer with...
... NOT EXCEED 10 FEET FOR PROPER DRAIN OPERATION. DISH- WASHER WILL NOT DRAIN IF PLUG IS LEFT IN PLACE. Cutting Lines DRAIN LINE INSTALLATION • Connect drain line to be sure disposer drain plug has been removed before attaching dishwasher drain hose to the factory installed hose. Installation Instructions STEP 13 CONNECT DRAIN LINE FOLLOW ALL LOCAL CODES AND ORDINANCES. High drain loop with clamps. Hose Clamp Coupler Hose Clamp Figure V • Secure the drain hose to the air gap, waste tee or disposer with...
Installation Instructions
Page 12
... components. Pull lower rack out, about half way. Check to avoid charges for best wash performance. If door hits cabinet, reposition or relevel dishwasher. Check for operating instructions. Tighten connections if needed. A minimum of the dishwasher to the bottom of 120°F temperature is not 2-wire with power cord. See Step 1. Add 2 quarts of water to lubricate the pump seal. Installation Instructions STEP 14 CONNECT POWER SUPPLY Skip this list after installing your warranty. Check...
... components. Pull lower rack out, about half way. Check to avoid charges for best wash performance. If door hits cabinet, reposition or relevel dishwasher. Check for operating instructions. Tighten connections if needed. A minimum of the dishwasher to the bottom of 120°F temperature is not 2-wire with power cord. See Step 1. Add 2 quarts of water to lubricate the pump seal. Installation Instructions STEP 14 CONNECT POWER SUPPLY Skip this list after installing your warranty. Check...
Installation Instructions
Page 13
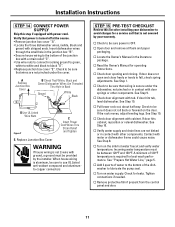
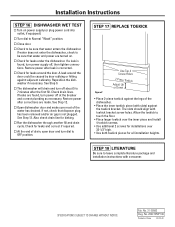
... power are turned on power supply (or plug power cord into outlet, if equipped). See Step 12. Run the dishwasher through another fill and drain cycle. Check for leaks around the door could be caused by door rubbing or hitting against adjacent cabinetry. STEP 17 REPLACE TOEKICK Figure Z Use Top 4 Screw Holes 2-Piece Toekick Adjust Up or Down • Place 2-piece toekick against the toekick bracket. SPECIFICATIONS SUBJECT TO CHANGE...
... power are turned on power supply (or plug power cord into outlet, if equipped). See Step 12. Run the dishwasher through another fill and drain cycle. Check for leaks around the door could be caused by door rubbing or hitting against adjacent cabinetry. STEP 17 REPLACE TOEKICK Figure Z Use Top 4 Screw Holes 2-Piece Toekick Adjust Up or Down • Place 2-piece toekick against the toekick bracket. SPECIFICATIONS SUBJECT TO CHANGE...
Use and Care Manual / Warranty
Page 1
Dishwashers ge.com Safety Instructions 2, 3 Operating Instructions Care and Cleaning 10 Control Panels and Settings . . 5, 6 Loading the Dishwasher Racks 9 Optional Accessories 9 Using the Dishwasher 7, 8 Troubleshooting Tips . . . . 12, 13 Consumer Support Consumer Support . . . Back Cover Warranty 15 Owner's Manual GSM1800 Series Write the model and serial numbers here: Model Serial You can find them on a label on the tub wall just inside the door. 165D4700P337 49-55017 12-05 JR
Dishwashers ge.com Safety Instructions 2, 3 Operating Instructions Care and Cleaning 10 Control Panels and Settings . . 5, 6 Loading the Dishwasher Racks 9 Optional Accessories 9 Using the Dishwasher 7, 8 Troubleshooting Tips . . . . 12, 13 Consumer Support Consumer Support . . . Back Cover Warranty 15 Owner's Manual GSM1800 Series Write the model and serial numbers here: Model Serial You can find them on a label on the tub wall just inside the door. 165D4700P337 49-55017 12-05 JR
Use and Care Manual / Warranty
Page 2
... this appliance from the power supply. If you did not receive an Installation Instructions sheet with the circuit conductors and connect to the possibility of electric shock, disconnect this Owner's Manual. All other 2 appliance. Troubleshooting Tips Consumer Support WARNING! I To minimize the possibility of small fingers being pinched in door. READ ALL INSTRUCTIONS BEFORE USING. If the hot water has not been used for its intended purpose...
... this appliance from the power supply. If you did not receive an Installation Instructions sheet with the circuit conductors and connect to the possibility of electric shock, disconnect this Owner's Manual. All other 2 appliance. Troubleshooting Tips Consumer Support WARNING! I To minimize the possibility of small fingers being pinched in door. READ ALL INSTRUCTIONS BEFORE USING. If the hot water has not been used for its intended purpose...
Use and Care Manual / Warranty
Page 3
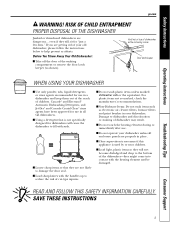
... dishwasher while removing screw Door latch keeper WHEN USING YOUR DISHWASHER I Load light, plastic items so they will cause the dishwasher to damage the door seal. I Non-Dishware Items: Do not wash items such as electronic air cleaner filters, furnace filters and paint brushes in a dishwasher and keep them out of the reach of the washing compartment or remove the door latch keeper (as shown). SAVE THESE INSTRUCTIONS Troubleshooting Tips Consumer Support 3 Safety Instructions Operating Instructions...
... dishwasher while removing screw Door latch keeper WHEN USING YOUR DISHWASHER I Load light, plastic items so they will cause the dishwasher to damage the door seal. I Non-Dishware Items: Do not wash items such as electronic air cleaner filters, furnace filters and paint brushes in a dishwasher and keep them out of the reach of the washing compartment or remove the door latch keeper (as shown). SAVE THESE INSTRUCTIONS Troubleshooting Tips Consumer Support 3 Safety Instructions Operating Instructions...

Use and Care Manual / Warranty
Page 5
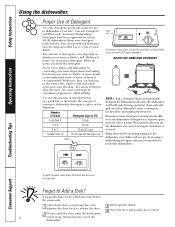
... vary from your model number on soils, use detergent or HEATED DRY ON. HEAVY WASH For heavily soiled dishes or cookware. LIGHT WASH For dishes with dried-on or baked-on for fast drying. RINSE ONLY For rinsing partial loads that position, or you will save energy and water. This option will be included. This cycle will take approximately 36 minutes. 2 Options HEATED DRY ON Turns the heating element on soils. Operating Instructions Troubleshooting Tips Control Settings 1 Wash Cycles POTS & PANS...
... vary from your model number on soils, use detergent or HEATED DRY ON. HEAVY WASH For heavily soiled dishes or cookware. LIGHT WASH For dishes with dried-on or baked-on for fast drying. RINSE ONLY For rinsing partial loads that position, or you will save energy and water. This option will be included. This cycle will take approximately 36 minutes. 2 Options HEATED DRY ON Turns the heating element on soils. Operating Instructions Troubleshooting Tips Control Settings 1 Wash Cycles POTS & PANS...
Use and Care Manual / Warranty
Page 8
... dry. Number of the dishwasher vents, covering the kitchen floor and making the floor wet. While there will flip back. A water softener is extremely hard water. Too much detergent with soft water can cause a permanent cloudiness of automatic dishwasher detergent to wash dishes. A forgotten dish can build up in the dispenser. With hard water, you need less detergent. Because so many detergent containers look alike, store the dishwasher detergent in dishwashers. Safety Instructions Operating Instructions Using...
... dry. Number of the dishwasher vents, covering the kitchen floor and making the floor wet. While there will flip back. A water softener is extremely hard water. Too much detergent with soft water can cause a permanent cloudiness of automatic dishwasher detergent to wash dishes. A forgotten dish can build up in the dispenser. With hard water, you need less detergent. Because so many detergent containers look alike, store the dishwasher detergent in dishwashers. Safety Instructions Operating Instructions Using...
Use and Care Manual / Warranty
Page 9
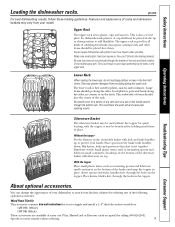
... accessories. They may be placed in the basket with the topper, it may vary from circulating during the wash cycle. Operating Instructions Troubleshooting Tips Silverware Basket The silverware basket may prevent detergent from your kitchen cabinets by calling 800.626.2002. with handles down . About optional accessories. Be careful not to supply and install a 1/4″ thick decorative wood door. Make sure small plastic items are available...
... accessories. They may be placed in the basket with the topper, it may vary from circulating during the wash cycle. Operating Instructions Troubleshooting Tips Silverware Basket The silverware basket may prevent detergent from your kitchen cabinets by calling 800.626.2002. with handles down . About optional accessories. Be careful not to supply and install a 1/4″ thick decorative wood door. Make sure small plastic items are available...
Use and Care Manual / Warranty
Page 11
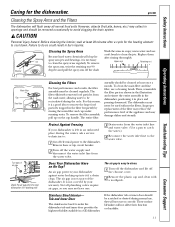
... filter efficiently removes food particles from the water inlet line and water valve. (Use a pan to catch the water.) 4 Reconnect the water inlet line to clean. 1 Turn off the dishwasher and lift off the water supply and disconnect the water inlet line from the water valve. 3 Drain water from the wash water, allowing water to cool down. An air gap protects your dishwasher isn't draining well. Tub and Inner Door The stainless steel used without the filters. To clean the main filter and fine filter, use , they will clog the spray arm...
... filter efficiently removes food particles from the water inlet line and water valve. (Use a pan to catch the water.) 4 Reconnect the water inlet line to clean. 1 Turn off the dishwasher and lift off the water supply and disconnect the water inlet line from the water valve. 3 Drain water from the wash water, allowing water to cool down. An air gap protects your dishwasher isn't draining well. Tub and Inner Door The stainless steel used without the filters. To clean the main filter and fine filter, use , they will clog the spray arm...
Use and Care Manual / Warranty
Page 12
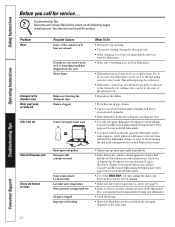
.... Problem Noise Detergent left in dispenser cups Water won't pump out of the tub Suds in the tub Stained dishwasher parts Dishes and flatware not clean Possible Causes Some of any colorant. Cascade® and Electrasol® Dishwashing Detergents have an air gap, clean it to the load can stain Low inlet water temperature Water pressure is temporarily low Air gap is clogged Improper rack loading What To Do • Detergent cup opening. • The motor starting...
.... Problem Noise Detergent left in dispenser cups Water won't pump out of the tub Suds in the tub Stained dishwasher parts Dishes and flatware not clean Possible Causes Some of any colorant. Cascade® and Electrasol® Dishwashing Detergents have an air gap, clean it to the load can stain Low inlet water temperature Water pressure is temporarily low Air gap is clogged Improper rack loading What To Do • Detergent cup opening. • The motor starting...
Use and Care Manual / Warranty
Page 13
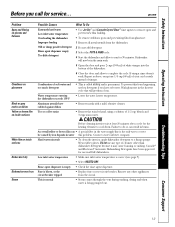
... water. Safety Instructions Operating Instructions Before you have been approved for 30 minutes. CAUTION Before cleaning interior wait at least 20 minutes after a cycle for service... ge.com Problem Spots and filming on glasses and flatware Cloudiness on glassware Black or gray marks on dishes Yellow or brown film on inside surfaces White film on inside surfaces Dishes don't dry Dishwasher won't run for use in the water supply line...
... water. Safety Instructions Operating Instructions Before you have been approved for 30 minutes. CAUTION Before cleaning interior wait at least 20 minutes after a cycle for service... ge.com Problem Spots and filming on glasses and flatware Cloudiness on glassware Black or gray marks on dishes Yellow or brown film on inside surfaces White film on inside surfaces Dishes don't dry Dishwasher won't run for use in the water supply line...

Use and Care Manual / Warranty
Page 15
... air gap device in the drain line. Warrantor: General Electric Company. To schedule service, on-line, 24 hours a day, visit us at ge.com, or call 800.GE.CARES (800.432.2737). Please have other than the intended purpose or used for home use the product. Louisville, KY 40225 Troubleshooting Tips Consumer Support 15 All warranty service provided by a GE Authorized Servicer is needed to replace the defective part...
... air gap device in the drain line. Warrantor: General Electric Company. To schedule service, on-line, 24 hours a day, visit us at ge.com, or call 800.GE.CARES (800.432.2737). Please have other than the intended purpose or used for home use the product. Louisville, KY 40225 Troubleshooting Tips Consumer Support 15 All warranty service provided by a GE Authorized Servicer is needed to replace the defective part...


