
Product Manual
Page 2
...the authorized dealer locator link to find the Hoover® authorized dealer nearest you need assistance: Visit our website at Hoover.com or call 1-800-944-9200 for choosing a HOOVER® product. CODE Hint: Attach your product online at hoover.com. Be sure to register by phone....-Off Switch...6 Cord Release...6 Carpet Height Adjustment...6 Suction Only Mode/ Brushroll Shut-Off 7 Tools ...7 Select Proper Tool...7 Removing Hose...7 Attach Wand And Tools...7 Stair Cleaning...8 Cord Rewind & Storage...8 How To Clean Tools...8 Maintenance...8 Dirt Cup...9 Filters...9-10 Brushroll...11 Belt ......
...the authorized dealer locator link to find the Hoover® authorized dealer nearest you need assistance: Visit our website at Hoover.com or call 1-800-944-9200 for choosing a HOOVER® product. CODE Hint: Attach your product online at hoover.com. Be sure to register by phone....-Off Switch...6 Cord Release...6 Carpet Height Adjustment...6 Suction Only Mode/ Brushroll Shut-Off 7 Tools ...7 Select Proper Tool...7 Removing Hose...7 Attach Wand And Tools...7 Stair Cleaning...8 Cord Rewind & Storage...8 How To Clean Tools...8 Maintenance...8 Dirt Cup...9 Filters...9-10 Brushroll...11 Belt ......
Product Manual
Page 4
... turn while product is turned on furniture, fringed area rugs, or carpeted stairs during tool use. • Do not use sharp objects to clean out hose as they can result. If the plug does not fit fully in a polarized outlet only one blade is in any way. 4 WARNING: • To reduce...
... turn while product is turned on furniture, fringed area rugs, or carpeted stairs during tool use. • Do not use sharp objects to clean out hose as they can result. If the plug does not fit fully in a polarized outlet only one blade is in any way. 4 WARNING: • To reduce...
Product Manual
Page 5
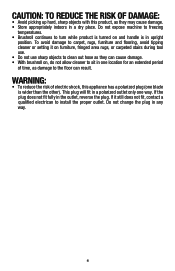
Vacuum Base C. Dusting Brush G. (1) Large Screw H. Make sure all parts from images shown. Insert the hose into hose tube until you hear a click. 1.6 1.5 E F 5 Actual model may vary from carton and identify each item shown. Extension Wand D. Crevice Tool E. Using ... (C) of vacuum and place Pet Turbo Tool on right back side (E) of Dirt Cup into Vacuum Base. Pivot cup into Vacuum Base. 1.3 Wrap hose around top of hose guide located on top of Extension Wand. 1.4 C ATTACH DIRT CUP 1.6 Place bottom of vacuum as shown. 1.5 Place Dusting Brush (F) on the handle...
Vacuum Base C. Dusting Brush G. (1) Large Screw H. Make sure all parts from images shown. Insert the hose into hose tube until you hear a click. 1.6 1.5 E F 5 Actual model may vary from carton and identify each item shown. Extension Wand D. Crevice Tool E. Using ... (C) of vacuum and place Pet Turbo Tool on right back side (E) of Dirt Cup into Vacuum Base. Pivot cup into Vacuum Base. 1.3 Wrap hose around top of hose guide located on top of Extension Wand. 1.4 C ATTACH DIRT CUP 1.6 Place bottom of vacuum as shown. 1.5 Place Dusting Brush (F) on the handle...
Product Manual
Page 6
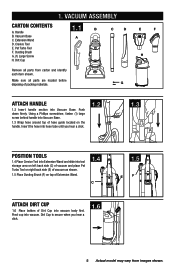
... grasp the end of height settings vary per model. Actual model may vary from overheating. Dirt Cup Release Button 3. Height Adjustment 3 9. Hose 16. To turn vacuum OFF (O=OFF), push switch to OFF position. IMPORTANT When pulling on the cord, the cord has reached its full...PUSH DOWN and TURN knob (C) to release the cord from the cord reel until red tape is reached. Handle 2.1 1 2. Cord Rewind Pedal 6 14. Hose Connecting Tube 8 19 9 14 ON-OFF SWITCH 2.2 A 2.2 Plug cord into electrical outlet. Pet Turbo Tool 17. Rinsable Filter Access 2 6. Furniture ...
... grasp the end of height settings vary per model. Actual model may vary from overheating. Dirt Cup Release Button 3. Height Adjustment 3 9. Hose 16. To turn vacuum OFF (O=OFF), push switch to OFF position. IMPORTANT When pulling on the cord, the cord has reached its full...PUSH DOWN and TURN knob (C) to release the cord from the cord reel until red tape is reached. Handle 2.1 1 2. Cord Rewind Pedal 6 14. Hose Connecting Tube 8 19 9 14 ON-OFF SWITCH 2.2 A 2.2 Plug cord into electrical outlet. Pet Turbo Tool 17. Rinsable Filter Access 2 6. Furniture ...
Product Manual
Page 7
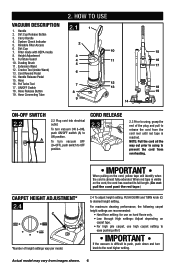
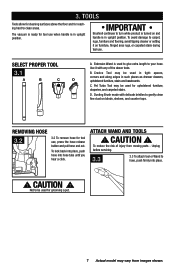
... be used for tool use, press the hose release button and pull hose end out. To lock back into place, push hose into place. ! ATTACH WAND AND TOOLS ! REMOVING HOSE 3.2 3.2 To remove hose for upholstered furniture, draperies, and carpeted stairs. Not to your hose. Use it on blinds, shelves, and ... Unplug before servicing. 3.3 3.3 To attach tool or Wand to clean areas. 3. The vacuum is ready for reaching hard to hose, push firmly into hose tube until you hear a click. SELECT PROPER TOOL 3.1 A B C D A. B. Crevice Tool may vary from moving parts -
... be used for tool use, press the hose release button and pull hose end out. To lock back into place, push hose into place. ! ATTACH WAND AND TOOLS ! REMOVING HOSE 3.2 3.2 To remove hose for upholstered furniture, draperies, and carpeted stairs. Not to your hose. Use it on blinds, shelves, and ... Unplug before servicing. 3.3 3.3 To attach tool or Wand to clean areas. 3. The vacuum is ready for reaching hard to hose, push firmly into hose tube until you hear a click. SELECT PROPER TOOL 3.1 A B C D A. B. Crevice Tool may vary from moving parts -

Product Manual
Page 8
...continued cleaning effectiveness. 4.1 The System Check Indicator located at bottom of stairs on side of cord reel. 3.5 ! HOW TO CLEAN TOOLS To clean Hose and Pet Turbo Tool, wipe with these home maintenance tasks as it to a service center prior to prevent the cleaner from images shown. 8 ...WARNING ! Clean rinsable filter and/or filter made with a detergent. Cyclone filter assembly is full and/or clogged. 2. STAIR CLEANING 3.4 Use the Hose, Pet Turbo Tool, and Crevice Tool for storage, hold plug and press down Cord Release Pedal (B) on floor. When using . 4.
...continued cleaning effectiveness. 4.1 The System Check Indicator located at bottom of stairs on side of cord reel. 3.5 ! HOW TO CLEAN TOOLS To clean Hose and Pet Turbo Tool, wipe with these home maintenance tasks as it to a service center prior to prevent the cleaner from images shown. 8 ...WARNING ! Clean rinsable filter and/or filter made with a detergent. Cyclone filter assembly is full and/or clogged. 2. STAIR CLEANING 3.4 Use the Hose, Pet Turbo Tool, and Crevice Tool for storage, hold plug and press down Cord Release Pedal (B) on floor. When using . 4.
Product Manual
Page 9
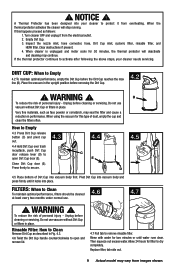
.... Allow 24 hours for this happens proceed as face powder or cornstarch, may seal the filter and cause a reduction in performance. Inspect the nozzle inlet, hose connector, hose, Dirt Cup inlet, cyclonic filter, rinsable filter, and HEPA filter. Clear obstructions if present. 4. WARNING ! How to Empty 4.3 Press Dirt Cup release button (C) and...
.... Allow 24 hours for this happens proceed as face powder or cornstarch, may seal the filter and cause a reduction in performance. Inspect the nozzle inlet, hose connector, hose, Dirt Cup inlet, cyclonic filter, rinsable filter, and HEPA filter. Clear obstructions if present. 4. WARNING ! How to Empty 4.3 Press Dirt Cup release button (C) and...
Product Manual
Page 13
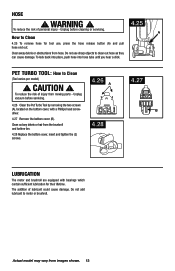
WARNING ! To reduce the risk of lubricant could cause damage. CAUTION ! Do not add lubricant to Clean 4.25 A 4.25 To remove hose for their lifetime. How to motor or brushroll. Clear away debris or obstructions from moving parts - Unplug vacuum before cleaning or servicing. The ... To lock back into place, push hose into hose tube until you hear a click. PET TURBO TOOL: How to clean out hose as they can cause damage. Do not use , press the hose release button (A) and pull hose end out. To reduce the risk of injury from hose. Clean out any debris or hair ...
WARNING ! To reduce the risk of lubricant could cause damage. CAUTION ! Do not add lubricant to Clean 4.25 A 4.25 To remove hose for their lifetime. How to motor or brushroll. Clear away debris or obstructions from moving parts - Unplug vacuum before cleaning or servicing. The ... To lock back into place, push hose into hose tube until you hear a click. PET TURBO TOOL: How to clean out hose as they can cause damage. Do not use , press the hose release button (A) and pull hose end out. To reduce the risk of injury from hose. Clean out any debris or hair ...
Product Manual
Page 14
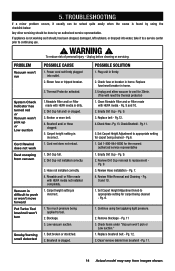
... 1. Carpet height setting is incorrect. 1. Plug unit in home. 3. Check fuse or breaker in home. Check Hose - Pg. 13. Pg. 9. 2. Review Hose installation - Set Carpet Height Adjustment knob to cool for carpet being cleaned - Clear/ remove debris from brushroll -... Unplug before cleaning or servicing. Brushroll and/ or Hose clogged. 5. Too much pressure being applied to appropriate setting for the nearest authorized service representative 1. Belt broken or stretched. 2. Pg...
... 1. Carpet height setting is incorrect. 1. Plug unit in home. 3. Check fuse or breaker in home. Check Hose - Pg. 13. Pg. 9. 2. Review Hose installation - Set Carpet Height Adjustment knob to cool for carpet being cleaned - Clear/ remove debris from brushroll -... Unplug before cleaning or servicing. Brushroll and/ or Hose clogged. 5. Too much pressure being applied to appropriate setting for the nearest authorized service representative 1. Belt broken or stretched. 2. Pg...


