Product Manual
Page 3
...Do not run appliance over cord. Unplug from product, and do not allow plug to rotate when in the upright position. • Turn off all parts of body away from falling, always place cleaner at voltage specified on data label on floor. To avoid injury or damage, keep free of dust... not use . • Do not pull or carry by pulling on wet surfaces. • Do not allow to prevent the cleaner from openings and moving parts. Close supervision is burning or smoking, such as gasoline, or fine wood sandings, or use with wet hands. • Do not put any openings. ...
...Do not run appliance over cord. Unplug from product, and do not allow plug to rotate when in the upright position. • Turn off all parts of body away from falling, always place cleaner at voltage specified on data label on floor. To avoid injury or damage, keep free of dust... not use . • Do not pull or carry by pulling on wet surfaces. • Do not allow to prevent the cleaner from openings and moving parts. Close supervision is burning or smoking, such as gasoline, or fine wood sandings, or use with wet hands. • Do not put any openings. ...
Product Manual
Page 5
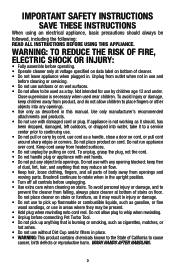
... located before disposing of packing materials. Make sure all parts from images shown. G E F H ATTACH HANDLE 1.2 Insert handle section into Vacuum Base. 1.3 Wrap hose around top of hose guide located on top of Extension Wand. 1.4 C ATTACH ...
... located before disposing of packing materials. Make sure all parts from images shown. G E F H ATTACH HANDLE 1.2 Insert handle section into Vacuum Base. 1.3 Wrap hose around top of hose guide located on top of Extension Wand. 1.4 C ATTACH ...
Product Manual
Page 7
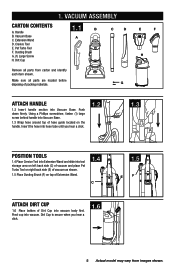
.... 7 Actual model may be used for tool use, press the hose release button and pull hose end out. Pet Turbo Tool may vary from moving parts - REMOVING HOSE 3.2 3.2 To remove hose for upholstered furniture, draperies, and carpeted stairs. To avoid damage to carpet, rugs, furniture and flooring, avoid tipping cleaner or...
.... 7 Actual model may be used for tool use, press the hose release button and pull hose end out. Pet Turbo Tool may vary from moving parts - REMOVING HOSE 3.2 3.2 To remove hose for upholstered furniture, draperies, and carpeted stairs. To avoid damage to carpet, rugs, furniture and flooring, avoid tipping cleaner or...
Product Manual
Page 10
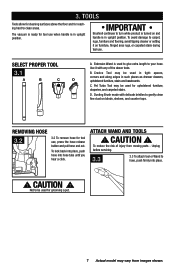
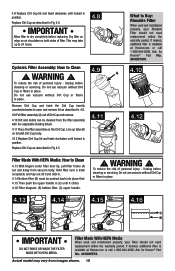
Replace Dirt Cup as described in place. Dry filter on edge so air circulates on the Dirt Cup. Ask for Hoover® Part No. 440005573. Actual model may take up tabs (H) on lid with the adjustable Dusting Brush. 4.11 Place the filter assembly on both ... filter. (C) upper handle. ! To reduce the risk of personal injury - Do not use vacuum without Dirt Cup or filters in position. Ask for Hoover® Part No. 304087001. 4.8 Replace Dirt Cup lid and twist clockwise until locked in place. To reduce the risk of personal injury - Unplug before cleaning or ...
Replace Dirt Cup as described in place. Dry filter on edge so air circulates on the Dirt Cup. Ask for Hoover® Part No. 440005573. Actual model may take up tabs (H) on lid with the adjustable Dusting Brush. 4.11 Place the filter assembly on both ... filter. (C) upper handle. ! To reduce the risk of personal injury - Do not use vacuum without Dirt Cup or filters in position. Ask for Hoover® Part No. 304087001. 4.8 Replace Dirt Cup lid and twist clockwise until locked in place. To reduce the risk of personal injury - Unplug before cleaning or ...
Product Manual
Page 11
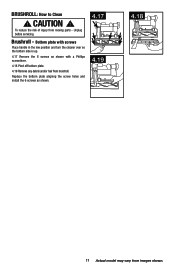
Unplug before servicing. To reduce the risk of injury from images shown. Replace the bottom plate aligning the screw holes and install the 6 screws as shown with a Phillips screwdriver. 4.18 Pivot off bottom plate. 4.19 Remove any debris and/or hair from brushroll. Bottom plate with screws Place handle in the low position and turn the cleaner over so the bottom side is up. 4.17 Remove the 6 screws as shown. 4.17 4.19 4.18 11 Actual model may vary from moving parts - BRUSHROLL: How to Clean ! Brushroll - CAUTION !
Unplug before servicing. To reduce the risk of injury from images shown. Replace the bottom plate aligning the screw holes and install the 6 screws as shown with a Phillips screwdriver. 4.18 Pivot off bottom plate. 4.19 Remove any debris and/or hair from brushroll. Bottom plate with screws Place handle in the low position and turn the cleaner over so the bottom side is up. 4.17 Remove the 6 screws as shown. 4.17 4.19 4.18 11 Actual model may vary from moving parts - BRUSHROLL: How to Clean ! Brushroll - CAUTION !
Product Manual
Page 12
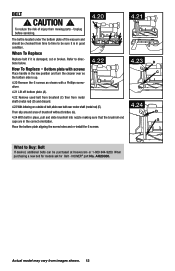
... Lift off bottom plate (A). 4.22 Remove used belt from brushroll (C) then from time to time to be purchased at Hoover.com or 1-800-944-9200. Actual model may vary from moving parts - HOOVER® part No. BELT ! Bottom plate with screws Place handle in the correct orientation. When purchasing a new belt for models ask...
... Lift off bottom plate (A). 4.22 Remove used belt from brushroll (C) then from time to time to be purchased at Hoover.com or 1-800-944-9200. Actual model may vary from moving parts - HOOVER® part No. BELT ! Bottom plate with screws Place handle in the correct orientation. When purchasing a new belt for models ask...
Product Manual
Page 13
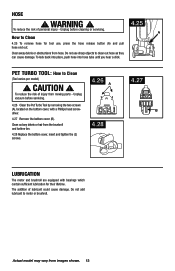
To reduce the risk of lubricant could cause damage. Clear away debris or obstructions from moving parts - CAUTION ! To reduce the risk of injury from hose. Do not add lubricant to Clean (Tool varies per model) ! PET TURBO TOOL: How to motor ...
To reduce the risk of lubricant could cause damage. Clear away debris or obstructions from moving parts - CAUTION ! To reduce the risk of injury from hose. Do not add lubricant to Clean (Tool varies per model) ! PET TURBO TOOL: How to motor ...
Product Manual
Page 15
... Dealer (Depot) by the complete model number when requesting information or ordering parts. (The model number appears on the bottom of authorized service outlet locations call 1-800-944-9200; Customers) or hoover.ca (Canadian customers). Always identify your vacuum to find the service outlet ... vacuum by : • Checking the Yellow Pages under "Vacuum Cleaners" or "Household". • Visit our website at hoover.com (U.S. Follow the service center link to Hoover®, Inc., Company in delay. Mon-Fri 8am-7pm EST. This will only result in Glenwillow for service. 6.
... Dealer (Depot) by the complete model number when requesting information or ordering parts. (The model number appears on the bottom of authorized service outlet locations call 1-800-944-9200; Customers) or hoover.ca (Canadian customers). Always identify your vacuum to find the service outlet ... vacuum by : • Checking the Yellow Pages under "Vacuum Cleaners" or "Household". • Visit our website at hoover.com (U.S. Follow the service center link to Hoover®, Inc., Company in delay. Mon-Fri 8am-7pm EST. This will only result in Glenwillow for service. 6.
Product Manual
Page 16
During the Warranty Period, Hoover® will provide labor and parts, at www.hoover.com. For an automated referral to authorized service outlets in which the product was initially purchased and resales of Hoover® products. For additional assistance or information concerning this product is not an ...of God, nature, vandalism or other acts beyond the control of purchase. Military Exchanges and Canada. However, if you mail your HOOVER® product is not transferable and may also have others that is not as maid, janitorial and equipment rental services), brushroll, ...
During the Warranty Period, Hoover® will provide labor and parts, at www.hoover.com. For an automated referral to authorized service outlets in which the product was initially purchased and resales of Hoover® products. For additional assistance or information concerning this product is not an ...of God, nature, vandalism or other acts beyond the control of purchase. Military Exchanges and Canada. However, if you mail your HOOVER® product is not transferable and may also have others that is not as maid, janitorial and equipment rental services), brushroll, ...


