
Product Manual
Page 2
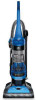
... phone. Verification of date of purchase may be required for warranty service of vacuum) CONTENTS Important Safety Instructions 3 Vacuum Assembly 5 Carton Contents...5 Attach Handle...5 Position Tools...5 Attach Dirt Cup...5 How To Use...6 Vacuum Description...6 On-Off Switch...6 Cord Release...6 Carpet Height Adjustment...6 Suction Only Mode......15 Warranty...16 If you need assistance: Visit our website at Hoover.com or call 1-800-944-9200 for choosing a HOOVER® product. Be sure to register your product online at hoover.com. PLEASE DO NOT RETURN THIS PRODUCT TO THE STORE. 2...
... phone. Verification of date of purchase may be required for warranty service of vacuum) CONTENTS Important Safety Instructions 3 Vacuum Assembly 5 Carton Contents...5 Attach Handle...5 Position Tools...5 Attach Dirt Cup...5 How To Use...6 Vacuum Description...6 On-Off Switch...6 Cord Release...6 Carpet Height Adjustment...6 Suction Only Mode......15 Warranty...16 If you need assistance: Visit our website at Hoover.com or call 1-800-944-9200 for choosing a HOOVER® product. Be sure to register your product online at hoover.com. PLEASE DO NOT RETURN THIS PRODUCT TO THE STORE. 2...
Product Manual
Page 5
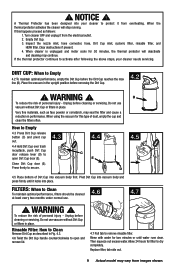
...located on top of Extension Wand. 1.4 C ATTACH DIRT CUP 1.6 Place bottom of Dirt Cup into tool storage area on left back side (C) of vacuum and place Pet Turbo Tool on right back side (E) of packing materials. Dirt Cup is secure when you hear a click. 1.2 1.3 POSITION TOOLS 1.4... Place Crevice Tool into Extension Wand and slide into vacuum body first. Make sure all parts from images shown. Insert the hose into hose tube until you hear a click. 1.6 1.5 E F 5 Actual model may...
...located on top of Extension Wand. 1.4 C ATTACH DIRT CUP 1.6 Place bottom of Dirt Cup into tool storage area on left back side (C) of vacuum and place Pet Turbo Tool on right back side (E) of packing materials. Dirt Cup is secure when you hear a click. 1.2 1.3 POSITION TOOLS 1.4... Place Crevice Tool into Extension Wand and slide into vacuum body first. Make sure all parts from images shown. Insert the hose into hose tube until you hear a click. 1.6 1.5 E F 5 Actual model may...
Product Manual
Page 6
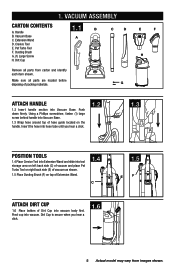
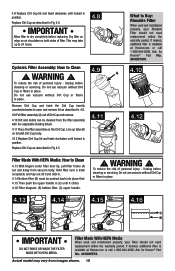
... past the red tape.) 2.4 To adjust height setting, PUSH DOWN and TURN knob (C) to ON position. IMPORTANT If the vacuum is difficult to push, push down and turn vacuum ON (I=0N), push ON/OFF switch (A) to desired height setting. Rinsable Filter Access 2 6. Crevice Tool (inside Wand) ... extended. When red tape is visible on the cord, yellow tape will identify when the cord is reached. Dirt Cup 7. To turn vacuum OFF (O=OFF), push switch to ease pushing effort. For maximum cleaning performance, the following carpet height settings are recommended: • Hard floor...
... past the red tape.) 2.4 To adjust height setting, PUSH DOWN and TURN knob (C) to ON position. IMPORTANT If the vacuum is difficult to push, push down and turn vacuum ON (I=0N), push ON/OFF switch (A) to desired height setting. Rinsable Filter Access 2 6. Crevice Tool (inside Wand) ... extended. When red tape is visible on the cord, yellow tape will identify when the cord is reached. Dirt Cup 7. To turn vacuum OFF (O=OFF), push switch to ease pushing effort. For maximum cleaning performance, the following carpet height settings are recommended: • Hard floor...
Product Manual
Page 7
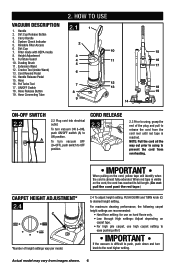
... into hose tube until you hear a click. To reduce the risk of the above the floor and for upholstered furniture, draperies, and carpeted stairs. The vacuum is used for tool use . IMPORTANT Brushroll continues to clean areas. Extension Wand is ready for grooming a pet. 7 Actual model may vary from moving parts...
... into hose tube until you hear a click. To reduce the risk of the above the floor and for upholstered furniture, draperies, and carpeted stairs. The vacuum is used for tool use . IMPORTANT Brushroll continues to clean areas. Extension Wand is ready for grooming a pet. 7 Actual model may vary from moving parts...

Product Manual
Page 8
... Tool, wipe with a detergent. DO NOT submerge in injury or damage. Other cleaning tools may vary from falling, always place cleaner at bottom of your vacuum will ensure continued cleaning effectiveness. 4.1 The System Check Indicator located at (A), alerts you to whip when rewinding. Clean rinsable filter and/or filter made with...
... Tool, wipe with a detergent. DO NOT submerge in injury or damage. Other cleaning tools may vary from falling, always place cleaner at bottom of your vacuum will ensure continued cleaning effectiveness. 4.1 The System Check Indicator located at (A), alerts you to whip when rewinding. Clean rinsable filter and/or filter made with...
Product Manual
Page 9
... cleaner needs servicing. When the thermal protector activates the cleaner will deactivate and cleaning may continue. If this type of Dirt Cup into vacuum body and press firmly until water runs clear. Turn cleaner OFF and unplug it from the electrical outlet. 2. When cleaner is unplugged ...D 4.5 Place bottom of dust, empty the cup and clean the filters often. Pivot Dirt Cup into vacuum body first. Unplug before cleaning or servicing. DIRT CUP: When to remove rinsable filter. Place the vacuum in the upright position before the Dirt Cup reaches the max line (B). Do not use...
... cleaner needs servicing. When the thermal protector activates the cleaner will deactivate and cleaning may continue. If this type of Dirt Cup into vacuum body and press firmly until water runs clear. Turn cleaner OFF and unplug it from the electrical outlet. 2. When cleaner is unplugged ...D 4.5 Place bottom of dust, empty the cup and clean the filters often. Pivot Dirt Cup into vacuum body first. Unplug before cleaning or servicing. DIRT CUP: When to remove rinsable filter. Place the vacuum in the upright position before the Dirt Cup reaches the max line (B). Do not use...
Product Manual
Page 10
... pushed back into place first. 4.15 Then push the upper handle in (C) until locked in place. Do not use vacuum without Dirt Cup or filters in position. Ask for Hoover® Part No. 304087001. Actual model may take up tabs (H) on lid with the adjustable Dusting Brush. 4.11... filter assembly on both sides of personal injury - Ask for Hoover® Part No. 440005573. Hold filter over a trash receptacle and tap out dirt and debris. 4.14 Bottom filter (B) must be cleaned from vacuum body. Do not use vacuum without Dirt Cup or filters in Fig 4.5. IMPORTANT Allow filter...
... pushed back into place first. 4.15 Then push the upper handle in (C) until locked in place. Do not use vacuum without Dirt Cup or filters in position. Ask for Hoover® Part No. 304087001. Actual model may take up tabs (H) on lid with the adjustable Dusting Brush. 4.11... filter assembly on both sides of personal injury - Ask for Hoover® Part No. 440005573. Hold filter over a trash receptacle and tap out dirt and debris. 4.14 Bottom filter (B) must be cleaned from vacuum body. Do not use vacuum without Dirt Cup or filters in Fig 4.5. IMPORTANT Allow filter...
Product Manual
Page 12
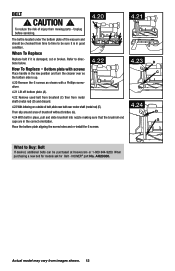
... shown with screws Place handle in the correct orientation. When purchasing a new belt for models ask for Belt - To reduce the risk of the vacuum and should be checked from motor shaft (metal rod) (D) and discard. 4.23 With lettering on outside of belt, slide new belt over motor shaft... (metal rod) (E). Refer to be purchased at Hoover.com or 1-800-944-9200. Then slip around area of brushroll without bristles (G). 4.24 D 4.24 With belt in place, pull and slide brushroll into nozzle...
... shown with screws Place handle in the correct orientation. When purchasing a new belt for models ask for Belt - To reduce the risk of the vacuum and should be checked from motor shaft (metal rod) (D) and discard. 4.23 With lettering on outside of belt, slide new belt over motor shaft... (metal rod) (E). Refer to be purchased at Hoover.com or 1-800-944-9200. Then slip around area of brushroll without bristles (G). 4.24 D 4.24 With belt in place, pull and slide brushroll into nozzle...
Product Manual
Page 13
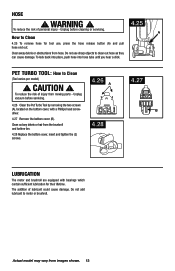
... risk of injury from hose. The addition of personal injury - To lock back into place, push hose into hose tube until you hear a click. Unplug vacuum before cleaning or servicing. Do not add lubricant to Clean (Tool varies per model) ! Unplug before servicing. 4.26 Clean the Pet Turbo Tool by removing...
... risk of injury from hose. The addition of personal injury - To lock back into place, push hose into hose tube until you hear a click. Unplug vacuum before cleaning or servicing. Do not add lubricant to Clean (Tool varies per model) ! Unplug before servicing. 4.26 Clean the Pet Turbo Tool by removing...
Product Manual
Page 14
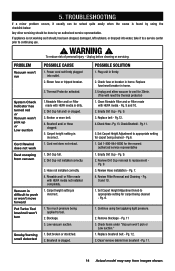
... - Review Hose installation - Pg. 7. 4. Set Carpet Height Adjustment knob to cool for carpet being cleaned - Check items under "Vacuum won 't run POSSIBLE CAUSE 1. Unplug before cleaning or servicing. Power cord not firmly plugged into water, take it usually can be done... not retract. 1. Hose not installed correctly. 4. Too much pressure being applied to appropriate setting for the nearest authorized service representative 1. Low vacuum suction. Brushroll is incorrect. 1. Plug unit in home. Clean Rinsable Filter and or Filter made with HEPA media not installed completely. 1. ...
... - Review Hose installation - Pg. 7. 4. Set Carpet Height Adjustment knob to cool for carpet being cleaned - Check items under "Vacuum won 't run POSSIBLE CAUSE 1. Unplug before cleaning or servicing. Power cord not firmly plugged into water, take it usually can be done... not retract. 1. Hose not installed correctly. 4. Too much pressure being applied to appropriate setting for the nearest authorized service representative 1. Low vacuum suction. Brushroll is incorrect. 1. Plug unit in home. Clean Rinsable Filter and or Filter made with HEPA media not installed completely. 1. ...

Product Manual
Page 15
... bottom of authorized service outlet locations call 1-800-944-9200; Do not send your vacuum by : • Checking the Yellow Pages under "Vacuum Cleaners" or "Household". • Visit our website at hoover.com (U.S. Follow the service center link to Hoover®, Inc., Company in delay. Mon-Fri 8am-7pm EST. 6. This will only result...
... bottom of authorized service outlet locations call 1-800-944-9200; Do not send your vacuum by : • Checking the Yellow Pages under "Vacuum Cleaners" or "Household". • Visit our website at hoover.com (U.S. Follow the service center link to Hoover®, Inc., Company in delay. Mon-Fri 8am-7pm EST. 6. This will only result...


