

Product Manual
Page 1
... Safeguards 2 Lubrication 14 Maintenance 8-13 Authorized Service 14 Cleaning Filters 9-10 Clearing Blockages 15 Emptying Dirt Cup 8-9 Replacing Agitator Brush Roll ..11-12 Replacing Belt 10-11 Replacing Powered Hand Tool Agitator Brush Roll 12 Replacing Power Hand Tool Belt ..13 Replacing Headlight 10 Thermal Protector 14 Warranty 15 Parts & accessories mail...
... Safeguards 2 Lubrication 14 Maintenance 8-13 Authorized Service 14 Cleaning Filters 9-10 Clearing Blockages 15 Emptying Dirt Cup 8-9 Replacing Agitator Brush Roll ..11-12 Replacing Belt 10-11 Replacing Powered Hand Tool Agitator Brush Roll 12 Replacing Power Hand Tool Belt ..13 Replacing Headlight 10 Thermal Protector 14 Warranty 15 Parts & accessories mail...
Product Manual
Page 5
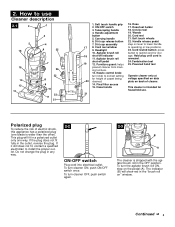
... tool 25. Polarized plug To reduce the risk of electric shock, this appliance has a polarized plug (one way. Soft touch handle grip 2. Agitator brush roll shut-off indicator 11. Furniture guard: helps prevent cleaner from marking furniture. 13. Continued § 5 How to correct setting for height of ...data plate on the pedal (A). To turn cleaner OFF, push switch again. 2-3 B A The cleaner is rewound. 24. To turn the agitator brush roll ON, step on back of carpet being 20 cleaned. 14. Cord rewind button: press button to install the proper outlet. Agitator...
... tool 25. Polarized plug To reduce the risk of electric shock, this appliance has a polarized plug (one way. Soft touch handle grip 2. Agitator brush roll shut-off indicator 11. Furniture guard: helps prevent cleaner from marking furniture. 13. Continued § 5 How to correct setting for height of ...data plate on the pedal (A). To turn cleaner OFF, push switch again. 2-3 B A The cleaner is rewound. 24. To turn the agitator brush roll ON, step on back of carpet being 20 cleaned. 14. Cord rewind button: press button to install the proper outlet. Agitator...
Product Manual
Page 7
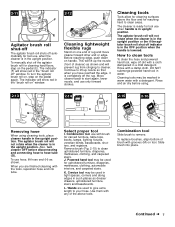
... tools may be used for upholstered furniture, draperies, mattresses, clothing, automobile interiors, and carpeted stairs. J. Combination tool Slide brush to hose tube (G). The indicator will not rotate when the cleaner is completely off the rug. Move cleaner back to clean...baseboards, shutters, and registers. Combination tool use only forward strokes. Wands are finished cleaning with the tools, reposition hose end into place. Slide brush into tube. To turn cleaner OFF before using. 2-13 H G 2-14 I . Rinse and air dry before disconnecting and connecting hose to...
... tools may be used for upholstered furniture, draperies, mattresses, clothing, automobile interiors, and carpeted stairs. J. Combination tool Slide brush to hose tube (G). The indicator will not rotate when the cleaner is completely off the rug. Move cleaner back to clean...baseboards, shutters, and registers. Combination tool use only forward strokes. Wands are finished cleaning with the tools, reposition hose end into place. Slide brush into tube. To turn cleaner OFF before using. 2-13 H G 2-14 I . Rinse and air dry before disconnecting and connecting hose to...

Product Manual
Page 9
...of dirt cup into wise. Secondary filter How to buy When purchasing a new secondary filter cartridge, ask for HOOVER part No. 93002518. Reposition filter frame cartridge by brushing with (3) slots on the dirt Remove dirt cup as described in Fig. 3-2. What to clean Disconnect cleaner ... both filter frame and filter to air dry for it clockwise to latch dirt cup door closed. To purchase a new black foam filter, ask for HOOVER part No. 93002517. position. Pivot cup into filter frame. Do not operate cleaner without dirt cup B or filters in place. 3-6 A C T ...
...of dirt cup into wise. Secondary filter How to buy When purchasing a new secondary filter cartridge, ask for HOOVER part No. 93002518. Reposition filter frame cartridge by brushing with (3) slots on the dirt Remove dirt cup as described in Fig. 3-2. What to clean Disconnect cleaner ... both filter frame and filter to air dry for it clockwise to latch dirt cup door closed. To purchase a new black foam filter, ask for HOOVER part No. 93002517. position. Pivot cup into filter frame. Do not operate cleaner without dirt cup B or filters in place. 3-6 A C T ...

Product Manual
Page 10
...Replacing lens Reposition lens and secure with your cleaner. When purchasing a new belt, ask for HOOVER part No. 93002360. HOOVER part No. 40201-271. 10 Removing lens Disconnect cleaner from electrical outlet. Belt replacement The ...belts are in "Replacing flat belt". When to clean Disconnect cleaner from electrical outlet. WARNING: Agitator brush roll can be sure they are located under "Agitator brush roll". What to be cleaned from the filter cartridge by brushing...
...Replacing lens Reposition lens and secure with your cleaner. When purchasing a new belt, ask for HOOVER part No. 93002360. HOOVER part No. 40201-271. 10 Removing lens Disconnect cleaner from electrical outlet. Belt replacement The ...belts are in "Replacing flat belt". When to clean Disconnect cleaner from electrical outlet. WARNING: Agitator brush roll can be sure they are located under "Agitator brush roll". What to be cleaned from the filter cartridge by brushing...

Product Manual
Page 11
...turns freely and is facing up agitator brush roll and slide V-belt (A) off bottom plate (A). The agitator brush roll When to lowest setting. Lift up . What to buy When purchasing a new agitator, ask for HOOVER part No. 93002361. 3-19 To check condition of brushes, move edge of belt over large ...pulley (C) while rolling the pulley in low position and turn cleaner over so bottom side is not pinched between agitator brush roll and agitator shield. Turn cleaner...
...turns freely and is facing up agitator brush roll and slide V-belt (A) off bottom plate (A). The agitator brush roll When to lowest setting. Lift up . What to buy When purchasing a new agitator, ask for HOOVER part No. 93002361. 3-19 To check condition of brushes, move edge of belt over large ...pulley (C) while rolling the pulley in low position and turn cleaner over so bottom side is not pinched between agitator brush roll and agitator shield. Turn cleaner...

Product Manual
Page 12
...200. Belt will "pop" into place. Ask for HOOVER part No. 48414-088. 3-24 A 3-25 B 2. Remove tool from hose and turn it out. Pull other side of tool and remove bottom plate (A). 3-26 D C 3. Press the latches on brush roll. 12 To remove V-belt, slide back of cleaner... Inspect belt to ensure that it is cracked, gouged or broken, replace it (see following section). 5. D F Positioning belt on agitator brush roll. Insert agitator brush roll through belt and position belt in Fig. 4-3. Unscrew the two Phillips screws and remove belt guard (B). If belt is in Fig....
...200. Belt will "pop" into place. Ask for HOOVER part No. 48414-088. 3-24 A 3-25 B 2. Remove tool from hose and turn it out. Pull other side of tool and remove bottom plate (A). 3-26 D C 3. Press the latches on brush roll. 12 To remove V-belt, slide back of cleaner... Inspect belt to ensure that it is cracked, gouged or broken, replace it (see following section). 5. D F Positioning belt on agitator brush roll. Insert agitator brush roll through belt and position belt in Fig. 4-3. Unscrew the two Phillips screws and remove belt guard (B). If belt is in Fig....
Product Manual
Page 13
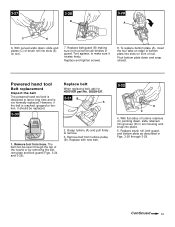
... Replace and tighten screws. 8. Replace with new belt. 3-32 D C 4. The belt can be replaced. 3-30 Replace belt When replacing belt, ask for HOOVER part No. 38528-037. 3-31 B A 1. 3-27 3-28 B 3-29 A C E 6. Powered hand tool Belt replacement Inspect the belt The powered ...hand tool belt is designed to remove. 3. Replace brush roll, belt guard, and bottom plate as described in Figs. 3-26 through the top of turbine retainers (C) pointing down and snap closed. Pivot bottom ...
... Replace and tighten screws. 8. Replace with new belt. 3-32 D C 4. The belt can be replaced. 3-30 Replace belt When replacing belt, ask for HOOVER part No. 38528-037. 3-31 B A 1. 3-27 3-28 B 3-29 A C E 6. Powered hand tool Belt replacement Inspect the belt The powered ...hand tool belt is designed to remove. 3. Replace brush roll, belt guard, and bottom plate as described in Figs. 3-26 through the top of turbine retainers (C) pointing down and snap closed. Pivot bottom ...

Product Manual
Page 14
... To obtain approved HOOVER service and genuine HOOVER parts, locate the nearest Hoover Sales and Service Center or Authorized Hoover Warranty Service Dealer (Depot) by: • checking the Yellow Pages under "Cleaner won't pick up Problem: Smoky Possible Cause Possible Solution • Broken or worn belt • Replace belt • Agitator brush roll worn •...
... To obtain approved HOOVER service and genuine HOOVER parts, locate the nearest Hoover Sales and Service Center or Authorized Hoover Warranty Service Dealer (Depot) by: • checking the Yellow Pages under "Cleaner won't pick up Problem: Smoky Possible Cause Possible Solution • Broken or worn belt • Replace belt • Agitator brush roll worn •...
Product Manual
Page 15
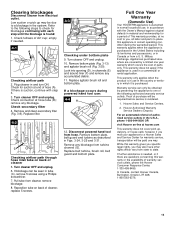
...defects in material and workmanship for blockages continuing with step 3. 3. In Canada, contact Hoover Canada, Burlington, Ontario L7R 4A8, 1-800-263-6376. 15 If there is rendered. 1. Replace agitator brush roll and bottom plate. Remove any blockage from cleaner, remove blockage. 8. Full ...One Year Warranty (Domestic Use) Your HOOVER® appliance is purchased in the United States including its territories and possessions...
...defects in material and workmanship for blockages continuing with step 3. 3. In Canada, contact Hoover Canada, Burlington, Ontario L7R 4A8, 1-800-263-6376. 15 If there is rendered. 1. Replace agitator brush roll and bottom plate. Remove any blockage from cleaner, remove blockage. 8. Full ...One Year Warranty (Domestic Use) Your HOOVER® appliance is purchased in the United States including its territories and possessions...


