Product Manual
Page 6
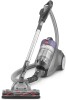
Cyclone Separator 2.1 1 (Located inside of the vacuum cleaner. Dirt Cup /Carry handle 6. Power Nozzle Parking Storage 9. Post-Motor Filter Cover 12 10. Do not exceed the cord length beyond the red mark. 2.4 ... of the dirt cup) 4. Fully unwind the power cord. Dirt Cup Release Button 7. A yellow mark on the top of the dirt bin to move the vacuum cleaner from room to turn the cleaner off. 2.2 Carry Handle 2.3 Use the carry handle located on the power cord indicates the recommended cord length. HOW...
Cyclone Separator 2.1 1 (Located inside of the vacuum cleaner. Dirt Cup /Carry handle 6. Power Nozzle Parking Storage 9. Post-Motor Filter Cover 12 10. Do not exceed the cord length beyond the red mark. 2.4 ... of the dirt cup) 4. Fully unwind the power cord. Dirt Cup Release Button 7. A yellow mark on the top of the dirt bin to move the vacuum cleaner from room to turn the cleaner off. 2.2 Carry Handle 2.3 Use the carry handle located on the power cord indicates the recommended cord length. HOW...
Product Manual
Page 7
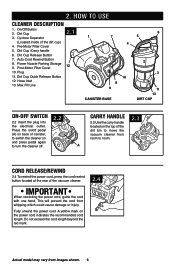
... attached directly to the hand grip or to dust furniture, lamps, lighting fixtures, blinds, baseboards, shutters and registers. Brushroll off : Vacuums hard floors. To avoid personal injury or damage, and to prevent the cleaner from bottom to tighten or loosen connection. 2.8 ! Select...A. Twist tool slightly to top. Stair Cleaning 2.5 2.5 Clean stairs from falling, always place cleaner at the rear of stairs or on : Vacuums carpets. Attaching Tools 2.8 Tools may be used for carpets, rugs and hard floor surfaces. CAUTION ! Brushroll on floor. May also be used...
... attached directly to the hand grip or to dust furniture, lamps, lighting fixtures, blinds, baseboards, shutters and registers. Brushroll off : Vacuums hard floors. To avoid personal injury or damage, and to prevent the cleaner from bottom to tighten or loosen connection. 2.8 ! Select...A. Twist tool slightly to top. Stair Cleaning 2.5 2.5 Clean stairs from falling, always place cleaner at the rear of stairs or on : Vacuums carpets. Attaching Tools 2.8 Tools may be used for carpets, rugs and hard floor surfaces. CAUTION ! Brushroll on floor. May also be used...

Product Manual
Page 8
... been designed into water, take it should be done by an authorized service representative. Inspect and remove blockage along the dirt path. When using the vacuum for 30 minutes, the thermal protector will stop running. How to Empty 3.1 Press button on the handle located on the dirt cup lid and pull...
... been designed into water, take it should be done by an authorized service representative. Inspect and remove blockage along the dirt path. When using the vacuum for 30 minutes, the thermal protector will stop running. How to Empty 3.1 Press button on the handle located on the dirt cup lid and pull...
Product Manual
Page 10
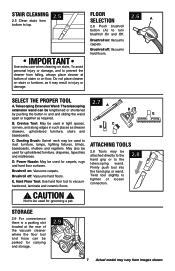
.... and Post-Motor filter should be rinsed in place. 3.10 3.11 When to air dry for Hoover® Part No. 304286001. 3.12 3.13 IMPORTANT Both Pre- Place Post-Motor filter back into rear of the vacuum cleaner. Allow to Clean It is available. Do not use without dirt cup or filters in... receptacle to remove dust and dirt. 3.13 Hold filter under running water to Clean 3.10 The Post-Motor filter is located on the rear of vacuum cleaner and replace filter door. How to clean. CAUTION !
.... and Post-Motor filter should be rinsed in place. 3.10 3.11 When to air dry for Hoover® Part No. 304286001. 3.12 3.13 IMPORTANT Both Pre- Place Post-Motor filter back into rear of the vacuum cleaner. Allow to Clean It is available. Do not use without dirt cup or filters in... receptacle to remove dust and dirt. 3.13 Hold filter under running water to Clean 3.10 The Post-Motor filter is located on the rear of vacuum cleaner and replace filter door. How to clean. CAUTION !
Product Manual
Page 11
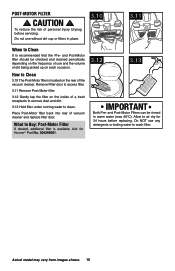
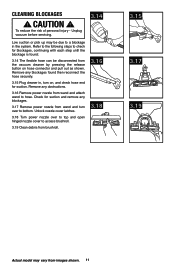
... cover to access brushroll. 3.19 Clean debris from brushroll. 3.14 3.16 3.18 3.15 3.17 3.19 Actual model may be disconnected from the vacuum cleaner by pressing the release button on , and check hose end for suction and remove any obstructions. 3.16 Remove power nozzle from images shown. ...and attach wand to a blockage in , turn on hose connector and pull out as shown. Refer to the following steps to bottom. Unplug vacuum before servicing. Unlock nozzle cover latches. 3.18 Turn power nozzle over to check for blockages, continuing with each step until the blockage is found...
... cover to access brushroll. 3.19 Clean debris from brushroll. 3.14 3.16 3.18 3.15 3.17 3.19 Actual model may be disconnected from the vacuum cleaner by pressing the release button on , and check hose end for suction and remove any obstructions. 3.16 Remove power nozzle from images shown. ...and attach wand to a blockage in , turn on hose connector and pull out as shown. Refer to the following steps to bottom. Unplug vacuum before servicing. Unlock nozzle cover latches. 3.18 Turn power nozzle over to check for blockages, continuing with each step until the blockage is found...
Product Manual
Page 12
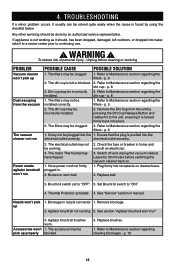
... p. 8 1. The dirt cup may be plugged into water, take it should be incorrectly installed. 3. Switch off and unplug the vacuum cleaner. Thermal Protector activated. 4. The accessory may be clogged 1. Any other servicing should , has been dropped, damaged, left outdoors, ...be working as it to a sevice center prior to Maintenance section regarding clearing blockages - Replace belt. 3. Remove the Dirt Cup from the vacuum The vacuum cleaner not run " 3. It may be done by using the checklist below. If appliance is full or blocked. 2. Remove blockage. 2. ...
... p. 8 1. The dirt cup may be plugged into water, take it should be incorrectly installed. 3. Switch off and unplug the vacuum cleaner. Thermal Protector activated. 4. The accessory may be clogged 1. Any other servicing should , has been dropped, damaged, left outdoors, ...be working as it to a sevice center prior to Maintenance section regarding clearing blockages - Replace belt. 3. Remove the Dirt Cup from the vacuum The vacuum cleaner not run " 3. It may be done by using the checklist below. If appliance is full or blocked. 2. Remove blockage. 2. ...
Product Manual
Page 13
... 8am-7pm EST. Always identify your vacuum to find the service outlet nearest you need further assistance: To speak with a customer service representative call 1-800-944-9200. Customers) or hoover.ca (Canadian customers). Service To obtain approved Hoover® service and genuine Hoover® parts, locate the nearest Authorized Hoover® Warranty Service Dealer (Depot...
... 8am-7pm EST. Always identify your vacuum to find the service outlet nearest you need further assistance: To speak with a customer service representative call 1-800-944-9200. Customers) or hoover.ca (Canadian customers). Service To obtain approved Hoover® service and genuine Hoover® parts, locate the nearest Authorized Hoover® Warranty Service Dealer (Depot...


