Product Manual
Page 1
For assistance, please call Customer Service at 1-800-944-9200 Mon-Fri 8am-7pm EST. Questions or concerns? PLEASE DO NOT RETURN THIS PRODUCT TO THE STORE. All rights reserved. #961151046 ID104881-R0 Owner's Manual Operating and Servicing Instructions Español - THIS PRODUCT IS INTENDED FOR HOUSEHOLD USE ONLY. IF USED COMMERCIALLY WARRANTY IS VOID. ©2012 Techtronic Floor Care Technology Limited. página E1 www.hoover.com IMPORTANT: READ CAREFULLY BEFORE ASSEMBLY AND USE.
For assistance, please call Customer Service at 1-800-944-9200 Mon-Fri 8am-7pm EST. Questions or concerns? PLEASE DO NOT RETURN THIS PRODUCT TO THE STORE. All rights reserved. #961151046 ID104881-R0 Owner's Manual Operating and Servicing Instructions Español - THIS PRODUCT IS INTENDED FOR HOUSEHOLD USE ONLY. IF USED COMMERCIALLY WARRANTY IS VOID. ©2012 Techtronic Floor Care Technology Limited. página E1 www.hoover.com IMPORTANT: READ CAREFULLY BEFORE ASSEMBLY AND USE.
Product Manual
Page 2
... cleaner) Contents Important Safeguards 3 Cleaner Assembly...5 Carton Contents...5 How To Use...6 Cleaner Description 6 Maintenance...8 Dirt Cup...8 Cyclone Separator 9 Filters...9 Clearing Blockages 11 Troubleshooting...12 Service...13 Warranty...14 If you for an automated referral of your product online at hoover.com. CODE Hint: Attach your sales receipt to this product to register by phone. Mon- Fri 8am- 7pm EST. Follow the authorized dealer locator link to speak with a customer service representative; Model...
... cleaner) Contents Important Safeguards 3 Cleaner Assembly...5 Carton Contents...5 How To Use...6 Cleaner Description 6 Maintenance...8 Dirt Cup...8 Cyclone Separator 9 Filters...9 Clearing Blockages 11 Troubleshooting...12 Service...13 Warranty...14 If you for an automated referral of your product online at hoover.com. CODE Hint: Attach your sales receipt to this product to register by phone. Mon- Fri 8am- 7pm EST. Follow the authorized dealer locator link to speak with a customer service representative; Model...
Product Manual
Page 3
... repair damaged hose, take it should always be present. • This hose contains electric wires. Not intended for repair. • Always turn off all parts of body away from outlet when not in this appliance before connecting or disconnecting either hose or motorized nozzle. • Unplug before operating. • Operate cleaner only at voltage specified on data plate on cord. To avoid injury or damage, keep free of cleaner...
... repair damaged hose, take it should always be present. • This hose contains electric wires. Not intended for repair. • Always turn off all parts of body away from outlet when not in this appliance before connecting or disconnecting either hose or motorized nozzle. • Unplug before operating. • Operate cleaner only at voltage specified on data plate on cord. To avoid injury or damage, keep free of cleaner...
Product Manual
Page 4
.... • Do not use without Dirt Cup and / or Filters in place. • WARNING: This product contains chemicals known to the State of electric shock, this product, as they may cause damage. • Store appropriately indoors in a polarized outlet only one blade is wider than the other). • Do not use sharp objects to clean out hose as they can...
.... • Do not use without Dirt Cup and / or Filters in place. • WARNING: This product contains chemicals known to the State of electric shock, this product, as they may cause damage. • Store appropriately indoors in a polarized outlet only one blade is wider than the other). • Do not use sharp objects to clean out hose as they can...
Product Manual
Page 5
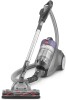
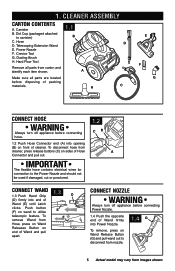
... Floor Tool Remove all parts are located before disposing of Hose A Connector and pull out. Push button (F) on sides of packing materials. Dirt Cup (packaged attached to the Power Nozzle and should not be used if damaged, cut or punctured. To remove, press on end of Wand (E) until Latch clicks. To remove Wand from F Hose, press on Wand Releases Button on Wand Release Button (G) and pull wand out to disconnect from nozzle. 1.4 G 5 Actual model may vary from cleaner...
... Floor Tool Remove all parts are located before disposing of Hose A Connector and pull out. Push button (F) on sides of packing materials. Dirt Cup (packaged attached to the Power Nozzle and should not be used if damaged, cut or punctured. To remove, press on end of Wand (E) until Latch clicks. To remove Wand from F Hose, press on Wand Releases Button on Wand Release Button (G) and pull wand out to disconnect from nozzle. 1.4 G 5 Actual model may vary from cleaner...
Product Manual
Page 6
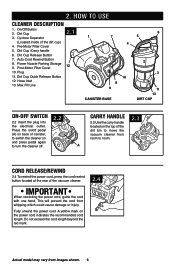
... power cord indicates the recommended cord length. IMPORTANT When rewinding the power cord, guide the cord with one hand, This will prevent the cord from images shown. 6 Fully unwind the power cord. Dirt Cup 3. Pre-Motor Filter Cover 5. 2. HOW TO USE Cleaner Description 1. Cyclone Separator 2.1 1 (Located inside of the vacuum cleaner. Do not exceed the cord length beyond the red mark. 2.4 Actual model may vary from whipping which could cause damage or injury. Dirt Cup Release Button 7. Auto Cord Rewind Button 8. Plug 11. Power Nozzle...
... power cord indicates the recommended cord length. IMPORTANT When rewinding the power cord, guide the cord with one hand, This will prevent the cord from images shown. 6 Fully unwind the power cord. Dirt Cup 3. Pre-Motor Filter Cover 5. 2. HOW TO USE Cleaner Description 1. Cyclone Separator 2.1 1 (Located inside of the vacuum cleaner. Do not exceed the cord length beyond the red mark. 2.4 Actual model may vary from whipping which could cause damage or injury. Dirt Cup Release Button 7. Auto Cord Rewind Button 8. Plug 11. Power Nozzle...
Product Manual
Page 7
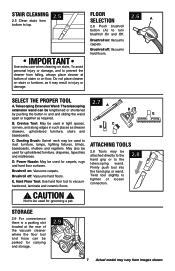
... cleaner on : Vacuums carpets. Select the Proper Tool A. B. Brushroll on stairs. E. Twist tool slightly to top. Storage 2.9 For convenience there is a parking slot located at bottom of the vacuum cleaner where the floor tool and hose can be used for carrying and storage. 2.9 7 Actual model may result in and and sliding the wand E apart or together as required. Brushroll off : Vacuums hard floors. Firmly push tool into the hand...
... cleaner on : Vacuums carpets. Select the Proper Tool A. B. Brushroll on stairs. E. Twist tool slightly to top. Storage 2.9 For convenience there is a parking slot located at bottom of the vacuum cleaner where the floor tool and hose can be used for carrying and storage. 2.9 7 Actual model may result in and and sliding the wand E apart or together as required. Brushroll off : Vacuums hard floors. Firmly push tool into the hand...

Product Manual
Page 8
... vacuum for 30 minutes, the thermal protector will ensure continued cleaning effectiveness. A Thermal Protector has been designed into water, take it from the electrical outlet. 2. Inspect and remove blockage along the dirt path. Dirt Cup When to continuing use. ! Turn cleaner OFF and unplug it to a sevice center prior to Empty Empty the dirt cup at the: nozzle inlet, nozzle connector, hose connector, hose, wand, dirt cup inlet, pre-filter, post-filter, and cyclonic separator. 4. If the thermal protector...
... vacuum for 30 minutes, the thermal protector will ensure continued cleaning effectiveness. A Thermal Protector has been designed into water, take it from the electrical outlet. 2. Inspect and remove blockage along the dirt path. Dirt Cup When to continuing use. ! Turn cleaner OFF and unplug it to a sevice center prior to Empty Empty the dirt cup at the: nozzle inlet, nozzle connector, hose connector, hose, wand, dirt cup inlet, pre-filter, post-filter, and cyclonic separator. 4. If the thermal protector...
Product Manual
Page 9
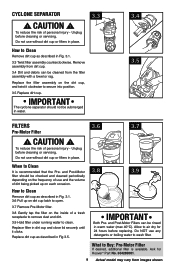
... wash filter. and Post-Motor Filters can be checked and cleaned periodically depending on the frequency of a trash receptacle to remove dust and dirt. 3.9 Hold filter under running water to secure into position. 3.5 Replace dirt cup. Do not use without dirt cup or filters in Fig. 3.1. 3.6 Pull up on the dirt cup, and twist it clicks. Unplug before cleaning or servicing. Replace dirt cup as described in warm water (max 40°C). Allow to Clean It is available. Cyclone...
... wash filter. and Post-Motor Filters can be checked and cleaned periodically depending on the frequency of a trash receptacle to remove dust and dirt. 3.9 Hold filter under running water to secure into position. 3.5 Replace dirt cup. Do not use without dirt cup or filters in Fig. 3.1. 3.6 Pull up on the dirt cup, and twist it clicks. Unplug before cleaning or servicing. Replace dirt cup as described in warm water (max 40°C). Allow to Clean It is available. Cyclone...
Product Manual
Page 10
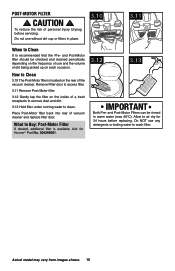
... of vacuum cleaner and replace filter door. Ask for 24 hours before servicing. Do NOT use without dirt cup or filters in warm water (max 40°C). Place Post-Motor filter back into rear of a trash receptacle to remove dust and dirt. 3.13 Hold filter under running water to Clean It is available. and Post-Motor filter should be rinsed in place. 3.10 3.11 When to clean. How to air dry for Hoover® Part No...
... of vacuum cleaner and replace filter door. Ask for 24 hours before servicing. Do NOT use without dirt cup or filters in warm water (max 40°C). Place Post-Motor filter back into rear of a trash receptacle to remove dust and dirt. 3.13 Hold filter under running water to Clean It is available. and Post-Motor filter should be rinsed in place. 3.10 3.11 When to clean. How to air dry for Hoover® Part No...
Product Manual
Page 11
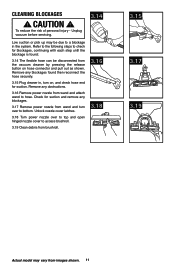
... open hinged nozzle cover to bottom. Remove any blockages. 3.17 Remove power nozzle from wand and turn on hose connector and pull out as shown. CAUTION ! Unplug vacuum before servicing. Unlock nozzle cover latches. 3.18 Turn power nozzle over to access brushroll. 3.19 Clean debris from brushroll. 3.14 3.16 3.18 3.15 3.17 3.19 Actual model may be disconnected from the vacuum cleaner by pressing the release button on , and check hose end for suction...
... open hinged nozzle cover to bottom. Remove any blockages. 3.17 Remove power nozzle from wand and turn on hose connector and pull out as shown. CAUTION ! Unplug vacuum before servicing. Unlock nozzle cover latches. 3.18 Turn power nozzle over to access brushroll. 3.19 Clean debris from brushroll. 3.14 3.16 3.18 3.15 3.17 3.19 Actual model may be disconnected from the vacuum cleaner by pressing the release button on , and check hose end for suction...
Product Manual
Page 12
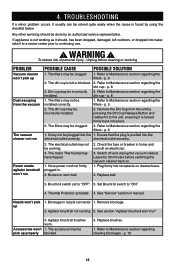
... 1. Replace brushes. 1. Refer to Maintenance section regarding the filters - Unplug before switching the vacuum cleaner back on cleaner base. 2. p. 8 1. The filters may be incorrectly installed. 3. It may not be installed correctly. 1. Replace belt. 3. See section "Agitator brushroll won 't pick up properly blocked. 3. WARNING ! The dirt cup may not be plugged into the electrical outlet correctly. Remove the Dirt Cup from the vacuum The vacuum cleaner not run Power nozzle agitator brushroll won 't 1. Hose power cord not firmly plugged in manual. Set...
... 1. Replace brushes. 1. Refer to Maintenance section regarding the filters - Unplug before switching the vacuum cleaner back on cleaner base. 2. p. 8 1. The filters may be incorrectly installed. 3. It may not be installed correctly. 1. Replace belt. 3. See section "Agitator brushroll won 't pick up properly blocked. 3. WARNING ! The dirt cup may not be plugged into the electrical outlet correctly. Remove the Dirt Cup from the vacuum The vacuum cleaner not run Power nozzle agitator brushroll won 't 1. Hose power cord not firmly plugged in manual. Set...
Product Manual
Page 13
... you . • For an automated referral of the vacuum.) PLEASE DO NOT RETURN THIS PRODUCT TO THE STORE. 13 Service To obtain approved Hoover® service and genuine Hoover® parts, locate the nearest Authorized Hoover® Warranty Service Dealer (Depot) by the complete model number when requesting information or ordering parts. (The model number appears on the bottom of authorized service outlet locations call 1-800-944-9200;
... you . • For an automated referral of the vacuum.) PLEASE DO NOT RETURN THIS PRODUCT TO THE STORE. 13 Service To obtain approved Hoover® service and genuine Hoover® parts, locate the nearest Authorized Hoover® Warranty Service Dealer (Depot) by the complete model number when requesting information or ordering parts. (The model number appears on the bottom of authorized service outlet locations call 1-800-944-9200;

Product Manual
Page 14
... original owner. For an automated referral to authorized service outlets in a commercial operation (such as warranted, take or send the product to you specific rights; In Canada, contact Hoover® Canada, Carson Building, 100 Carson St., Etobicoke, Ontario M8W 3R9, Phone: 1-800-944-9200, MonFri 8am-7pm EST. WHAT THIS WARRANTY DOES NOT COVER This Warranty does not cover: use...
... original owner. For an automated referral to authorized service outlets in a commercial operation (such as warranted, take or send the product to you specific rights; In Canada, contact Hoover® Canada, Carson Building, 100 Carson St., Etobicoke, Ontario M8W 3R9, Phone: 1-800-944-9200, MonFri 8am-7pm EST. WHAT THIS WARRANTY DOES NOT COVER This Warranty does not cover: use...


