
Manual
Page 1
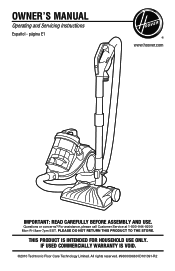
página E1 www.hoover.com IMPORTANT: READ CAREFULLY BEFORE ASSEMBLY AND USE. For assistance, please call Customer Service at 1-800-944-9200 Mon-Fri 8am-7pm EST. Owner's Manual Operating and Servicing Instructions Español - All rights reserved. #960009660 ID101391-R2 Questions or concerns? IF USED COMMERCIALLY WARRANTY IS VOID. ©2010 Techtronic Floor Care Technology Limited. PLEASE DO NOT RETURN THIS PRODUCT TO THE STORE. THIS PRODUCT IS INTENDED FOR HOUSEHOLD USE ONLY.
página E1 www.hoover.com IMPORTANT: READ CAREFULLY BEFORE ASSEMBLY AND USE. For assistance, please call Customer Service at 1-800-944-9200 Mon-Fri 8am-7pm EST. Owner's Manual Operating and Servicing Instructions Español - All rights reserved. #960009660 ID101391-R2 Questions or concerns? IF USED COMMERCIALLY WARRANTY IS VOID. ©2010 Techtronic Floor Care Technology Limited. PLEASE DO NOT RETURN THIS PRODUCT TO THE STORE. THIS PRODUCT IS INTENDED FOR HOUSEHOLD USE ONLY.

Manual
Page 2
Manufacturing code (Label located on bottom of cleaner) Contents Important Safety Instructions 3 Cleaner Assembly...5 Carton Contents...5 How To Use...6 Cleaner Description 6 ON-OFF switch...6 Cord Release/Rewind 6 Carry Handle...6 Vacuum Controls...7 Carpet Cleaning...7 Hard Floor Cleaning 7 Edge Cleaning...7 Stair Cleaning...7 Tools...8 Maintenance...9 Dirt Cup...9 Umbrella Tube...9 Primary Filter...10 Hepa Filter...10 Power Nozzle Brushroll Replacement 11 Troubleshooting...12 Service...13 Warranty...14 If you need assistance: Visit our website at Hoover.com or call 1-800-944-...
Manufacturing code (Label located on bottom of cleaner) Contents Important Safety Instructions 3 Cleaner Assembly...5 Carton Contents...5 How To Use...6 Cleaner Description 6 ON-OFF switch...6 Cord Release/Rewind 6 Carry Handle...6 Vacuum Controls...7 Carpet Cleaning...7 Hard Floor Cleaning 7 Edge Cleaning...7 Stair Cleaning...7 Tools...8 Maintenance...9 Dirt Cup...9 Umbrella Tube...9 Primary Filter...10 Hepa Filter...10 Power Nozzle Brushroll Replacement 11 Troubleshooting...12 Service...13 Warranty...14 If you need assistance: Visit our website at Hoover.com or call 1-800-944-...

Manual
Page 3
... pets. • Do not operate cleaner in place. • Unplug before connecting or disconnecting either hose or motorized nozzle. • Hold plug when rewinding onto cord reel. Do not use of an extension cord is not working as it should always be present. • The hose contains electrical wires. Avoid picking up sharp objects. • Always turn off all controls before unplugging. • Use extra care when cleaning on wet...
... pets. • Do not operate cleaner in place. • Unplug before connecting or disconnecting either hose or motorized nozzle. • Hold plug when rewinding onto cord reel. Do not use of an extension cord is not working as it should always be present. • The hose contains electrical wires. Avoid picking up sharp objects. • Always turn off all controls before unplugging. • Use extra care when cleaning on wet...
Manual
Page 4
... the above steps, your cleaner may need servicing (see "Service" section). Refer to "Troubleshooting" section. 4. CAUTION: TO REDUCE THE RISK OF DAMAGE: • Avoid picking up hard, sharp objects with this happens, proceed as they can cause damage. Check Primary Filter, HEPA Filter, and Umbrella Tube for 30 minutes, the thermal protector automatically resets and cleaning may continue. If the plug does not fit fully in...
... the above steps, your cleaner may need servicing (see "Service" section). Refer to "Troubleshooting" section. 4. CAUTION: TO REDUCE THE RISK OF DAMAGE: • Avoid picking up hard, sharp objects with this happens, proceed as they can cause damage. Check Primary Filter, HEPA Filter, and Umbrella Tube for 30 minutes, the thermal protector automatically resets and cleaning may continue. If the plug does not fit fully in...
Manual
Page 5
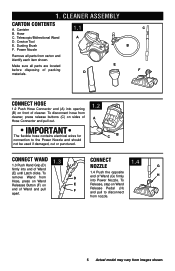
... B C Connect Wand 1.3 Connect 1.4 1.3 Push Hand Grip (D) Nozzle G firmly into Power Nozzle. To disconnect hose from Hose, press on Wand end of Wand and pull apart. Hose C. Telescopic/Bidirectional Wand D. D E F Connect Hose 1.2 Push Hose Connector end (A) into opening (B) on sides of cleaner. To remove Wand from cleaner, press release buttons (C) on front of Hose Connector and pull out. 1. Crevice Tool E. Power Nozzle 1.1 A C B Remove all parts are located before disposing of Wand (E) until Latch clicks. IMPORTANT The flexible hose contains electrical wires for...
... B C Connect Wand 1.3 Connect 1.4 1.3 Push Hand Grip (D) Nozzle G firmly into Power Nozzle. To disconnect hose from Hose, press on Wand end of Wand and pull apart. Hose C. Telescopic/Bidirectional Wand D. D E F Connect Hose 1.2 Push Hose Connector end (A) into opening (B) on sides of cleaner. To remove Wand from cleaner, press release buttons (C) on front of Hose Connector and pull out. 1. Crevice Tool E. Power Nozzle 1.1 A C B Remove all parts are located before disposing of Wand (E) until Latch clicks. IMPORTANT The flexible hose contains electrical wires for...

Manual
Page 6
HOW TO USE Cleaner Description Canister 1 Hose Inlet (Front Of Canister) 2.1 2 Dirt Cup 2 3 Dirt Cup Handle/Carry Handle 4 Dirt Cup Release Button 5 Auto Cord Rewind Pedal 1 6 ON/OFF Pedal 7 Power Cord 8 Exhaust Filter Cover Power Nozzle 9 Wand Release Pedal 10 Headlight Canister 11 Handle Release Pedal Hose/Hand Grip/Wand 12 Hose 13 Brushroll On/Off Button 14 Wand Release Button 15 Telescopic/Bidirectional Wand 16 Suction Control Valve 17 Tool Storage Accessories 18 Crevice Tool 19 Dusting Brush (Included in all models) 3 4 Hose/Hand Grip/Wand/ Accessories (...
HOW TO USE Cleaner Description Canister 1 Hose Inlet (Front Of Canister) 2.1 2 Dirt Cup 2 3 Dirt Cup Handle/Carry Handle 4 Dirt Cup Release Button 5 Auto Cord Rewind Pedal 1 6 ON/OFF Pedal 7 Power Cord 8 Exhaust Filter Cover Power Nozzle 9 Wand Release Pedal 10 Headlight Canister 11 Handle Release Pedal Hose/Hand Grip/Wand 12 Hose 13 Brushroll On/Off Button 14 Wand Release Button 15 Telescopic/Bidirectional Wand 16 Suction Control Valve 17 Tool Storage Accessories 18 Crevice Tool 19 Dusting Brush (Included in all models) 3 4 Hose/Hand Grip/Wand/ Accessories (...
Manual
Page 7
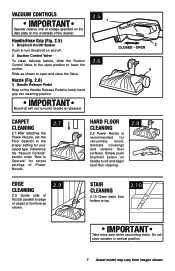
... images shown. Simply push brushroll button on and off and begin hard floor cleaning. 2.8 Edge Cleaning 2.9 Guide side of Nozzle parallel to edge of Power Nozzle. 2.7 Hard Floor Cleaning 2.8 Power Nozzle is released. 2.5 1 2.6 2 CLOSED - Vacuum Controls IMPORTANT Operate cleaner only at voltage specified on the data plate on the Handle Release Pedal to lower hand grip into cleaning position. OPEN 6 Carpet Cleaning 2.7 After attaching the Power Nozzle, set the Floor Selector to Operate" for carpet settings of carpet or furniture as shown to...
... images shown. Simply push brushroll button on and off and begin hard floor cleaning. 2.8 Edge Cleaning 2.9 Guide side of Nozzle parallel to edge of Power Nozzle. 2.7 Hard Floor Cleaning 2.8 Power Nozzle is released. 2.5 1 2.6 2 CLOSED - Vacuum Controls IMPORTANT Operate cleaner only at voltage specified on the data plate on the Handle Release Pedal to lower hand grip into cleaning position. OPEN 6 Carpet Cleaning 2.7 After attaching the Power Nozzle, set the Floor Selector to Operate" for carpet settings of carpet or furniture as shown to...
Manual
Page 8
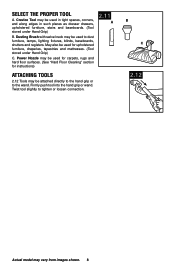
...) C. Power Nozzle may be used to tighten or loosen connection. Twist tool slightly to dust furniture, lamps, lighting fixtures, blinds, baseboards, shutters and registers. Firmly push tool into the hand grip or wand. Dusting Brush with swivel neck may be used for instructions) 2.11 A Attaching Tools 2.12 Tools may vary from images shown. 8 Select the Proper Tool A. Crevice Tool may be used for carpets, rugs and hard floor surfaces. (See "Hard Floor Cleaning...
...) C. Power Nozzle may be used to tighten or loosen connection. Twist tool slightly to dust furniture, lamps, lighting fixtures, blinds, baseboards, shutters and registers. Firmly push tool into the hand grip or wand. Dusting Brush with swivel neck may be used for instructions) 2.11 A Attaching Tools 2.12 Tools may vary from images shown. 8 Select the Proper Tool A. Crevice Tool may be used for carpets, rugs and hard floor surfaces. (See "Hard Floor Cleaning...
Manual
Page 9
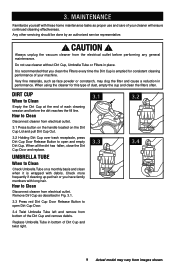
... Umbrella Tube left and remove from bottom of Dirt Cup and twist right. 3.1 3.3 3.2 3.4 9 Actual model may clog the filter and cause a reduction in place. Do not use and care of dust, empty the cup and clean the filters often. When using the cleaner for consistent cleaning performance of each cleaning session and before performing any general maintenance. Umbrella Tube When to Clean Disconnect cleaner from electrical outlet. 3.1 Press button on the handle located on...
... Umbrella Tube left and remove from bottom of Dirt Cup and twist right. 3.1 3.3 3.2 3.4 9 Actual model may clog the filter and cause a reduction in place. Do not use and care of dust, empty the cup and clean the filters often. When using the cleaner for consistent cleaning performance of each cleaning session and before performing any general maintenance. Umbrella Tube When to Clean Disconnect cleaner from electrical outlet. 3.1 Press button on the handle located on...

Manual
Page 10
... use only Hoover® service part only, #302445001. Once completely dry, return the Lifetime Primary Filter to the Filter Frame, replace Filter Assembly into canister and replace cover. 3.5 3.6 3.7 What to remove excess water. HEPA Exhaust Filter When to Clean The HEPA Filter is intended to remove dirt and debris. Lifetime Primary Filter IMPORTANT This is located on each cleaning. Separate the Filter from images shown. 10 How to the vacuum cleaner. How to dry completely before restarting the vacuum cleaner...
... use only Hoover® service part only, #302445001. Once completely dry, return the Lifetime Primary Filter to the Filter Frame, replace Filter Assembly into canister and replace cover. 3.5 3.6 3.7 What to remove excess water. HEPA Exhaust Filter When to Clean The HEPA Filter is intended to remove dirt and debris. Lifetime Primary Filter IMPORTANT This is located on each cleaning. Separate the Filter from images shown. 10 How to the vacuum cleaner. How to dry completely before restarting the vacuum cleaner...

Manual
Page 11
... power nozzle drives the agitator. What to Buy There are other belts manufactured that you use only genuine HOOVER® parts to Remove Disconnect cleaner from images shown. 11 How to assure your cleaner operates at peak performance. When to Buy: Brushroll To assure cleaning effectiveness, use in this cleaner and is important that are similar in shape and size, but are worn, it should be replaced. 3.10 To check...
... power nozzle drives the agitator. What to Buy There are other belts manufactured that you use only genuine HOOVER® parts to Remove Disconnect cleaner from images shown. 11 How to assure your cleaner operates at peak performance. When to Buy: Brushroll To assure cleaning effectiveness, use in this cleaner and is important that are similar in shape and size, but are worn, it should be replaced. 3.10 To check...

Manual
Page 12
...or reset Circuit Breaker in and switching the cleaner back "ON". 5. before servicing. Clean or replace Filters. 5. See "Service" section in stored upright position. Remove blockage. 3. TROUBLESHOOTING If a minor problem occurs, it usually can be done by using the checklist below. PROBLEM Cleaner won't run Low suction: Canister / Power Nozzle Power Nozzle won't run Power Nozzle won 't run " section above . 2. Motor Thermal Protector has tripped. 5. Handle is automatically shut off and unplug the vacuum cleaner. Brushroll is not released and in manual. 1. Review Dirt Cup replacement...
...or reset Circuit Breaker in and switching the cleaner back "ON". 5. before servicing. Clean or replace Filters. 5. See "Service" section in stored upright position. Remove blockage. 3. TROUBLESHOOTING If a minor problem occurs, it usually can be done by using the checklist below. PROBLEM Cleaner won't run Low suction: Canister / Power Nozzle Power Nozzle won't run Power Nozzle won 't run " section above . 2. Motor Thermal Protector has tripped. 5. Handle is automatically shut off and unplug the vacuum cleaner. Brushroll is not released and in manual. 1. Review Dirt Cup replacement...
Manual
Page 13
...; For an automated referral of the vacuum.) PLEASE DO NOT RETURN THIS PRODUCT TO THE STORE. 13 Service To obtain approved Hoover® service and genuine Hoover® parts, locate the nearest Authorized Hoover® Warranty Service Dealer (Depot) by the complete model number when requesting information or ordering parts. (The model number appears on the bottom of authorized service outlet locations call 1-800-944-9200; In Canada...
...; For an automated referral of the vacuum.) PLEASE DO NOT RETURN THIS PRODUCT TO THE STORE. 13 Service To obtain approved Hoover® service and genuine Hoover® parts, locate the nearest Authorized Hoover® Warranty Service Dealer (Depot) by the complete model number when requesting information or ordering parts. (The model number appears on the bottom of authorized service outlet locations call 1-800-944-9200; In Canada...
Manual
Page 14
... OR ARISING FROM ANY CAUSE WHATSOEVER. WHAT THIS WARRANTY DOES NOT COVER This Warranty does not cover: use of the product in a commercial operation (such as warranted, take or send the product to either a Hoover® Sales and Service Center or Hoover® Authorized Warranty Service Dealer along with the Owner's Manual, your product to authorized service outlets in accordance with proof of Ohio. ALL OTHER...
... OR ARISING FROM ANY CAUSE WHATSOEVER. WHAT THIS WARRANTY DOES NOT COVER This Warranty does not cover: use of the product in a commercial operation (such as warranted, take or send the product to either a Hoover® Sales and Service Center or Hoover® Authorized Warranty Service Dealer along with the Owner's Manual, your product to authorized service outlets in accordance with proof of Ohio. ALL OTHER...


