Manual
Page 1
Hoover® ™ Canister Cleaner ® Owner's Manual English § pp. 1-10 Español § pàg.11-16 Français § p.17-22 www.hoover.com Review this manual before operating cleaner.
Hoover® ™ Canister Cleaner ® Owner's Manual English § pp. 1-10 Español § pàg.11-16 Français § p.17-22 www.hoover.com Review this manual before operating cleaner.
Manual
Page 2
... Hoover Warranty Service Dealer (Depot). • Use vacuum cleaner only for warranty service of the cleaner. To unplug, grasp the plug, not the cord. others may be present. • The hose contains electrical wires. Save these instructions! Index Important Safeguards 2 Assembling Cleaner 3 Carton contents 3 Connect hose, wand, nozzle 3 Cleaner Description 4 How To Use Canister Cleaner 4-6 Powered Nozzle 4 Cleaning Tools 5 Cleaning Stairs 5 Storage 5,6 Maintenance Filter bag replacement 6 Cleaning filters 7 Replacing power nozzle belt ..........7-8 Replacing agitator...
... Hoover Warranty Service Dealer (Depot). • Use vacuum cleaner only for warranty service of the cleaner. To unplug, grasp the plug, not the cord. others may be present. • The hose contains electrical wires. Save these instructions! Index Important Safeguards 2 Assembling Cleaner 3 Carton contents 3 Connect hose, wand, nozzle 3 Cleaner Description 4 How To Use Canister Cleaner 4-6 Powered Nozzle 4 Cleaning Tools 5 Cleaning Stairs 5 Storage 5,6 Maintenance Filter bag replacement 6 Cleaning filters 7 Replacing power nozzle belt ..........7-8 Replacing agitator...
Manual
Page 3
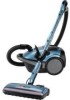
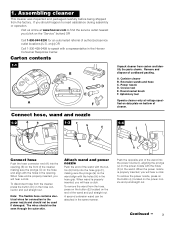
... need assistance during assembly or operation, Visit us online at voltage specified on data plate on bottom of the cleaner, making sure the prongs (G) on the wand align with a representative in the Hoover Consumer Response Center. Remove and dispose of the wand and pull straight out. A second extension wand can be seen through the outer skin. Continued ª 3 Canister cleaner B. Extension wands and hose C. A. Power nozzle D. Attach wand and power nozzle...
... need assistance during assembly or operation, Visit us online at voltage specified on data plate on bottom of the cleaner, making sure the prongs (G) on the wand align with a representative in the Hoover Consumer Response Center. Remove and dispose of the wand and pull straight out. A second extension wand can be seen through the outer skin. Continued ª 3 Canister cleaner B. Extension wands and hose C. A. Power nozzle D. Attach wand and power nozzle...

Manual
Page 4
... The assembled cleaner will fit in the outlet, reverse the plug. Extension wand release buttons 4. Extension wands 5. Power nozzle 10. Headlight 11. Filter bag door 15. Hold plug until cord is pulled over carpet, area rugs and door sills 21. Final filter door 22 23. Do not change the plug in recessed area 16. Power nozzle Handle positions The handle has two positions when used with the power nozzle: upright and operating. Carrying handle 13. Hose connector 14. Cord rewind...
... The assembled cleaner will fit in the outlet, reverse the plug. Extension wand release buttons 4. Extension wands 5. Power nozzle 10. Headlight 11. Filter bag door 15. Hold plug until cord is pulled over carpet, area rugs and door sills 21. Final filter door 22 23. Do not change the plug in recessed area 16. Power nozzle Handle positions The handle has two positions when used with the power nozzle: upright and operating. Carrying handle 13. Hose connector 14. Cord rewind...

Manual
Page 5
... use in the "RUG" position. The head of the wand. Hard surface floor cleaning The power nozzle can be attached to -reach spaces. Crevice tool (stores inside tool lid) may be turned off . Open the tool door (H), located on extension wand) may be used in tight spaces, corners, and along edges in the recessed area on . Round swivel brush (stores on the cleaner body, for agitator brush operation, and to deep clean carpets. Clean...
... use in the "RUG" position. The head of the wand. Hard surface floor cleaning The power nozzle can be attached to -reach spaces. Crevice tool (stores inside tool lid) may be turned off . Open the tool door (H), located on extension wand) may be used in tight spaces, corners, and along edges in the recessed area on . Round swivel brush (stores on the cleaner body, for agitator brush operation, and to deep clean carpets. Clean...

Manual
Page 6
... of your HOOVER cleaner operates at www.hoover.com. Maintenance Filter bag When to release bag from electrical outlet. Discard used bag. Discard used bag. HOOVER bags can be identified by The Hoover Company. When using the cleaner to remove material of this nature, change the bag often. 3-3 C Where to buy In order to replace Turn cleaner off and disconnect from frame. Close the bag compartment door and reattach hose. 2-11 K J With the cleaner standing on end, the wand holder...
... of your HOOVER cleaner operates at www.hoover.com. Maintenance Filter bag When to release bag from electrical outlet. Discard used bag. Discard used bag. HOOVER bags can be identified by The Hoover Company. When using the cleaner to remove material of this nature, change the bag often. 3-3 C Where to buy In order to replace Turn cleaner off and disconnect from frame. Close the bag compartment door and reattach hose. 2-11 K J With the cleaner standing on end, the wand holder...
Manual
Page 7
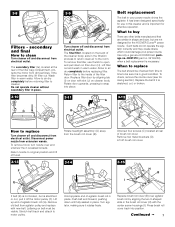
... to air dry completely before replacing filter. If the filter becomes dirty, lift filter out. Disconnect power nozzle from dirt particles. Lift off the motor pulley (F). Continued ª 7 Lift filter out and wash in place. Use only a genuine HOOVER belt package no. 40201270 (part no. 59134226) when a belt replacement is in place. 3-10 3-9 J H I ). To check, remove the nozzle cover (see following section). Push belt end forward, pushing down on cleaner body. Allow to clean Turn cleaner...
... to air dry completely before replacing filter. If the filter becomes dirty, lift filter out. Disconnect power nozzle from dirt particles. Lift off the motor pulley (F). Continued ª 7 Lift filter out and wash in place. Use only a genuine HOOVER belt package no. 40201270 (part no. 59134226) when a belt replacement is in place. 3-10 3-9 J H I ). To check, remove the nozzle cover (see following section). Push belt end forward, pushing down on cleaner body. Allow to clean Turn cleaner...
Manual
Page 8
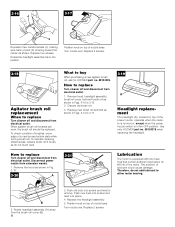
... electrical outlet. To maintain cleaning effectiveness, replace brush roll if brushes do not add lubricant to 3-17. 3-19 A Headlight replacement The headlight (A), located on top of the power nozzle, operates when the cleaner is turned on, except when the power nozzle switch is equipped with two bearings that contain sufficient lubrication for HOOVER part no . 59134219 when replacing the headlight. Discard old brush roll. 3. Use only HOOVER part no . 59134225. Replace the headlight assembly. 5. Remove hood, headlight assembly, brush roll...
... electrical outlet. To maintain cleaning effectiveness, replace brush roll if brushes do not add lubricant to 3-17. 3-19 A Headlight replacement The headlight (A), located on top of the power nozzle, operates when the cleaner is turned on, except when the power nozzle switch is equipped with two bearings that contain sufficient lubrication for HOOVER part no . 59134219 when replacing the headlight. Discard old brush roll. 3. Use only HOOVER part no . 59134225. Replace the headlight assembly. 5. Remove hood, headlight assembly, brush roll...
Manual
Page 9
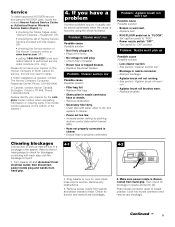
...; Replace fuse/reset breaker. Problem: Cleaner suction low Possible cause Possible solution • Filter bag full. • Replace filter bag. • Obstruction in nozzle connector, hose or wands. • Remove obstruction. • Secondary filter dirty. • Clean filter with water, allow to dry and replace in the system. Check for an automated referral of the cleaner.) 4. Please do not send your cleaner by the complete model number when requesting information or ordering parts. (The model number appears on , and check hose end...
...; Replace fuse/reset breaker. Problem: Cleaner suction low Possible cause Possible solution • Filter bag full. • Replace filter bag. • Obstruction in nozzle connector, hose or wands. • Remove obstruction. • Secondary filter dirty. • Clean filter with water, allow to dry and replace in the system. Check for an automated referral of the cleaner.) 4. Please do not send your cleaner by the complete model number when requesting information or ordering parts. (The model number appears on , and check hose end...
Manual
Page 10
... appliance is purchased. This warranty only applies when the product is in use , in accordance with the Owner's Manual against original defects in the U.S.A., phone 1-800-944-9200 OR visit The Hoover Company online at no cost to a Hoover Factory Service Center for a period of warranty service outlets, phone the Hoover Consumer Response Center, 1-330-499-9499. Hoover Factory Service Centers. 2. Proof of purchase...
... appliance is purchased. This warranty only applies when the product is in use , in accordance with the Owner's Manual against original defects in the U.S.A., phone 1-800-944-9200 OR visit The Hoover Company online at no cost to a Hoover Factory Service Center for a period of warranty service outlets, phone the Hoover Consumer Response Center, 1-330-499-9499. Hoover Factory Service Centers. 2. Proof of purchase...


