Manual
Page 1
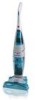
.... Review this manual before being shipped from the factory. www.hoover.com If you should happen to need assistance during assembly or operation: Visit us online at www.hoover.com to speak with SpinScrub™ Brushes The Hard Floor Cleaner Thank you (click on the "Service" button) or Call ...1-800-944-9200 for selecting a HOOVER product. only) or Call 1-330-499-9499 to find the service...
.... Review this manual before being shipped from the factory. www.hoover.com If you should happen to need assistance during assembly or operation: Visit us online at www.hoover.com to speak with SpinScrub™ Brushes The Hard Floor Cleaner Thank you (click on the "Service" button) or Call ...1-800-944-9200 for selecting a HOOVER product. only) or Call 1-330-499-9499 to find the service...
Manual
Page 2
...on cord or pull cord around sharp edges or corners. Do not allow cleaner to a Hoover Factory Service Center or Authorized Hoover Warranty Service Dealer (Depot). • Use cleaner only for warranty service of body away from electrical outlet before unplugging. •...at any other toxic material with this information. Index Assembly 3-4 Cleaner descriptions 5 How to clean 9-10 Recommended cleaning sequence 9 To clean floor 9 Cleaning sealed wood floors ..10 Picking up chlorine bleach, pine based cleaners, drain cleaner, or any time. • Keep hair, loose clothing,...
...on cord or pull cord around sharp edges or corners. Do not allow cleaner to a Hoover Factory Service Center or Authorized Hoover Warranty Service Dealer (Depot). • Use cleaner only for warranty service of body away from electrical outlet before unplugging. •...at any other toxic material with this information. Index Assembly 3-4 Cleaner descriptions 5 How to clean 9-10 Recommended cleaning sequence 9 To clean floor 9 Cleaning sealed wood floors ..10 Picking up chlorine bleach, pine based cleaners, drain cleaner, or any time. • Keep hair, loose clothing,...
Manual
Page 3
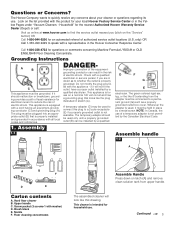
... like the plug illustrated in the Hoover Consumer Response Center. DANGER- Do not modify the plug provided with a cord having an equipment-grounding conductor (C) and grounding plug (A). The green colored rigid ear, lug, or the like (F) extending from upper handle. Hard floor cleaner B. Brush block E. Nozzle F. This cleaner is properly grounded. only) OR Call...
... like the plug illustrated in the Hoover Consumer Response Center. DANGER- Do not modify the plug provided with a cord having an equipment-grounding conductor (C) and grounding plug (A). The green colored rigid ear, lug, or the like (F) extending from upper handle. Hard floor cleaner B. Brush block E. Nozzle F. This cleaner is properly grounded. only) OR Call...

Manual
Page 4
... G F H 1-10 F To install nozzle, make sure latches (F) are out. 1-3 1-4 B 1-5 C With cord hook (B) to back of cleaner, Insert two screws into back of screwdriver. as shown. tank area. Tighten screw with washer in place. 1-11 I Cord clip To help keep the...D Replace clean solution tank by positioning bottom first. Push brush control switch (C) down onto cleaner. Press latch and snap top portion into hole. Tilt cleaner back so that it rests on the floor. Tighten with a Phillips Insert screw with a Phillips screwdriver. Press brush assembly firmly to connect...
... G F H 1-10 F To install nozzle, make sure latches (F) are out. 1-3 1-4 B 1-5 C With cord hook (B) to back of cleaner, Insert two screws into back of screwdriver. as shown. tank area. Tighten screw with washer in place. 1-11 I Cord clip To help keep the...D Replace clean solution tank by positioning bottom first. Push brush control switch (C) down onto cleaner. Press latch and snap top portion into hole. Tilt cleaner back so that it rests on the floor. Tighten with a Phillips Insert screw with a Phillips screwdriver. Press brush assembly firmly to connect...
Manual
Page 6
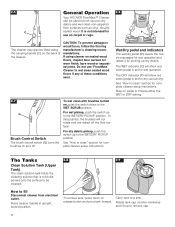
...operation. To remove tank, press down to clean" section for complete cleaner setup instructions. 2-5 C General Operation 2-6 Your HOOVER FloorMate™ Cleaner can be lifted using cleaner on sealed wood floors, inspect floor surface for worn finish, bare wood or separated joints. Step on ...pedal to wet clean sealed wood floors if any of the cleaner. The Tanks 2-8 2-9 Clean Solution...
...operation. To remove tank, press down to clean" section for complete cleaner setup instructions. 2-5 C General Operation 2-6 Your HOOVER FloorMate™ Cleaner can be lifted using cleaner on sealed wood floors, inspect floor surface for worn finish, bare wood or separated joints. Step on ...pedal to wet clean sealed wood floors if any of the cleaner. The Tanks 2-8 2-9 Clean Solution...
Manual
Page 7
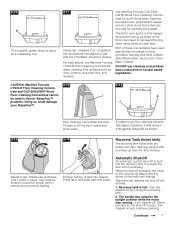
... Concentrate and OLD ENGLISH® Wood Floor Cleaning Concentrate cannot be locked in Hoover SteamVac™ products. If rubber ring (J) on and continue cleaning. Turn the cleaner off . Turn cleaner on cap has become dislodged, reposition it locks in your SteamVac™. 2-12 I ) (1 quart) with the 'FloorMate' hard floor cleaner. of the motor will activate. 1. Check...
... Concentrate and OLD ENGLISH® Wood Floor Cleaning Concentrate cannot be locked in Hoover SteamVac™ products. If rubber ring (J) on and continue cleaning. Turn the cleaner off . Turn cleaner on cap has become dislodged, reposition it locks in your SteamVac™. 2-12 I ) (1 quart) with the 'FloorMate' hard floor cleaner. of the motor will activate. 1. Check...
Manual
Page 9
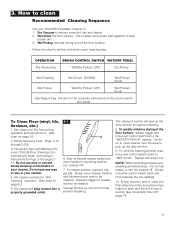
... Recovery Tank. (Figs. 2-16 through 212. Empty recovery tank or clean the filter when the motor sound becomes higher in your HOOVER 'FloorMate' Cleaner to help prevent streaking. Fill solution tank with steps 7-9. Step on the control switch and pedal. Slowly move wet control switch up...cleaning another area, move the control switch back and forth between wet cleaning and wet pickup, it is a loss of the floor surface, release trigger and move cleaner forward and backward over the area to "WET Scrub". Dry Vacuum to help loosen dirt. 3. To greatly enhance drying of...
... Recovery Tank. (Figs. 2-16 through 212. Empty recovery tank or clean the filter when the motor sound becomes higher in your HOOVER 'FloorMate' Cleaner to help prevent streaking. Fill solution tank with steps 7-9. Step on the control switch and pedal. Slowly move wet control switch up...cleaning another area, move the control switch back and forth between wet cleaning and wet pickup, it is a loss of the floor surface, release trigger and move cleaner forward and backward over the area to "WET Scrub". Dry Vacuum to help loosen dirt. 3. To greatly enhance drying of...
Manual
Page 10
...11. Set Wet/Dry pedal in your 'FloorMate' Cleaner to wet clean the floor if any of wax in the WET Pickup/Scrub position. Cleaning Sealed Wood Floors Your HOOVER 'FloorMate' Cleaner may also be used to clean wood floors that have been sealed with a polyurethane coating and ...can be cleaned with Machine Formula OLD ENGLISH® Wood Floor Cleaning Concentrate and water, according to instructions for ...
...11. Set Wet/Dry pedal in your 'FloorMate' Cleaner to wet clean the floor if any of wax in the WET Pickup/Scrub position. Cleaning Sealed Wood Floors Your HOOVER 'FloorMate' Cleaner may also be used to clean wood floors that have been sealed with a polyurethane coating and ...can be cleaned with Machine Formula OLD ENGLISH® Wood Floor Cleaning Concentrate and water, according to instructions for ...
Manual
Page 11
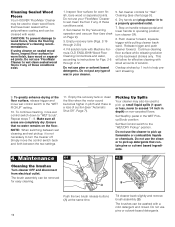
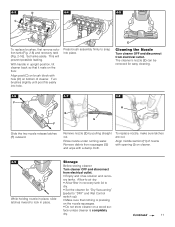
...(E) by pulling straight out. Storage Before storing cleaner: Turn cleaner OFF and disconnect from squeegee (G) and wipe with hole (D) on brush block with a damp cloth. The cleaner's nozzle (E) can be removed for easy cleaning. 4-6 4-7 4-8 F E H I ) on cleaner. 4-9 While holding nozzle in place, slide ...hole. E Cleaning the Nozzle Turn cleaner OFF and disconnect from electrical outlet. With handle in upright position, tilt cleaner back so that nothing is pressing on the nozzle squeegee. • Do not store cleaner on the floor. To replace nozzle, make sure ...
...(E) by pulling straight out. Storage Before storing cleaner: Turn cleaner OFF and disconnect from squeegee (G) and wipe with hole (D) on brush block with a damp cloth. The cleaner's nozzle (E) can be removed for easy cleaning. 4-6 4-7 4-8 F E H I ) on cleaner. 4-9 While holding nozzle in place, slide ...hole. E Cleaning the Nozzle Turn cleaner OFF and disconnect from electrical outlet. With handle in upright position, tilt cleaner back so that nothing is pressing on the nozzle squeegee. • Do not store cleaner on the floor. To replace nozzle, make sure ...
Manual
Page 12
... is too large to clear squeegee • Tip nozzle off floor by : • checking the Yellow Pages under "Vacuum Cleaners Household" OR - • checking the list of Factory Service Centers provided with this cleaner OR - • checking the Service section of The Hoover Company on-line at the bottom of the back of Reckitt...
... is too large to clear squeegee • Tip nozzle off floor by : • checking the Yellow Pages under "Vacuum Cleaners Household" OR - • checking the list of Factory Service Centers provided with this cleaner OR - • checking the Service section of The Hoover Company on-line at the bottom of the back of Reckitt...


