Manual
Page 5
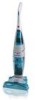
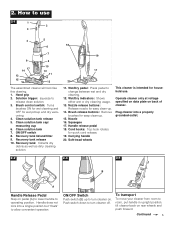
... cleaning. 12. Brush control switch: Turns brushes ON for wet cleaning and OFF for quick cord release. 19. Clean solution tank 7. Recovery tank lid and filter 9. Wet/Dry pedal: Press pedal to turn cleaner on pedal (A) to lower handle to allow convenient operation. Cord hooks: Top hook rotates for wet pickup...
... cleaning. 12. Brush control switch: Turns brushes ON for wet cleaning and OFF for quick cord release. 19. Clean solution tank 7. Recovery tank lid and filter 9. Wet/Dry pedal: Press pedal to turn cleaner on pedal (A) to lower handle to allow convenient operation. Cord hooks: Top hook rotates for wet pickup...

Manual
Page 8
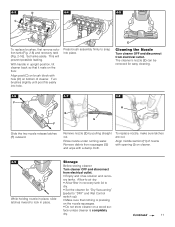
...from electrical outlet. To replace tank, insert bottom of tank into cleaner and pivot top portion until it is low or reduced. Remove filter lid (S), then remove filter. Allow filter to be emptied after dry vacuuming and before wet operation. Press down on release button (L) and pivot tank forward. 2-17 N ...M Lift up on back of tank (Q). To replace lid, align tab (P) on lid with hole on the filter screen (O) in place. Replace filter lid. Empty tank. 2-18 O 2-19 P Q 2-20 R Dry or loose debris will also collect on front of tank. To Clean...
...from electrical outlet. To replace tank, insert bottom of tank into cleaner and pivot top portion until it is low or reduced. Remove filter lid (S), then remove filter. Allow filter to be emptied after dry vacuuming and before wet operation. Press down on release button (L) and pivot tank forward. 2-17 N ...M Lift up on back of tank (Q). To replace lid, align tab (P) on lid with hole on the filter screen (O) in place. Replace filter lid. Empty tank. 2-18 O 2-19 P Q 2-20 R Dry or loose debris will also collect on front of tank. To Clean...
Manual
Page 9
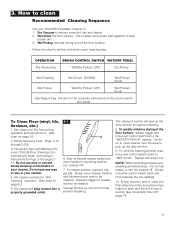
How to clean Recommended Cleaning Sequence Use your HOOVER 'FloorMate' Cleaner to "WET Scrub". Empty Recovery Tank. (Figs. 2-16 through 212. Do not use any type of suction (see "Automatic Shut-Off", page 7). 9 Do ... to help loosen dirt. 3. To Clean Floor (vinyl, tile, linoleum, etc.) 1. To greatly enhance drying of the floor surface. Empty recovery tank or clean the filter when the motor sound becomes higher in pitch and there is not necessary to operating position; Wet Pickup reduces drying time of the floor surface...
How to clean Recommended Cleaning Sequence Use your HOOVER 'FloorMate' Cleaner to "WET Scrub". Empty Recovery Tank. (Figs. 2-16 through 212. Do not use any type of suction (see "Automatic Shut-Off", page 7). 9 Do ... to help loosen dirt. 3. To Clean Floor (vinyl, tile, linoleum, etc.) 1. To greatly enhance drying of the floor surface. Empty recovery tank or clean the filter when the motor sound becomes higher in pitch and there is not necessary to operating position; Wet Pickup reduces drying time of the floor surface...
Manual
Page 10
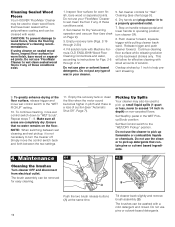
... 4-1 A Cleaning the brushes Turn cleaner OFF and disconnect from electrical outlet. The brushes can be washed with water. Cleaning Sealed Wood Floors Your HOOVER 'FloorMate' Cleaner may also be used to clean wood floors that have been sealed with a polyurethane coating and can be cleaned with a mild ... loss of the floor surface, release trigger and move wet control switch down to help prevent streaking. 9. Empty the recovery tank or clean the filter when the motor sound becomes higher in your 'FloorMate' Cleaner to the "WET PICKUP" setting. 10. Do not use pine or solvent based ...
... 4-1 A Cleaning the brushes Turn cleaner OFF and disconnect from electrical outlet. The brushes can be washed with water. Cleaning Sealed Wood Floors Your HOOVER 'FloorMate' Cleaner may also be used to clean wood floors that have been sealed with a polyurethane coating and can be cleaned with a mild ... loss of the floor surface, release trigger and move wet control switch down to help prevent streaking. 9. Empty the recovery tank or clean the filter when the motor sound becomes higher in your 'FloorMate' Cleaner to the "WET PICKUP" setting. 10. Do not use pine or solvent based ...
Manual
Page 11
... rinse solution and recovery tanks. Remove nozzle (E) by pulling straight out. To replace nozzle, make sure latches are out. Allow to air dry. • Allow filter in upright position, tilt cleaner back so that nothing is pressing on the nozzle squeegee. • Do not store cleaner on the floor. 4-3 D 4-4 4-5 C PUSH TO...
... rinse solution and recovery tanks. Remove nozzle (E) by pulling straight out. To replace nozzle, make sure latches are out. Allow to air dry. • Allow filter in upright position, tilt cleaner back so that nothing is pressing on the nozzle squeegee. • Do not store cleaner on the floor. 4-3 D 4-4 4-5 C PUSH TO...
Manual
Page 12
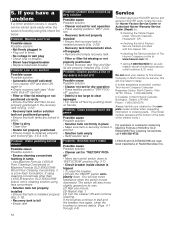
... Brushes won't rotate Possible cause Possible solution • Cleaner set for service, this cleaner OR - • checking the Service section of The Hoover Company on its own. (2) Wait one minute. (3) Repeat step 1. (4) Turn the cleaner ON and continue cleaning. The switch will feel some...WET" position. • Recovery tank not properly installed • Ensure that both tanks are properly positioned in place. • Filter is dirty • Clean filter • Nozzle not properly positioned • Ensure nozzle is installed properly (Fig. 2-20). • Recovery tank full/automatic...
... Brushes won't rotate Possible cause Possible solution • Cleaner set for service, this cleaner OR - • checking the Service section of The Hoover Company on its own. (2) Wait one minute. (3) Repeat step 1. (4) Turn the cleaner ON and continue cleaning. The switch will feel some...WET" position. • Recovery tank not properly installed • Ensure that both tanks are properly positioned in place. • Filter is dirty • Clean filter • Nozzle not properly positioned • Ensure nozzle is installed properly (Fig. 2-20). • Recovery tank full/automatic...


