Manual
Page 2
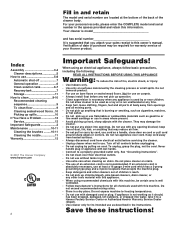
... chlorine bleach, pine based cleaners, drain cleaner, or any time. • Keep hair, loose clothing, fingers, feet and all parts of your Hoover product. Index Assembly 3-4 Cleaner descriptions 5 How to use 5-8 Automatic shut-off all controls before unplugging. • Do not unplug by cord, ...You Have a Problem 12 Service 12 Important Safeguards 2 Maintenance 10-11 Cleaning the brushes .........10-11 Cleaning the nozzle 11 Warranty 13 © 2001 The Hoover Company www.hoover.com 2 Important Safeguards! They may damage the cleaner. • Do not put any opening blocked; keep ...
... chlorine bleach, pine based cleaners, drain cleaner, or any time. • Keep hair, loose clothing, fingers, feet and all parts of your Hoover product. Index Assembly 3-4 Cleaner descriptions 5 How to use 5-8 Automatic shut-off all controls before unplugging. • Do not unplug by cord, ...You Have a Problem 12 Service 12 Important Safeguards 2 Maintenance 10-11 Cleaning the brushes .........10-11 Cleaning the nozzle 11 Warranty 13 © 2001 The Hoover Company www.hoover.com 2 Important Safeguards! They may damage the cleaner. • Do not put any opening blocked; keep ...
Manual
Page 3
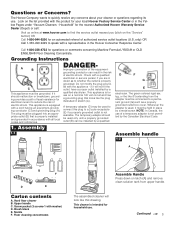
...? The plug must be plugged into an appropriate outlet (B) that looks like the plug illustrated in the Hoover Consumer Response Center. A temporary adapter (D) may be grounded. Nozzle F. Call 1-800-228-4722 for an automated referral of authorized service outlet locations (U.S. Grounding Instructions A ...its use on the list provided with a cord having an equipment-grounding conductor (C) and grounding plug (A). Brush block E. The Hoover Company wants to reduce the risk of a temporary adapter is intended for use . Improper connection of electric shock. Hard floor ...
...? The plug must be plugged into an appropriate outlet (B) that looks like the plug illustrated in the Hoover Consumer Response Center. A temporary adapter (D) may be grounded. Nozzle F. Call 1-800-228-4722 for an automated referral of authorized service outlet locations (U.S. Grounding Instructions A ...its use on the list provided with a cord having an equipment-grounding conductor (C) and grounding plug (A). Brush block E. The Hoover Company wants to reduce the risk of a temporary adapter is intended for use . Improper connection of electric shock. Hard floor ...

Manual
Page 4
...place. 1-6 1-7 E 1-8 D Replace clean solution tank by positioning bottom first. Turn brushes slightly until post fits easily into place. While holding nozzle in place, slide latches inward to back of cleaner, Insert two screws into back of handle push upper handle down onto cleaner. tank area. Remove...the floor. Tighten screw with opening (H) on cleaner. Push brush control switch (C) down to snap into place. 1-9 G F H 1-10 F To install nozzle, make sure latches (F) are out. Press latch and snap top portion into hole. Tilt cleaner back so that it rests on underside of...
...place. 1-6 1-7 E 1-8 D Replace clean solution tank by positioning bottom first. Turn brushes slightly until post fits easily into place. While holding nozzle in place, slide latches inward to back of cleaner, Insert two screws into back of handle push upper handle down onto cleaner. tank area. Remove...the floor. Tighten screw with opening (H) on cleaner. Push brush control switch (C) down to snap into place. 1-9 G F H 1-10 F To install nozzle, make sure latches (F) are out. Press latch and snap top portion into hole. Tilt cleaner back so that it rests on underside of...
Manual
Page 5
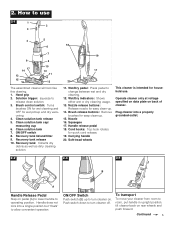
... lock into a properly grounded outlet. 2-2 2-3 2-4 B A Handle Release Pedal Step on . Hand grip 2. To transport To move your cleaner from room to operating position. Nozzle release buttons: Release nozzle for easy clean-up to turn cleaner on pedal (A) to lower handle to room, put handle in upright position; tilt cleaner back on back...
... lock into a properly grounded outlet. 2-2 2-3 2-4 B A Handle Release Pedal Step on . Hand grip 2. To transport To move your cleaner from room to operating position. Nozzle release buttons: Release nozzle for easy clean-up to turn cleaner on pedal (A) to lower handle to room, put handle in upright position; tilt cleaner back on back...
Manual
Page 6
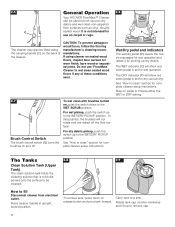
...debris. Do not use on sealed wood floors, inspect floor surface for worn finish, bare wood or separated joints. 2-5 C General Operation 2-6 Your HOOVER FloorMate™ Cleaner can be used to wood floors, follow the flooring manufacturer's cleaning recommendations. Place cleaner handle in upright, locked position. It is...surface to wet clean sealed wood floors if any of the cleaner. Wet/Dry pedal and indicators The wet/dry pedal (D) lowers the nozzle squeegee for wet operation and raises it for use 'FloorMate' Cleaner to be lifted using cleaner on carpet or rugs. To wet ...
...debris. Do not use on sealed wood floors, inspect floor surface for worn finish, bare wood or separated joints. 2-5 C General Operation 2-6 Your HOOVER FloorMate™ Cleaner can be used to wood floors, follow the flooring manufacturer's cleaning recommendations. Place cleaner handle in upright, locked position. It is...surface to wet clean sealed wood floors if any of the cleaner. Wet/Dry pedal and indicators The wet/dry pedal (D) lowers the nozzle squeegee for wet operation and raises it for use 'FloorMate' Cleaner to be lifted using cleaner on carpet or rugs. To wet ...
Manual
Page 11
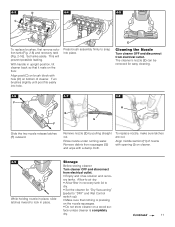
...switch up). • Make sure that it rests on a wood surface unless cleaner is pressing on the nozzle squeegee. • Do not store cleaner on the floor. Remove nozzle (E) by pulling straight out. Allow to air dry. • Allow filter in recovery tank lid to.... • Set the cleaner for easy cleaning. 4-6 4-7 4-8 F E H I ) on cleaner. 4-9 While holding nozzle in place. Remove debris from squeegee (G) and wipe with opening (I G F Slide the two nozzle release latches (F) outward. 4-3 D 4-4 4-5 C PUSH TO SELECT DRY OR WET HANDLE RELEASE DRY PICKUP WET PICKUP SCRUB...
...switch up). • Make sure that it rests on a wood surface unless cleaner is pressing on the nozzle squeegee. • Do not store cleaner on the floor. Remove nozzle (E) by pulling straight out. Allow to air dry. • Allow filter in recovery tank lid to.... • Set the cleaner for easy cleaning. 4-6 4-7 4-8 F E H I ) on cleaner. 4-9 While holding nozzle in place. Remove debris from squeegee (G) and wipe with opening (I G F Slide the two nozzle release latches (F) outward. 4-3 D 4-4 4-5 C PUSH TO SELECT DRY OR WET HANDLE RELEASE DRY PICKUP WET PICKUP SCRUB...
Manual
Page 12
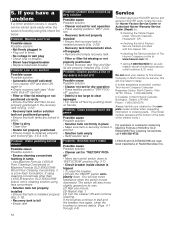
..., clean the brushes to remove debris. (Figs. 4-1 through 4-4) Service To obtain approved HOOVER service and genuine HOOVER parts, locate the nearest Hoover Factory Service Center or Authorized Hoover Warranty Service Dealer (Depot) by the complete model number when requesting information or ordering parts...; Filter is dirty • Clean filter • Nozzle not properly positioned • Ensure nozzle is found by pushing down to "WET SCRUB" position (Fig. 2-7). • Circuit breaker inside cleaner is too large to The Hoover Company in delay. If further assistance is a low-...
..., clean the brushes to remove debris. (Figs. 4-1 through 4-4) Service To obtain approved HOOVER service and genuine HOOVER parts, locate the nearest Hoover Factory Service Center or Authorized Hoover Warranty Service Dealer (Depot) by the complete model number when requesting information or ordering parts...; Filter is dirty • Clean filter • Nozzle not properly positioned • Ensure nozzle is found by pushing down to "WET SCRUB" position (Fig. 2-7). • Circuit breaker inside cleaner is too large to The Hoover Company in delay. If further assistance is a low-...

