Product Manual
Page 3
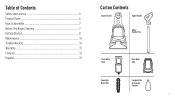
Table of Contents Safety Instructions 4 Product Guide 6 How to Assemble 7 Before You Begin Cleaning 7 Getting Started 8 Maintenance 10 Troubleshooting 14 Warranty ...15 Français...16 Español...31 Carton Contents Carpet Cleaner Upper Handle Upper Handle Pole Clean Water Tank Dirty Water Tank PowerSpin Brush Roll Sample Bottle of Cleaning Solution 3
Table of Contents Safety Instructions 4 Product Guide 6 How to Assemble 7 Before You Begin Cleaning 7 Getting Started 8 Maintenance 10 Troubleshooting 14 Warranty ...15 Français...16 Español...31 Carton Contents Carpet Cleaner Upper Handle Upper Handle Pole Clean Water Tank Dirty Water Tank PowerSpin Brush Roll Sample Bottle of Cleaning Solution 3
Product Manual
Page 6
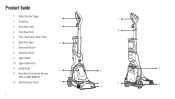
Removable Nozzle 8. Upper Handle Pole 11. Dirty Water Tank Handle Release (NOT A CARRY HANDLE!) 13. Product Guide 1. PowerSpin Brush 9. On/Off Pedal 4 12. Handle Release Pedal 5 6 9 10 12 6 7 11 13 8 Cord Wrap 3. Filter (Under Dirty Water Tank) 6. Upper Handle 10. Clean Water Tank 2 4. Quick Pour Spout 3 7. Water/Solution Trigger 1 2. Dirty Water Tank 5.
Removable Nozzle 8. Upper Handle Pole 11. Dirty Water Tank Handle Release (NOT A CARRY HANDLE!) 13. Product Guide 1. PowerSpin Brush 9. On/Off Pedal 4 12. Handle Release Pedal 5 6 9 10 12 6 7 11 13 8 Cord Wrap 3. Filter (Under Dirty Water Tank) 6. Upper Handle 10. Clean Water Tank 2 4. Quick Pour Spout 3 7. Water/Solution Trigger 1 2. Dirty Water Tank 5.

Product Manual
Page 7
...in a small, hidden area. Gently rub surface with a white paper towel. Don't clean fabric marked "S" ("solvent/ dry" clean only). 3. Vacuum carpet and upholstery thoroughly with a Hoover spot treatment (see Hoover Cleaning Solution Guide) to wood floors underneath area rugs or carpet, place waterproof material (ex:... the upper Handle Pole into the base until you hear a "CLICK". 3 Slide the Clean Water Tank securely into place on the back of the unit. Before You Begin Cleaning 1. Assembly Instructions How to Assemble Fully assemble or install product prior to protect wood or ...
...in a small, hidden area. Gently rub surface with a white paper towel. Don't clean fabric marked "S" ("solvent/ dry" clean only). 3. Vacuum carpet and upholstery thoroughly with a Hoover spot treatment (see Hoover Cleaning Solution Guide) to wood floors underneath area rugs or carpet, place waterproof material (ex:... the upper Handle Pole into the base until you hear a "CLICK". 3 Slide the Clean Water Tank securely into place on the back of the unit. Before You Begin Cleaning 1. Assembly Instructions How to Assemble Fully assemble or install product prior to protect wood or ...
Product Manual
Page 8
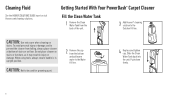
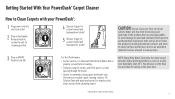
...in injury or damage. Slide the Clean Water Tank back into the unit. Getting Started With Your PowerDash™ Carpet Cleaner Fill the Clean Water Tank 1 Remove the Clean Water Tank from the bottom and add warm water to the Water fill line. 4 Replace and ...tighten cap. CAUTION: Not to the Solution fill line. Do not place cleaner on stairs. To avoid personal injury or damage, and to prevent the cleaner from falling, always place cleaner at bottom of the unit. 3 Add Hoover® cleaning...
...in injury or damage. Slide the Clean Water Tank back into the unit. Getting Started With Your PowerDash™ Carpet Cleaner Fill the Clean Water Tank 1 Remove the Clean Water Tank from the bottom and add warm water to the Water fill line. 4 Replace and ...tighten cap. CAUTION: Not to the Solution fill line. Do not place cleaner on stairs. To avoid personal injury or damage, and to prevent the cleaner from falling, always place cleaner at bottom of the unit. 3 Add Hoover® cleaning...
Product Manual
Page 9
... Water Tank is properly secured before cleaning. • Continue using dry strokes until little water is a loss in suction (see the float rise and shut off "). For heavily soiled areas, repeat. Fill Solution Tank with water only. NOTE: Empty Dirty Water Tank when the motor sound becomes higher pitched and there is visible passing through the nozzle. • Hoover...
... Water Tank is properly secured before cleaning. • Continue using dry strokes until little water is a loss in suction (see the float rise and shut off "). For heavily soiled areas, repeat. Fill Solution Tank with water only. NOTE: Empty Dirty Water Tank when the motor sound becomes higher pitched and there is visible passing through the nozzle. • Hoover...
Product Manual
Page 10
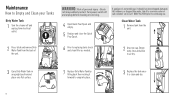
... switch off and unplug from the back of personal injury - If appliance is clean and dry. Clean Water Tank 1 Remove tank from the unit. 2 Press latch and remove Dirty Water Tank from electrical outlet. WARNING: Risk of the unit. 6 Prior to replacing tank, check and clean filter as it should, has been dropped, damaged, left outdoors, or dropped into...
... switch off and unplug from the back of personal injury - If appliance is clean and dry. Clean Water Tank 1 Remove tank from the unit. 2 Press latch and remove Dirty Water Tank from electrical outlet. WARNING: Risk of the unit. 6 Prior to replacing tank, check and clean filter as it should, has been dropped, damaged, left outdoors, or dropped into...
Product Manual
Page 11
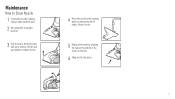
Lift the unit up to remove. Maintenance How to Clean Nozzle 1 To prevent possible leaking, remove tanks from the unit. 2 Unit should be in upright position. 3 Grip the top of the nozzle to the foot. 6 Snap nozzle into place. 11 Allow it to dry. 5 Replace the nozzle by aligning the tabs at the bottom of the nozzle and pull up slightly to remove nozzle. 4 Rinse the nozzle under running water to remove any dirt or debris.
Lift the unit up to remove. Maintenance How to Clean Nozzle 1 To prevent possible leaking, remove tanks from the unit. 2 Unit should be in upright position. 3 Grip the top of the nozzle to the foot. 6 Snap nozzle into place. 11 Allow it to dry. 5 Replace the nozzle by aligning the tabs at the bottom of the nozzle and pull up slightly to remove nozzle. 4 Rinse the nozzle under running water to remove any dirt or debris.
Product Manual
Page 14
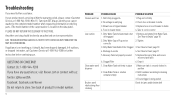
... at 1-800-944-9200; Replace Recovery Tank and secure recovery tank latch 6. Dirty Water Cap or Plug not on the data plate). Tighten 3. Blockage in home 4. Dirty Water Tank Debris Filter Clogged 3. Dirty Water Tank full/automatic shut 1. See "How to Clean" page 11 5. Troubleshooting If you have any questions or, visit Hoover.com or connect with us: Twitter...
... at 1-800-944-9200; Replace Recovery Tank and secure recovery tank latch 6. Dirty Water Cap or Plug not on the data plate). Tighten 3. Blockage in home 4. Dirty Water Tank Debris Filter Clogged 3. Dirty Water Tank full/automatic shut 1. See "How to Clean" page 11 5. Troubleshooting If you have any questions or, visit Hoover.com or connect with us: Twitter...
Product Manual
Page 48
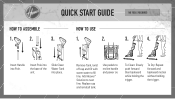
Use pedals to next line. Add Hoover® Solution to recline handle and power on. To Clean: Slowly push forward then backward while holding the trigger. To Dry: Repeat forward and backward motion without holding the trigger. Remove Tank, twist off cap and ll with warm water to ll line. Replace cap and reinstall tank. Slide Clean Water Tank into Pole. QUICK START GUIDE Insert Handle into place. Insert Pole into the base of the unit.
Use pedals to next line. Add Hoover® Solution to recline handle and power on. To Clean: Slowly push forward then backward while holding the trigger. To Dry: Repeat forward and backward motion without holding the trigger. Remove Tank, twist off cap and ll with warm water to ll line. Replace cap and reinstall tank. Slide Clean Water Tank into Pole. QUICK START GUIDE Insert Handle into place. Insert Pole into the base of the unit.


