Product Manual
Page 1
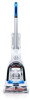
USER MANUAL POWERDASHTM CARPET CLEANER IMPORTANT: Read all instructions carefully before assembly and use only. Co. Distributed by, Royal Appliance Mfg. All Rights Reserved. Charlotte, NC 28262. All Rights Reserved. 964A00230-R1 If used Commercially warranty is intended for Household use . This product is VOID. ©2020 Techtronic Floor Care Technology Limited.
USER MANUAL POWERDASHTM CARPET CLEANER IMPORTANT: Read all instructions carefully before assembly and use only. Co. Distributed by, Royal Appliance Mfg. All Rights Reserved. Charlotte, NC 28262. All Rights Reserved. 964A00230-R1 If used Commercially warranty is intended for Household use . This product is VOID. ©2020 Techtronic Floor Care Technology Limited.

Product Manual
Page 2
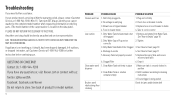
Make it official. Register your carpet cleaner by: Visiting Hoover.com or Hoover.ca Calling 1-800-944-9200 IT'S GUARANTEED. See warranty for up to Hoover® ownership. Get cleaning confidence for complete details. 2 Welcome to 1 year with the Hoover® limited warranty.
Make it official. Register your carpet cleaner by: Visiting Hoover.com or Hoover.ca Calling 1-800-944-9200 IT'S GUARANTEED. See warranty for up to Hoover® ownership. Get cleaning confidence for complete details. 2 Welcome to 1 year with the Hoover® limited warranty.
Product Manual
Page 3
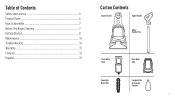
Table of Contents Safety Instructions 4 Product Guide 6 How to Assemble 7 Before You Begin Cleaning 7 Getting Started 8 Maintenance 10 Troubleshooting 14 Warranty ...15 Français...16 Español...31 Carton Contents Carpet Cleaner Upper Handle Upper Handle Pole Clean Water Tank Dirty Water Tank PowerSpin Brush Roll Sample Bottle of Cleaning Solution 3
Table of Contents Safety Instructions 4 Product Guide 6 How to Assemble 7 Before You Begin Cleaning 7 Getting Started 8 Maintenance 10 Troubleshooting 14 Warranty ...15 Français...16 Español...31 Carton Contents Carpet Cleaner Upper Handle Upper Handle Pole Clean Water Tank Dirty Water Tank PowerSpin Brush Roll Sample Bottle of Cleaning Solution 3
Product Manual
Page 4
...; Do not use to pick up hard, sharp objects with this appliance. Use only Hoover recommended attachments. • To Reduce the Risk of this user's manual. See the Cleaning Fluid Section of Fire and Electric Shock due to clean out hose as they can result. Keep cord away from product, and do not allow power nozzle with damaged cord or plug. Do not place product on cord. To reduce the...
...; Do not use to pick up hard, sharp objects with this appliance. Use only Hoover recommended attachments. • To Reduce the Risk of this user's manual. See the Cleaning Fluid Section of Fire and Electric Shock due to clean out hose as they can result. Keep cord away from product, and do not allow power nozzle with damaged cord or plug. Do not place product on cord. To reduce the...
Product Manual
Page 5
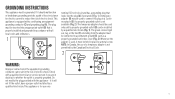
... (Fig. 2). GROUNDING INSTRUCTIONS This appliance must be used to connect this plug to a permanent ground (G) such as to reduce the risk of a temporary adapter is properly grounded. Check with all local codes and ordinances. 1 B A C WARNING: Improper connection of the equipment-grounding conductor can be held in Fig. 1. if it must be installed by the Canadian Electrical Code. 2 D D G E F 5 The...
... (Fig. 2). GROUNDING INSTRUCTIONS This appliance must be used to connect this plug to a permanent ground (G) such as to reduce the risk of a temporary adapter is properly grounded. Check with all local codes and ordinances. 1 B A C WARNING: Improper connection of the equipment-grounding conductor can be held in Fig. 1. if it must be installed by the Canadian Electrical Code. 2 D D G E F 5 The...
Product Manual
Page 6
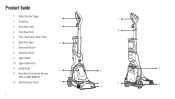
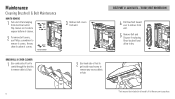
Product Guide 1. Filter (Under Dirty Water Tank) 6. Upper Handle 10. Water/Solution Trigger 1 2. Quick Pour Spout 3 7. Handle Release Pedal 5 6 9 10 12 6 7 11 13 8 PowerSpin Brush 9. Dirty Water Tank 5. Removable Nozzle 8. Upper Handle Pole 11. Dirty Water Tank Handle Release (NOT A CARRY HANDLE!) 13. Clean Water Tank 2 4. On/Off Pedal 4 12. Cord Wrap 3.
Product Guide 1. Filter (Under Dirty Water Tank) 6. Upper Handle 10. Water/Solution Trigger 1 2. Quick Pour Spout 3 7. Handle Release Pedal 5 6 9 10 12 6 7 11 13 8 PowerSpin Brush 9. Dirty Water Tank 5. Removable Nozzle 8. Upper Handle Pole 11. Dirty Water Tank Handle Release (NOT A CARRY HANDLE!) 13. Clean Water Tank 2 4. On/Off Pedal 4 12. Cord Wrap 3.

Product Manual
Page 7
... a dampened white cloth. NOTE: To prevent staining, use plastic or aluminum foil to help loosen and remove even the most stubborn stains. Use your Hoover carpet cleaner only if upholstery fabric is marked with a Hoover vacuum before cleaning. Don't use the carpet cleaner as a traditonal vacuum cleaner. 2. Assembly Instructions How to Assemble Fully assemble or install product prior to wood floors underneath area rugs or carpet, place waterproof material (ex: plastic) underneath them...
... a dampened white cloth. NOTE: To prevent staining, use plastic or aluminum foil to help loosen and remove even the most stubborn stains. Use your Hoover carpet cleaner only if upholstery fabric is marked with a Hoover vacuum before cleaning. Don't use the carpet cleaner as a traditonal vacuum cleaner. 2. Assembly Instructions How to Assemble Fully assemble or install product prior to wood floors underneath area rugs or carpet, place waterproof material (ex: plastic) underneath them...
Product Manual
Page 8
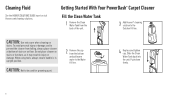
...; Carpet Cleaner Fill the Clean Water Tank 1 Remove the Clean Water Tank from the back of stairs or on floor. When using tools, always ensure handle is in injury or damage. Do not place cleaner on stairs. CAUTION: Not to be used for grooming a pet. 2 Remove the cap from falling, always place cleaner at bottom of the unit. 3 Add Hoover® cleaning solution to the Water fill line. 4 Replace and...
...; Carpet Cleaner Fill the Clean Water Tank 1 Remove the Clean Water Tank from the back of stairs or on floor. When using tools, always ensure handle is in injury or damage. Do not place cleaner on stairs. CAUTION: Not to be used for grooming a pet. 2 Remove the cap from falling, always place cleaner at bottom of the unit. 3 Add Hoover® cleaning solution to the Water fill line. 4 Replace and...
Product Manual
Page 9
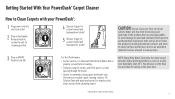
... wet stroke*. 5 Release trigger for best results 9 CAUTION: Do not clean over floor electrical outlets. NOTE: Empty Dirty Water Tank when the motor sound becomes higher pitched and there is visible passing through the nozzle. • Hoover recommends rinsing carpet with your PowerDash™: 1 Plug power cord into electrical outlet. 2 Step on ON/OFF Pedal to turn ON. Getting Started With Your PowerDash™ Carpet Cleaner How to Clean Carpets...
... wet stroke*. 5 Release trigger for best results 9 CAUTION: Do not clean over floor electrical outlets. NOTE: Empty Dirty Water Tank when the motor sound becomes higher pitched and there is visible passing through the nozzle. • Hoover recommends rinsing carpet with your PowerDash™: 1 Plug power cord into electrical outlet. 2 Step on ON/OFF Pedal to turn ON. Getting Started With Your PowerDash™ Carpet Cleaner How to Clean Carpets...
Product Manual
Page 10
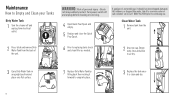
... upright position and place on a flat surface. 10 7 Replace Dirty Water Tank by tilting back then rocking it forward to snap into water, take it is not working as needed. 2 Unscrew cap. Brush roll may suddenly restart. Turn power switch off and unplug from the back of personal injury - Maintenance How to continuing use. WARNING: Risk of the unit. 6 Prior to replacing tank, check and clean filter...
... upright position and place on a flat surface. 10 7 Replace Dirty Water Tank by tilting back then rocking it forward to snap into water, take it is not working as needed. 2 Unscrew cap. Brush roll may suddenly restart. Turn power switch off and unplug from the back of personal injury - Maintenance How to continuing use. WARNING: Risk of the unit. 6 Prior to replacing tank, check and clean filter...
Product Manual
Page 11
Allow it to dry. 5 Replace the nozzle by aligning the tabs at the bottom of the nozzle and pull up slightly to remove nozzle. 4 Rinse the nozzle under running water to remove any dirt or debris. Maintenance How to Clean Nozzle 1 To prevent possible leaking, remove tanks from the unit. 2 Unit should be in upright position. 3 Grip the top of the nozzle to the foot. 6 Snap nozzle into place. 11 Lift the unit up to remove.
Allow it to dry. 5 Replace the nozzle by aligning the tabs at the bottom of the nozzle and pull up slightly to remove nozzle. 4 Rinse the nozzle under running water to remove any dirt or debris. Maintenance How to Clean Nozzle 1 To prevent possible leaking, remove tanks from the unit. 2 Unit should be in upright position. 3 Grip the top of the nozzle to the foot. 6 Snap nozzle into place. 11 Lift the unit up to remove.
Product Manual
Page 12
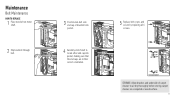
... in front of wheel BRUSHROLL & COVER CLEANER 1 Use comb side of tool to comb through the bristles to remove debris & hair. 3 Remove belt covers from unit. 2 Use hook side of cleaner. 2 To remove belt covers, use Philips screwdriver to remove from electrical outlet. Flip cleaner on its side to expose bottom of tool to get inside nozzle area to purchase. 12 BELT PART #: 440014074 - Maintenance Cleaning Brushroll & Belt Maintenance HOW TO REMOVE 1 Turn unit off...
... in front of wheel BRUSHROLL & COVER CLEANER 1 Use comb side of tool to comb through the bristles to remove debris & hair. 3 Remove belt covers from unit. 2 Use hook side of cleaner. 2 To remove belt covers, use Philips screwdriver to remove from electrical outlet. Flip cleaner on its side to expose bottom of tool to get inside nozzle area to purchase. 12 BELT PART #: 440014074 - Maintenance Cleaning Brushroll & Belt Maintenance HOW TO REMOVE 1 Turn unit off...
Product Manual
Page 13
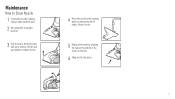
Maintenance Belt Maintenance HOW TO REPLACE 1 Place new belt on motor shaft. 2 Slip brushroll through belt. 3 Position non-belt side end cap of brushroll into pocket. 4 Carefully stretch belt to locate other end cap into pocket, making sure that the end caps are in their correct orientation. 5 Replace belt covers and secure by replacing all 6 screws. *in front of wheel STORAGE: Allow brushes and underside of carpet cleaner to air dry thoroughly before storing carpet cleaner on a carpeted or wood surface. 13
Maintenance Belt Maintenance HOW TO REPLACE 1 Place new belt on motor shaft. 2 Slip brushroll through belt. 3 Position non-belt side end cap of brushroll into pocket. 4 Carefully stretch belt to locate other end cap into pocket, making sure that the end caps are in their correct orientation. 5 Replace belt covers and secure by replacing all 6 screws. *in front of wheel STORAGE: Allow brushes and underside of carpet cleaner to air dry thoroughly before storing carpet cleaner on a carpeted or wood surface. 13
Product Manual
Page 14
... product for further instruction before continuing use. Clean Water Tank not firmly in home 4. USE TROUBLESHOOTING GUIDE AS A FIRST STEP TO RESOLVE ANY PROBLEMS YOU MAY BE EXPERIENCING. See "How to Empty" page 10 2. Always identify your product needs servicing within the warranty period, please contact Customer Service at 1-800-944-9200 for model number. 14 PROBLEM POSSIBLE CAUSE POSSIBLE SOLUTION Cleaner won't run 1. Dirty Water Tank full/automatic shut 1. Clogged Filter...
... product for further instruction before continuing use. Clean Water Tank not firmly in home 4. USE TROUBLESHOOTING GUIDE AS A FIRST STEP TO RESOLVE ANY PROBLEMS YOU MAY BE EXPERIENCING. See "How to Empty" page 10 2. Always identify your product needs servicing within the warranty period, please contact Customer Service at 1-800-944-9200 for model number. 14 PROBLEM POSSIBLE CAUSE POSSIBLE SOLUTION Cleaner won't run 1. Dirty Water Tank full/automatic shut 1. Clogged Filter...
Product Manual
Page 15
... Warrantor's sole discretion. Pick-up, delivery, transportation, and house calls are not limited to you may void your product; (ii) ship you a similar product of North Carolina. Depending on the data plate of implied warranties, so the above exclusions, disclaimers, and/or limitations may not apply to , belts, filters, brush rolls, blower fans, blower and vacuum tubes, and vacuum bags and straps. The...
... Warrantor's sole discretion. Pick-up, delivery, transportation, and house calls are not limited to you may void your product; (ii) ship you a similar product of North Carolina. Depending on the data plate of implied warranties, so the above exclusions, disclaimers, and/or limitations may not apply to , belts, filters, brush rolls, blower fans, blower and vacuum tubes, and vacuum bags and straps. The...

Product Manual
Page 47
Find us on: Hoover.com youtube.com/hoover facebook.com/hoover twitter.com/hooverusa
Find us on: Hoover.com youtube.com/hoover facebook.com/hoover twitter.com/hooverusa
Product Manual
Page 48
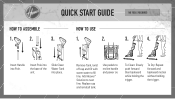
Insert Pole into Pole. To Dry: Repeat forward and backward motion without holding the trigger. Add Hoover® Solution to ll line. Remove Tank, twist off cap and ll with warm water to next line. QUICK START GUIDE Insert Handle into the base of the unit. Replace cap and reinstall tank. Use pedals to recline handle and power on. Slide Clean Water Tank into place. To Clean: Slowly push forward then backward while holding the trigger.
Insert Pole into Pole. To Dry: Repeat forward and backward motion without holding the trigger. Add Hoover® Solution to ll line. Remove Tank, twist off cap and ll with warm water to next line. QUICK START GUIDE Insert Handle into the base of the unit. Replace cap and reinstall tank. Use pedals to recline handle and power on. Slide Clean Water Tank into place. To Clean: Slowly push forward then backward while holding the trigger.


