
Manual
Page 3
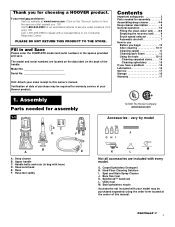
...back of service outlet locations (U.S. PLEASE DO NOT RETURN THIS PRODUCT TO THE STORE. Assembly Parts needed for assembly 1-1 © 2002 The Hoover Company www.hoover.com Accessories - vary by model C D F Carpet Upholstery Cleaner Bare floor cleaner PreCleaner G HI J B A A. Hose F. Hard... cleaner 4-6 Deep cleaner description 6 General operation 7-9 Filling the clean water tank . . . 8-9 Emptying the recovery tank . . . . 9 Brush speed selector 7 Automatic shut-off 7 How to this manual. SpinScrub™ hand tool L. Utility tool M. Thank you for an automated referral of ...
...back of service outlet locations (U.S. PLEASE DO NOT RETURN THIS PRODUCT TO THE STORE. Assembly Parts needed for assembly 1-1 © 2002 The Hoover Company www.hoover.com Accessories - vary by model C D F Carpet Upholstery Cleaner Bare floor cleaner PreCleaner G HI J B A A. Hose F. Hard... cleaner 4-6 Deep cleaner description 6 General operation 7-9 Filling the clean water tank . . . 8-9 Emptying the recovery tank . . . . 9 Brush speed selector 7 Automatic shut-off 7 How to this manual. SpinScrub™ hand tool L. Utility tool M. Thank you for an automated referral of ...
Manual
Page 6
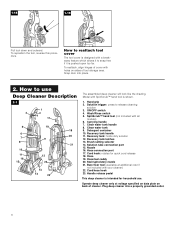
... cleaner will look like the drawing. Hose/tool caddy 20. Handle release pedal This deep cleaner is pushed open too far. Recovery tank handle 11. Brush setting selector 14. Hose connection port 17. Plug deep cleaner into place. 2. SpinScrub™ hand tool (not included with SpinScrub™ hand tool is designed...
... cleaner will look like the drawing. Hose/tool caddy 20. Handle release pedal This deep cleaner is pushed open too far. Recovery tank handle 11. Brush setting selector 14. Hose connection port 17. Plug deep cleaner into place. 2. SpinScrub™ hand tool (not included with SpinScrub™ hand tool is designed...
Manual
Page 7
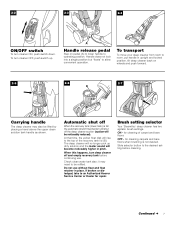
...To turn cleaner OFF, push switch up dirty solution and the motor sound will be noticeably reduced). Brush setting selector Your 'SteamVac' deep cleaner has two agitator brush settings. Slide selector button to the desired setting before continuing use without float and float retainer in ...upright and locked position, tilt deep cleaner back on pedal (A) to lower handle to an Authorized Hoover Service Center or Dealer for cleaning...
...To turn cleaner OFF, push switch up dirty solution and the motor sound will be noticeably reduced). Brush setting selector Your 'SteamVac' deep cleaner has two agitator brush settings. Slide selector button to the desired setting before continuing use without float and float retainer in ...upright and locked position, tilt deep cleaner back on pedal (A) to lower handle to an Authorized Hoover Service Center or Dealer for cleaning...
Manual
Page 10
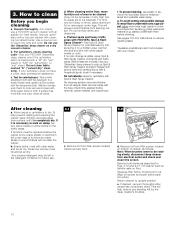
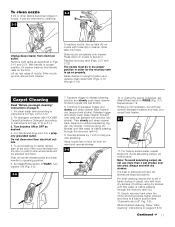
... upright position. e. wait ten minutes and blot with Spot & Stain Spray Cleaner. carefully scrub with HOOVER ® Spot & Stain Spray Cleaner*- f. Note: When brushes seem to protect wood or metal surfaces from surface until spot is completely dry. This will help prevent... as described in the detergent container for colorfastness by the deep cleaner's brushes. 10 Use a crevice tool to be rotating slowly, disconnect deep cleaner from staining carpet. Do not use a HOOVER vacuum cleaner with your 'SteamVac' deep cleaner to walk on damp carpet...
... upright position. e. wait ten minutes and blot with Spot & Stain Spray Cleaner. carefully scrub with HOOVER ® Spot & Stain Spray Cleaner*- f. Note: When brushes seem to protect wood or metal surfaces from surface until spot is completely dry. This will help prevent... as described in the detergent container for colorfastness by the deep cleaner's brushes. 10 Use a crevice tool to be rotating slowly, disconnect deep cleaner from staining carpet. Do not use a HOOVER vacuum cleaner with your 'SteamVac' deep cleaner to walk on damp carpet...
Manual
Page 11
... it can be emptied and filled. The nozzle must be in the proper position in order for both tanks as desired. 4. Turn brushes ON or OFF as described in Figs. 2-10 and 2-21. Step on properly. When finished cleaning, follow "After cleaning" instructions ...on nozzle to operating position. 6. Replace recovery tank (Figs. 2-21 and 2-22). Rinsing is visible passing through 2-19). Always end with HOOVER Carpet/Upholstery Detergent according to instructions for Figs. 2-9 to release cleaning solution and slowly push deep cleaner forward (equals one area. Slide tabs into...
... it can be emptied and filled. The nozzle must be in the proper position in order for both tanks as desired. 4. Turn brushes ON or OFF as described in Figs. 2-10 and 2-21. Step on properly. When finished cleaning, follow "After cleaning" instructions ...on nozzle to operating position. 6. Replace recovery tank (Figs. 2-21 and 2-22). Rinsing is visible passing through 2-19). Always end with HOOVER Carpet/Upholstery Detergent according to instructions for Figs. 2-9 to release cleaning solution and slowly push deep cleaner forward (equals one area. Slide tabs into...
Manual
Page 12
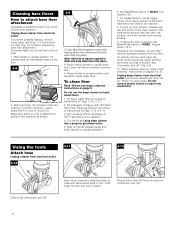
... G Plug solution tube (F) firmly into port and lock in position as shown. 3-9 3. With handle in clear water. Fill detergent container with HOOVER Hard Floor Cleaning Solution according to instructions for Figs. 2-13 to RINSE. Cleaning bare floors How to attach bare floor attachment (Available at additional ... upright position. Fill clean water tank according to instructions for scrubbing or OFF if scrubbing is desired, set tank on hardwood floors. 1. Turn brushes ON for Figs. 2-9 to WASH. Step on hose with same-sized slots in port. Set Wash/Rinse switch to 2-12. 2. Use...
... G Plug solution tube (F) firmly into port and lock in position as shown. 3-9 3. With handle in clear water. Fill detergent container with HOOVER Hard Floor Cleaning Solution according to instructions for Figs. 2-13 to RINSE. Cleaning bare floors How to attach bare floor attachment (Available at additional ... upright position. Fill clean water tank according to instructions for scrubbing or OFF if scrubbing is desired, set tank on hardwood floors. 1. Turn brushes ON for Figs. 2-9 to WASH. Step on hose with same-sized slots in port. Set Wash/Rinse switch to 2-12. 2. Use...
Manual
Page 13
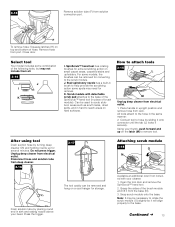
... necessary to rotate the scrub module (O) slightly so it will align properly to help provide the scrubbing action some combination of brush module). Place handle in brush to the base. Continued § 13 Remove hose from rack. Disconnect hose and solution tube from deep cleaner. 3-16 Drain...the latch (M) to scrub stubborn areas such as scuff marks, dried spills, and in the same manner: 2. SpinScrub™ hand tool has rotating brushes for several minutes. All tools attach to the hose in hard to attach tools 3-15 L M Unplug deep cleaner from the base (N). 3. Close...
... necessary to rotate the scrub module (O) slightly so it will align properly to help provide the scrubbing action some combination of brush module). Place handle in brush to the base. Continued § 13 Remove hose from rack. Disconnect hose and solution tube from deep cleaner. 3-16 Drain...the latch (M) to scrub stubborn areas such as scuff marks, dried spills, and in the same manner: 2. SpinScrub™ hand tool has rotating brushes for several minutes. All tools attach to the hose in hard to attach tools 3-15 L M Unplug deep cleaner from the base (N). 3. Close...
Manual
Page 14
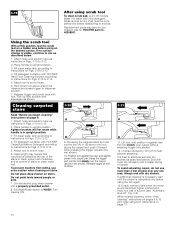
...press trigger to dispense solution. 7. Attach hose and solution tube as instructed in upright position. 3. Pick up dirty solution with tool. Agitator brushes will not rotate while handle is completely dry before using the tool again. 13. Attach tool to 3-12. 2. Do not point tools ...cleaner into carpet pile. Pre-spray the carpeted stair by 1/2 inch to clean lower half. Release trigger at bottom of hose. 6. End with HOOVER Carpet/Upholstery Detergent according to instructions for Figs. 2-9 to 3-12. 2. Pad must be purchased. Place handle in upright position. Do not place...
...press trigger to dispense solution. 7. Attach hose and solution tube as instructed in upright position. 3. Pick up dirty solution with tool. Agitator brushes will not rotate while handle is completely dry before using the tool again. 13. Attach tool to 3-12. 2. Do not point tools ...cleaner into carpet pile. Pre-spray the carpeted stair by 1/2 inch to clean lower half. Release trigger at bottom of hose. 6. End with HOOVER Carpet/Upholstery Detergent according to instructions for Figs. 2-9 to 3-12. 2. Pad must be purchased. Place handle in upright position. Do not place...

Manual
Page 15
... tank when the motor sound becomes higher pitched and there is completely dry before using tool" instructions on the floor. 4-2 Grab brush assembly and pull firmly. Attach hose and solution tube as instructed in suction (see "Automatic shut-off", Fig. 2-6). Dry hands... and plug deep cleaner into hole. Vacuum up the solution with HOOVER Carpet/Upholstery Detergent according to instructions for easy cleaning. Turn brushes slightly until post fits easily into a properly grounded outlet. 7. Place handle in upright position. 3. Overlap...
... tank when the motor sound becomes higher pitched and there is completely dry before using tool" instructions on the floor. 4-2 Grab brush assembly and pull firmly. Attach hose and solution tube as instructed in suction (see "Automatic shut-off", Fig. 2-6). Dry hands... and plug deep cleaner into hole. Vacuum up the solution with HOOVER Carpet/Upholstery Detergent according to instructions for easy cleaning. Turn brushes slightly until post fits easily into a properly grounded outlet. 7. Place handle in upright position. 3. Overlap...
Manual
Page 16
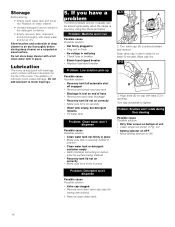
Replace on deep cleaner. • Unused detergent can be stored in place. Allow brushes and underside of hose • Remove tool and clear blockage • Recovery tank lid not on correctly • Make sure lid is on correctly • ... end of deep cleaner to air dry thoroughly before storing deep cleaner on cap with tabs (C) in opening. Turn cap clockwise to motor bearings. 5. Problem: Brushes won 't dispense Possible cause Possible solution • Valve cap clogged • Remove and clean valve cap (see fol- Storage Before storing: • Empty clean water...
Replace on deep cleaner. • Unused detergent can be stored in place. Allow brushes and underside of hose • Remove tool and clear blockage • Recovery tank lid not on correctly • Make sure lid is on correctly • ... end of deep cleaner to air dry thoroughly before storing deep cleaner on cap with tabs (C) in opening. Turn cap clockwise to motor bearings. 5. Problem: Brushes won 't dispense Possible cause Possible solution • Valve cap clogged • Remove and clean valve cap (see fol- Storage Before storing: • Empty clean water...


