
Manual
Page 1
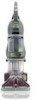
™ ™ ® ENGLISH § pp. 1-17 ESPAÑOL § pág. 18-27 FRANÇAIS § p. 28-37 Deep Cleaner The Easy to Use Deep Cleaner SteamVac™ Dual V™ Deep Cleaner cleans carpet fibers by applying hot tap water and cleaning solution. www.hoover.com
™ ™ ® ENGLISH § pp. 1-17 ESPAÑOL § pág. 18-27 FRANÇAIS § p. 28-37 Deep Cleaner The Easy to Use Deep Cleaner SteamVac™ Dual V™ Deep Cleaner cleans carpet fibers by applying hot tap water and cleaning solution. www.hoover.com
Manual
Page 2
... point tools toward people or pets. • Use only commercially available Hoover SteamVac™ cleaners intended for use with a cord having an equipment-grounding conductor (C) and grounding plug (A). See "Grounding Instructions". • Do not clean over cord. Turn off all controls before unplugging. • Do not pick up flammable or combustible liquids such as a handle, close door on stairs. • Do not use on cord. Do not run...
... point tools toward people or pets. • Use only commercially available Hoover SteamVac™ cleaners intended for use with a cord having an equipment-grounding conductor (C) and grounding plug (A). See "Grounding Instructions". • Do not clean over cord. Turn off all controls before unplugging. • Do not pick up flammable or combustible liquids such as a handle, close door on stairs. • Do not use on cord. Do not run...
Manual
Page 3
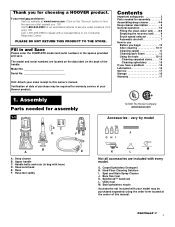
... 2 Parts needed for assembly 3 Assembling deep cleaner 4-6 Deep cleaner description 6 General operation 7-9 Filling the clean water tank . . . 8-9 Emptying the recovery tank . . . . 9 Brush speed selector 7 Automatic shut-off 7 How to this manual. Bare floor tool K. Utility tool M. only) OR Call 1-330-499-9499 to speak with a representative in bag with your sales receipt to use Before you begin 10 After cleaning 10-11 Cleaning carpet 11 Cleaning bare floors 12 Using the tools 12-15 Cleaning carpeted...
... 2 Parts needed for assembly 3 Assembling deep cleaner 4-6 Deep cleaner description 6 General operation 7-9 Filling the clean water tank . . . 8-9 Emptying the recovery tank . . . . 9 Brush speed selector 7 Automatic shut-off 7 How to this manual. Bare floor tool K. Utility tool M. only) OR Call 1-330-499-9499 to speak with a representative in bag with your sales receipt to use Before you begin 10 After cleaning 10-11 Cleaning carpet 11 Cleaning bare floors 12 Using the tools 12-15 Cleaning carpeted...
Manual
Page 4
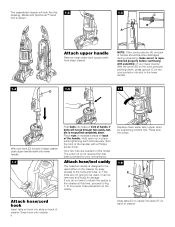
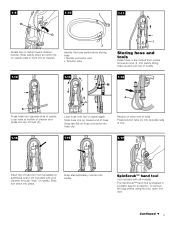
.... NOTE: If the cord protector (A) on back of cleaner. The assembled cleaner will not go through hole easily, handle is not pushed completely down onto lower handle. 1-7 Push bolts into holes on the cleaner for easy access to the tools and hose, or if the tools are needed on back of the handle. Model with SpinScrub™ hand tool is shown. 1-3 C B A Attach upper handle Remove clean water tank (upper tank) from...
.... NOTE: If the cord protector (A) on back of cleaner. The assembled cleaner will not go through hole easily, handle is not pushed completely down onto lower handle. 1-7 Push bolts into holes on the cleaner for easy access to the tools and hose, or if the tools are needed on back of the handle. Model with SpinScrub™ hand tool is shown. 1-3 C B A Attach upper handle Remove clean water tank (upper tank) from...
Manual
Page 5
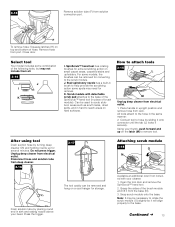
... Insert top of bare floor tool (available at bottom of hook (K). Slide caddy down into caddy. J Identify the hose parts before using the tool, open tool door. Nozzle connector end J. Solution tube I Storing hose and tools Press hose, a few inches from nozzle connector end (I), into place. Snap tab (M) on other end of caddy again. Bring hose up and over top of hose. To remove the bag before storing...
... Insert top of bare floor tool (available at bottom of hook (K). Slide caddy down into caddy. J Identify the hose parts before using the tool, open tool door. Nozzle connector end J. Solution tube I Storing hose and tools Press hose, a few inches from nozzle connector end (I), into place. Snap tab (M) on other end of caddy again. Bring hose up and over top of hose. To remove the bag before storing...
Manual
Page 6
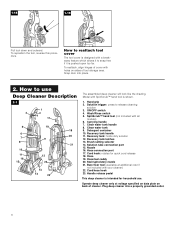
... drawing. Plug deep cleaner into place. 2. How to snap free if it is designed with all models) 6. Brush setting selector 14. Bare floor tool (available at voltage specified on data plate on sides of tool storage area. SpinScrub™ hand tool (not included with a breakaway feature which allows it to reattach tool cover The tool cover is pushed open too far. Hose connection port 17. Handle release pedal...
... drawing. Plug deep cleaner into place. 2. How to snap free if it is designed with all models) 6. Brush setting selector 14. Bare floor tool (available at voltage specified on data plate on sides of tool storage area. SpinScrub™ hand tool (not included with a breakaway feature which allows it to reattach tool cover The tool cover is pushed open too far. Hose connection port 17. Handle release pedal...
Manual
Page 7
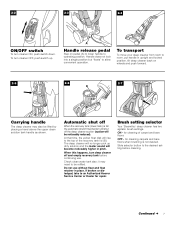
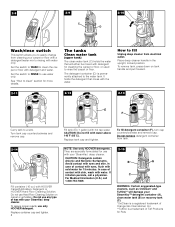
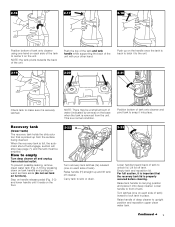
...; 7 A Handle release pedal Step on wheels and push forward. 2-5 2-6 2-7 B Carrying handle The deep cleaner may need to room, put handle in pitch. At that time, the yellow float disk will be refilled. Slide selector button to the top of carpet and bare floors OFF - If broken or dislodged, take to allow convenient operation. Check clean water tank also; Do not use . 2-2 2-3 2-4 Rinse ON WASH OFF ON/OFF switch...
...; 7 A Handle release pedal Step on wheels and push forward. 2-5 2-6 2-7 B Carrying handle The deep cleaner may need to room, put handle in pitch. At that time, the yellow float disk will be refilled. Slide selector button to the top of carpet and bare floors OFF - If broken or dislodged, take to allow convenient operation. Check clean water tank also; Do not use . 2-2 2-3 2-4 Rinse ON WASH OFF ON/OFF switch...
Manual
Page 8
... with water only. 2-8 2-9 2-10 C D Rinse ON WASH OFF Wash/rinse switch This switch allows you to easily change from cleaning your 'SteamVac' deep cleaner. Set the switch to WASH to a sink. The detergent container (D) is a trademark of Orange Glo International, Inc. **TuffOxi is permanently attached to rinse the carpet or floor. Turn tank cap counterclockwise and remove cap. To assure proper results, use Hard Floor Cleaning Solution on tank handle...
... with water only. 2-8 2-9 2-10 C D Rinse ON WASH OFF Wash/rinse switch This switch allows you to easily change from cleaning your 'SteamVac' deep cleaner. Set the switch to WASH to a sink. The detergent container (D) is a trademark of Orange Glo International, Inc. **TuffOxi is permanently attached to rinse the carpet or floor. Turn tank cap counterclockwise and remove cap. To assure proper results, use Hard Floor Cleaning Solution on tank handle...
Manual
Page 9
... picked up from the surface being cleaned. How to empty Turn deep cleaner off cleaner. Raise handle (H) straight up on the base when the tank is removed from electrical outlet. Continued § 9 To prevent possible leaking, remove clean water tank (Fig. 2-10) by arrows) on the handle once the tank is back to latch it onto deep cleaner. NOTE: There may be emptied. set...
... picked up from the surface being cleaned. How to empty Turn deep cleaner off cleaner. Raise handle (H) straight up on the base when the tank is removed from electrical outlet. Continued § 9 To prevent possible leaking, remove clean water tank (Fig. 2-10) by arrows) on the handle once the tank is back to latch it onto deep cleaner. NOTE: There may be emptied. set...
Manual
Page 10
.../dry" clean only). Test for color removal or bleed with a "W" (for "wet" clean) or "S/W" (for best results. In a small, hidden area, gently rub the surface with a household scrub brush if necessary. Wait ten minutes and check for colorfastness - This will help prevent matting and resoiling the carpet, keep children and pets away from filter screen located on floor. Test Spot & Stain Spray Cleaner for instructions on...
.../dry" clean only). Test for color removal or bleed with a "W" (for "wet" clean) or "S/W" (for best results. In a small, hidden area, gently rub the surface with a household scrub brush if necessary. Wait ten minutes and check for colorfastness - This will help prevent matting and resoiling the carpet, keep children and pets away from filter screen located on floor. Test Spot & Stain Spray Cleaner for instructions on...
Manual
Page 11
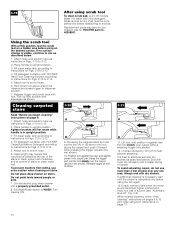
... cleaner back so that handle rests on pages 9 &10. Slide nozzle up and remove from electrical outlet. Replace recovery tank (Figs. 2-21 and 2-22). Keep nozzle flat on floor for Figs. 2-9 to go on page 9. 1. Fill clean water tank according to instructions for both tanks as described above. Rinse ON WASH OFF Carpet Cleaning Read "Before you (second wet stroke). Empty recovery tank when the motor sound...
... cleaner back so that handle rests on pages 9 &10. Slide nozzle up and remove from electrical outlet. Replace recovery tank (Figs. 2-21 and 2-22). Keep nozzle flat on floor for Figs. 2-9 to go on page 9. 1. Fill clean water tank according to instructions for both tanks as described above. Rinse ON WASH OFF Carpet Cleaning Read "Before you (second wet stroke). Empty recovery tank when the motor sound...
Manual
Page 12
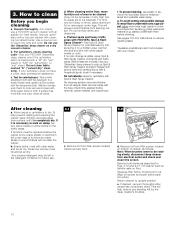
... leaking, remove clean water tank (Fig. 2-10) and recovery tank (Fig. 2-21) before positioning bare floor attachment. With foam strip (C) (located under the netting) in place. Set Wash/Rinse switch to RINSE. Use both ends snap into port and lock in position as shown. 3-9 3. Make sure arrow on end of attachment points in clear water. Using the tools Attach hose Unplug cleaner from the floor. 10. Turn cleaner ON. 7. Turn brushes ON...
... leaking, remove clean water tank (Fig. 2-10) and recovery tank (Fig. 2-21) before positioning bare floor attachment. With foam strip (C) (located under the netting) in place. Set Wash/Rinse switch to RINSE. Use both ends snap into port and lock in position as shown. 3-9 3. Make sure arrow on end of attachment points in clear water. Using the tools Attach hose Unplug cleaner from the floor. 10. Turn cleaner ON. 7. Turn brushes ON...
Manual
Page 13
...™ hand tool. 2. Do not press trigger. Select tool Your model includes some spots may be used to scrub stubborn areas such as scuff marks, dried spills, and in brush to the base of hose. Scrub module with your thumb, push forward and up for removal. Note: It may need for several minutes. J. 3-13 Remove solution tube (F) from electrical outlet. Unplug deep cleaner from...
...™ hand tool. 2. Do not press trigger. Select tool Your model includes some spots may be used to scrub stubborn areas such as scuff marks, dried spills, and in brush to the base of hose. Scrub module with your thumb, push forward and up for removal. Note: It may need for several minutes. J. 3-13 Remove solution tube (F) from electrical outlet. Unplug deep cleaner from...
Manual
Page 14
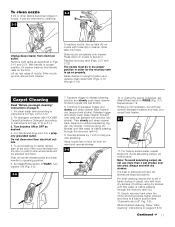
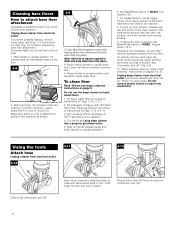
... dry strokes. Place handle in upright position. 3. Set Wash/Rinse switch to 2-14. 5. Pull tool slowly over any one wet stroke). 10. To avoid saturating carpet, do not use more dry strokes to dispense solution. 7. Always end with tool. Position tool against riser. Fill clean water tank according to instructions for Figs. 2-9 to end of hose. 6. Attach tool to 2-12. 4. Attach tool to alternate wet and dry strokes as described above. End with HOOVER Carpet...
... dry strokes. Place handle in upright position. 3. Set Wash/Rinse switch to 2-14. 5. Pull tool slowly over any one wet stroke). 10. To avoid saturating carpet, do not use more dry strokes to dispense solution. 7. Always end with tool. Position tool against riser. Fill clean water tank according to instructions for Figs. 2-9 to end of hose. 6. Attach tool to 2-12. 4. Attach tool to alternate wet and dry strokes as described above. End with HOOVER Carpet...

Manual
Page 15
... nozzle over -wetting and damage to 3-12. 2. Agitator brushes will not rotate while handle is a loss in upright position. 3. For heavily soiled areas, it may be cleaned under running water. 4-3 B A DB A C To replace brushes Align posts (A) on the floor. 4-2 Grab brush assembly and pull firmly. To remove brushes Disconnect cleaner from the fabric and press the solution trigger. 11. Attach hose and solution tube as instructed in upright position. Attach tool to end of brush assembly...
... nozzle over -wetting and damage to 3-12. 2. Agitator brushes will not rotate while handle is a loss in upright position. 3. For heavily soiled areas, it may be cleaned under running water. 4-3 B A DB A C To replace brushes Align posts (A) on the floor. 4-2 Grab brush assembly and pull firmly. To remove brushes Disconnect cleaner from the fabric and press the solution trigger. 11. Attach hose and solution tube as instructed in upright position. Attach tool to end of brush assembly...
Manual
Page 16
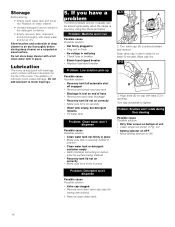
... the motor. lowing instructions) 1. Remove clean water tank. 5-1 A A 2. Wipe cap dry. 5-2 C B 3. Turn cap clockwise to motor bearings. 5. Do not store deep cleaner with clean water and let air dry. Do not add lubricant to tighten. Problem: Brushes won 't dispense Possible cause Possible solution • Valve cap clogged • Remove and clean valve cap (see fol- Storage Before storing: • Empty clean water tank and let air dry. Lubrication The motor is found by using the check list...
... the motor. lowing instructions) 1. Remove clean water tank. 5-1 A A 2. Wipe cap dry. 5-2 C B 3. Turn cap clockwise to motor bearings. 5. Do not store deep cleaner with clean water and let air dry. Do not add lubricant to tighten. Problem: Brushes won 't dispense Possible cause Possible solution • Valve cap clogged • Remove and clean valve cap (see fol- Storage Before storing: • Empty clean water tank and let air dry. Lubrication The motor is found by using the check list...
Manual
Page 17
... ordering parts. (The model number appears on the bottom of the cleaner.) Full One Year Warranty (Domestic Use) Your HOOVER® appliance is needed , or if there are covered by a limited one year warranty which vary from a U. Appliances purchased elsewhere are questions concerning this warranty or the availability of Sales and Service Centers provided with the Owner's Manual against original defects in a commercial or...
... ordering parts. (The model number appears on the bottom of the cleaner.) Full One Year Warranty (Domestic Use) Your HOOVER® appliance is needed , or if there are covered by a limited one year warranty which vary from a U. Appliances purchased elsewhere are questions concerning this warranty or the availability of Sales and Service Centers provided with the Owner's Manual against original defects in a commercial or...


