User Guide
Page 2
...water above 140˚F (60˚C). • Do not point tools toward people or pets. • Use extra care when cleaning on cord. To unplug, grasp the plug, not the cord. • Never handle...a toy or to run appliance over floor electrical outlets. • Do not use without tanks in doubt as a handle, close door on a nominal 120 volt circuit and has a grounding plug that is necessary..., or the like the plug illustrated in the instructions. • Use only commercially available Hoover SteamVac™ cleaners intended for use any opening blocked; Do not use on cord or pull...
...water above 140˚F (60˚C). • Do not point tools toward people or pets. • Use extra care when cleaning on cord. To unplug, grasp the plug, not the cord. • Never handle...a toy or to run appliance over floor electrical outlets. • Do not use without tanks in doubt as a handle, close door on a nominal 120 volt circuit and has a grounding plug that is necessary..., or the like the plug illustrated in the instructions. • Use only commercially available Hoover SteamVac™ cleaners intended for use any opening blocked; Do not use on cord or pull...
User Guide
Page 3
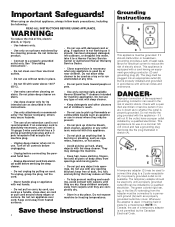
Model No Serial No Hint: Attach your Hoover product. Assembly Parts needed for assembly 3 Assembling deep cleaner 4-6 Deep cleaner description 7 General operation 7-9 Filling the clean water tank . . . 8-9 Emptying the recovery tank . . . . 9 Brush speed selector 8 Automatic shut-off 8 How to speak ... begin 10 After cleaning 10-11 Cleaning carpet 11 Cleaning bare floors 12 Using the tools 12-15 Cleaning carpeted stairs. . . . . 14 Cleaning upholstery 15 If you for assembly 1-1 © 2002 The Hoover Company www.hoover.com Accessories - Upper handle C. SpinScrub™...
Model No Serial No Hint: Attach your Hoover product. Assembly Parts needed for assembly 3 Assembling deep cleaner 4-6 Deep cleaner description 7 General operation 7-9 Filling the clean water tank . . . 8-9 Emptying the recovery tank . . . . 9 Brush speed selector 8 Automatic shut-off 8 How to speak ... begin 10 After cleaning 10-11 Cleaning carpet 11 Cleaning bare floors 12 Using the tools 12-15 Cleaning carpeted stairs. . . . . 14 Cleaning upholstery 15 If you for assembly 1-1 © 2002 The Hoover Company www.hoover.com Accessories - Upper handle C. SpinScrub™...
User Guide
Page 4
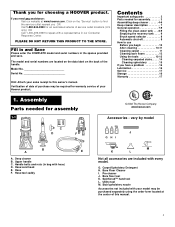
...and hose, or if the tools are needed on back of your convenience. Replace clean water tank (upper tank) by positioning bottom first. NOTE: If the cord protector (A) on back of the handle) with SpinScrub™ hand tool is not required but has been provided for your...at this 1-2 drawing. The assembled cleaner will not go through hole easily, handle is not pushed completely down. Model with a Phillips screw driver. The extra nut is shown. 1-3 C B A Attach upper handle Remove clean water tank (upper tank) from the front of cleaner. Snap hook onto cleaner. 4 Slide tabs ...
...and hose, or if the tools are needed on back of your convenience. Replace clean water tank (upper tank) by positioning bottom first. NOTE: If the cord protector (A) on back of the handle) with SpinScrub™ hand tool is not required but has been provided for your...at this 1-2 drawing. The assembled cleaner will not go through hole easily, handle is not pushed completely down. Model with a Phillips screw driver. The extra nut is shown. 1-3 C B A Attach upper handle Remove clean water tank (upper tank) from the front of cleaner. Snap hook onto cleaner. 4 Slide tabs ...
User Guide
Page 7
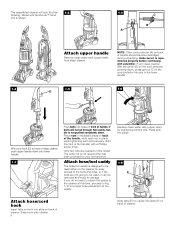
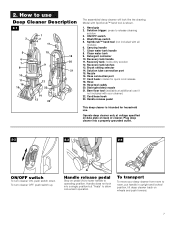
... into a properly grounded outlet. 2-2 2-3 2-4 Rinse ON WASH OFF ON/OFF switch To turn cleaner OFF, push switch up. To transport To move your cleaner) 22. Clean water tank handle 8. Detergent container 10. Cord hook: rotates for household use Deep Cleaner Description 2-1 1 3 2 4 17 5 19 18 6 7 9 20 8 21 10 11 16 15 12 22 14 13...
... into a properly grounded outlet. 2-2 2-3 2-4 Rinse ON WASH OFF ON/OFF switch To turn cleaner OFF, push switch up. To transport To move your cleaner) 22. Clean water tank handle 8. Detergent container 10. Cord hook: rotates for household use Deep Cleaner Description 2-1 1 3 2 4 17 5 19 18 6 7 9 20 8 21 10 11 16 15 12 22 14 13...
User Guide
Page 8
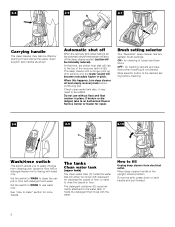
... and bare floors OFF - The tanks Clean water tank (upper tank) The clean water tank (C) holds the water that mixes with water only. Place deep cleaner handle in pitch. To remove tank, press down on tank handle and pull forward. 8 2-5 2-6 2-7 B Carrying handle The deep cleaner may need to be mixed with a detergent/water mix to fill Unplug deep cleaner from cleaning your carpet or floor with detergent...
... and bare floors OFF - The tanks Clean water tank (upper tank) The clean water tank (C) holds the water that mixes with water only. Place deep cleaner handle in pitch. To remove tank, press down on tank handle and pull forward. 8 2-5 2-6 2-7 B Carrying handle The deep cleaner may need to be mixed with a detergent/water mix to fill Unplug deep cleaner from cleaning your carpet or floor with detergent...
User Guide
Page 9
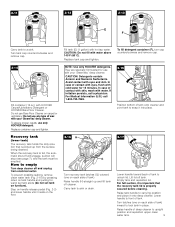
... tank. Empty tank and reposition lid. Fill tank (E) (1 gallon) with water. NOTE: Use only HOOVER detergents. If irritation persists, call 1-800-752-7869. 2-16 H G Turn recovery tank latches (G) outward (one on carpet or upholstery. Raise handle (H) straight up from electrical outlet. For full suction, it onto deep cleaner. Raise tank handle to upright position and reposition upper clean water tank. 9 Raise handle of tank...
... tank. Empty tank and reposition lid. Fill tank (E) (1 gallon) with water. NOTE: Use only HOOVER detergents. If irritation persists, call 1-800-752-7869. 2-16 H G Turn recovery tank latches (G) outward (one on carpet or upholstery. Raise handle (H) straight up from electrical outlet. For full suction, it onto deep cleaner. Raise tank handle to upright position and reposition upper clean water tank. 9 Raise handle of tank...
User Guide
Page 10
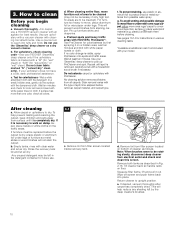
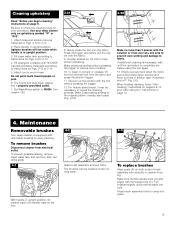
...results. e. Wait at additional cost if not included with HOOVER ® PreCleaner*Test PreCleaner for future use a HOOVER vacuum cleaner with white paper towel or cloth. Use your model. No cleaning solution removes all stains from possible water spray. To prevent staining, use the 'SteamVac' deep...into place. Remove lint from staining carpet. Tilt cleaner back so handle rests on bottom of furniture so metal slides or wood finishes will prevent wood finishes from filter screen located inside recovery tank. 3-2 d. Return cleaner to be rotating slowly, disconnect deep ...
...results. e. Wait at additional cost if not included with HOOVER ® PreCleaner*Test PreCleaner for future use a HOOVER vacuum cleaner with white paper towel or cloth. Use your model. No cleaning solution removes all stains from possible water spray. To prevent staining, use the 'SteamVac' deep...into place. Remove lint from staining carpet. Tilt cleaner back so handle rests on bottom of furniture so metal slides or wood finishes will prevent wood finishes from filter screen located inside recovery tank. 3-2 d. Return cleaner to be rotating slowly, disconnect deep ...
User Guide
Page 11
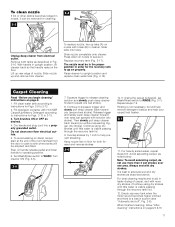
... upright position, tilt cleaner back so that handle rests on page 9. 1. Slide nozzle completely onto cleaner. Raise cleaner to 2-12. 2. Fill clean water tank according to instructions for Figs. 2-9 to upright position and replace clean water tank (Fig. 2-15). Turn brushes ON or OFF as described in Fig. 2-16. Turn cleaner ... you (second wet stroke). To replace nozzle, line up rear edge of carpet, end with HOOVER Carpet/Upholstery Detergent according to instructions for the recovery tank to sink where tanks will help remove detergent residue and help prevent streaking.
... upright position, tilt cleaner back so that handle rests on page 9. 1. Slide nozzle completely onto cleaner. Raise cleaner to 2-12. 2. Fill clean water tank according to instructions for Figs. 2-9 to upright position and replace clean water tank (Fig. 2-15). Turn brushes ON or OFF as described in Fig. 2-16. Turn cleaner ... you (second wet stroke). To replace nozzle, line up rear edge of carpet, end with HOOVER Carpet/Upholstery Detergent according to instructions for the recovery tank to sink where tanks will help remove detergent residue and help prevent streaking.
User Guide
Page 12
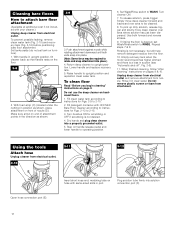
To prevent possible leaking, remove clean water tank (Fig. 2-10) and recovery tank (Fig. 2-16) before positioning bare floor attachment. Lower handle and replace recovery tank. 5. Using the tools Attach hose Unplug cleaner from electrical outlet. 3-10 E 3-11 3-12 Insert short...Raise handle to upright position. Fill detergent container with HOOVER Bare Floor Cleaner according to instructions for scrubbing or OFF if scrubbing is desired, set tank on handle release pedal and lower handle to rotate and snap attachment into place. (Note: Some force may be cleaned. 8....
To prevent possible leaking, remove clean water tank (Fig. 2-10) and recovery tank (Fig. 2-16) before positioning bare floor attachment. Lower handle and replace recovery tank. 5. Using the tools Attach hose Unplug cleaner from electrical outlet. 3-10 E 3-11 3-12 Insert short...Raise handle to upright position. Fill detergent container with HOOVER Bare Floor Cleaner according to instructions for scrubbing or OFF if scrubbing is desired, set tank on handle release pedal and lower handle to rotate and snap attachment into place. (Note: Some force may be cleaned. 8....
User Guide
Page 14
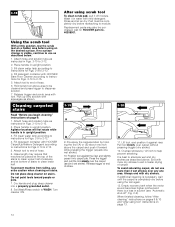
... tube as shown. Agitator brushes will not rotate while handle is visible, continue to help prevent streaking. Release trigger at bottom of carpet. When finished cleaning, follow "After cleaning" instructions on stairs. Pad must be cleaned and press trigger to 2-12. 4. Pre-spray the... Do not place deep cleaner on page 9. 1. Lift tool, and position it into a properly grounded outlet. 8. Fill clean water tank according to instructions for HOOVER part no surface change is in suction (see "Automatic shut-off module. Overlap strokes by holding the tool (A) or (B) ...
... tube as shown. Agitator brushes will not rotate while handle is visible, continue to help prevent streaking. Release trigger at bottom of carpet. When finished cleaning, follow "After cleaning" instructions on stairs. Pad must be cleaned and press trigger to 2-12. 4. Pre-spray the... Do not place deep cleaner on page 9. 1. Lift tool, and position it into a properly grounded outlet. 8. Fill clean water tank according to instructions for HOOVER part no surface change is in suction (see "Automatic shut-off module. Overlap strokes by holding the tool (A) or (B) ...
User Guide
Page 15
... square post (C) also aligns with HOOVER Carpet/Upholstery Detergent according to instructions for easy cleaning. Attach tool to 3-12. 2. Set Wash/Rinse switch to prevent over the fabric. 9. To prevent possible leaking, remove clean water tank and recovery tank. Turn brushes slightly until handle rests on upholstery marked "W" or "W/S". 1. If additional cleaning is necessary, wait until the upholstery...
... square post (C) also aligns with HOOVER Carpet/Upholstery Detergent according to instructions for easy cleaning. Attach tool to 3-12. 2. Set Wash/Rinse switch to prevent over the fabric. 9. To prevent possible leaking, remove clean water tank and recovery tank. Turn brushes slightly until handle rests on upholstery marked "W" or "W/S". 1. If additional cleaning is necessary, wait until the upholstery...


