
Manual
Page 1
www.hoover.com ™ ™ ® ENGLISH § pp. 1-17 ESPAÑOL § pág. 18-27 FRANÇAIS § p. 28-37 Deep Cleaner The Easy to Use Deep Cleaner SteamVac™ Dual V™ Deep Cleaner cleans carpet fibers by applying hot tap water and cleaning solution.
www.hoover.com ™ ™ ® ENGLISH § pp. 1-17 ESPAÑOL § pág. 18-27 FRANÇAIS § p. 28-37 Deep Cleaner The Easy to Use Deep Cleaner SteamVac™ Dual V™ Deep Cleaner cleans carpet fibers by applying hot tap water and cleaning solution.

Manual
Page 2
... connecting the powered hand tool. • Always disconnect cord from carpets until they are dry. Check with deep cleaner. • Keep detergents and other toxic material with this plug to a permanent ground (G) such as to run appliance over floor electrical outlets. • Do not use without tanks in areas where they are completely dry. • Store in the instructions. • Use only commercially available Hoover SteamVac...
... connecting the powered hand tool. • Always disconnect cord from carpets until they are dry. Check with deep cleaner. • Keep detergents and other toxic material with this plug to a permanent ground (G) such as to run appliance over floor electrical outlets. • Do not use without tanks in areas where they are completely dry. • Store in the instructions. • Use only commercially available Hoover SteamVac...

Manual
Page 3
... handle C. Hose/cord hook E. Hose/tool caddy M E K L Not all accessories are located on the data label on the "Service" button to use Before you begin 10 After cleaning 10-11 Cleaning carpet 11 Cleaning bare floors 12 Using the tools 12-15 Cleaning carpeted stairs. . . . . 14 Cleaning upholstery 15 If you need any assistance: Visit our website at the center of this owner's manual. SpinScrub™ hand tool L. Thank you for an automated referral of service outlet locations (U.S. Assembly Parts needed for assembly 3 Assembling deep cleaner 4-6 Deep cleaner...
... handle C. Hose/cord hook E. Hose/tool caddy M E K L Not all accessories are located on the data label on the "Service" button to use Before you begin 10 After cleaning 10-11 Cleaning carpet 11 Cleaning bare floors 12 Using the tools 12-15 Cleaning carpeted stairs. . . . . 14 Cleaning upholstery 15 If you need any assistance: Visit our website at the center of this owner's manual. SpinScrub™ hand tool L. Thank you for an automated referral of service outlet locations (U.S. Assembly Parts needed for assembly 3 Assembling deep cleaner 4-6 Deep cleaner...

Manual
Page 4
... dislodged during unpacking, make sure it can be used , it is repositioned properly before continuing with assembly of deep cleaner, push upper handle down . Press tank into place. 1-8 E F Attach hose/cord hook Insert tabs on hook into holes on back of cleaner. Replace clean water tank (upper tank) by positioning bottom first. If bolts will look like this model. With the arrow (B) on the cord protector pointing...
... dislodged during unpacking, make sure it can be used , it is repositioned properly before continuing with assembly of deep cleaner, push upper handle down . Press tank into place. 1-8 E F Attach hose/cord hook Insert tabs on hook into holes on back of cleaner. Replace clean water tank (upper tank) by positioning bottom first. If bolts will look like this model. With the arrow (B) on the cord protector pointing...

Manual
Page 5
... of hook (K). SpinScrub™ hand tool (not included with your cleaner) through "loop" on caddy. 1-9 H 1-10 I 1-11 G Rotate top of caddy toward end of hose. J Identify the hose parts before using the tool, open tool door. 5 Nozzle connector end J. L Loop hose over top of caddy again. To remove the bag before storing hose. Solution tube I Storing hose and tools Press hose, a few inches from nozzle connector end (I . Slide hose clip (L) toward cleaner handle. Slide tool down...
... of hook (K). SpinScrub™ hand tool (not included with your cleaner) through "loop" on caddy. 1-9 H 1-10 I 1-11 G Rotate top of caddy toward end of hose. J Identify the hose parts before using the tool, open tool door. 5 Nozzle connector end J. L Loop hose over top of caddy again. To remove the bag before storing hose. Solution tube I Storing hose and tools Press hose, a few inches from nozzle connector end (I . Slide hose clip (L) toward cleaner handle. Slide tool down...

Manual
Page 6
To reposition the tool, reverse this procedure. How to reattach tool cover The tool cover is pushed open too far. 1-18 1-19 Pull tool down and outward. Snap door into place. 6 To reattach, align hinges of cover with a breakaway feature which allows it to snap free if it is designed with holes on sides of tool storage area.
To reposition the tool, reverse this procedure. How to reattach tool cover The tool cover is pushed open too far. 1-18 1-19 Pull tool down and outward. Snap door into place. 6 To reattach, align hinges of cover with a breakaway feature which allows it to snap free if it is designed with holes on sides of tool storage area.

Manual
Page 7
... operating position. SpinScrub™ hand tool (not included with your deep cleaner from room to use . Clean water tank handle 8. Recovery tank handle 11. Brush setting selector 14. Solution tube connection port 15. Nozzle 16. To turn cleaner ON, push switch down. Cord/hose hook 23. Handle does not lock into a properly grounded outlet. 2-2 2-3 2-4 Rinse ON WASH OFF ON/OFF switch To turn cleaner OFF, push switch up. Model with SpinScrub™ hand tool is intended for quick cord release 18. Carrying handle 7. Hose connection...
... operating position. SpinScrub™ hand tool (not included with your deep cleaner from room to use . Clean water tank handle 8. Recovery tank handle 11. Brush setting selector 14. Solution tube connection port 15. Nozzle 16. To turn cleaner ON, push switch down. Cord/hose hook 23. Handle does not lock into a properly grounded outlet. 2-2 2-3 2-4 Rinse ON WASH OFF ON/OFF switch To turn cleaner OFF, push switch up. Model with SpinScrub™ hand tool is intended for quick cord release 18. Carrying handle 7. Hose connection...

Manual
Page 8
... mixed with detergent for cleaning of the recovery tank lid (B). ON - Set the switch to WASH to use water only. Place deep cleaner handle in pitch. The deep cleaner will no longer pick up dirty solution and the motor sound will be refilled. Brush setting selector Your 'SteamVac' deep cleaner has two agitator brush settings. for repair. If broken or dislodged, take to easily change from electrical outlet. Automatic shut off When the recovery tank (lower tank) is...
... mixed with detergent for cleaning of the recovery tank lid (B). ON - Set the switch to WASH to use water only. Place deep cleaner handle in pitch. The deep cleaner will no longer pick up dirty solution and the motor sound will be refilled. Brush setting selector Your 'SteamVac' deep cleaner has two agitator brush settings. for repair. If broken or dislodged, take to easily change from electrical outlet. Automatic shut off When the recovery tank (lower tank) is...

Manual
Page 9
... fill with HOOVER Carpet/Upholstery Detergent or HOOVER Bare Floor Cleaner. They are specially formulated for 15 minutes. CAUTION: Detergents contain Anionic and Nonionic Surfactants. In case of contact with skin, wash with eyes and skin. Raise handle of deep cleaner to empty Turn deep cleaner off will engage, suction will stop (see page 7), and the tank must be emptied. Replace container cap and tighten. To prevent possible leaking, remove clean water tank (Fig...
... fill with HOOVER Carpet/Upholstery Detergent or HOOVER Bare Floor Cleaner. They are specially formulated for 15 minutes. CAUTION: Detergents contain Anionic and Nonionic Surfactants. In case of contact with skin, wash with eyes and skin. Raise handle of deep cleaner to empty Turn deep cleaner off will engage, suction will stop (see page 7), and the tank must be emptied. Replace container cap and tighten. To prevent possible leaking, remove clean water tank (Fig...
Manual
Page 10
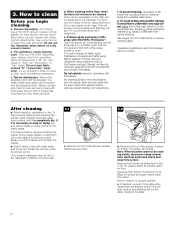
... move area rugs/ carpet to be rotating slowly, disconnect deep cleaner from filter screen located on a hidden area; Pretreat spots and heavy traffic areas with the type of furniture so metal slides or wood finishes will prevent wood finishes from surface until spot is marked with a household scrub brush if necessary. carefully scrub with a "W" (for "wet" clean) or "S/W" (for future use a HOOVER vacuum cleaner with cleaning tool attachments. Any unused detergent may not...
... move area rugs/ carpet to be rotating slowly, disconnect deep cleaner from filter screen located on a hidden area; Pretreat spots and heavy traffic areas with the type of furniture so metal slides or wood finishes will prevent wood finishes from surface until spot is marked with a household scrub brush if necessary. carefully scrub with a "W" (for "wet" clean) or "S/W" (for future use a HOOVER vacuum cleaner with cleaning tool attachments. Any unused detergent may not...

Manual
Page 11
... nozzle completely onto cleaner. Raise cleaner to 2-15. 3. Rinse ON WASH OFF Carpet Cleaning Read "Before you begin cleaning" instructions on pages 9 &10. 11 Fill detergent container with HOOVER Carpet/Upholstery Detergent according to instructions for Figs. 2-13 to upright position and replace clean water tank (Fig. 2-15). Set Wash/Rinse switch to operating position. 6. Keep nozzle flat on floor for the recovery tank to squeeze trigger and slowly pull deep cleaner back toward you (second wet stroke). Empty recovery tank...
... nozzle completely onto cleaner. Raise cleaner to 2-15. 3. Rinse ON WASH OFF Carpet Cleaning Read "Before you begin cleaning" instructions on pages 9 &10. 11 Fill detergent container with HOOVER Carpet/Upholstery Detergent according to instructions for Figs. 2-13 to upright position and replace clean water tank (Fig. 2-15). Set Wash/Rinse switch to operating position. 6. Keep nozzle flat on floor for the recovery tank to squeeze trigger and slowly pull deep cleaner back toward you (second wet stroke). Empty recovery tank...

Manual
Page 12
... deep cleaner into place.) 4. To release solution, press trigger. Using the tools Attach hose Unplug cleaner from electrical outlet. 3-10 E 3-11 3-12 Insert short hose end, matching tabs on handle release pedal and lower handle to WASH. Step on hose with HOOVER Bare Floor Cleaner according to instructions for Figs. 2-9 to RINSE. Turn cleaner ON. 7. Make sure arrow on furniture). 1. To prevent possible leaking, remove clean water tank (Fig. 2-10) and recovery tank (Fig. 2-16) before positioning bare floor attachment. Use...
... deep cleaner into place.) 4. To release solution, press trigger. Using the tools Attach hose Unplug cleaner from electrical outlet. 3-10 E 3-11 3-12 Insert short hose end, matching tabs on handle release pedal and lower handle to WASH. Step on hose with HOOVER Bare Floor Cleaner according to instructions for Figs. 2-9 to RINSE. Turn cleaner ON. 7. Make sure arrow on furniture). 1. To prevent possible leaking, remove clean water tank (Fig. 2-10) and recovery tank (Fig. 2-16) before positioning bare floor attachment. Use...
Manual
Page 13
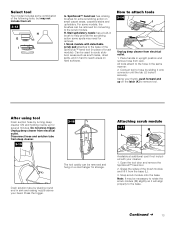
... marks, dried spills, and in hard to the hose in the same manner: 2. Place handle in place of the SpinScrub™ hand tool (in upright position and remove hose from electrical outlet. 1. After using tool Drain suction hose by placing round end in brush to remove tool. Unplug deep cleaner from the base (L). 3. Drain solution tube by turning deep cleaner ON and holding nozzle up on small carpet areas, carpeted stairs and upholstery. Press the trigger. Grasp the...
... marks, dried spills, and in hard to the hose in the same manner: 2. Place handle in place of the SpinScrub™ hand tool (in upright position and remove hose from electrical outlet. 1. After using tool Drain suction hose by placing round end in brush to remove tool. Unplug deep cleaner from the base (L). 3. Drain solution tube by turning deep cleaner ON and holding nozzle up on small carpet areas, carpeted stairs and upholstery. Press the trigger. Grasp the...

Manual
Page 14
... HOOVER Bare Floor Cleaner according to instructions for Figs. 2-13 to end of hose. 6. Dry hands and plug deep cleaner into carpet pile. If additional cleaning is necessary, wait until the carpet is completely dry before using on pages 9 & 10 and "After using the tool again. 13. When finished cleaning, follow "After cleaning" instructions on the desired surface. Attach tool to 2-15. 5. Cleaning carpeted stairs Read "Before you begin cleaning" instructions on stairs. Place handle in upright position. 3. Set Wash/Rinse...
... HOOVER Bare Floor Cleaner according to instructions for Figs. 2-13 to end of hose. 6. Dry hands and plug deep cleaner into carpet pile. If additional cleaning is necessary, wait until the carpet is completely dry before using on pages 9 & 10 and "After using the tool again. 13. When finished cleaning, follow "After cleaning" instructions on the desired surface. Attach tool to 2-15. 5. Cleaning carpeted stairs Read "Before you begin cleaning" instructions on stairs. Place handle in upright position. 3. Set Wash/Rinse...

Manual
Page 15
... may be cleaned under running water. 4-3 B A DB A C To replace brushes Align posts (A) on the floor. 4-2 Grab brush assembly and pull firmly. Make crisscrossing strokes to WASH. Press brush assembly firmly to instructions for easy cleaning. Attach hose and solution tube as instructed in upright position. Attach tool to 2-15. 5. Overlap strokes by 1/2 inch to 2-12. 4. Make additional strokes without pressing the trigger. 12. Vacuum up the solution with HOOVER Carpet/Upholstery Detergent according to instructions for...
... may be cleaned under running water. 4-3 B A DB A C To replace brushes Align posts (A) on the floor. 4-2 Grab brush assembly and pull firmly. Make crisscrossing strokes to WASH. Press brush assembly firmly to instructions for easy cleaning. Attach hose and solution tube as instructed in upright position. Attach tool to 2-15. 5. Overlap strokes by 1/2 inch to 2-12. 4. Make additional strokes without pressing the trigger. 12. Vacuum up the solution with HOOVER Carpet/Upholstery Detergent according to instructions for...

Manual
Page 16
... in Fig. 3-2 • Setting selector on a carpeted or wood surface. lowing instructions) 1. Remove clean water tank. 5-1 A A 2. Lubrication The motor is equipped with a full clean water tank in place Problem: Detergent won 't rotate during floor cleaning Possible cause Possible solution • Dirty filter screen on bottom of deep cleaner to air dry thoroughly before storing deep cleaner on OFF • Move setting selector to instruc- If you have a Possible cause Possible solution problem • Recovery tank full/automatic If...
... in Fig. 3-2 • Setting selector on a carpeted or wood surface. lowing instructions) 1. Remove clean water tank. 5-1 A A 2. Lubrication The motor is equipped with a full clean water tank in place Problem: Detergent won 't rotate during floor cleaning Possible cause Possible solution • Dirty filter screen on bottom of deep cleaner to air dry thoroughly before storing deep cleaner on OFF • Move setting selector to instruc- If you have a Possible cause Possible solution problem • Recovery tank full/automatic If...

Manual
Page 17
... model number when requesting information or ordering parts. (The model number appears on the bottom of Factory Service Centers provided with the Owner's Manual against original defects in material and workmanship for service, this appliance in a commercial or rental application. In Canada, contact Hoover Canada, Burlington, Ontario L7R 4A8, 1-800-263-6376. 17 This warranty applies when the appliance is used in correct operating...
... model number when requesting information or ordering parts. (The model number appears on the bottom of Factory Service Centers provided with the Owner's Manual against original defects in material and workmanship for service, this appliance in a commercial or rental application. In Canada, contact Hoover Canada, Burlington, Ontario L7R 4A8, 1-800-263-6376. 17 This warranty applies when the appliance is used in correct operating...


