Manual
Page 3
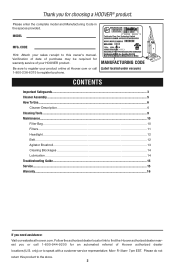
...; authorized dealer locations (U.S. CODE Hint: Attach your HOOVER® product. Fri 8am- 7pm EST. Manufacturing code (Label located under vacuum) Contents Important Safeguards...3 Cleaner Assembly...5 How To Use...6 Cleaner Description 6 Cleaning Tools...9 Maintenance...10 Filter Bag...10 Filters...11 Headlight...12 Belt...12 Agitator Brushroll 13 Clearing Blockages 14 Lubrication...14 Troubleshooting Guide...
...; authorized dealer locations (U.S. CODE Hint: Attach your HOOVER® product. Fri 8am- 7pm EST. Manufacturing code (Label located under vacuum) Contents Important Safeguards...3 Cleaner Assembly...5 How To Use...6 Cleaner Description 6 Cleaning Tools...9 Maintenance...10 Filter Bag...10 Filters...11 Headlight...12 Belt...12 Agitator Brushroll 13 Clearing Blockages 14 Lubrication...14 Troubleshooting Guide...

Manual
Page 6
... moving parts. Use only manufacturer's recommended attachments and products. • Do not use cord as a toy. Brushroll continues to rotate when in the upright position. • Turn off all parts of stairs on cord. Not intended for use by cord, use with wet hands. • Do not...flow. • Keep hair, loose clothing, fingers, and all controls before operating. • Operate vacuum only at bottom of body away from product, and do not allow to continuing use without Dust bag and Filters in this manual. WARNING: TO REDUCE THE RISK OF FIRE, ELECTRIC SHOCK OR INJURY:...
... moving parts. Use only manufacturer's recommended attachments and products. • Do not use cord as a toy. Brushroll continues to rotate when in the upright position. • Turn off all parts of stairs on cord. Not intended for use by cord, use with wet hands. • Do not...flow. • Keep hair, loose clothing, fingers, and all controls before operating. • Operate vacuum only at bottom of body away from product, and do not allow to continuing use without Dust bag and Filters in this manual. WARNING: TO REDUCE THE RISK OF FIRE, ELECTRIC SHOCK OR INJURY:...
Manual
Page 10
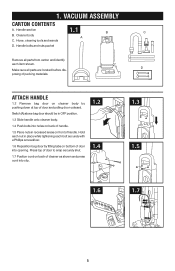
Attach handle 1.2 Remove bag door on cleaner body by fitting tabs on front of door into clip. 1.2 1.4 1.3 1.5 1.6...bottom of handle. Make sure all parts from carton and identify each bolt securely with a Phillips screwdriver. 1.6 Reposition bag door by pushing down at top of handle. 1.5 Place nuts in place while tightening each item shown. Press top... pulling door outward. 1. D posing of cleaner as shown and press cord into opening. Switch (A) above bag door should be in OFF position. 1.3 Slide handle onto cleaner body. 1.4 Push bolts into holes on back of packing...
Attach handle 1.2 Remove bag door on cleaner body by fitting tabs on front of door into clip. 1.2 1.4 1.3 1.5 1.6...bottom of handle. Make sure all parts from carton and identify each bolt securely with a Phillips screwdriver. 1.6 Reposition bag door by pushing down at top of handle. 1.5 Place nuts in place while tightening each item shown. Press top... pulling door outward. 1. D posing of cleaner as shown and press cord into opening. Switch (A) above bag door should be in OFF position. 1.3 Slide handle onto cleaner body. 1.4 Push bolts into holes on back of packing...
Manual
Page 11
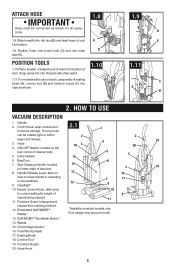
...Vacuum Description 1. Hose 16 3 20 4. Embedded DirtFINDER™ display* *Available on 13 6 2 18 16 lever to lower handle to operating or low positions 12 9. Check Bag Indicator* 16. Hose Hook 6 Attach hose 1.8 IMPORTANT Hose must be rotated right or left rear corner of cleaner body 5 4 5. Bag... edge of rack. Furniture Guard: helps prevent cleaner from marking furniture 12. Wands 15. Handle 2. Snap wand into bottom of bag door 8. ON/OFF Switch: located on back, snap ends of dusting brush (A), crevice tool (B) and furniture nozzle (C) into ...
...Vacuum Description 1. Hose 16 3 20 4. Embedded DirtFINDER™ display* *Available on 13 6 2 18 16 lever to lower handle to operating or low positions 12 9. Check Bag Indicator* 16. Hose Hook 6 Attach hose 1.8 IMPORTANT Hose must be rotated right or left rear corner of cleaner body 5 4 5. Bag... edge of rack. Furniture Guard: helps prevent cleaner from marking furniture 12. Wands 15. Handle 2. Snap wand into bottom of bag door 8. ON/OFF Switch: located on back, snap ends of dusting brush (A), crevice tool (B) and furniture nozzle (C) into ...

Manual
Page 14
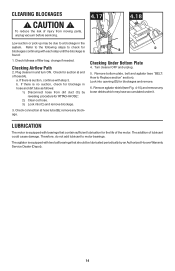
upright for a considerable amount of cleaner. The green light will come on when the cleaner is first turned on for storage and when using the carry handle. 2.6 Cord clip To help keep the cord out of the way while vacuuming, position cord down into electrical outlet. To decrease ...(A), the 'DirtFINDER' system alerts the user to areas of your cleaner has three positions; To let you should take additional cleaning strokes in upright position, tilt cleaner back on rear wheels and push forward. 2.5 Embedded DirtFINDER™ (Available on carpet and floors; then the red light...
upright for a considerable amount of cleaner. The green light will come on when the cleaner is first turned on for storage and when using the carry handle. 2.6 Cord clip To help keep the cord out of the way while vacuuming, position cord down into electrical outlet. To decrease ...(A), the 'DirtFINDER' system alerts the user to areas of your cleaner has three positions; To let you should take additional cleaning strokes in upright position, tilt cleaner back on rear wheels and push forward. 2.5 Embedded DirtFINDER™ (Available on carpet and floors; then the red light...
Manual
Page 15
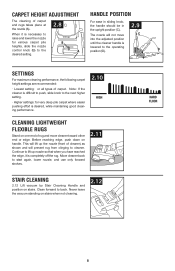
... edge, push down on stairs. D desired setting. Continue to start again, lower nozzle, and use only forward strokes. 2.11 Stair Cleaning 2.12 Lift vacuum by Stair Cleaning Handle and position on handle. Settings For maximum cleaning performance, the following carpet height settings are recommended: • Lowest setting: or all ... nozzle control knob (B) to the lowered to cleaner. Note: If the cleaner is difficult to push, slide knob to back. Never leave the vacuum standing on one end of cleaner) as shown and will not move cleaner toward other end or edge. the...
... edge, push down on stairs. D desired setting. Continue to start again, lower nozzle, and use only forward strokes. 2.11 Stair Cleaning 2.12 Lift vacuum by Stair Cleaning Handle and position on handle. Settings For maximum cleaning performance, the following carpet height settings are recommended: • Lowest setting: or all ... nozzle control knob (B) to the lowered to cleaner. Note: If the cleaner is difficult to push, slide knob to back. Never leave the vacuum standing on one end of cleaner) as shown and will not move cleaner toward other end or edge. the...

Manual
Page 18
...used in tight spaces, corners and along edges in the upright position. To use . D. Attach second wand, tool or crevice tool* to clean areas. Cleaning tools may be washed in the same manner. The vacuum is ready for upholstered furniture, draperies, mattresses, clothing, ...automobile interiors, and carpeted stairs. C. Rinse with a cloth dampened in upright position. B. Crevice tool* may be used for reaching hard to the ...
...used in tight spaces, corners and along edges in the upright position. To use . D. Attach second wand, tool or crevice tool* to clean areas. Cleaning tools may be washed in the same manner. The vacuum is ready for upholstered furniture, draperies, mattresses, clothing, ...automobile interiors, and carpeted stairs. C. Rinse with a cloth dampened in upright position. B. Crevice tool* may be used for reaching hard to the ...
Manual
Page 19
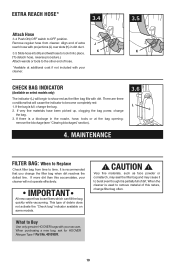
... to the other end of dirt. If more dirt than this nature, change the bag. 3. When purchasing a new bag, ask for HOOVER® Allergen Type Y Part No. 4010100Y. ! Very fine materials, such as the filter bag fills with your cleaner. Remove regular hose from time to OFF position. K K ...the nozzle, hose, tools or at additional cost if not included with your vacuum. If very fine materials have been picked up, clogging the bag pores; This type of debris does not activate the "Check bag" indicator available on select models only) The indicator (L) will cause the ...
... to the other end of dirt. If more dirt than this nature, change the bag. 3. When purchasing a new bag, ask for HOOVER® Allergen Type Y Part No. 4010100Y. ! Very fine materials, such as the filter bag fills with your cleaner. Remove regular hose from time to OFF position. K K ...the nozzle, hose, tools or at additional cost if not included with your vacuum. If very fine materials have been picked up, clogging the bag pores; This type of debris does not activate the "Check bag" indicator available on select models only) The indicator (L) will cause the ...

Manual
Page 22
... filter (A), located behind the grill in filter bag. 4.3 Reposition bag door by placing tabs on the side of door into opening in place. What to Buy Use only genuine HOOVER® Secondary Filter with your vacuum. Reposition bag door. Do not operate cleaner without either the... secondary or final filter in filter bag with your vacuum. Reposition dry filter and grill. When purchasing a new ...
... filter (A), located behind the grill in filter bag. 4.3 Reposition bag door by placing tabs on the side of door into opening in place. What to Buy Use only genuine HOOVER® Secondary Filter with your vacuum. Reposition bag door. Do not operate cleaner without either the... secondary or final filter in filter bag with your vacuum. Reposition dry filter and grill. When purchasing a new ...
Manual
Page 23
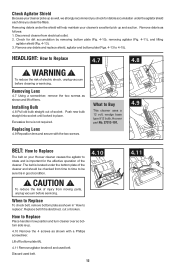
... unplug vacuum before cleaning or servicing. Headlight: How to rotate and is important for the effective operation of the cleaner. What to Buy This cleaner uses a 12 volt, wedge base type 912 bulb, Hoover® part No. 27313-101. 4.9 Belt: How to Replace The belt on your Hoover®...broken. How to Replace Place handle in good condition. 4.10 ! Installing Bulb 4.8 Pull old bulb straight out of electric shock, unplug vacuum before servicing. The belt is located under the agitator shield each time you check for debris accumulation under the bottom plate of injury from ...
... unplug vacuum before cleaning or servicing. Headlight: How to rotate and is important for the effective operation of the cleaner. What to Buy This cleaner uses a 12 volt, wedge base type 912 bulb, Hoover® part No. 27313-101. 4.9 Belt: How to Replace The belt on your Hoover®...broken. How to Replace Place handle in good condition. 4.10 ! Installing Bulb 4.8 Pull old bulb straight out of electric shock, unplug vacuum before servicing. The belt is located under the agitator shield each time you check for debris accumulation under the bottom plate of injury from ...
Manual
Page 26
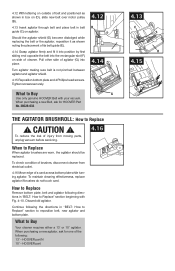
...into the rectangular slot (F) on agitator. To maintain cleaning effectiveness, replace agitator if brushes do not touch card. What to Replace ! HOOVER part 4.13 C D 4.15 Pull other side of belt and positioned as shown noting the placement of its belt guide (E). 4.14... HOOVER part N 15" - When purchasing a new Belt, ask for one of a card across bottom plate while turning agitator. Continue following : 13" - CAUTION ! To check condition of brushes, disconnect cleaner from moving parts, unplug vacuum before servicing. 4.16 When to Replace" section beginning with your vacuum....
...into the rectangular slot (F) on agitator. To maintain cleaning effectiveness, replace agitator if brushes do not touch card. What to Replace ! HOOVER part 4.13 C D 4.15 Pull other side of belt and positioned as shown noting the placement of its belt guide (E). 4.14... HOOVER part N 15" - When purchasing a new Belt, ask for one of a card across bottom plate while turning agitator. Continue following : 13" - CAUTION ! To check condition of brushes, disconnect cleaner from moving parts, unplug vacuum before servicing. 4.16 When to Replace" section beginning with your vacuum....
Manual
Page 27
... and remove blockage. 3. To reduce the risk of injury from dirt duct (C) by an Authorized Hoover Warranty Service Dealer (Depot). 14 Check connection at end of the motor. Remove bottom plate, belt...be lubricated periodically by reversing procedure for the life of hose (A). The addition of filter bag; If there is suction, continue with each step until the blockage is no suction, check...for blockage in hose and dirt tube as follows: 1) Disconnect hose from moving parts, unplug vacuum before servicing. 4.17 4.18 Low suction or pick up may have accumulated under it. The...
... and remove blockage. 3. To reduce the risk of injury from dirt duct (C) by an Authorized Hoover Warranty Service Dealer (Depot). 14 Check connection at end of the motor. Remove bottom plate, belt...be lubricated periodically by reversing procedure for the life of hose (A). The addition of filter bag; If there is suction, continue with each step until the blockage is no suction, check...for blockage in hose and dirt tube as follows: 1) Disconnect hose from moving parts, unplug vacuum before servicing. 4.17 4.18 Low suction or pick up may have accumulated under it. The...

Manual
Page 30
...will only result in firmly 2. Customers) or hoover.ca (Canadian customers). Mon-Fri 8am-7pm EST. To reduce risk of authorized service outlet locations call 1-800-944-9200. Plug unit in delay. Replace belt 2. Change filter bag 4. Blown fuse or tripped breaker 4. Move carpet...won 't pick up 1. No voltage in the Maintenance section. 6. Incorrect carpet height setting Smoky/burning smell detected 1. Always identify your vacuum to Hoover,® Inc., Company in Glenwillow for 30 minutes (this product to find the service outlet nearest you. • For an automated ...
...will only result in firmly 2. Customers) or hoover.ca (Canadian customers). Mon-Fri 8am-7pm EST. To reduce risk of authorized service outlet locations call 1-800-944-9200. Plug unit in delay. Replace belt 2. Change filter bag 4. Blown fuse or tripped breaker 4. Move carpet...won 't pick up 1. No voltage in the Maintenance section. 6. Incorrect carpet height setting Smoky/burning smell detected 1. Always identify your vacuum to Hoover,® Inc., Company in Glenwillow for 30 minutes (this product to find the service outlet nearest you. • For an automated ...


