Manual
Page 2
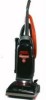
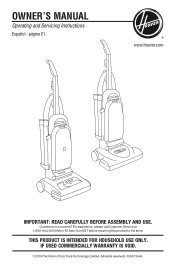
Owner's Manual Operating and Servicing Instructions Español - For assistance, please call Customer Service at 1-800-944-9200 Mon-Fri 8am-7pm EST before returning this product to the store. Questions or concerns? All rights reserved. #56511A46 IF USED COMMERCIALLY WARRANTY IS VOID. ©2009 Techtronic Floor Care Technology Limited. THIS PRODUCT IS INTENDED FOR HOUSEHOLD USE ONLY. página E1 www.hoover.com IMPORTANT: READ CAREFULLY BEFORE ASSEMBLY AND USE.
Owner's Manual Operating and Servicing Instructions Español - For assistance, please call Customer Service at 1-800-944-9200 Mon-Fri 8am-7pm EST before returning this product to the store. Questions or concerns? All rights reserved. #56511A46 IF USED COMMERCIALLY WARRANTY IS VOID. ©2009 Techtronic Floor Care Technology Limited. THIS PRODUCT IS INTENDED FOR HOUSEHOLD USE ONLY. página E1 www.hoover.com IMPORTANT: READ CAREFULLY BEFORE ASSEMBLY AND USE.
Manual
Page 3
... locator link to register your product online at hoover.com. Manufacturing code (Label located under vacuum) Contents Important Safeguards...3 Cleaner Assembly...5 How To Use...6 Cleaner Description 6 Cleaning Tools...9 Maintenance...10 Filter Bag...10 Filters...11 Headlight...12 Belt...12 Agitator Brushroll 13 Clearing Blockages 14 Lubrication...14 Troubleshooting Guide...15 Service...15 Warranty...16 If you need assistance: Visit our website at Hoover.com or call 1-800-944-9200 for choosing a HOOVER® product. CODE Hint: Attach your HOOVER® product...
... locator link to register your product online at hoover.com. Manufacturing code (Label located under vacuum) Contents Important Safeguards...3 Cleaner Assembly...5 How To Use...6 Cleaner Description 6 Cleaning Tools...9 Maintenance...10 Filter Bag...10 Filters...11 Headlight...12 Belt...12 Agitator Brushroll 13 Clearing Blockages 14 Lubrication...14 Troubleshooting Guide...15 Service...15 Warranty...16 If you need assistance: Visit our website at Hoover.com or call 1-800-944-9200 for choosing a HOOVER® product. CODE Hint: Attach your HOOVER® product...

Manual
Page 6
... when plugged in the upright position. • Turn off all parts of body away from falling, always place cleaner at voltage specified on data label on cord. IMPORTANT SAFETY INSTRUCTIONS SAVE THESE INSTRUCTIONS When using an electrical appliance, basic precautions should , has been dropped, damaged, left outdoors, or dropped into openings. Use only manufacturer's recommended attachments and products. • Do not use without Dust bag and Filters in...
... when plugged in the upright position. • Turn off all parts of body away from falling, always place cleaner at voltage specified on data label on cord. IMPORTANT SAFETY INSTRUCTIONS SAVE THESE INSTRUCTIONS When using an electrical appliance, basic precautions should , has been dropped, damaged, left outdoors, or dropped into openings. Use only manufacturer's recommended attachments and products. • Do not use without Dust bag and Filters in...

Manual
Page 7
... carpet, rugs, furniture and flooring, avoid tipping cleaner or setting it from the electrical outlet. 2. If the plug does not fit fully in upright position. A Thermal Protector has been designed into your cleaner needs servicing. Inspect and remove blockage along the dirt path. NOTICE ! If this appliance has a polarized plug (one way. ! When the thermal protector activates the cleaner will deactivate and cleaning may occur at the: nozzle inlet, hose tube, dirt duct, hose, filter bag...
... carpet, rugs, furniture and flooring, avoid tipping cleaner or setting it from the electrical outlet. 2. If the plug does not fit fully in upright position. A Thermal Protector has been designed into your cleaner needs servicing. Inspect and remove blockage along the dirt path. NOTICE ! If this appliance has a polarized plug (one way. ! When the thermal protector activates the cleaner will deactivate and cleaning may occur at the: nozzle inlet, hose tube, dirt duct, hose, filter bag...
Manual
Page 10
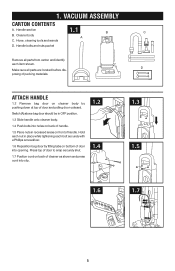
... pulling door outward. Attach handle 1.2 Remove bag door on cleaner body by fitting tabs on bottom of handle. 1.5 Place nuts in place while tightening each item shown. 1. D posing of handle. Hold each nut in recessed areas on back of door into opening. Handle section B. Cleaner body 1.1 B A C C. Hose, cleaning tools and wands D. Vacuum ASSEMBLY Carton contents A. Switch (A) above bag door should be in OFF position. 1.3 Slide handle onto cleaner body. 1.4 Push...
... pulling door outward. Attach handle 1.2 Remove bag door on cleaner body by fitting tabs on bottom of handle. 1.5 Place nuts in place while tightening each item shown. 1. D posing of handle. Hold each nut in recessed areas on back of door into opening. Handle section B. Cleaner body 1.1 B A C C. Hose, cleaning tools and wands D. Vacuum ASSEMBLY Carton contents A. Switch (A) above bag door should be in OFF position. 1.3 Slide handle onto cleaner body. 1.4 Push...
Manual
Page 11
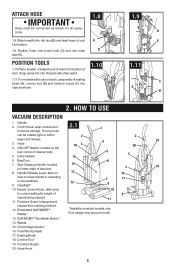
... Filter Exhaust 17. Furniture Nozzle 20. Repeat with other wand. 1.11 For models with tools on lower edge of wand into clip. HOW TO USE Vacuum Description 1. Handle 2. Stair Cleaning Handle: located 14 on back, snap ends of dusting brush (A), crevice tool (B) and furniture nozzle (C) into hose B tube (E). Furniture Guard: helps prevent cleaner from marking furniture 12. Hose Hook 6 Embedded DirtFINDER™ display* *Available on left for storage. Dusting Brush 18. Attach hose 1.8 IMPORTANT Hose must...
... Filter Exhaust 17. Furniture Nozzle 20. Repeat with other wand. 1.11 For models with tools on lower edge of wand into clip. HOW TO USE Vacuum Description 1. Handle 2. Stair Cleaning Handle: located 14 on back, snap ends of dusting brush (A), crevice tool (B) and furniture nozzle (C) into hose B tube (E). Furniture Guard: helps prevent cleaner from marking furniture 12. Hose Hook 6 Embedded DirtFINDER™ display* *Available on left for storage. Dusting Brush 18. Attach hose 1.8 IMPORTANT Hose must...

Manual
Page 14
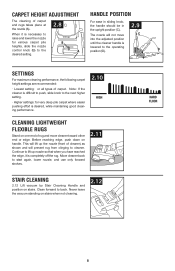
... on carpet and floors; After a few seconds, the red light will go off and the green light will come on . then the red light will come on . To increase the feature's sensitivity to dirt, set the switch to the "Reg" (Regular) position. 7 To turn cleaner ON, push switch (A) toward back of cleaner. 2.2 A Handle positions The handle of dirt is being removed by using cleaning tools; Cleaning may need more AB cleaning attention. When the red light...
... on carpet and floors; After a few seconds, the red light will go off and the green light will come on . then the red light will come on . To increase the feature's sensitivity to dirt, set the switch to the "Reg" (Regular) position. 7 To turn cleaner ON, push switch (A) toward back of cleaner. 2.2 A Handle positions The handle of dirt is being removed by using cleaning tools; Cleaning may need more AB cleaning attention. When the red light...
Manual
Page 15
... HIGH Cleaning lightweight flexible rugs Stand on stairs. This will lift up nozzle so that when you have reached the edge, it is necessary to The nozzle will prevent rug from clinging to the operating A position (D). the upright position (C). Carpet height adjustment Handle position The cleaning of carpet. Before reaching edge, push down on stairs when not cleaning. 2.12 HARD FLOOR 8
... HIGH Cleaning lightweight flexible rugs Stand on stairs. This will lift up nozzle so that when you have reached the edge, it is necessary to The nozzle will prevent rug from clinging to the operating A position (D). the upright position (C). Carpet height adjustment Handle position The cleaning of carpet. Before reaching edge, push down on stairs when not cleaning. 2.12 HARD FLOOR 8

Manual
Page 18
..., books, lamps, lighting fixtures, venetian blinds, baseboards, shutters, and registers. Also, turn while product is in upright position. To use . Twist wand or tool slightly to your hose. C. D. Use them with a damp cloth. For models with crevice tool, the dusting brush (I How to turn cleaner OFF before using cleaning tools, cleaner handle should be washed in warm water with a cloth dampened in the upright position. 3. IMPORTANT Brushroll continues to clean tools To clean the hose, wipe off dirt with...
..., books, lamps, lighting fixtures, venetian blinds, baseboards, shutters, and registers. Also, turn while product is in upright position. To use . Twist wand or tool slightly to your hose. C. D. Use them with a damp cloth. For models with crevice tool, the dusting brush (I How to turn cleaner OFF before using cleaning tools, cleaner handle should be washed in warm water with a cloth dampened in the upright position. 3. IMPORTANT Brushroll continues to clean tools To clean the hose, wipe off dirt with...
Manual
Page 19
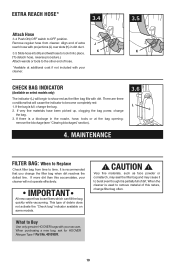
... have been picked up, clogging the bag pores; This type of dirt. When the cleaner is partially full of debris does not activate the "Check bag" indicator available on select models only) The indicator (L) will not operate effectively. Extra reach hose* 3.4 3.5 Attach Hose 3.4 Push ON/OFF switch to time. MAINTENANCE Filter bag: When to Replace Check filter bag from cleaner. K K (To detach hose, reverse procedure.) Attach wands or tools to Buy Use only genuine HOOVER® bags with dirt. What to...
... have been picked up, clogging the bag pores; This type of dirt. When the cleaner is partially full of debris does not activate the "Check bag" indicator available on select models only) The indicator (L) will not operate effectively. Extra reach hose* 3.4 3.5 Attach Hose 3.4 Push ON/OFF switch to time. MAINTENANCE Filter bag: When to Replace Check filter bag from cleaner. K K (To detach hose, reverse procedure.) Attach wands or tools to Buy Use only genuine HOOVER® bags with dirt. What to...

Manual
Page 22
... the motor from moving parts, unplug vacuum before servicing. 4.1 4.2 B 4.1 To change filter bag, push down top of filter. 4.6 Lift out filter (B) and hand wash it on bottom of the cleaner. Hand wash filter in filter bag. 4.3 Reposition bag door by placing tabs on the side of door into opening in cold water with your vacuum. Let filter air dry and reposition it in filter bag with mild detergent, then air dry. When purchasing a new Final Filter, ask for Hoover® Part No...
... the motor from moving parts, unplug vacuum before servicing. 4.1 4.2 B 4.1 To change filter bag, push down top of filter. 4.6 Lift out filter (B) and hand wash it on bottom of the cleaner. Hand wash filter in filter bag. 4.3 Reposition bag door by placing tabs on the side of door into opening in cold water with your vacuum. Let filter air dry and reposition it in filter bag with mild detergent, then air dry. When purchasing a new Final Filter, ask for Hoover® Part No...
Manual
Page 23
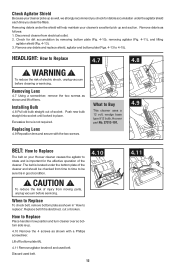
... will help maintain your cleaner's excellent pick up so well, we strongly recommend you clean the filters. Remove debris as shown and lift off bottom plate (A). 4.11 Remove agitator brushroll and used belt. 12 4.11 Disconnect cleaner from moving parts, unplug vacuum before cleaning or servicing. WARNING ! What to Buy This cleaner uses a 12 volt, wedge base type 912 bulb, Hoover® part No. 27313-101. 4.9 Belt: How to Replace The belt on your Hoover® cleaner...
... will help maintain your cleaner's excellent pick up so well, we strongly recommend you clean the filters. Remove debris as shown and lift off bottom plate (A). 4.11 Remove agitator brushroll and used belt. 12 4.11 Disconnect cleaner from moving parts, unplug vacuum before cleaning or servicing. WARNING ! What to Buy This cleaner uses a 12 volt, wedge base type 912 bulb, Hoover® part No. 27313-101. 4.9 Belt: How to Replace The belt on your Hoover® cleaner...
Manual
Page 26
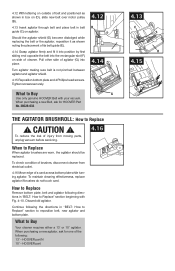
... directions in "BELT: How to Replace When agitator brushes are worn, the agitator should be replaced. What to Replace ! To check condition of brushes, disconnect cleaner from moving parts, unplug vacuum before servicing. 4.16 When to Replace" section beginning with your vacuum. To maintain cleaning effectiveness, replace agitator if brushes do not touch card. How to Replace Remove bottom plate, belt and agitator following directions in "BELT: How to Replace" section to Buy G Use only genuine HOOVER® Belt with Fig. 4-10. Turn agitator...
... directions in "BELT: How to Replace When agitator brushes are worn, the agitator should be replaced. What to Replace ! To check condition of brushes, disconnect cleaner from moving parts, unplug vacuum before servicing. 4.16 When to Replace" section beginning with your vacuum. To maintain cleaning effectiveness, replace agitator if brushes do not touch card. How to Replace Remove bottom plate, belt and agitator following directions in "BELT: How to Replace" section to Buy G Use only genuine HOOVER® Belt with Fig. 4-10. Turn agitator...
Manual
Page 27
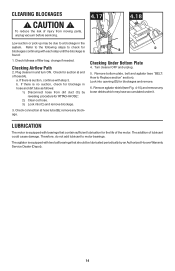
... following steps to Replace section" section). Check fullness of hose (A). Check for suction at hose tube (B); Turn cleaner OFF and unplug. 5. Remove agitator shield (see "BELT: How to check for "Attach hose". 2) Clear out hose. 3) Look into opening (D) for the life of lubricant could cause damage. If there is no suction, check for blockage in hose and dirt tube as follows: 1) Disconnect hose from moving parts, unplug vacuum before servicing. 4.17 4.18 Low suction or pick up may have...
... following steps to Replace section" section). Check fullness of hose (A). Check for suction at hose tube (B); Turn cleaner OFF and unplug. 5. Remove agitator shield (see "BELT: How to check for "Attach hose". 2) Clear out hose. 3) Look into opening (D) for the life of lubricant could cause damage. If there is no suction, check for blockage in hose and dirt tube as follows: 1) Disconnect hose from moving parts, unplug vacuum before servicing. 4.17 4.18 Low suction or pick up may have...

Manual
Page 30
... servicing. PROBLEM Cleaner won 't pick up 1. Thermal protector activated Cleaner/ tools won 't run POSSIBLE REASON 1. Agitator brushroll worn 3. Blockage in the Maintenance section. 6. Replace belt 2. Replace brushroll 3. Change filter bag 4. Replace agitator brushroll belt as described in Figs. 3-10 through 3-15 in air flow passage Cleaner hard to find the service outlet nearest you. • For an automated referral of personal injury - Service To obtain approved Hoover® service and genuine Hoover® parts, locate the nearest Authorized Hoover® Warranty...
... servicing. PROBLEM Cleaner won 't pick up 1. Thermal protector activated Cleaner/ tools won 't run POSSIBLE REASON 1. Agitator brushroll worn 3. Blockage in the Maintenance section. 6. Replace belt 2. Replace brushroll 3. Change filter bag 4. Replace agitator brushroll belt as described in Figs. 3-10 through 3-15 in air flow passage Cleaner hard to find the service outlet nearest you. • For an automated referral of personal injury - Service To obtain approved Hoover® service and genuine Hoover® parts, locate the nearest Authorized Hoover® Warranty...
Manual
Page 31
... warranty does not cover pick up, delivery, transportation or house calls. These items include belts, agitator roll sleeves, agitator bearings, brushes, bags, filters and bulbs. WARRANTY Limited One-Year Commercial Product Warranty Plus Limited Two-Year Motor Warranty WHAT THIS WARRANTY COVERS When used and maintained in normal Commercial use and in which the product was initially purchased, resale of warranty service outlets, phone 1-800-944-9200, Mon-Fri 8am-7pm EST. These parts...
... warranty does not cover pick up, delivery, transportation or house calls. These items include belts, agitator roll sleeves, agitator bearings, brushes, bags, filters and bulbs. WARRANTY Limited One-Year Commercial Product Warranty Plus Limited Two-Year Motor Warranty WHAT THIS WARRANTY COVERS When used and maintained in normal Commercial use and in which the product was initially purchased, resale of warranty service outlets, phone 1-800-944-9200, Mon-Fri 8am-7pm EST. These parts...


