
Product Manual
Page 2
... HOOVER® product. Thank you or call 1-800-944-9200 to register by phone. Please enter the complete model and Manufacturing Code in the spaces provided. CODE Hint: Attach your sales receipt to this product to the store. 2 Follow the authorized dealer locator link to Charger ... Attach Nozzle Base 5 Unfold Handle...5 How to Use...6 Vacuum Description 6 Connect to find the Hoover® authorized dealer nearest you for an automated referral of your product online at hoover.com. Verification of date of purchase may be required for assembly and maintenance. Be sure to speak...
... HOOVER® product. Thank you or call 1-800-944-9200 to register by phone. Please enter the complete model and Manufacturing Code in the spaces provided. CODE Hint: Attach your sales receipt to this product to the store. 2 Follow the authorized dealer locator link to Charger ... Attach Nozzle Base 5 Unfold Handle...5 How to Use...6 Vacuum Description 6 Connect to find the Hoover® authorized dealer nearest you for an automated referral of your product online at hoover.com. Verification of date of purchase may be required for assembly and maintenance. Be sure to speak...

Product Manual
Page 3
...into openings. WARNING: TO REDUCE THE RISK OF FIRE, ELECTRIC SHOCK OR INJURY: • Fully assemble before operating. • Do not use by charger cord, use charger with any openings. • Use only as lemon juice or vinegar. Use only manufacturer's recommended attachments and products. • Do not use cord... as gasoline, or fine wood sandings or use with damaged cord or plug. Keep cord away from heated surfaces. • Do not unplug charger by the manufacturer to continuing use. • Do not pull or carry by children age 12 and under extreme conditions. Do not use in...
...into openings. WARNING: TO REDUCE THE RISK OF FIRE, ELECTRIC SHOCK OR INJURY: • Fully assemble before operating. • Do not use by charger cord, use charger with any openings. • Use only as lemon juice or vinegar. Use only manufacturer's recommended attachments and products. • Do not use cord... as gasoline, or fine wood sandings or use with damaged cord or plug. Keep cord away from heated surfaces. • Do not unplug charger by the manufacturer to continuing use. • Do not pull or carry by children age 12 and under extreme conditions. Do not use in...

Product Manual
Page 5
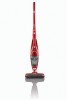
... AC Adapter plug (A) into bottom of packing materials. *Hand Vac comes packed attached to Stick Vac. WARNING ! Always turn off this appliance before disposing of charger base (B) and fit cord snugly into place. 1.4 1.6 1.3 B A 1.5 5 Actual model may vary from Stick Vac, press Nozzle release button located above nozzle on Stick Vac body...
... AC Adapter plug (A) into bottom of packing materials. *Hand Vac comes packed attached to Stick Vac. WARNING ! Always turn off this appliance before disposing of charger base (B) and fit cord snugly into place. 1.4 1.6 1.3 B A 1.5 5 Actual model may vary from Stick Vac, press Nozzle release button located above nozzle on Stick Vac body...

Product Manual
Page 6
... in 6-8 hours. 2.2 Insert AC Adapter plug (A) into bottom of charger base (B) and fit cord snugly into base. When the batteries are in upright position. 2.3 Place the charger upright and slide the Stick Vac into cord well so cord exits the... Nozzle With Rotating Brushroll 9. Charging Station Contact Points 4 12. WARNING ! 2.2 B A 2.3 Use only the Hoover® charger part #44000295 supplied by the manufacturer to charger ! AC Adapter Connection (Located under charger base) 8 16. 3-In-1 Tool: A. Actual model may vary from images shown. 6 Power Indicator Light 7...
... in 6-8 hours. 2.2 Insert AC Adapter plug (A) into bottom of charger base (B) and fit cord snugly into base. When the batteries are in upright position. 2.3 Place the charger upright and slide the Stick Vac into cord well so cord exits the... Nozzle With Rotating Brushroll 9. Charging Station Contact Points 4 12. WARNING ! 2.2 B A 2.3 Use only the Hoover® charger part #44000295 supplied by the manufacturer to charger ! AC Adapter Connection (Located under charger base) 8 16. 3-In-1 Tool: A. Actual model may vary from images shown. 6 Power Indicator Light 7...

Product Manual
Page 8
.... Tool Storage 2.11 To store tools, attach Upholstery/Dusting brush to crevice tool. 3-in-1 Tool Attachment and Use Insert Tools into suction slot located on charger base. 2.8 2.10 STORAGE Always store the appliance indoors in a cool, dry place and out of reach of children. Before storing for grooming a pet. Suggested use...
.... Tool Storage 2.11 To store tools, attach Upholstery/Dusting brush to crevice tool. 3-in-1 Tool Attachment and Use Insert Tools into suction slot located on charger base. 2.8 2.10 STORAGE Always store the appliance indoors in a cool, dry place and out of reach of children. Before storing for grooming a pet. Suggested use...


