
Owner's Manual
Page 1
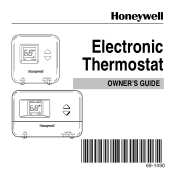
Set Room FAN Auto On SYSTEM Cool Off Heat M18535 Em Ht Aux Ht Set Room Electronic Thermostat OWNER'S GUIDE FAN Auto On SYSTEM Cool Off Heat Em.Ht. M18539 1 69-1490 69-1490
Set Room FAN Auto On SYSTEM Cool Off Heat M18535 Em Ht Aux Ht Set Room Electronic Thermostat OWNER'S GUIDE FAN Auto On SYSTEM Cool Off Heat Em.Ht. M18539 1 69-1490 69-1490
Owner's Manual
Page 2
Over 100 years of Honeywell engineering expertise went into the making of your new thermostat! You can easily read the current room temperature at a glance. • No need for you with a more comfortable and convenient living environment. • Simple and easy to change your temperature setting. • Large digital display. Batteries are not required because your temperature settings are held permanently in an effort to provide you to use. The ▲ and ▼ keys make it easy for batteries. Congratulations on the purchase of this thermostat in memory. 69-1490 2
Over 100 years of Honeywell engineering expertise went into the making of your new thermostat! You can easily read the current room temperature at a glance. • No need for you with a more comfortable and convenient living environment. • Simple and easy to change your temperature setting. • Large digital display. Batteries are not required because your temperature settings are held permanently in an effort to provide you to use. The ▲ and ▼ keys make it easy for batteries. Congratulations on the purchase of this thermostat in memory. 69-1490 2
Owner's Manual
Page 3
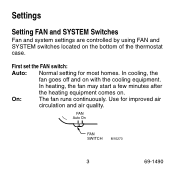
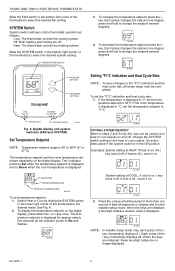
First set the FAN switch: Auto: Normal setting for improved air circulation and air quality. FAN Auto On FAN SWITCH M10273 3 69-1490 Use for most homes. On: The fan runs continuously. Settings Setting FAN and SYSTEM Switches Fan and system settings are controlled by using FAN and SYSTEM switches located on . In heating, the fan may start a few minutes after the heating equipment comes on the bottom of the thermostat case. In cooling, the fan goes off and on with the cooling equipment.
First set the FAN switch: Auto: Normal setting for improved air circulation and air quality. FAN Auto On FAN SWITCH M10273 3 69-1490 Use for most homes. On: The fan runs continuously. Settings Setting FAN and SYSTEM Switches Fan and system settings are controlled by using FAN and SYSTEM switches located on . In heating, the fan may start a few minutes after the heating equipment comes on the bottom of the thermostat case. In cooling, the fan goes off and on with the cooling equipment.
Owner's Manual
Page 8
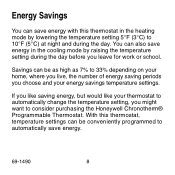
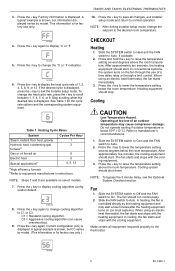
With this thermostat in the cooling mode by lowering the temperature setting 5°F (3°C) to 10°F (5°C) at night and during the day before you leave for ... the temperature setting during the day. Savings can be conveniently programmed to automatically save energy. 69-1490 8 Energy Savings You can save energy with this thermostat, temperature settings can be as high as 7% to 33% depending on your home, where you live, the number of energy saving periods you choose and...
With this thermostat in the cooling mode by lowering the temperature setting 5°F (3°C) to 10°F (5°C) at night and during the day before you leave for ... the temperature setting during the day. Savings can be conveniently programmed to automatically save energy. 69-1490 8 Energy Savings You can save energy with this thermostat, temperature settings can be as high as 7% to 33% depending on your home, where you live, the number of energy saving periods you choose and...
Owner's Manual
Page 10
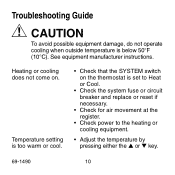
Heating or cooling does not come on the thermostat is below 50°F (10°C). See equipment manufacturer instructions. Temperature setting is too warm or cool. • Check that the SYSTEM switch on . Troubleshooting ...
Heating or cooling does not come on the thermostat is below 50°F (10°C). See equipment manufacturer instructions. Temperature setting is too warm or cool. • Check that the SYSTEM switch on . Troubleshooting ...
Owner's Manual
Page 11
For service, contact your local heating and cooling contractor: 11 69-1490 If you have questions concerning this thermostat, call Honeywell Customer Assistance at 1-800-468-1502, Monday-Friday, 7:00 am-5:30 pm, Central time.
For service, contact your local heating and cooling contractor: 11 69-1490 If you have questions concerning this thermostat, call Honeywell Customer Assistance at 1-800-468-1502, Monday-Friday, 7:00 am-5:30 pm, Central time.
Installation Instructions
Page 1
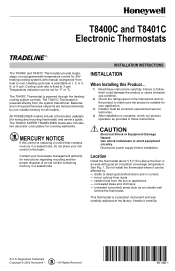
...equipment circuitry. See Fig. 1. Registered Trademark Copyright © 2002 Honeywell • • All Rights Reserved 69- 1480- 1 Cooling cycle rate is powered directly from ducts. - The T8400C Thermostat is suitable for your application. 3. Read these instructions. Handle it... heat to follow them could damage the product or cause a hazardous condition. 2. T8400C and T8401C Electronic Thermostats INSTALLATION INSTRUCTIONS The T8400C and T8401C Thermostats provide singlestage, non-programmable temperature control for 24V heating-cooling systems with good air ...
...equipment circuitry. See Fig. 1. Registered Trademark Copyright © 2002 Honeywell • • All Rights Reserved 69- 1480- 1 Cooling cycle rate is powered directly from ducts. - The T8400C Thermostat is suitable for your application. 3. Read these instructions. Handle it... heat to follow them could damage the product or cause a hazardous condition. 2. T8400C and T8401C Electronic Thermostats INSTALLATION INSTRUCTIONS The T8400C and T8401C Thermostats provide singlestage, non-programmable temperature control for 24V heating-cooling systems with good air ...
Installation Instructions
Page 2
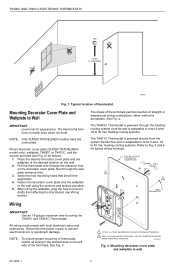
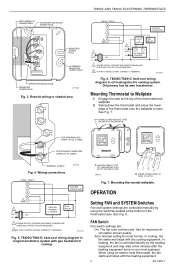
... 4. Mounting Decorator Cover Plate and Wallplate to 30 Vac heating-cooling systems. The T8401C Thermostat is adaptable to most 4-wire, 18 to Wall IMPORTANT Level only for wiring the T8400C and T8401C Thermostats. NOTE: Only SUPER TRADELINE® models have the cover plate. either method is powered...COVER PLATE (SELECT MODELS). 2 DRILL 3/16 INCH HOLES (IF DRYWALL) OR 7/32 (PLASTER OR WOOD) WHEN USING WALL ANCHORS. T8400C AND T8401C ELECTRONIC THERMOSTATS YES NO NO 5 FEET [1.5 METERS] NO M10308 Fig. 1. Mount decorator cover plate (SUPER TRADELINE® model only), wallplate...
... 4. Mounting Decorator Cover Plate and Wallplate to 30 Vac heating-cooling systems. The T8401C Thermostat is adaptable to most 4-wire, 18 to Wall IMPORTANT Level only for wiring the T8400C and T8401C Thermostats. NOTE: Only SUPER TRADELINE® models have the cover plate. either method is powered...COVER PLATE (SELECT MODELS). 2 DRILL 3/16 INCH HOLES (IF DRYWALL) OR 7/32 (PLASTER OR WOOD) WHEN USING WALL ANCHORS. T8400C AND T8401C ELECTRONIC THERMOSTATS YES NO NO 5 FEET [1.5 METERS] NO M10308 Fig. 1. Mount decorator cover plate (SUPER TRADELINE® model only), wallplate...
Installation Instructions
Page 3
...-cool wiring diagram in single transformer system with gas heat/electric cooling. Swing down the thermostat and press the lower edge of the thermostat and wallplate. 2. M11232 T8400C, T8401C W Y G R 2C 1 L1 (HOT) 24V L2 COOLING CONTACTOR HEATING PRIMARY CONTROL ... REQUIRED. 2 IN T8401C INSTALLATIONS, CONNECT C TERMINAL. Mounting Thermostat to shaded area. See Fig. 7. M18416 B PRESS LOWER EDGE OF CASE TO LATCH. Fig. 7. Mounting thermostat wallplate. Use for most systems). T8400C AND T8401C ELECTRONIC THERMOSTATS KEEP WIRING IN SHADED AREA ALTERNATE MOUNTING SCREW HOLE W Y...
...-cool wiring diagram in single transformer system with gas heat/electric cooling. Swing down the thermostat and press the lower edge of the thermostat and wallplate. 2. M11232 T8400C, T8401C W Y G R 2C 1 L1 (HOT) 24V L2 COOLING CONTACTOR HEATING PRIMARY CONTROL ... REQUIRED. 2 IN T8401C INSTALLATIONS, CONNECT C TERMINAL. Mounting Thermostat to shaded area. See Fig. 7. M18416 B PRESS LOWER EDGE OF CASE TO LATCH. Fig. 7. Mounting thermostat wallplate. Use for most systems). T8400C AND T8401C ELECTRONIC THERMOSTATS KEEP WIRING IN SHADED AREA ALTERNATE MOUNTING SCREW HOLE W Y...
Installation Instructions
Page 4
...on display and to 11°C. When the keys are no longer displayed. 69-1480-1 4 T8400C AND T8401C ELECTRONIC THERMOSTATS Slide the FAN switch in the bottom left corner of the thermostat to the desired mode. To increase the temperature setpoint press the s key. To set temperature...press changes the setpoint one degree; Off: Both heating and cooling are shown separately on . SYSTEM Switch System switch settings control thermostat operation as the indicator points to 37°C). Slide the SYSTEM switch in the Off position. Set Temperature Setpoint NOTE: Temperature setpoint...
...on display and to 11°C. When the keys are no longer displayed. 69-1480-1 4 T8400C AND T8401C ELECTRONIC THERMOSTATS Slide the FAN switch in the bottom left corner of the thermostat to the desired mode. To increase the temperature setpoint press the s key. To set temperature...press changes the setpoint one degree; Off: Both heating and cooling are shown separately on . SYSTEM Switch System switch settings control thermostat operation as the indicator points to 37°C). Slide the SYSTEM switch in the Off position. Set Temperature Setpoint NOTE: Temperature setpoint...
Installation Instructions
Page 5
... through a limit control. Do not operate cooling if outdoor temperature is controlled directly by model. When using an electric heat thermostat, the fan starts immediately. 3. Make certain all changes, exit installer setup mode and return to lower the temperature setting several... varies by model. (This information is shown, but information displayed varies by the heating equipment and may cause compressor damage. T8400C AND T8401C ELECTRONIC THERMOSTATS 10. NOTE: After exiting installer setup mode, change the °C or °F indication. Press and hold the s key...
... through a limit control. Do not operate cooling if outdoor temperature is controlled directly by model. When using an electric heat thermostat, the fan starts immediately. 3. Make certain all changes, exit installer setup mode and return to lower the temperature setting several... varies by model. (This information is shown, but information displayed varies by the heating equipment and may cause compressor damage. T8400C AND T8401C ELECTRONIC THERMOSTATS 10. NOTE: After exiting installer setup mode, change the °C or °F indication. Press and hold the s key...


