

User Guide
Page 8
... Mode 108 Monitoring Event-Detected Video 108 Viewing Live Video from Covert Cameras 109 Using Pan, Tilt, and Zoom During Live Monitoring. . . . . . 109 Recording 113 Recording Video 113 Panic Recording 113 Recording Audio 114 Playing Recorded Video 114 Front Panel and Remote Control Playback Arrow Buttons . 116 Mouse Playback Controls 116 Searching Recorded Video 117 Go To Search 118 Record Table 119 Event Log Search 121 Text-In Search 124 Motion Search 126 Copying Video Clips to an External Storage Device . . . . . 129 Reviewing Video Clips 132 Appendix A USB Hard Disk Drive...
... Mode 108 Monitoring Event-Detected Video 108 Viewing Live Video from Covert Cameras 109 Using Pan, Tilt, and Zoom During Live Monitoring. . . . . . 109 Recording 113 Recording Video 113 Panic Recording 113 Recording Audio 114 Playing Recorded Video 114 Front Panel and Remote Control Playback Arrow Buttons . 116 Mouse Playback Controls 116 Searching Recorded Video 117 Go To Search 118 Record Table 119 Event Log Search 121 Text-In Search 124 Motion Search 126 Copying Video Clips to an External Storage Device . . . . . 129 Reviewing Video Clips 132 Appendix A USB Hard Disk Drive...

User Guide
Page 17
...; Appendix I, Error Code Notices provides a helpful list of error code notices. • Appendix J, Specifications, lists the DVR specifications. • The Index lists common terms and the pages where they appear. It also describes how to configure the infrared remote control. • Chapter 4, Operation, describes live monitoring, recording video and audio, playing recorded video, and searching for recorded video. • Appendix A, USB Hard Disk Drive Preparation, describes how to use Microsoft® Windows® XP/Vista operating systems to prepare the USB hard disk drive for...
...; Appendix I, Error Code Notices provides a helpful list of error code notices. • Appendix J, Specifications, lists the DVR specifications. • The Index lists common terms and the pages where they appear. It also describes how to configure the infrared remote control. • Chapter 4, Operation, describes live monitoring, recording video and audio, playing recorded video, and searching for recorded video. • Appendix A, USB Hard Disk Drive Preparation, describes how to use Microsoft® Windows® XP/Vista operating systems to prepare the USB hard disk drive for...

User Guide
Page 20
... any service or repairs to this equipment from the wall outlet and refer servicing to the instructions. 19. Therefore, consideration should conform to its normal operation. • If the equipment has been dropped or the cabinet damaged • When the equipment exhibits a distinct change in a closed or multi-unit rack assembly, the operating ambient temperature of used replacement parts specified...
... any service or repairs to this equipment from the wall outlet and refer servicing to the instructions. 19. Therefore, consideration should conform to its normal operation. • If the equipment has been dropped or the cabinet damaged • When the equipment exhibits a distinct change in a closed or multi-unit rack assembly, the operating ambient temperature of used replacement parts specified...

User Guide
Page 24
.../POS Digital Video Recorder Alarm Output Flash Drive IR Remote Control RASPlus Network Web Guard Siren Technical Overview In addition to replacing both a time-lapse VCR and a multiplexer in a security installation, your DVR remotely by time or events, and you can instantly view video after selecting the time or event. Using a hard disk drive allows you can view video and control your DVR has many features that make it much more powerful and easier to use to upgrade the system or copy video...
.../POS Digital Video Recorder Alarm Output Flash Drive IR Remote Control RASPlus Network Web Guard Siren Technical Overview In addition to replacing both a time-lapse VCR and a multiplexer in a security installation, your DVR remotely by time or events, and you can instantly view video after selecting the time or event. Using a hard disk drive allows you can view video and control your DVR has many features that make it much more powerful and easier to use to upgrade the system or copy video...
User Guide
Page 25
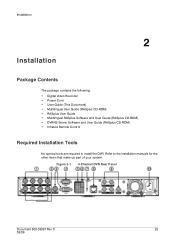
Figure 2-1 4-Channel DVR Rear Panel Document 800-03097 Rev C 25 03/09 Refer to install the DVR. Installation 2 Installation Package Contents The package contains the following: • Digital Video Recorder • Power Cord • User Guide (This Document) • Multilingual User Guide (RASplus CD-ROM) • RASplus User Guide • Mulitlingual RASplus Software and User Guide (RASplus CD-ROM) • DVRNS Server Software and User Guide (RASplus CD-ROM) • Infrared Remote Control Required Installation Tools No special tools...
Figure 2-1 4-Channel DVR Rear Panel Document 800-03097 Rev C 25 03/09 Refer to install the DVR. Installation 2 Installation Package Contents The package contains the following: • Digital Video Recorder • Power Cord • User Guide (This Document) • Multilingual User Guide (RASplus CD-ROM) • RASplus User Guide • Mulitlingual RASplus Software and User Guide (RASplus CD-ROM) • DVRNS Server Software and User Guide (RASplus CD-ROM) • Infrared Remote Control Required Installation Tools No special tools...

User Guide
Page 35
... configured cameras. You can press to play video forward at high speed. In playback mode, press to directly enter the digital zoom mode. In Live Monitoring mode, press The screen displays . Press again to freeze the current live screen. Note When the DVR does not detect a VGA monitor automatically, pressing and holding for five seconds or longer switches the video output to VGA out manually. 8 PTZ/ZOOM Button In Live Monitoring mode...
... configured cameras. You can press to play video forward at high speed. In playback mode, press to directly enter the digital zoom mode. In Live Monitoring mode, press The screen displays . Press again to freeze the current live screen. Note When the DVR does not detect a VGA monitor automatically, pressing and holding for five seconds or longer switches the video output to VGA out manually. 8 PTZ/ZOOM Button In Live Monitoring mode...
User Guide
Page 38
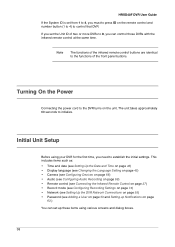
...) • Camera (see Configuring Devices on page 66) • Audio (see Configuring Audio Recording on page 69) • Remote control (see Connecting the Infrared Remote Control on page 37) • Record mode (see Configuring Recording Settings on page 74) • Network (see Setting Up the DVR Network Connections on page 55) • Password (see Adding a User on page 53 and Setting up these items using your DVR for the first time, you can set from 1 to...
...) • Camera (see Configuring Devices on page 66) • Audio (see Configuring Audio Recording on page 69) • Remote control (see Connecting the Infrared Remote Control on page 37) • Record mode (see Configuring Recording Settings on page 74) • Network (see Setting Up the DVR Network Connections on page 55) • Password (see Adding a User on page 53 and Setting up these items using your DVR for the first time, you can set from 1 to...

User Guide
Page 43
... upgrade the software during clip copy. Importing Saved DVR Settings 1. Import..., then press . The Setup Import window appears. Highlight Install, then click to close this window without upgrading the software. Note You will get an error message if the upgrade is not properly installed on the USB-IDE hard disk drive or USB flash drive is disabled. Highlight Cancel, then click to install the selected software package. button is NOT FAT16 or FAT32 format, you need a USB device...
... upgrade the software during clip copy. Importing Saved DVR Settings 1. Import..., then press . The Setup Import window appears. Highlight Install, then click to close this window without upgrading the software. Note You will get an error message if the upgrade is not properly installed on the USB-IDE hard disk drive or USB flash drive is disabled. Highlight Cancel, then click to install the selected software package. button is NOT FAT16 or FAT32 format, you need a USB device...

User Guide
Page 44
... DVR. Note Even after changing the DVR settings by importing saved settings, the time-related settings (Date/Time, Time Zone and Daylight Saving Time) will not be changed . The Setup Export window appears. Otherwise, the connection to import the selected settings and change the DVR settings. Figure 3-10 Setup Export Window 3. When set Include Network Setup to On when the network settings of the setup file are used in .dat file format on the USB device. Connect to Off, the network settings will NOT be changed . Highlight Setup...
... DVR. Note Even after changing the DVR settings by importing saved settings, the time-related settings (Date/Time, Time Zone and Daylight Saving Time) will not be changed . The Setup Export window appears. Otherwise, the connection to import the selected settings and change the DVR settings. Figure 3-10 Setup Export Window 3. When set Include Network Setup to On when the network settings of the setup file are used in .dat file format on the USB device. Connect to Off, the network settings will NOT be changed . Highlight Setup...

User Guide
Page 59
... factory default Port settings are: Remote Admin: Remote Callback: Remote Watch: Remote Search: Remote Audio: 8200 8201 8016 10019 8116 Note The system restarts automatically after changing the port settings. Refer to exit the screen without saving the changes. Note Do NOT use the same port number for two different programs. Otherwise, the DVR cannot be connected with a PC running RASplus or WebGuard as well. Document 800-03097 Rev C 59 03/09 Save your network...
... factory default Port settings are: Remote Admin: Remote Callback: Remote Watch: Remote Search: Remote Audio: 8200 8201 8016 10019 8116 Note The system restarts automatically after changing the port settings. Refer to exit the screen without saving the changes. Note Do NOT use the same port number for two different programs. Otherwise, the DVR cannot be connected with a PC running RASplus or WebGuard as well. Document 800-03097 Rev C 59 03/09 Save your network...

User Guide
Page 69
... . Highlight Audio in the Devices menu and press appears. Figure 3-36 Port Setup Screen 2. Figure 3-37 Audio Setup Screen . The Port Setup window appears. Save your Camera changes by highlighting Save and pressing exit the screen without saving the changes. . Configure the PTZ Camera's Port 1. Select Cancel to Configuring Audio Recording Your DVR can record up to control, the icon displays on the PTZ camera manufacturer's instructions. Highlight the Setup... Configure the port's setting based on the PTZ camera screen. The Audio Setup screen Document...
... . Highlight Audio in the Devices menu and press appears. Figure 3-36 Port Setup Screen 2. Figure 3-37 Audio Setup Screen . The Port Setup window appears. Save your Camera changes by highlighting Save and pressing exit the screen without saving the changes. . Configure the PTZ Camera's Port 1. Select Cancel to Configuring Audio Recording Your DVR can record up to control, the icon displays on the PTZ camera manufacturer's instructions. Highlight the Setup... Configure the port's setting based on the PTZ camera screen. The Audio Setup screen Document...

User Guide
Page 72
... Ethernet. displays on the screen. The record related icons display on each camera screen. The text input strings display on the enlarged video. You can adjust the transparency of the currently logged on the screen. Figure 3-39 OSD Setup Screen HRSD40F DVR User Guide Option Remote Control Zoom Network Freeze & Sequence Free Space Date/Time User Name Camera No. Table 3-8 Function On-Screen Display Options displays when the DVR can adjust the Display Dwell time (sec.) for the text input strings displayed on user displays...
... Ethernet. displays on the screen. The record related icons display on each camera screen. The text input strings display on the enlarged video. You can adjust the transparency of the currently logged on the screen. Figure 3-39 OSD Setup Screen HRSD40F DVR User Guide Option Remote Control Zoom Network Freeze & Sequence Free Space Date/Time User Name Camera No. Table 3-8 Function On-Screen Display Options displays when the DVR can adjust the Display Dwell time (sec.) for the text input strings displayed on user displays...

User Guide
Page 78
... Record, Time, Event, and Time & Event. When the DVR is in the Time mode, the icon displays at the top-left corner of the recording for Time and Event recording. You will not record during certain times. Table 3-10 Default Settings Setting ips Quality Function Highlight a field under Quality and press to make changes. HRSD40F DVR User Guide 4. When the DVR is in the No Record mode, it will be used. The DVR records and the icon displays at...
... Record, Time, Event, and Time & Event. When the DVR is in the Time mode, the icon displays at the top-left corner of the recording for Time and Event recording. You will not record during certain times. Table 3-10 Default Settings Setting ips Quality Function Highlight a field under Quality and press to make changes. HRSD40F DVR User Guide 4. When the DVR is in the No Record mode, it will be used. The DVR records and the icon displays at...
User Guide
Page 92
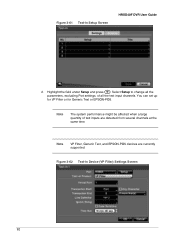
Figure 3-62 Text-In Device (VP Filter) Settings Screen 92 Note The system performance might be affected when a large quantity of all the text input channels. Note VP Filter, Generic Text, and EPSON-POS devices are detected from several channels at the same time. Highlight the field under Setup and press . Select Setup to change all the parameters, excluding Port settings, of text inputs are currently supported. Figure 3-61 Text-In Setup Screen HRSD40F DVR User Guide 2. You can set up for VP Filter or for Generic Text or EPSON-POS.
Figure 3-62 Text-In Device (VP Filter) Settings Screen 92 Note The system performance might be affected when a large quantity of all the text input channels. Note VP Filter, Generic Text, and EPSON-POS devices are detected from several channels at the same time. Highlight the field under Setup and press . Select Setup to change all the parameters, excluding Port settings, of text inputs are currently supported. Figure 3-61 Text-In Setup Screen HRSD40F DVR User Guide 2. You can set up for VP Filter or for Generic Text or EPSON-POS.

User Guide
Page 105
... previously recorded video The DVR can be connected remotely using RASplus software for live viewing, searching, playback, and copying video evidence clips using much greater control. You can: • Establish recording schedules based on the time of day and the day of the week • Search through the recorded video using a computer. However, you are recording and playing back video. Figure 4-1 HRSD 4 Front Panel Controls Camera Buttons LEDs Enter/Pause Button USB Port Infrared Quad/Seq Panic Sensor Button Button Menu Button Zoom/PTZ Button Arrow Buttons...
... previously recorded video The DVR can be connected remotely using RASplus software for live viewing, searching, playback, and copying video evidence clips using much greater control. You can: • Establish recording schedules based on the time of day and the day of the week • Search through the recorded video using a computer. However, you are recording and playing back video. Figure 4-1 HRSD 4 Front Panel Controls Camera Buttons LEDs Enter/Pause Button USB Port Infrared Quad/Seq Panic Sensor Button Button Menu Button Zoom/PTZ Button Arrow Buttons...

User Guide
Page 126
... Search screen. 5. Text-In Product Highlight the text input device box and press Text Input Device from the Search menu. The screen changes for a Generic Text device. Select the desired search option settings, then select Load and press the search option settings. Highlight Search and press when you can enter a specific Date and Time. Select Motion Search... Channel Highlight the Channel and press . The column can be from the Search menu while the DVR displays the camera full screen...
... Search screen. 5. Text-In Product Highlight the text input device box and press Text Input Device from the Search menu. The screen changes for a Generic Text device. Select the desired search option settings, then select Load and press the search option settings. Highlight Search and press when you can enter a specific Date and Time. Select Motion Search... Channel Highlight the Channel and press . The column can be from the Search menu while the DVR displays the camera full screen...

User Guide
Page 147
.... Click to send audio to enhance image display quality by eliminating stair stepping (aliasing) effects in WebWatch mode does not affect the camera name set up on each camera screen when audio communication is a remote web search program that allows you to allow two-way Click disables audio communication. Use a deinterlace filter for interlaced video to the connected remote site. Note A camera name change in the enlarged image. HRSD40F DVR User Guide Table D-2 WebWatch...
.... Click to send audio to enhance image display quality by eliminating stair stepping (aliasing) effects in WebWatch mode does not affect the camera name set up on each camera screen when audio communication is a remote web search program that allows you to allow two-way Click disables audio communication. Use a deinterlace filter for interlaced video to the connected remote site. Note A camera name change in the enlarged image. HRSD40F DVR User Guide Table D-2 WebWatch...

User Guide
Page 150
Right-click a camera on the screen to search from the SEGMENT menu at the top-right corner on the remote site displays. 150 Title Enable Audio Plays back recorded video if audio is recorded with motion. Note A camera name change in hour segments). Aspect Ratio Changes the image aspect ratio. If the DVR time and date have been reset to a time that is blank, the camera name set up on the timetable. Deinterlacing Use a deinterlace...
Right-click a camera on the screen to search from the SEGMENT menu at the top-right corner on the remote site displays. 150 Title Enable Audio Plays back recorded video if audio is recorded with motion. Note A camera name change in hour segments). Aspect Ratio Changes the image aspect ratio. If the DVR time and date have been reset to a time that is blank, the camera name set up on the timetable. Deinterlacing Use a deinterlace...

User Guide
Page 164
... default settings 39 deleting a group 54 deleting a user 54 Device menu 66 DHCP 60 disk bad 50 display margins, adjusting 73 display, configuring 71 DNS server 58 DVR settings, exporting the 44 DVR settings, importing the 43 DVRNS setup 61 dwell time, setting the 70 E editing an alarm output schedule 71 enable audio for WebGuard 147 enter/pause button 35 event record dwell 76 exporting DVR settings 44 F factory reset 30 factory reset switch 30 Freeze mode 107 front panel...
... default settings 39 deleting a group 54 deleting a user 54 Device menu 66 DHCP 60 disk bad 50 display margins, adjusting 73 display, configuring 71 DNS server 58 DVR settings, exporting the 44 DVR settings, importing the 43 DVRNS setup 61 dwell time, setting the 70 E editing an alarm output schedule 71 enable audio for WebGuard 147 enter/pause button 35 event record dwell 76 exporting DVR settings 44 F factory reset 30 factory reset switch 30 Freeze mode 107 front panel...

User Guide
Page 165
... buttons 116 using digital zoom 117 playback button 36 Port number setup screen 59 port setup number 58 power cord, connecting 31, 32 power LED 34 power, turning on 38, 106 pre-event recording 79 PTZ cameras, formatting a device 67 ptz/zoom button 35 R rear panel 25 record table, searching the 121 recording audio 69 pre-event setup 79 setup 74 recording audio 69, 114 recording resolution, adjusthing the 75 recording schedule, setting the 76 recording video 113 recycle function 75 remote control 37 remote control, configuring 74 resetting to default 39 RS232 port, connecting...
... buttons 116 using digital zoom 117 playback button 36 Port number setup screen 59 port setup number 58 power cord, connecting 31, 32 power LED 34 power, turning on 38, 106 pre-event recording 79 PTZ cameras, formatting a device 67 ptz/zoom button 35 R rear panel 25 record table, searching the 121 recording audio 69 pre-event setup 79 setup 74 recording audio 69, 114 recording resolution, adjusthing the 75 recording schedule, setting the 76 recording video 113 recycle function 75 remote control 37 remote control, configuring 74 resetting to default 39 RS232 port, connecting...
