
Owner's Manual
Page 1
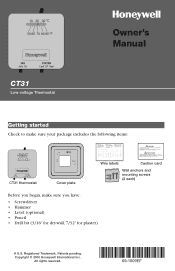
Patents pending. All rights reserved. Registered Trademark. Owner's Manual CT31 Low-voltage Thermostat Getting started Check to make sure your package includes the following items: CT31 thermostat Cover plate Wire labels Caution card Wall anchors and mounting screws (2 each) Before you begin, make sure you have: • Screwdriver • Hammer • Level (optional) • Pencil • Drill bit (3/16" for drywall, 7/32" for plaster) ® U.S. Copyright © 2005 Honeywell International Inc.
Patents pending. All rights reserved. Registered Trademark. Owner's Manual CT31 Low-voltage Thermostat Getting started Check to make sure your package includes the following items: CT31 thermostat Cover plate Wire labels Caution card Wall anchors and mounting screws (2 each) Before you begin, make sure you have: • Screwdriver • Hammer • Level (optional) • Pencil • Drill bit (3/16" for drywall, 7/32" for plaster) ® U.S. Copyright © 2005 Honeywell International Inc.
Owner's Manual
Page 2
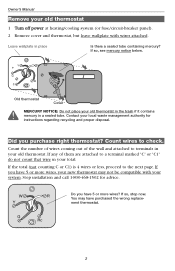
... to a terminal marked "C" or "C1" do not count that wire in your old thermostat. If so, see mercury notice below. If so, stop now. Owner's Manual Remove your old thermostat 1 Turn off power at heating/cooling system (or fuse/circuit-breaker panel). 2 Remove cover and thermostat, but leave wallplate with your...
... to a terminal marked "C" or "C1" do not count that wire in your old thermostat. If so, see mercury notice below. If so, stop now. Owner's Manual Remove your old thermostat 1 Turn off power at heating/cooling system (or fuse/circuit-breaker panel). 2 Remove cover and thermostat, but leave wallplate with your...
Owner's Manual
Page 4
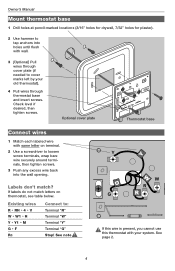
If labels do not match letters on terminal. 2 Use a screwdriver to : Terminal "R" Terminal "W" Terminal "Y" Terminal "G" Stop! Owner's Manual Mount thermostat base 1 Drill holes at pencil-marked locations (3/16" holes for drywall, 7/32" holes for plaster). 2 Use hammer to tap anchors into the wall ...
If labels do not match letters on terminal. 2 Use a screwdriver to : Terminal "R" Terminal "W" Terminal "Y" Terminal "G" Stop! Owner's Manual Mount thermostat base 1 Drill holes at pencil-marked locations (3/16" holes for drywall, 7/32" holes for plaster). 2 Use hammer to tap anchors into the wall ...
Owner's Manual
Page 6
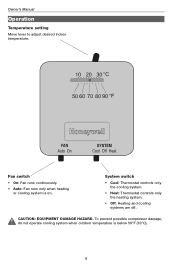
Fan switch • On: Fan runs continuously. • Auto: Fan runs only when heating or cooling system is below 50°F (10°C). 6 Owner's Manual Operation Temperature setting Move lever to adjust desired indoor temperature. CAUTION: EQUIPMENT DAMAGE HAZARD. To prevent possible compressor damage, do not operate cooling system when outdoor temperature is on. System switch • Cool: Thermostat controls only the cooling system. • Heat: Thermostat controls only the heating system. • Off: Heating and cooling systems are off.
Fan switch • On: Fan runs continuously. • Auto: Fan runs only when heating or cooling system is below 50°F (10°C). 6 Owner's Manual Operation Temperature setting Move lever to adjust desired indoor temperature. CAUTION: EQUIPMENT DAMAGE HAZARD. To prevent possible compressor damage, do not operate cooling system when outdoor temperature is on. System switch • Cool: Thermostat controls only the cooling system. • Heat: Thermostat controls only the heating system. • Off: Heating and cooling systems are off.


