
Owner's Manual
Page 1
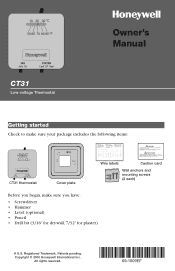
Copyright © 2005 Honeywell International Inc. All rights reserved. Registered Trademark. Patents pending. Owner's Manual CT31 Low-voltage Thermostat Getting started Check to make sure your package includes the following items: CT31 thermostat Cover plate Wire labels Caution card Wall anchors and mounting screws (2 each) Before you begin, make sure you have: • Screwdriver • Hammer • Level (optional) • Pencil • Drill bit (3/16" for drywall, 7/32" for plaster) ® U.S.
Copyright © 2005 Honeywell International Inc. All rights reserved. Registered Trademark. Patents pending. Owner's Manual CT31 Low-voltage Thermostat Getting started Check to make sure your package includes the following items: CT31 thermostat Cover plate Wire labels Caution card Wall anchors and mounting screws (2 each) Before you begin, make sure you have: • Screwdriver • Hammer • Level (optional) • Pencil • Drill bit (3/16" for drywall, 7/32" for plaster) ® U.S.
Owner's Manual
Page 2
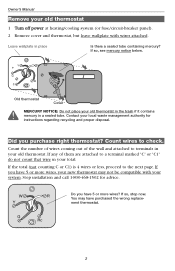
... notice below. Contact your new thermostat may not be compatible with wires attached. Count wires to the next page. Leave wallplate in your total. Do you purchase right thermostat? If the total (not counting C or C1) is 4 wires or less, proceed to check. Owner's Manual Remove your old thermostat 1 Turn off power at heating/cooling system (or fuse/circuit-breaker panel). 2 Remove cover and thermostat, but leave wallplate...
... notice below. Contact your new thermostat may not be compatible with wires attached. Count wires to the next page. Leave wallplate in your total. Do you purchase right thermostat? If the total (not counting C or C1) is 4 wires or less, proceed to check. Owner's Manual Remove your old thermostat 1 Turn off power at heating/cooling system (or fuse/circuit-breaker panel). 2 Remove cover and thermostat, but leave wallplate...

Owner's Manual
Page 3
... let loose wires fall into the wall opening ! CT31 Low-voltage Thermostat Label wires and remove old wallplate Use a screwdriver to disconnect wires one by one.As you disconnect each wire Do not let wires fall into wall opening . Wrap supplied labels securely around each wire, wrap it with the label matching the letter on your old thermostat. (Adhesive labels are supplied in your thermostat package.) Remove the old wallplate...
... let loose wires fall into the wall opening ! CT31 Low-voltage Thermostat Label wires and remove old wallplate Use a screwdriver to disconnect wires one by one.As you disconnect each wire Do not let wires fall into wall opening . Wrap supplied labels securely around each wire, wrap it with the label matching the letter on your old thermostat. (Adhesive labels are supplied in your thermostat package.) Remove the old wallplate...
Owner's Manual
Page 4
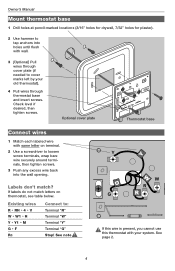
... until flush with your old thermostat). 4 Pull wires through thermostat base and insert screws. Existing wires R • RH • 4 • V W • W1 • H Y • Y1 • M G•F Rc Connect to cover marks left by your system. Labels don't match? See note If this wire is present, you cannot use this thermostat with wall. 3 [Optional] Pull wires through cover plate (if needed to : Terminal "R" Terminal "W" Terminal "Y" Terminal "G" Stop! Check level...
... until flush with your old thermostat). 4 Pull wires through thermostat base and insert screws. Existing wires R • RH • 4 • V W • W1 • H Y • Y1 • M G•F Rc Connect to cover marks left by your system. Labels don't match? See note If this wire is present, you cannot use this thermostat with wall. 3 [Optional] Pull wires through cover plate (if needed to : Terminal "R" Terminal "W" Terminal "Y" Terminal "G" Stop! Check level...
Owner's Manual
Page 5
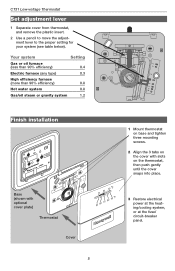
CT31 Low-voltage Thermostat Set adjustment lever 1 Separate cover from thermostat, and remove the plastic insert. 2 Use a pencil to move the adjustment lever to the proper setting for your system (see table below). Your system Setting Gas or oil furnace (less than 90% efficiency) 0.4 Electric furnace (any type) 0.3 High efficiency furnace (more than 90% efficiency) 0.8 Hot water system 0.8 Gas/oil steam or gravity system 1.2 Finish installation Base (shown with optional cover plate) Thermostat Cover 5 1 Mount...
CT31 Low-voltage Thermostat Set adjustment lever 1 Separate cover from thermostat, and remove the plastic insert. 2 Use a pencil to move the adjustment lever to the proper setting for your system (see table below). Your system Setting Gas or oil furnace (less than 90% efficiency) 0.4 Electric furnace (any type) 0.3 High efficiency furnace (more than 90% efficiency) 0.8 Hot water system 0.8 Gas/oil steam or gravity system 1.2 Finish installation Base (shown with optional cover plate) Thermostat Cover 5 1 Mount...
Owner's Manual
Page 6
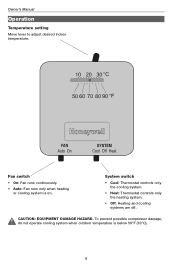
Fan switch • On: Fan runs continuously. • Auto: Fan runs only when heating or cooling system is below 50°F (10°C). 6 To prevent possible compressor damage, do not operate cooling system when outdoor temperature is on. System switch • Cool: Thermostat controls only the cooling system. • Heat: Thermostat controls only the heating system. • Off: Heating and cooling systems are off. CAUTION: EQUIPMENT DAMAGE HAZARD. Owner's Manual Operation Temperature setting Move lever to adjust desired indoor temperature.
Fan switch • On: Fan runs continuously. • Auto: Fan runs only when heating or cooling system is below 50°F (10°C). 6 To prevent possible compressor damage, do not operate cooling system when outdoor temperature is on. System switch • Cool: Thermostat controls only the cooling system. • Heat: Thermostat controls only the heating system. • Off: Heating and cooling systems are off. CAUTION: EQUIPMENT DAMAGE HAZARD. Owner's Manual Operation Temperature setting Move lever to adjust desired indoor temperature.
Owner's Manual
Page 7
... ANY INCIDENTAL OR CONSEQUENTIAL DAMAGES RESULTING, DIRECTLY OR INDIRECTLY, FROM ANY BREACH OF ANY WARRANTY, EXPRESS OR IMPLIED, OR ANY OTHER FAILURE OF THIS PRODUCT. This warranty does not cover removal or reinstallation costs.This warranty shall not apply if it is defective, (i) return it ; CT31 Low-voltage Thermostat Limited Warranty Honeywell warrants this product to be free from defects in the possession of...
... ANY INCIDENTAL OR CONSEQUENTIAL DAMAGES RESULTING, DIRECTLY OR INDIRECTLY, FROM ANY BREACH OF ANY WARRANTY, EXPRESS OR IMPLIED, OR ANY OTHER FAILURE OF THIS PRODUCT. This warranty does not cover removal or reinstallation costs.This warranty shall not apply if it is defective, (i) return it ; CT31 Low-voltage Thermostat Limited Warranty Honeywell warrants this product to be free from defects in the possession of...
Owner's Manual
Page 8
... or call Honeywell Customer Care toll-free at least 10% post-consumer paper fibers. ® U.S. Need Help? Honeywell Limited-Honeywell Limitée 1985 Douglas Drive North 35 Dynamic Drive Golden Valley, MN 55422 Scarborough, Ontario M1V 4Z9 www.honeywell.com/yourhome Printed in U.S.A. Patents pending. on recycled paper containing at 1-800-468-1502 Automation and Control Solutions Honeywell International...
... or call Honeywell Customer Care toll-free at least 10% post-consumer paper fibers. ® U.S. Need Help? Honeywell Limited-Honeywell Limitée 1985 Douglas Drive North 35 Dynamic Drive Golden Valley, MN 55422 Scarborough, Ontario M1V 4Z9 www.honeywell.com/yourhome Printed in U.S.A. Patents pending. on recycled paper containing at 1-800-468-1502 Automation and Control Solutions Honeywell International...


