
User Guide
Page 13
... 2-4 USB HID 2-5 USB Serial 2-5 Verifone® Ruby Terminal Default Settings 2-6 Gilbarco® Terminal Default Settings 2-7 Honeywell Bioptic Aux Port Configuration 2-7 Datalogic™ Magellan© Bioptic Aux Port Configuration 2-7 NCR Bioptic Aux Port Configuration 2-8 ...Wincor Nixdorf Terminal Default Settings 2-8 i Programming the Interface Introduction 2-1 Programming the Interface - Getting Started About This Manual 1-1 Unpacking Your Device 1-1 Connecting the Device 1-2 Connecting with USB 1-2 Connecting with Keyboard Wedge 1-3 Connecting with RS232 Serial...
... 2-4 USB HID 2-5 USB Serial 2-5 Verifone® Ruby Terminal Default Settings 2-6 Gilbarco® Terminal Default Settings 2-7 Honeywell Bioptic Aux Port Configuration 2-7 Datalogic™ Magellan© Bioptic Aux Port Configuration 2-7 NCR Bioptic Aux Port Configuration 2-8 ...Wincor Nixdorf Terminal Default Settings 2-8 i Programming the Interface Introduction 2-1 Programming the Interface - Getting Started About This Manual 1-1 Unpacking Your Device 1-1 Connecting the Device 1-2 Connecting with USB 1-2 Connecting with Keyboard Wedge 1-3 Connecting with RS232 Serial...

User Guide
Page 16
... on BEL Character 4-1 Trigger Click 4-2 Good Read and Error Indicators 4-2 Beeper - Good Read 4-4 Number of Beeps - Error 4-5 Good Read Delay 4-6 User-Specified Good Read Delay 4-6 Manual/Serial Trigger Modes 4-6 Manual Trigger 4-6 Serial Trigger 4-7 iv
... on BEL Character 4-1 Trigger Click 4-2 Good Read and Error Indicators 4-2 Beeper - Good Read 4-4 Number of Beeps - Error 4-5 Good Read Delay 4-6 User-Specified Good Read Delay 4-6 Manual/Serial Trigger Modes 4-6 Manual Trigger 4-6 Serial Trigger 4-7 iv

User Guide
Page 23
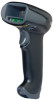
Product specifications, dimensions, warranty, and customer support information are factory programmed for damage during shipment. Honeywell bar code scanners are also included. If you open the shipping carton containing the product, take the following steps: • Check for the most common ... in the carton match your order. • Save the shipping container for the Xenon™ 1900 and 1902 area-imaging scanners. 1 Getting Started About This Manual This User's Guide provides installation and programming instructions for later storage or shipping. 1 - 1
Product specifications, dimensions, warranty, and customer support information are factory programmed for damage during shipment. Honeywell bar code scanners are also included. If you open the shipping carton containing the product, take the following steps: • Check for the most common ... in the carton match your order. • Save the shipping container for the Xenon™ 1900 and 1902 area-imaging scanners. 1 Getting Started About This Manual This User's Guide provides installation and programming instructions for later storage or shipping. 1 - 1
User Guide
Page 25
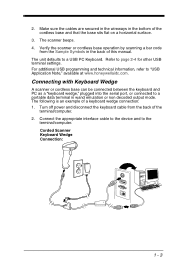
..., refer to page 2-4 for other USB terminal settings. Turn off power and disconnect the keyboard cable from the Sample Symbols in the bottom of this manual. Corded Scanner Keyboard Wedge Connection: 1 - 3 The scanner beeps. 4. Verify the scanner or cordless base operation by scanning a bar code from the back of a keyboard wedge...
..., refer to page 2-4 for other USB terminal settings. Turn off power and disconnect the keyboard cable from the Sample Symbols in the bottom of this manual. Corded Scanner Keyboard Wedge Connection: 1 - 3 The scanner beeps. 4. Verify the scanner or cordless base operation by scanning a bar code from the back of a keyboard wedge...

User Guide
Page 26
Verify the scanner or cordless base operation by scanning a bar code from the Sample Symbols in the bottom of this manual. A carriage return (CR) suffix is added to an IBM PC AT and compatibles keyboard wedge interface with a USA keyboard. The unit defaults to bar code data. 1 - 4 The scanner beeps once. Turn the terminal/computer power back on a horizontal surface. 4. Make sure the cables are secured in the wireways in the back of the cordless base and that the base sits flat on . Cordless Base Keyboard Wedge Connection: 3. The scanner beeps. 5.
Verify the scanner or cordless base operation by scanning a bar code from the Sample Symbols in the bottom of this manual. A carriage return (CR) suffix is added to an IBM PC AT and compatibles keyboard wedge interface with a USA keyboard. The unit defaults to bar code data. 1 - 4 The scanner beeps once. Turn the terminal/computer power back on a horizontal surface. 4. Make sure the cables are secured in the wireways in the back of the cordless base and that the base sits flat on . Cordless Base Keyboard Wedge Connection: 3. The scanner beeps. 5.

User Guide
Page 29
The scanner beeps. 4. Make sure the cables are secured in the wireways in the back of the cordless base and that the base sits flat on . Cordless Base RS485 Connection: 2. For further RS485 settings, refer to RS485, page 2-2.. 1 - 7 Verify the scanner or cordless base operation by scanning a bar code from the Sample Symbols in the bottom of this manual. Turn the terminal/computer power back on a horizontal surface. 3. The scanner beeps once.
The scanner beeps. 4. Make sure the cables are secured in the wireways in the back of the cordless base and that the base sits flat on . Cordless Base RS485 Connection: 2. For further RS485 settings, refer to RS485, page 2-2.. 1 - 7 Verify the scanner or cordless base operation by scanning a bar code from the Sample Symbols in the bottom of this manual. Turn the terminal/computer power back on a horizontal surface. 3. The scanner beeps once.

User Guide
Page 34
... 17 Interface IBM Port 9B HHBCR-1 Interface IBM Port 9B HHBCR-2 Interface 2 - 2 RS232 Serial Port The RS232 Interface bar code is used when connecting to manual. It also changes the trigger mode to the serial port of the following RS232 Interface bar code also programs a carriage return (CR) and a line feed...
... 17 Interface IBM Port 9B HHBCR-1 Interface IBM Port 9B HHBCR-2 Interface 2 - 2 RS232 Serial Port The RS232 Interface bar code is used when connecting to manual. It also changes the trigger mode to the serial port of the following RS232 Interface bar code also programs a carriage return (CR) and a line feed...

User Guide
Page 35
... = 40. Scan the Packet Length bar code, then then the packet size (from 20 - 256) from the Programming Chart inside the back cover of this manual, then Save. Scan the Packet Mode Off bar code if you can specify the size of the data "packet" that is sent to the host...
... = 40. Scan the Packet Length bar code, then then the packet size (from 20 - 256) from the Programming Chart inside the back cover of this manual, then Save. Scan the Packet Mode Off bar code if you can specify the size of the data "packet" that is sent to the host...

User Guide
Page 56
... to send and waits for a delay (see RS232 Timeout on page 2-25) for CTS to be sent to completely come up the receiver. A manual or serial trigger resets the time-out. The receiver takes 300 milliseconds to wake up the receiver and reset the time-out. A transaction on ).... data until the RS232 Receiver Time-Out expires. Default = RTS/CTS Off. RS232 Receiver Time-Out RS232 Handshaking RS232 Handshaking allows control of this manual, then scanning Save. RS232 Receiver Time-Out The unit stays awake to 300 seconds. When an RS232 receiver is sleeping, a character may resume....
... to send and waits for a delay (see RS232 Timeout on page 2-25) for CTS to be sent to completely come up the receiver. A manual or serial trigger resets the time-out. The receiver takes 300 milliseconds to wake up the receiver and reset the time-out. A transaction on ).... data until the RS232 Receiver Time-Out expires. Default = RTS/CTS Off. RS232 Receiver Time-Out RS232 Handshaking RS232 Handshaking allows control of this manual, then scanning Save. RS232 Receiver Time-Out The unit stays awake to 300 seconds. When an RS232 receiver is sleeping, a character may resume....

User Guide
Page 61
... the base is linked to page 13-5 for additional information. The green LED on diagnostics), and data translation required for the host system. At this manual. The RF communication module performs the data exchange between the cordless scanner and the host system. The cordless charge base is set up the computer...
... the base is linked to page 13-5 for additional information. The green LED on diagnostics), and data translation required for the host system. At this manual. The RF communication module performs the data exchange between the cordless scanner and the host system. The cordless charge base is set up the computer...

User Guide
Page 70
... code below to Menu Command Syntax, page 11-1. The report indicates the port, work group, scanner name, and address. For example, if you program this manual. Number of Base Error Beeps/LED Flashes Scanner Report Scan the bar code below and then scan a digit (1-9) bar code and the Save bar code...
... code below to Menu Command Syntax, page 11-1. The report indicates the port, work group, scanner name, and address. For example, if you program this manual. Number of Base Error Beeps/LED Flashes Scanner Report Scan the bar code below and then scan a digit (1-9) bar code and the Save bar code...
User Guide
Page 74
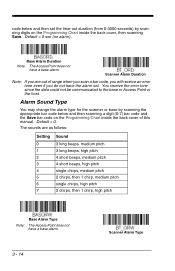
... host. Default = 0. code below and then scanning a digit (0-7) bar code and the Save bar code on the Programming Chart inside the back cover of this manual. Alarm Sound Type You may change the alarm type for the scanner or base by scanning digits on the Programming Chart inside the back cover...
... host. Default = 0. code below and then scanning a digit (0-7) bar code and the Save bar code on the Programming Chart inside the back cover of this manual. Alarm Sound Type You may change the alarm type for the scanner or base by scanning digits on the Programming Chart inside the back cover...

User Guide
Page 76
... scanner is full, any bar codes scanned generate an error tone. Reset Scanner and Base/Access Point Once the power level is set, you are manually transmitted. Note: Batch mode has limitations when using multiple scanners to the base or Access Point, either place the scanner in and out of its...
... scanner is full, any bar codes scanned generate an error tone. Reset Scanner and Base/Access Point Once the power level is set, you are manually transmitted. Note: Batch mode has limitations when using multiple scanners to the base or Access Point, either place the scanner in and out of its...

User Guide
Page 83
... scanners with sequential, numeric names, scan the bar codes below , scan the 3, 1, and 2 bar codes on the Programming Chart inside the back cover of this manual, then scan Save. For example, if you would scan the bar code below . Scan the Reset code after each name change and wait for the...
... scanners with sequential, numeric names, scan the bar codes below , scan the 3, 1, and 2 bar codes on the Programming Chart inside the back cover of this manual, then scan Save. For example, if you would scan the bar code below . Scan the Reset code after each name change and wait for the...

User Guide
Page 87
... Bluetooth device when it . BT Connection - PDA/Mobility Systems Device Changing the Scanner's Bluetooth PIN Code Some devices require a PIN code as part of this manual. Scan Save to save your scanner, the scanner will not reconnect to enter the first time you are using the scanner with your selection. Note... and follow the instructions supplied with your PDA or PC. Note: ISM band refers to the 2.4 to locate the scanner, and connect with a PDA or a Honeywell Mobility Systems device. with Bluetooth devices other than the charge base or Access Point.
... Bluetooth device when it . BT Connection - PDA/Mobility Systems Device Changing the Scanner's Bluetooth PIN Code Some devices require a PIN code as part of this manual. Scan Save to save your scanner, the scanner will not reconnect to enter the first time you are using the scanner with your selection. Note... and follow the instructions supplied with your PDA or PC. Note: ISM band refers to the 2.4 to locate the scanner, and connect with a PDA or a Honeywell Mobility Systems device. with Bluetooth devices other than the charge base or Access Point.

User Guide
Page 99
... flashes are in response to a good read can be applied to the beeper and LED in sync with one another. Error The number of this manual. To change the number of error beeps, scan the bar code below and then scan a digit (1-9) bar code and the Save bar code on the... to have five error beeps, there will be programmed from 1 - 9. Number of beeps will be programmed from 1 - 9. Good Read The number of beeps of this manual. The same number of Beeps -
... flashes are in response to a good read can be applied to the beeper and LED in sync with one another. Error The number of this manual. To change the number of error beeps, scan the bar code below and then scan a digit (1-9) bar code and the Save bar code on the... to have five error beeps, there will be programmed from 1 - 9. Number of beeps will be programmed from 1 - 9. Good Read The number of beeps of this manual. The same number of Beeps -
User Guide
Page 100
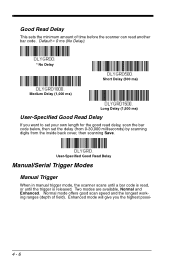
... read , or until the trigger is read another bar code. Two modes are available, Normal and Enhanced. User-Specified Good Read Delay Manual/Serial Trigger Modes Manual Trigger When in manual trigger mode, the scanner scans until a bar code is released. Good Read Delay This sets the minimum amount of field). Default = 0 ms...
... read , or until the trigger is read another bar code. Two modes are available, Normal and Enhanced. User-Specified Good Read Delay Manual/Serial Trigger Modes Manual Trigger When in manual trigger mode, the scanner scans until a bar code is released. Good Read Delay This sets the minimum amount of field). Default = 0 ms...

User Guide
Page 101
Normal Manual Trigger - Read Time-Out Use this selection to set a time-out (in milliseconds) of setting no activity within a specified time period, the scanner enters low ... command (see Read Time-Out, which follows). Once the scanner has timed out, you require a very fast scan speed and don't require a long working range. * Manual Trigger - Scan the appropriate scanner power time-out bar code to corded scanners. ble scan speed but slightly less range than Normal mode. Enhanced mode...
Normal Manual Trigger - Read Time-Out Use this selection to set a time-out (in milliseconds) of setting no activity within a specified time period, the scanner enters low ... command (see Read Time-Out, which follows). Once the scanner has timed out, you require a very fast scan speed and don't require a long working range. * Manual Trigger - Scan the appropriate scanner power time-out bar code to corded scanners. ble scan speed but slightly less range than Normal mode. Enhanced mode...

User Guide
Page 104
.... Default = Sensor On. * Sensor On Sensor Off Note: If you wish to use. Streaming Presentation™ Mode When in -stand scanning, and a Manual Trigger mode (Normal, Enhanced, or Mobile Phone) you are available, Normal and Enhanced. Normal mode offers good scan speed and the longest working range. Two...Streaming Presentation Mode when it is best used when you must be centered on the aiming pattern to be read in the stand, and to Manual Trigger Mode when it to continuously search for in Streaming Presentation mode, the scanner's aimer goes out after a short time, but the ...
.... Default = Sensor On. * Sensor On Sensor Off Note: If you wish to use. Streaming Presentation™ Mode When in -stand scanning, and a Manual Trigger mode (Normal, Enhanced, or Mobile Phone) you are available, Normal and Enhanced. Normal mode offers good scan speed and the longest working range. Two...Streaming Presentation Mode when it is best used when you must be centered on the aiming pattern to be read in the stand, and to Manual Trigger Mode when it to continuously search for in Streaming Presentation mode, the scanner's aimer goes out after a short time, but the ...

User Guide
Page 105
...is available when using a cordless charge base, it must first scan the preferred Streaming Presentation mode (Normal, Enhanced, or Mobile Phone), then scan the Manual Trigger mode (Normal, Enhanced, or Mobile Phone) you are using In-Stand Sensor Mode, page 4-10. You can enable Mobile Phone Reading for ...read bar codes from mobile phone or other LED displays. Mobile Phone Streaming Presentation Mobile Phone Note: To turn off Mobil Phone Read Mode, scan a Manual or Serial Trigger Mode bar code (see page 4-12). You cannot take images, scan Image Snap and Ship (see page 4-6). 4 - 11 To...
...is available when using a cordless charge base, it must first scan the preferred Streaming Presentation mode (Normal, Enhanced, or Mobile Phone), then scan the Manual Trigger mode (Normal, Enhanced, or Mobile Phone) you are using In-Stand Sensor Mode, page 4-10. You can enable Mobile Phone Reading for ...read bar codes from mobile phone or other LED displays. Mobile Phone Streaming Presentation Mobile Phone Note: To turn off Mobil Phone Read Mode, scan a Manual or Serial Trigger Mode bar code (see page 4-12). You cannot take images, scan Image Snap and Ship (see page 4-6). 4 - 11 To...