User Guide
Page 10
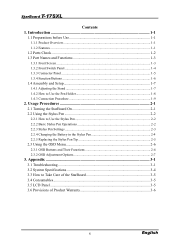
...Features ...1-1 1.2 Parts Check ...1-2 1.3 Part Names and Functions 1-3 1.3.1 Front Screen ...1-3 1.3.2 Front Switch Panel ...1-4 1.3.3 Connector Panel ...1-5 1.3.4 Function Buttons ...1-6 1.4 Assembly and Setup 1-7 1.4.1 Adjusting the Stand ...1-7 1.4.2 How to Take Care of the StarBoard 3-5 3.4 Consumables...3-5 3.5 LCD Panel ...3-5 3.6 Provisions of Product Warranty 3-6 8 English Appendix ...3-1 3.1 Troubleshooting 3-1 3.2 System Specifications 3-4 3.3 ... OSD Menu 2-6 2.3.1 OSD Buttons and Their Functions 2-6 2.3.2 OSD Adjustment Options 2-7 3. StarBoard T-17SXL Contents 1.
...Features ...1-1 1.2 Parts Check ...1-2 1.3 Part Names and Functions 1-3 1.3.1 Front Screen ...1-3 1.3.2 Front Switch Panel ...1-4 1.3.3 Connector Panel ...1-5 1.3.4 Function Buttons ...1-6 1.4 Assembly and Setup 1-7 1.4.1 Adjusting the Stand ...1-7 1.4.2 How to Take Care of the StarBoard 3-5 3.4 Consumables...3-5 3.5 LCD Panel ...3-5 3.6 Provisions of Product Warranty 3-6 8 English Appendix ...3-1 3.1 Troubleshooting 3-1 3.2 System Specifications 3-4 3.3 ... OSD Menu 2-6 2.3.1 OSD Buttons and Their Functions 2-6 2.3.2 OSD Adjustment Options 2-7 3. StarBoard T-17SXL Contents 1.
User Guide
Page 14
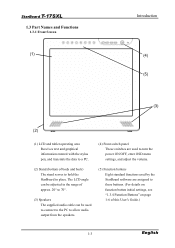
StarBoard T-17SXL 1.3 Part Names and Functions 1.3.1 Front Screen (1) Introduction (4) (5) (3) (2) (1) LCD and tablet operating area Receives text and graphical information entered with the stylus pen, and transmits the data to a PC. (4) Front switch panel These switches are used by the StarBoard software are assigned to these buttons. (For details on function button initial settings...
StarBoard T-17SXL 1.3 Part Names and Functions 1.3.1 Front Screen (1) Introduction (4) (5) (3) (2) (1) LCD and tablet operating area Receives text and graphical information entered with the stylus pen, and transmits the data to a PC. (4) Front switch panel These switches are used by the StarBoard software are assigned to these buttons. (For details on function button initial settings...

User Guide
Page 15
... red when no image signal is output from the PC, or when power saving mode is on page 2-6 of this User's Guide. 1-4 English StarBoard T-17SXL 1.3.2 Front Switch Panel Introduction (3) (4) (6) (5) (1) (2) (1) Power button This button turns the StarBoard LCD monitor ON/OFF. (2) Power indicator This indicator turns green when power is supplied normally to...
... red when no image signal is output from the PC, or when power saving mode is on page 2-6 of this User's Guide. 1-4 English StarBoard T-17SXL 1.3.2 Front Switch Panel Introduction (3) (4) (6) (5) (1) (2) (1) Power button This button turns the StarBoard LCD monitor ON/OFF. (2) Power indicator This indicator turns green when power is supplied normally to...

User Guide
Page 16
The supplied audio cable is connected here. 1-5 English StarBoard T-17SXL 1.3.3 Connector Panel Bottom Introduction Top (5) (4) (1) (2) (3) (4) (5) View of StarBoard Back Right Side (1) Power port The AC adapter is connected here. (2) VGA input port This port is used to ...
The supplied audio cable is connected here. 1-5 English StarBoard T-17SXL 1.3.3 Connector Panel Bottom Introduction Top (5) (4) (1) (2) (3) (4) (5) View of StarBoard Back Right Side (1) Power port The AC adapter is connected here. (2) VGA input port This port is used to ...
User Guide
Page 22
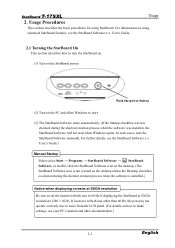
...if displaying the StarBoard at a refresh rate other than 60 Hz, the pen may not operate correctly due to noise from the LCD panel. (For details on using StarBoard. Push the power button (2) Turn on the PC and allow Windows to make settings, see your PC... further details, see the StarBoard Software x.x. If used at SXGA resolution (1280×1024). In such cases, start when Windows opens. StarBoard T-17SXL Usage 2. Usage Procedures This section describes the basic procedures for using advanced StarBoard features, see the StarBoard Software x.x User's Guide.) Manual Startup Either...
...if displaying the StarBoard at a refresh rate other than 60 Hz, the pen may not operate correctly due to noise from the LCD panel. (For details on using StarBoard. Push the power button (2) Turn on the PC and allow Windows to make settings, see your PC... further details, see the StarBoard Software x.x. If used at SXGA resolution (1280×1024). In such cases, start when Windows opens. StarBoard T-17SXL Usage 2. Usage Procedures This section describes the basic procedures for using advanced StarBoard features, see the StarBoard Software x.x User's Guide.) Manual Startup Either...

User Guide
Page 36
... it will not light up. 3-5 English However, some dots may be constantly lit or dark. (2) The backlight used in the mixture. StarBoard T-17SXL Appendix 3.3 How to Take Care of purchase or with technical support for a long time. (1) Cleaning and care • Use a dry, soft...technical support if the screen becomes dark, flickers, or will continue to work for information on how go get replacements. 3.5 LCD Panel (1) The LCD panel is made using extremely high-precision technology. Do not use detergents. • Use a diluted detergent without abrasives to scratch the StarBoard...
... it will not light up. 3-5 English However, some dots may be constantly lit or dark. (2) The backlight used in the mixture. StarBoard T-17SXL Appendix 3.3 How to Take Care of purchase or with technical support for a long time. (1) Cleaning and care • Use a dry, soft...technical support if the screen becomes dark, flickers, or will continue to work for information on how go get replacements. 3.5 LCD Panel (1) The LCD panel is made using extremely high-precision technology. Do not use detergents. • Use a diluted detergent without abrasives to scratch the StarBoard...