Owners Guide
Page 2
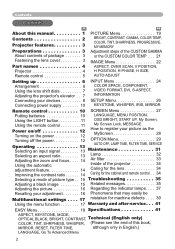
...the CUSTOM COLOR TEMP . . . 21 IMAGE Menu 22 ASPECT, OVER SCAN, V POSITION, Projector 4 Remote control 5 H POSITION, H PHASE, H SIZE, AUTO ADJUST Setting up 6 Arrangement 6 Using the lens shift dials 7 Adjusting the projector's elevator . . 7 INPUT Menu 24 COLOR SPACE, COMPONENT, VIDEO FORMAT, DVI, S-ASPECT,... . . 14 Air filter 33 Using the automatic Inside of the projector 34 adjustment feature 14 Caring for the lens 34 Improving the contrast ratio. . . . . . 14 Caring for the cabinet and remote control . . 34 Selecting a mode of picture type . . 15 Troubleshooting 35...
...the CUSTOM COLOR TEMP . . . 21 IMAGE Menu 22 ASPECT, OVER SCAN, V POSITION, Projector 4 Remote control 5 H POSITION, H PHASE, H SIZE, AUTO ADJUST Setting up 6 Arrangement 6 Using the lens shift dials 7 Adjusting the projector's elevator . . 7 INPUT Menu 24 COLOR SPACE, COMPONENT, VIDEO FORMAT, DVI, S-ASPECT,... . . 14 Air filter 33 Using the automatic Inside of the projector 34 adjustment feature 14 Caring for the lens 34 Improving the contrast ratio. . . . . . 14 Caring for the cabinet and remote control . . 34 Selecting a mode of picture type . . 15 Troubleshooting 35...
Owners Guide
Page 4
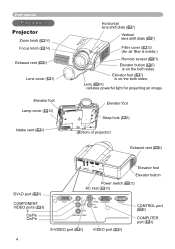
...PB CR/PR COMPONENT VIDEO S-VIDEO COMPUTER VIDEO CONTROL S-VIDEO port ( 8) VIDEO port ( 8) CONTROL port ( 8) COMPUTER port ( 8) 4 Elevator foot ( 7) is on the both sides. Part names Part names Projector Zoom knob ( 14) Focus knob ( 14...) Exhaust vent ( 6) Lens cover ( 3) Elevator foot Lamp cover ( 32) Intake vent ( 6) Horizontal lens shift dials ( 7) Vertical lens shift dials ( 7) Filter cover ( 33) (An air filter is inside.) Remote...
...PB CR/PR COMPONENT VIDEO S-VIDEO COMPUTER VIDEO CONTROL S-VIDEO port ( 8) VIDEO port ( 8) CONTROL port ( 8) COMPUTER port ( 8) 4 Elevator foot ( 7) is on the both sides. Part names Part names Projector Zoom knob ( 14) Focus knob ( 14...) Exhaust vent ( 6) Lens cover ( 3) Elevator foot Lamp cover ( 32) Intake vent ( 6) Horizontal lens shift dials ( 7) Vertical lens shift dials ( 7) Filter cover ( 33) (An air filter is inside.) Remote...
Owners Guide
Page 5
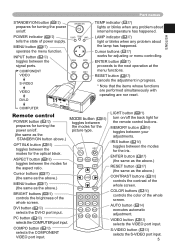
...POWER LIGHT ASPECT button ( 16) toggles between the modes for the remote control buttons. ENTER button ( 17) (the same as the above.) RESET button ( 17) (the same as the above .) MENU RESET BRIGHT buttons ( 16) controls the brightness of the whole screen. VIDEO button ( 13) selects the... VIDEO port input. COMPUTER Remote control POWER button ( 12) prepares for turning the power on/off. (the same as the above .) ...
...POWER LIGHT ASPECT button ( 16) toggles between the modes for the remote control buttons. ENTER button ( 17) (the same as the above.) RESET button ( 17) (the same as the above .) MENU RESET BRIGHT buttons ( 16) controls the brightness of the whole screen. VIDEO button ( 13) selects the... VIDEO port input. COMPUTER Remote control POWER button ( 12) prepares for turning the power on/off. (the same as the above .) ...

Owners Guide
Page 10
... your body or clothes, rinse well with the projector. Never attempt to use only the batteries specified. Connect the connector of the power cord to the AC inlet of a battery, wipe out the flower and then replace a battery. AC inlet Remote control Power outlet Putting batteries WARNING ►Always handle...
... your body or clothes, rinse well with the projector. Never attempt to use only the batteries specified. Connect the connector of the power cord to the AC inlet of a battery, wipe out the flower and then replace a battery. AC inlet Remote control Power outlet Putting batteries WARNING ►Always handle...
Owners Guide
Page 11
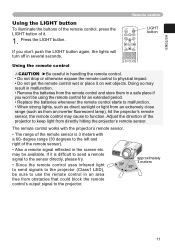
... ►Be careful in handling the remote control. • Do not drop or otherwise expose the remote control to physical impact. • Do not get the remote control wet or place it is 3 meters with the projector's remote sensor. • The range of the projector to function. may result in malfunction.... on wet objects. Doing so may be sure to use the remote control in an area free from an inverter fluorescent lamp), hit the projector's remote sensor, the remote control may cause to keep light from the remote control and store them in a safe place if you don't push ...
... ►Be careful in handling the remote control. • Do not drop or otherwise expose the remote control to physical impact. • Do not get the remote control wet or place it is 3 meters with the projector's remote sensor. • The range of the projector to function. may result in malfunction.... on wet objects. Doing so may be sure to use the remote control in an area free from an inverter fluorescent lamp), hit the projector's remote sensor, the remote control may cause to keep light from the remote control and store them in a safe place if you don't push ...

Owners Guide
Page 12
...buttons may not function for approximately 5 seconds. POWER 2. POWER (Blinking orange) POWER 3. Press the button STANDBY/ON (projector) or POWER (remote control) again while the message is firmly and correctly connected to solid orange when the lamp cooling is complete. Power ... the indicator will begin blinking green. When the power is emitted. Press the button STANDBY/ON (projector) or POWER (remote control). Press the button STANDBY/ON (projector) or POWER (remote control). Remove the lens cover, and set the power switch to solid orange. POWER (Solid green) The...
...buttons may not function for approximately 5 seconds. POWER 2. POWER (Blinking orange) POWER 3. Press the button STANDBY/ON (projector) or POWER (remote control) again while the message is firmly and correctly connected to solid orange when the lamp cooling is complete. Power ... the indicator will begin blinking green. When the power is emitted. Press the button STANDBY/ON (projector) or POWER (remote control). Press the button STANDBY/ON (projector) or POWER (remote control). Remove the lens cover, and set the power switch to solid orange. POWER (Solid green) The...
Owners Guide
Page 13
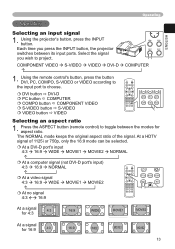
... or 750p, only the 16:9 mode can be selected. COMPONENT VIDEO S-VIDEO VIDEO DVI-D MENU ENTER INPUT RESET COMPUTER 1. Using the projector's button, press the INPUT button. DVI button DVI-D PC button COMPUTER COMPO button COMPONENT VIDEO S-VIDEO button S-VIDEO VIDEO button VIDEO POWER... MEMORY ASPECT IRIS At a signal 4:3 for 4:3 16:9 WIDE MOVIE1 MOVIE2 At a signal for aspect ratio. Press the ASPECT button (remote control) to toggle between its input ports. ENGLISH Operating Operating Selecting an input signal 1. At a HDTV signal of the signal. Using the...
... or 750p, only the 16:9 mode can be selected. COMPONENT VIDEO S-VIDEO VIDEO DVI-D MENU ENTER INPUT RESET COMPUTER 1. Using the projector's button, press the INPUT button. DVI button DVI-D PC button COMPUTER COMPO button COMPONENT VIDEO S-VIDEO button S-VIDEO VIDEO button VIDEO POWER... MEMORY ASPECT IRIS At a signal 4:3 for 4:3 16:9 WIDE MOVIE1 MOVIE2 At a signal for aspect ratio. Press the ASPECT button (remote control) to toggle between its input ports. ENGLISH Operating Operating Selecting an input signal 1. At a HDTV signal of the signal. Using the...
Owners Guide
Page 14
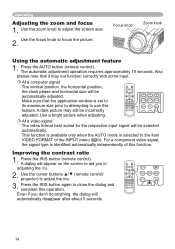
... format best suited for the respective input signal will appear on the screen to adjust the iris. 3. Press the AUTO button (remote control). A dialog will be automatically adjusted. This function is available only when the AUTO mode is selected to the item VIDEO FORMAT of... adjustment operation requires approximately 10 seconds. Make sure that it may still be incorrectly adjusted. Use the cursor buttons ▲/▼ (remote control/ projector) to aid you don't do anything, the dialog will be selected automatically. Press the IRIS button again to use this operation. ...
... format best suited for the respective input signal will appear on the screen to adjust the iris. 3. Press the AUTO button (remote control). A dialog will be automatically adjusted. This function is available only when the AUTO mode is selected to the item VIDEO FORMAT of... adjustment operation requires approximately 10 seconds. Make sure that it may still be incorrectly adjusted. Use the cursor buttons ▲/▼ (remote control/ projector) to aid you don't do anything, the dialog will be selected automatically. Press the IRIS button again to use this operation. ...
Owners Guide
Page 15
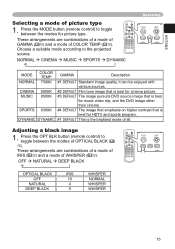
DYNAMIC DYNAMIC #1 DEFAULT This is best for HDTV and sports program. Press the OPT BLK button (remote control) to toggle between the modes for music video clip, and the DVD image other than cinema. OPT BLK MODE MEMORY ASPECT IRIS ENTER These ...brightest mode of COLOR TEMP ( 19). MUSIC 8500K #3 DEFAULT The image pursuits DVD source image that is best for picture type. Press the MODE button (remote control) to the projected source. MENU RESET BRIGHT CONTRAST COLOR DVI PC AUTO COMPO S-VIDEO VIDEO NORMAL CINEMA MUSIC SPORTS DYNAMIC Operating POWER LIGHT OPT BLK...
DYNAMIC DYNAMIC #1 DEFAULT This is best for HDTV and sports program. Press the OPT BLK button (remote control) to toggle between the modes for music video clip, and the DVD image other than cinema. OPT BLK MODE MEMORY ASPECT IRIS ENTER These ...brightest mode of COLOR TEMP ( 19). MUSIC 8500K #3 DEFAULT The image pursuits DVD source image that is best for picture type. Press the MODE button (remote control) to the projected source. MENU RESET BRIGHT CONTRAST COLOR DVI PC AUTO COMPO S-VIDEO VIDEO NORMAL CINEMA MUSIC SPORTS DYNAMIC Operating POWER LIGHT OPT BLK...
Owners Guide
Page 16
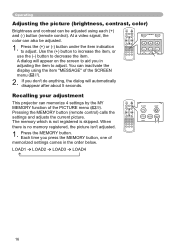
... AUTO COMPO S-VIDEO VIDEO MENU RESET BRIGHT CONTRAST COLOR Recalling your adjustment This projector can also be adjusted using the item "MESSAGE" of the SCREEN menu ( 27). 2. A dialog will automatically disappear after about 5 seconds. Pressing the MEMORY button (remote control) calls the settings and adjusts the current picture. Each time you don't do...
... AUTO COMPO S-VIDEO VIDEO MENU RESET BRIGHT CONTRAST COLOR Recalling your adjustment This projector can also be adjusted using the item "MESSAGE" of the SCREEN menu ( 27). 2. A dialog will automatically disappear after about 5 seconds. Pressing the MEMORY button (remote control) calls the settings and adjusts the current picture. Each time you don't do...
Owners Guide
Page 17
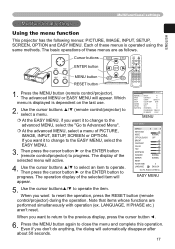
...Menu... Note that items whose functions are as follows. Even if you want it to change to Advanced Menu". Press the MENU button (remote control/projector). At the EASY MENU, if you don't do anything, the dialog will active. 4. When you want to the previous display, press...MENU RESET BRIGHT CONTRAST COLOR DVI PC AUTO COMPO S-VIDEO VIDEO 1. Then press the cursor button ► or the ENTER button (remote control/projector) to close the menu and complete this operation. The basic operations of the selected menu will automatically disappear after about 50 seconds. 17...
...Menu... Note that items whose functions are as follows. Even if you want it to change to Advanced Menu". Press the MENU button (remote control/projector). At the EASY MENU, if you don't do anything, the dialog will active. 4. When you want to the previous display, press...MENU RESET BRIGHT CONTRAST COLOR DVI PC AUTO COMPO S-VIDEO VIDEO 1. Then press the cursor button ► or the ENTER button (remote control/projector) to close the menu and complete this operation. The basic operations of the selected menu will automatically disappear after about 50 seconds. 17...
Owners Guide
Page 34
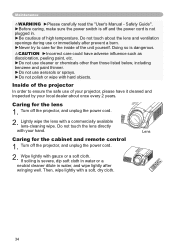
Caring for the cabinet and remote control 1. Lightly wipe the lens with gauze or a soft cloth. Wipe lightly with a commercially available lens-cleaning wipe. CAUTION ►Incorrect care could have it cleaned and inspected by your hand. Turn off the projector, and unplug the power cord. 2. ... AUTO VIDEO 34 Do not touch the lens directly with your local dealer about the lens and ventilation openings during use of your projector, please have adverse in . ►Be cautious of the unit yourself. Maintenance WARNING ►Please carefully read the "User's Manual...
Caring for the cabinet and remote control 1. Lightly wipe the lens with gauze or a soft cloth. Wipe lightly with a commercially available lens-cleaning wipe. CAUTION ►Incorrect care could have it cleaned and inspected by your hand. Turn off the projector, and unplug the power cord. 2. ... AUTO VIDEO 34 Do not touch the lens directly with your local dealer about the lens and ventilation openings during use of your projector, please have adverse in . ►Be cautious of the unit yourself. Maintenance WARNING ►Please carefully read the "User's Manual...
Owners Guide
Page 39
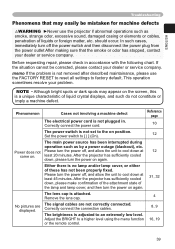
... to cool down , please turn the power on . After the projector has sufficiently cooled down at 12 come on again. 31, 32 The lens cap is not set to a higher level using the menu function or the remote control. 8, 9 16, 19 39 NOTE • Although bright spots ...of liquid crystal displays, and such do not constitute or imply a machine defect. The brightness is not removed after described maintainance, please use the projector if abnormal operations such as by a power outage (blackout), etc. In such cases, immediately turn the power off the power switch and then...
... to cool down , please turn the power on . After the projector has sufficiently cooled down at 12 come on again. 31, 32 The lens cap is not set to a higher level using the menu function or the remote control. 8, 9 16, 19 39 NOTE • Although bright spots ...of liquid crystal displays, and such do not constitute or imply a machine defect. The brightness is not removed after described maintainance, please use the projector if abnormal operations such as by a power outage (blackout), etc. In such cases, immediately turn the power off the power switch and then...

