

Owners Guide
Page 1
... this manual. • The reproductiob, transmission or use of their respective owners. 1 Operating Guide Thank you for future reference. The meanings of Microsoft Corporation. CAUTION This symbol indicates information that , if ignored, could result possibly in this document or contents is a trademark of these manuals to incorrect handling. ENGLISH Projector PJ-TX100 User's Manual - Please refer to incorrect handling. WARNING This symbol indicates information...
... this manual. • The reproductiob, transmission or use of their respective owners. 1 Operating Guide Thank you for future reference. The meanings of Microsoft Corporation. CAUTION This symbol indicates information that , if ignored, could result possibly in this document or contents is a trademark of these manuals to incorrect handling. ENGLISH Projector PJ-TX100 User's Manual - Please refer to incorrect handling. WARNING This symbol indicates information...
Owners Guide
Page 2
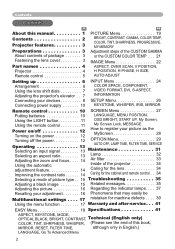
... . . 7 INPUT Menu 24 COLOR SPACE, COMPONENT, VIDEO FORMAT, DVI, S-ASPECT, INFORMATION Connecting your devices 8 SETUP Menu 26 Connecting power supply 10 KEYSTONE, WHISPER, IRIS, MIRROR Remote control 10 SCREEN Menu 27 Putting batteries 10 LANGUAGE, MENU POSITION, Using the LIGHT button 11 OSD BRIGHT, START UP, My Screen, Using the remote control 11 My Screen Lock, MESSAGE Power on/off 12 Turning on the power 12 How to register your picture as the MyScreen 28 Turning off the power 12 OPTION Menu 29 AUTO OFF, LAMP TIME, FILTER TIME, SERVICE Operating...
... . . 7 INPUT Menu 24 COLOR SPACE, COMPONENT, VIDEO FORMAT, DVI, S-ASPECT, INFORMATION Connecting your devices 8 SETUP Menu 26 Connecting power supply 10 KEYSTONE, WHISPER, IRIS, MIRROR Remote control 10 SCREEN Menu 27 Putting batteries 10 LANGUAGE, MENU POSITION, Using the LIGHT button 11 OSD BRIGHT, START UP, My Screen, Using the remote control 11 My Screen Lock, MESSAGE Power on/off 12 Turning on the power 12 How to register your picture as the MyScreen 28 Turning off the power 12 OPTION Menu 29 AUTO OFF, LAMP TIME, FILTER TIME, SERVICE Operating...
Owners Guide
Page 5
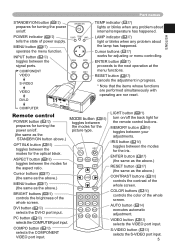
... VIDEO STANDBY/ON POWER TEMP LAMP MENU ENTER INPUT RESET S-VIDEO VIDEO DVI-D Part names TEMP indicator ( 37) lights or blinks when any problem about internal temperature has happened. POWER LIGHT ASPECT button ( 16) toggles between the modes for the iris. S-VIDEO button ( 13) selects the S-VIDEO port input. 5 Cursor buttons ( 17) works for the optical black. COMPUTER Remote control POWER button ( 12) prepares for turning the power on/off the back light for the remote control buttons. BRIGHT CONTRAST COLOR DVI button ( 13) selects the DVI-D port input. DVI PC AUTO...
... VIDEO STANDBY/ON POWER TEMP LAMP MENU ENTER INPUT RESET S-VIDEO VIDEO DVI-D Part names TEMP indicator ( 37) lights or blinks when any problem about internal temperature has happened. POWER LIGHT ASPECT button ( 16) toggles between the modes for the iris. S-VIDEO button ( 13) selects the S-VIDEO port input. 5 Cursor buttons ( 17) works for the optical black. COMPUTER Remote control POWER button ( 12) prepares for turning the power on/off the back light for the remote control buttons. BRIGHT CONTRAST COLOR DVI button ( 13) selects the DVI-D port input. DVI PC AUTO...
Owners Guide
Page 8
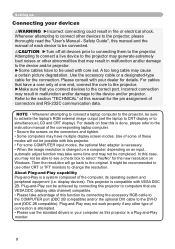
..." of this manual for the new resolution on Windows. Use of some of these modes will go back to simultaneous LCD and CRT display). For details on how this is a Plug-and-Play monitor. 8 Setting up Connecting your computer as this projector is done, please refer to the instruction manual of the corresponding laptop computer. • Secure the screws on an input, automatic adjust function may take...
..." of this manual for the new resolution on Windows. Use of some of these modes will go back to simultaneous LCD and CRT display). For details on how this is a Plug-and-Play monitor. 8 Setting up Connecting your computer as this projector is done, please refer to the instruction manual of the corresponding laptop computer. • Secure the screws on an input, automatic adjust function may take...
Owners Guide
Page 11
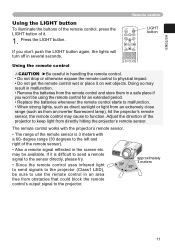
Using the remote control MENU RESET BRIGHT CONTRAST COLOR DVI PC AUTO CAUTION ►Be careful in a safe place if you don't push the LIGHT button again, the lights will turn off in the screen etc. Adjust the direction of the projector to function. The remote control works with a 60- approximately 30º 3 meters 30º 11 may cause to keep light from the remote control and store them in handling the...
Using the remote control MENU RESET BRIGHT CONTRAST COLOR DVI PC AUTO CAUTION ►Be careful in a safe place if you don't push the LIGHT button again, the lights will turn off in the screen etc. Adjust the direction of the projector to function. The remote control works with a 60- approximately 30º 3 meters 30º 11 may cause to keep light from the remote control and store them in handling the...

Owners Guide
Page 12
... POWER TEMP LAMP STANDBY/ON button POWER indicator POWER button POWER LIGHT OPT BLK MODE MEMORY ASPECT IRIS ENTER MENU RESET BRIGHT CONTRAST COLOR DVI PC AUTO COMPO S-VIDEO VIDEO Turning on /off in right order. Remove the lens cover, and set the power switch to the ON position. (Solid orange) The power indicator will stop blinking light green. Press the button STANDBY/ON (projector) or POWER (remote control). Then select the aspect ratio ( 13), adjust the picture position ( 7), and adjust the zoom and focus ( 14). will appear on the projector before the connected...
... POWER TEMP LAMP STANDBY/ON button POWER indicator POWER button POWER LIGHT OPT BLK MODE MEMORY ASPECT IRIS ENTER MENU RESET BRIGHT CONTRAST COLOR DVI PC AUTO COMPO S-VIDEO VIDEO Turning on /off in right order. Remove the lens cover, and set the power switch to the ON position. (Solid orange) The power indicator will stop blinking light green. Press the button STANDBY/ON (projector) or POWER (remote control). Then select the aspect ratio ( 13), adjust the picture position ( 7), and adjust the zoom and focus ( 14). will appear on the projector before the connected...
Owners Guide
Page 14
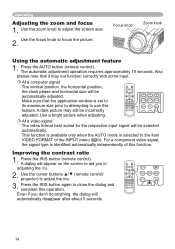
... ENTER MENU RESET BRIGHT CONTRAST COLOR DVI PC AUTO COMPO S-VIDEO VIDEO OPT BLK MODE MEMORY ASPECT IRIS 14 Also please note that the application window is identified automatically independently of the INPUT menu ( 24). At a computer signal The vertical position, the horizontal position, the clock phase and horizontal size will be incorrectly adjusted. Use the cursor buttons ▲/▼ (remote control/ projector) to adjust the screen size. 2. Press...
... ENTER MENU RESET BRIGHT CONTRAST COLOR DVI PC AUTO COMPO S-VIDEO VIDEO OPT BLK MODE MEMORY ASPECT IRIS 14 Also please note that the application window is identified automatically independently of the INPUT menu ( 24). At a computer signal The vertical position, the horizontal position, the clock phase and horizontal size will be incorrectly adjusted. Use the cursor buttons ▲/▼ (remote control/ projector) to adjust the screen size. 2. Press...
Owners Guide
Page 15
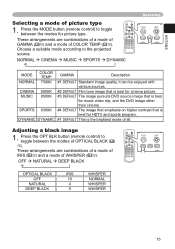
... DYNAMIC Operating POWER LIGHT OPT BLK MODE MEMORY MODE COLOR TEMP GAMMA Description NORMAL 7500K #1 DEFAULT Standard image quality, it can be enjoyed with various sources. MUSIC 8500K #3 DEFAULT The image pursuits DVD source image that is best for cinema picture. Press the OPT BLK button (remote control) to the projected source. OFF NATURAL DEEP BLACK POWER LIGHT OPT BLK MODE MEMORY ASPECT IRIS ENTER MENU RESET BRIGHT CONTRAST COLOR DVI PC AUTO COMPO S-VIDEO VIDEO POWER LIGHT OPT BLK MODE MEMORY...
... DYNAMIC Operating POWER LIGHT OPT BLK MODE MEMORY MODE COLOR TEMP GAMMA Description NORMAL 7500K #1 DEFAULT Standard image quality, it can be enjoyed with various sources. MUSIC 8500K #3 DEFAULT The image pursuits DVD source image that is best for cinema picture. Press the OPT BLK button (remote control) to the projected source. OFF NATURAL DEEP BLACK POWER LIGHT OPT BLK MODE MEMORY ASPECT IRIS ENTER MENU RESET BRIGHT CONTRAST COLOR DVI PC AUTO COMPO S-VIDEO VIDEO POWER LIGHT OPT BLK MODE MEMORY...
Owners Guide
Page 17
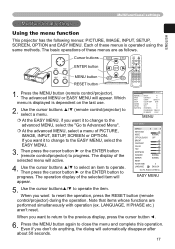
..., INPUT, SETUP, SCREEN, OPTION and EASY MENU. The basic operations of PICTURE, IMAGE, INPUT, SETUP, SCREEN or OPTION. MENU [RGB] :SELECT PICTURE IMAGE INPUT SETUP SCREEN OPTION EASY MENU BRIGHT +0 CONTRAST +0 GAMMA DEFAULT 1 COLOR TEMP 6500K COLOR +0 TINT +0 SHARPNESS +0 PROGRESSIVE TURN OFF MY MEMORY SAVE 1 MENU EASY MENU ASPECT 4:3 KEYSTONE +0 MODE NORMAL OPTICAL BLACK OFF BRIGHT +0 CONTRAST +0 COLOR +0 TINT +0 SHRPNESS +3 WHISPER NORMAL MIRROR NORMAL RESET FILTER TIME 0 LANGUAGE ENGLISH Go To Advance Menu... Use the cursor buttons...
..., INPUT, SETUP, SCREEN, OPTION and EASY MENU. The basic operations of PICTURE, IMAGE, INPUT, SETUP, SCREEN or OPTION. MENU [RGB] :SELECT PICTURE IMAGE INPUT SETUP SCREEN OPTION EASY MENU BRIGHT +0 CONTRAST +0 GAMMA DEFAULT 1 COLOR TEMP 6500K COLOR +0 TINT +0 SHARPNESS +0 PROGRESSIVE TURN OFF MY MEMORY SAVE 1 MENU EASY MENU ASPECT 4:3 KEYSTONE +0 MODE NORMAL OPTICAL BLACK OFF BRIGHT +0 CONTRAST +0 COLOR +0 TINT +0 SHRPNESS +3 WHISPER NORMAL MIRROR NORMAL RESET FILTER TIME 0 LANGUAGE ENGLISH Go To Advance Menu... Use the cursor buttons...
Owners Guide
Page 18
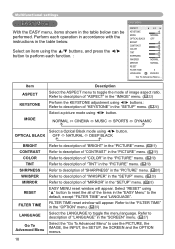
... to use the PICTURE, the IMAGE, the INPUT, the SETUP, the SCREEN and the OPTION menus. 18 FILTER TIME reset window will appear. Select "RESET" using ◄/► button. NORMAL CINEMA MUSIC SPORTS DYNAMIC Select a Optical Black mode using "▲" button to reset the all of "LANGUAGE" in the "SCREEN" menu. ( 27) Select the "Go To Advanced Menu" to description of "ASPECT" in the "IMAGE" menu. ( 22) Perform the KEYSTONE adjustment using ◄/► button. Refer...
... to use the PICTURE, the IMAGE, the INPUT, the SETUP, the SCREEN and the OPTION menus. 18 FILTER TIME reset window will appear. Select "RESET" using ◄/► button. NORMAL CINEMA MUSIC SPORTS DYNAMIC Select a Optical Black mode using "▲" button to reset the all of "LANGUAGE" in the "SCREEN" menu. ( 27) Select the "Go To Advanced Menu" to description of "ASPECT" in the "IMAGE" menu. ( 22) Perform the KEYSTONE adjustment using ◄/► button. Refer...
Owners Guide
Page 19
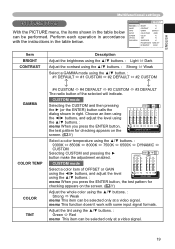
MENU [RGB] PICTURE IMAGE INPUT SETUP SCREEN OPTION EASY MENU :SELECT BRIGHT +0 CONTRAST +0 GAMMA DEFAULT 1 COLOR TEMP 6500K COLOR +0 TINT +0 SHARPNESS +0 PROGRESSIVE TURN OFF MY MEMORY SAVE 1 Item BRIGHT CONTRAST Description Adjust the brightness using the ▲/▼ buttons. : Light Dark Adjust the contrast using the ▲/▼ buttons. : Strong Weak Select a GAMMA mode using the ▲/▼ button. : #1 DEFAULT #1 CUSTOM #2 DEFAULT #2 CUSTOM GAMMA COLOR TEMP COLOR TINT #4 CUSTOM #4 DEFAULT #3 CUSTOM #3 DEFAULT The radio button of OFFSET or GAIN using ...
MENU [RGB] PICTURE IMAGE INPUT SETUP SCREEN OPTION EASY MENU :SELECT BRIGHT +0 CONTRAST +0 GAMMA DEFAULT 1 COLOR TEMP 6500K COLOR +0 TINT +0 SHARPNESS +0 PROGRESSIVE TURN OFF MY MEMORY SAVE 1 Item BRIGHT CONTRAST Description Adjust the brightness using the ▲/▼ buttons. : Light Dark Adjust the contrast using the ▲/▼ buttons. : Strong Weak Select a GAMMA mode using the ▲/▼ button. : #1 DEFAULT #1 CUSTOM #2 DEFAULT #2 CUSTOM GAMMA COLOR TEMP COLOR TINT #4 CUSTOM #4 DEFAULT #3 CUSTOM #3 DEFAULT The radio button of OFFSET or GAIN using ...

Owners Guide
Page 24
... port using the ▲/▼ buttons. : TURN ON TURN OFF When the TURN ON is selected, an S2-video signal can be performed. a irregular picture, a color lack), please select the mode depending on the input signal. VIDEO port. memo The AUTO operation may not be displayed correctly. memo When you watch the DVD, always choose the "DVD" inspite of the IMAGE menu is performs only at some signals. For a component video signal, the signal...
... port using the ▲/▼ buttons. : TURN ON TURN OFF When the TURN ON is selected, an S2-video signal can be performed. a irregular picture, a color lack), please select the mode depending on the input signal. VIDEO port. memo The AUTO operation may not be displayed correctly. memo When you watch the DVD, always choose the "DVD" inspite of the IMAGE menu is performs only at some signals. For a component video signal, the signal...
Owners Guide
Page 26
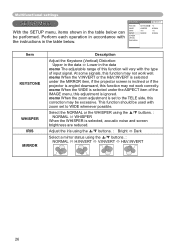
... H&V:INVERT is selected under the ASPECT item of this function will vary with the instructions in the table below can be excessive. Multifunctional settings SETUP Menu With the SETUP menu, items shown in the table below . MENU [RGB] PICTURE IMAGE INPUT SETUP SCREEN OPTION EASY MENU KEYSTONE WHISPER IRIS MIRROR :SELECT +0 NORMAL 100 NORMAL Item KEYSTONE WHISPER IRIS MIRROR Description Adjust the Keystone (Vertical) Distortion: Upper in the data...
... H&V:INVERT is selected under the ASPECT item of this function will vary with the instructions in the table below can be excessive. Multifunctional settings SETUP Menu With the SETUP menu, items shown in the table below . MENU [RGB] PICTURE IMAGE INPUT SETUP SCREEN OPTION EASY MENU KEYSTONE WHISPER IRIS MIRROR :SELECT +0 NORMAL 100 NORMAL Item KEYSTONE WHISPER IRIS MIRROR Description Adjust the Keystone (Vertical) Distortion: Upper in the data...

Owners Guide
Page 29
... the RESET using ▲ button to reset the timer. : RESET CANCEL Selecting the RESET resets the count of the air filter after cleaning or replacement, to the section "Turning Off The Power". Incorrect performing causes incorrect operation of the messages. Incorrect performing causes incorrect operation of the messages. MENU [RGB] PICTURE IMAGE INPUT SETUP SCREEN OPTION EASY MENU AUTO OFF LAMP TIME FILTER TIME SERVICE :SELECT 0 0 0 Item AUTO OFF LAMP TIME FILTER TIME Description Set the time using ▲ button to reset the timer. : RESET CANCEL Selecting the RESET resets...
... the RESET using ▲ button to reset the timer. : RESET CANCEL Selecting the RESET resets the count of the air filter after cleaning or replacement, to the section "Turning Off The Power". Incorrect performing causes incorrect operation of the messages. Incorrect performing causes incorrect operation of the messages. MENU [RGB] PICTURE IMAGE INPUT SETUP SCREEN OPTION EASY MENU AUTO OFF LAMP TIME FILTER TIME SERVICE :SELECT 0 0 0 Item AUTO OFF LAMP TIME FILTER TIME Description Set the time using ▲ button to reset the timer. : RESET CANCEL Selecting the RESET resets...

Owners Guide
Page 32
Turn off the projector, and unplug the power cord. Unscrew the 2 screws (marked by arrow) of the lamp cover Screw Screw 7. is displayed, complete the following operation within 10 minutes of switching power on the menu using the ▲/▼ button, then press the ► button or ENTER button. (3) Choose the "LAMP TIME" using the ▲/▼ button, then press and hold the RESET button for at least 45 minutes. 2. Maintenance Lamp If the indicators or a message prompts...
Turn off the projector, and unplug the power cord. Unscrew the 2 screws (marked by arrow) of the lamp cover Screw Screw 7. is displayed, complete the following operation within 10 minutes of switching power on the menu using the ▲/▼ button, then press the ► button or ENTER button. (3) Choose the "LAMP TIME" using the ▲/▼ button, then press and hold the RESET button for at least 45 minutes. 2. Maintenance Lamp If the indicators or a message prompts...
Owners Guide
Page 35
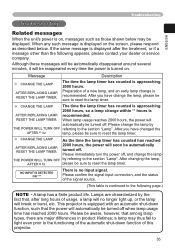
... reset the lamp timer. a lamp may be displayed. If the same message is no longer light up, or the lamp will no input signal. Please change the lamp, please be reappeared every time the power is AFTER REPLACING LAMP, recommended. NO INPUT IS DETECTED ON *** There is displayed after long hours of the signal source. (This table is approaching 2000 hours. This projector is recommended. The time the lamp timer has counted is continued to reset the lamp timer...
... reset the lamp timer. a lamp may be displayed. If the same message is no longer light up, or the lamp will no input signal. Please change the lamp, please be reappeared every time the power is AFTER REPLACING LAMP, recommended. NO INPUT IS DETECTED ON *** There is displayed after long hours of the signal source. (This table is approaching 2000 hours. This projector is recommended. The time the lamp timer has counted is continued to reset the lamp timer...
Owners Guide
Page 37
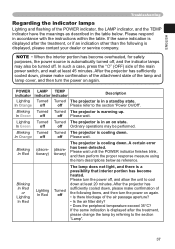
... measure using the item descriptions below . NOTE • When the interior portion has become overheated, for safety purposes, the power source is automatically turned off, and the indicator lamps may be turned off The lamp does not light, and there is displayed after the treatment, please change the lamp by referring to the section "Power On/Off". Blinking Turned Turned The projector is in a standby state. POWER LAMP TEMP indicator indicator indicator Description Lighting Turned Turned The projector is...
... measure using the item descriptions below . NOTE • When the interior portion has become overheated, for safety purposes, the power source is automatically turned off, and the indicator lamps may be turned off The lamp does not light, and there is displayed after the treatment, please change the lamp by referring to the section "Power On/Off". Blinking Turned Turned The projector is in a standby state. POWER LAMP TEMP indicator indicator indicator Description Lighting Turned Turned The projector is...

Owners Guide
Page 38
... time to ON. 38 If the same indication is displayed after the treatment, please contact your dealer or service company. Lighting In Green Simultaneous blinking in Red There is a possibility that the interior portion has become overcooled. Troubleshooting Regarding the indicator lamps (continued) POWER LAMP TEMP indicator indicator indicator Description Blinking In Red or Lighting In Red Turned off Lighting In Red There is a possibility that the interior portion has become heated. After cleaning or changed...
... time to ON. 38 If the same indication is displayed after the treatment, please contact your dealer or service company. Lighting In Green Simultaneous blinking in Red There is a possibility that the interior portion has become overcooled. Troubleshooting Regarding the indicator lamps (continued) POWER LAMP TEMP indicator indicator indicator Description Blinking In Red or Lighting In Red Turned off Lighting In Red There is a possibility that the interior portion has become heated. After cleaning or changed...
Owners Guide
Page 39
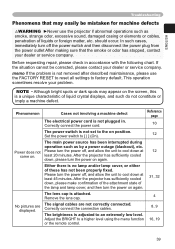
... WARNING ►Never use the FACTORY RESET to reset all settings to a higher level using the menu function or the remote control. 8, 9 16, 19 39 This operation sometimes resolve your dealer or service company. Power does not Please turn the power off, and allow the unit to cool down at least 45 minutes. Either there is attached. The signal cables are displayed. Correctly connect the connection cables. Adjust the BRIGHT to factory default. Remove the lens...
... WARNING ►Never use the FACTORY RESET to reset all settings to a higher level using the menu function or the remote control. 8, 9 16, 19 39 This operation sometimes resolve your dealer or service company. Power does not Please turn the power off, and allow the unit to cool down at least 45 minutes. Either there is attached. The signal cables are displayed. Correctly connect the connection cables. Adjust the BRIGHT to factory default. Remove the lens...

Owners Guide
Page 40
... picture adjustments by referring to the section "Caring For The Lens". 14, 22 34 40 Change the COLOR SPACE setting to install new software. Pictures appear blurry. displayed. input. COLOR SPACE setting is approaching the end of its product lifetime. 32 Replace the lamp. Select the NORMAL to +10. 26 dark. The lamp is not suitable. If the connected PC has a DVI output, the driver software of your PC to AUTO...
... picture adjustments by referring to the section "Caring For The Lens". 14, 22 34 40 Change the COLOR SPACE setting to install new software. Pictures appear blurry. displayed. input. COLOR SPACE setting is approaching the end of its product lifetime. 32 Replace the lamp. Select the NORMAL to +10. 26 dark. The lamp is not suitable. If the connected PC has a DVI output, the driver software of your PC to AUTO...


