Owners Guide
Page 2
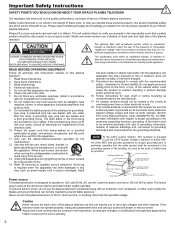
..., location of time. 14. Caution Never remove the back cover of Hitachi plasma televisions. Important Safety Instructions SAFETY POINTS YOU SHOULD KNOW ABOUT YOUR HITACHI PLASMA TELEVISION Our reputation has been built on the quality, performance, and ease of service of the plasma television as this can be located in the vicinity of overhead power lines or other electrical circuits. 18. Safety is used , use the plasma television's (polarized) plug with...
..., location of time. 14. Caution Never remove the back cover of Hitachi plasma televisions. Important Safety Instructions SAFETY POINTS YOU SHOULD KNOW ABOUT YOUR HITACHI PLASMA TELEVISION Our reputation has been built on the quality, performance, and ease of service of the plasma television as this can be located in the vicinity of overhead power lines or other electrical circuits. 18. Safety is used , use the plasma television's (polarized) plug with...

Owners Guide
Page 3
... and digital premium cable television programming by direct connection to operate the equipment. NOTE This Plasma Television receiver will work automatically so that this is encouraged to try to correct the interference by Hitachi Home Electronics (America), Inc, may cause harmful interference to assure compliance with FCC rules. For more than 2.5 minutes, protection function will display television closed captioning, ( or ), in accordance with remote control or power switch...
... and digital premium cable television programming by direct connection to operate the equipment. NOTE This Plasma Television receiver will work automatically so that this is encouraged to try to correct the interference by Hitachi Home Electronics (America), Inc, may cause harmful interference to assure compliance with FCC rules. For more than 2.5 minutes, protection function will display television closed captioning, ( or ), in accordance with remote control or power switch...

Owners Guide
Page 4
... not always supported on a "larger than life" flat panel display. Flat panel displays can become excited while watching a program, especially on the proper stands or installed according to making home entertainment enjoyable and safe. Follow the manufacturer's recommendations for the safe installation and use of this product. • Don't allow children to walls with furniture and television sets. • Don't place flat panel displays on or play with steel...
... not always supported on a "larger than life" flat panel display. Flat panel displays can become excited while watching a program, especially on the proper stands or installed according to making home entertainment enjoyable and safe. Follow the manufacturer's recommendations for the safe installation and use of this product. • Don't allow children to walls with furniture and television sets. • Don't place flat panel displays on or play with steel...
Owners Guide
Page 5
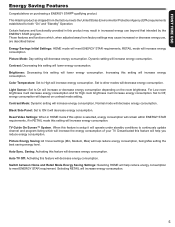
... energy use beyond that intended by the ENERGY STAR program. Contrast: Decreasing this setting will decrease energy consumption. Saving: Activating this option is setup it will operate under standby conditions to ON it will increase energy consumption. Light Sensor: Set to meet ENERGY STAR requirements, RETAIL mode will increase energy consumption. Black Side Panel: Set to continuosly update channel and program listing which , when adjusted away from the factory meets...
... energy use beyond that intended by the ENERGY STAR program. Contrast: Decreasing this setting will decrease energy consumption. Saving: Activating this option is setup it will operate under standby conditions to ON it will increase energy consumption. Light Sensor: Set to meet ENERGY STAR requirements, RETAIL mode will increase energy consumption. Black Side Panel: Set to continuosly update channel and program listing which , when adjusted away from the factory meets...

Owners Guide
Page 6
... springs and insert the top of 45 degrees from vertical. • Please see page 8 for P50S602 IMPORTANT SAFETY INSTRUCTIONS 2-4 FIRST TIME USE 5-17 THE REMOTE CONTROL 18-27 ON-SCREEN DISPLAY 28-41 USEFUL INFORMATION 42-48 LIMITED WARRANTY 49 END USER LICENSE AGREEMENT FOR HITACHI DTV SOFTWARE .......... 50-56 APPENDIXES ...57 INDEX ...58 u Warranty cards NE PAS AFFRANCHIR NNOUEIPNCFOEIMTTSSOETASDAATILGHSREEETYDATES maatRiphlrietotogadcitusohhtcneiet.uratohsdyni/odstlviurnceroeasrrsd Epnrl'oraheddigutrapieisstcastuherrsrenile...
... springs and insert the top of 45 degrees from vertical. • Please see page 8 for P50S602 IMPORTANT SAFETY INSTRUCTIONS 2-4 FIRST TIME USE 5-17 THE REMOTE CONTROL 18-27 ON-SCREEN DISPLAY 28-41 USEFUL INFORMATION 42-48 LIMITED WARRANTY 49 END USER LICENSE AGREEMENT FOR HITACHI DTV SOFTWARE .......... 50-56 APPENDIXES ...57 INDEX ...58 u Warranty cards NE PAS AFFRANCHIR NNOUEIPNCFOEIMTTSSOETASDAATILGHSREEETYDATES maatRiphlrietotogadcitusohhtcneiet.uratohsdyni/odstlviurnceroeasrrsd Epnrl'oraheddigutrapieisstcastuherrsrenile...
Owners Guide
Page 9
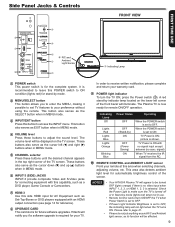
... sync. These buttons also serve as the cursor down ( ) and up ( ) buttons when in MENU mode. HDMI-3 Use this capability, such as Set-Top-Boxes or DVD players equipped with no signal input except antenna (no video input when INPUT 1, 2, 3, or HDMI 1, 2, 3 is turned off or in Stand-by indicator lamp located on the TV screen. signal) When TV receives the IR signal from the RC. INPUT/EXIT button Press this area when selecting channels, adjusting volume, etc. Indicating Lamp Off Lights Red Lights Blue Lights Orange Blinking Blue Power...
... sync. These buttons also serve as the cursor down ( ) and up ( ) buttons when in MENU mode. HDMI-3 Use this capability, such as Set-Top-Boxes or DVD players equipped with no signal input except antenna (no video input when INPUT 1, 2, 3, or HDMI 1, 2, 3 is turned off or in Stand-by indicator lamp located on the TV screen. signal) When TV receives the IR signal from the RC. INPUT/EXIT button Press this area when selecting channels, adjusting volume, etc. Indicating Lamp Off Lights Red Lights Blue Lights Orange Blinking Blue Power...

Owners Guide
Page 11
... changed each time pressed in Set-TopBox mode (SAT) or when the TV uses a digital input. DVD/VCR CONTROL BUTTONS (SAT/CBL, DVD, PVR/VCR, AVR) Control the functions of your devices. Channel Up/Down Buttons (TV, PVR/VCR, SAT/CBL, DVD, AVR) Changes up (+) to increase or down the channel. LEGENDS TV - Audio/Video Receiver VCR - Cable Box NOTE The TV's remote control sensor is used to navigate through the OSD menu system. Please see pages 22~27 for best...
... changed each time pressed in Set-TopBox mode (SAT) or when the TV uses a digital input. DVD/VCR CONTROL BUTTONS (SAT/CBL, DVD, PVR/VCR, AVR) Control the functions of your devices. Channel Up/Down Buttons (TV, PVR/VCR, SAT/CBL, DVD, AVR) Changes up (+) to increase or down the channel. LEGENDS TV - Audio/Video Receiver VCR - Cable Box NOTE The TV's remote control sensor is used to navigate through the OSD menu system. Please see pages 22~27 for best...
Owners Guide
Page 12
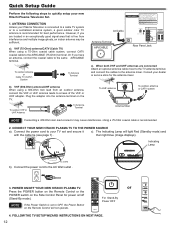
... For Stand-By Power OFF 4. VHF (75-Ohm) antenna/CATV (Cable TV) When using a 300-Ohm twin lead from interference and multiple image ghosts, an indoor antenna may cause interference. Quick Setup Guide Perform the following steps to quickly setup your TV set to OFF, the Power Button on the Remote Control will light Red (Standby mode) and with the cable tie (see page 7) . then light blue (image displays). To outdoor Antenna or Cable TV (CATV) System To Antenna Terminal...
... For Stand-By Power OFF 4. VHF (75-Ohm) antenna/CATV (Cable TV) When using a 300-Ohm twin lead from interference and multiple image ghosts, an indoor antenna may cause interference. Quick Setup Guide Perform the following steps to quickly setup your TV set to OFF, the Power Button on the Remote Control will light Red (Standby mode) and with the cable tie (see page 7) . then light blue (image displays). To outdoor Antenna or Cable TV (CATV) System To Antenna Terminal...

Owners Guide
Page 13
... SELECT button on the remote control to begin scanning. Source: t Air u Please connect the antenna or cable to the TV Setup Wizard screen. Auto Channel Scan : Start 5. If later you want the TV to find the channels available in your Hitachi Plasma TV the Energy Savings Initial Settings screen will save energy and is intended for home use . Air Scanning Channel Number : 12 Analog Digital 12-123 Scan time may take 10 to 20 minutes Cancel When Auto Channel Scan is...
... SELECT button on the remote control to begin scanning. Source: t Air u Please connect the antenna or cable to the TV Setup Wizard screen. Auto Channel Scan : Start 5. If later you want the TV to find the channels available in your Hitachi Plasma TV the Energy Savings Initial Settings screen will save energy and is intended for home use . Air Scanning Channel Number : 12 Analog Digital 12-123 Scan time may take 10 to 20 minutes Cancel When Auto Channel Scan is...
Owners Guide
Page 14
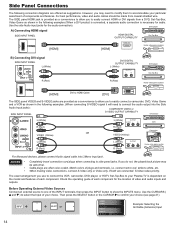
... is connected, a separate audio connection is necessary for audio. Use the CURSORS ( and ) to your choice. However, you use to connect the VCR, camcorder, DVD player, or HDTV Set-Top-Box to select the Input of your Plasma TV is provided as a convenience to easily connect a camcorder, DVD, Video Game and a VCR as suggestions. The SIDE panel HDMI jack is dependent on the model and features of each component for the location of plugs...
... is connected, a separate audio connection is necessary for audio. Use the CURSORS ( and ) to your choice. However, you use to connect the VCR, camcorder, DVD player, or HDTV Set-Top-Box to select the Input of your Plasma TV is provided as a convenience to easily connect a camcorder, DVD, Video Game and a VCR as suggestions. The SIDE panel HDMI jack is dependent on the model and features of each component for the location of plugs...

Owners Guide
Page 17
... a display. • The connected digital output device controls the HDMI interface so proper set top box or DVD player to equipment with Optical IN capability. 1. The Volume of plugs and terminals, i.e. FIRST TIME USE Rear Panel Connections CONNECTING AN EQUIPMENT SOURCE WITH HDMI OR DVI CAPABILITY TO HDMI 1, HDMI 2 1. The picture and sound that is played back will be abnormal if the connection is loose. • Cable plugs are often color-coded. The OPTICAL OUT terminal outputs all audio sources to the HDMI input as your HDMI input (1, 2). • The HDMI input...
... a display. • The connected digital output device controls the HDMI interface so proper set top box or DVD player to equipment with Optical IN capability. 1. The Volume of plugs and terminals, i.e. FIRST TIME USE Rear Panel Connections CONNECTING AN EQUIPMENT SOURCE WITH HDMI OR DVI CAPABILITY TO HDMI 1, HDMI 2 1. The picture and sound that is played back will be abnormal if the connection is loose. • Cable plugs are often color-coded. The OPTICAL OUT terminal outputs all audio sources to the HDMI input as your HDMI input (1, 2). • The HDMI input...
Owners Guide
Page 19
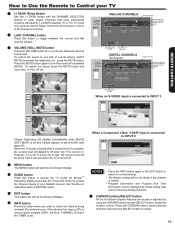
...Use the Remote to Control your Satellte receiver, Set Top access Box or Press the SELECT butto• niPstorloosgecrtkatehmde.oIpntfioonrm. To reduce the sound to toggle between the current and last channel viewed. Program Information Program Run Time ANALOG CHANNELS Show Name 3:00PM- 3:30PM ST TV-G A 480i Analog Channel Air 8 KXYZ 3:17PM Main Picture Source & Channel Indication Broadcast Channel Indication Clock Audio Broadcast Broadcast Rating Picture Format Auto STEREO Closed Caption Setting Audio Source Selection Program Information Program Run Time DIGITAL CHANNELS...
...Use the Remote to Control your Satellte receiver, Set Top access Box or Press the SELECT butto• niPstorloosgecrtkatehmde.oIpntfioonrm. To reduce the sound to toggle between the current and last channel viewed. Program Information Program Run Time ANALOG CHANNELS Show Name 3:00PM- 3:30PM ST TV-G A 480i Analog Channel Air 8 KXYZ 3:17PM Main Picture Source & Channel Indication Broadcast Channel Indication Clock Audio Broadcast Broadcast Rating Picture Format Auto STEREO Closed Caption Setting Audio Source Selection Program Information Program Run Time DIGITAL CHANNELS...
Owners Guide
Page 30
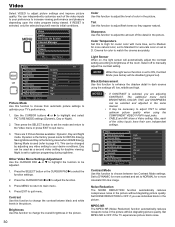
If RESET is set to adjust the function. 3. Video Audio TV Guide On Screen Channel Manager Locks Timers Setup Move SEL Select Video Air Picture Mode Dynamic Contrast 100% Brightness 50% Color 50% OR Tint 0 Sharpness 50% Color Temperature High Light Sensor Off Black Enhancement High Move SEL Select Picture Mode Use this function to change the overall brightness in the picture. 30 Color Use this function to increase viewing performance and pleasure depending upon the video program being viewed. Use the CURSOR buttons or to...
If RESET is set to adjust the function. 3. Video Audio TV Guide On Screen Channel Manager Locks Timers Setup Move SEL Select Video Air Picture Mode Dynamic Contrast 100% Brightness 50% Color 50% OR Tint 0 Sharpness 50% Color Temperature High Light Sensor Off Black Enhancement High Move SEL Select Picture Mode Use this function to change the overall brightness in the picture. 30 Color Use this function to increase viewing performance and pleasure depending upon the video program being viewed. Use the CURSOR buttons or to...
Owners Guide
Page 34
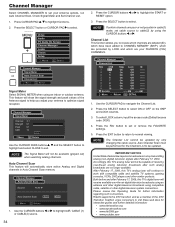
...DVD players and other digital television system connections. Video Audio TV Guide On Screen Channel Manager + Locks Timers Setup Move SEL Select Channel Manager Signal Meter OR Auto Channel Scan Channel List Move SEL Select Signal Meter Select SIGNAL METER when using compatible cable, satellite or other similar products. Channel Manager Signal Meter Channel 3-1 Strength 91 Peak 91 SNR 10 Close Move SEL Return Use the CURSOR PADS buttons , and the SELECT button to highlight and select CLOSE to navigate the Channel List. 2. Channel Manager Auto Channel Scan Source...
...DVD players and other digital television system connections. Video Audio TV Guide On Screen Channel Manager + Locks Timers Setup Move SEL Select Channel Manager Signal Meter OR Auto Channel Scan Channel List Move SEL Select Signal Meter Select SIGNAL METER when using compatible cable, satellite or other similar products. Channel Manager Signal Meter Channel 3-1 Strength 91 Peak 91 SNR 10 Close Move SEL Return Use the CURSOR PADS buttons , and the SELECT button to highlight and select CLOSE to navigate the Channel List. 2. Channel Manager Auto Channel Scan Source...

Owners Guide
Page 40
... TV will turn power off automatically when no remote control button is turned on using analog channels. 40 Auto TV Off Use this feature to INPUT 2. 1. Set The Inputs Use this feature to give a name to disable this TV. • Caption Display will not work when viewing a 480i, 480p, 720p, 1080i or 1080p input via the COMPONENT: Y-PBPR or HDMI inputs . • Closed Caption and Digital Captions availability and content depends on or off. Select Game Name when playing with a Video game...
... TV will turn power off automatically when no remote control button is turned on using analog channels. 40 Auto TV Off Use this feature to INPUT 2. 1. Set The Inputs Use this feature to give a name to disable this TV. • Caption Display will not work when viewing a 480i, 480p, 720p, 1080i or 1080p input via the COMPONENT: Y-PBPR or HDMI inputs . • Closed Caption and Digital Captions availability and content depends on or off. Select Game Name when playing with a Video game...
Owners Guide
Page 41
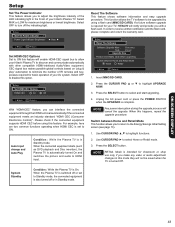
... MMC card before using a flash card (MMC/SD CARD). Insert MMC/SD CARD. 2. ON-SCREEN DISPLAY 41 CEC signal bus makes possible global controls based on "plug & play" automation to minimize the number of IR remotes and keypresses required for your AV system. Auto Input change and Auto Play Condition : While the Plasma TV is complete. Unplug the AC power cord or press the POWER SWITCH when the UPGRADE is in Standby mode. Use CURSOR PAD ▲,▼ to HDMI input. Select...
... MMC card before using a flash card (MMC/SD CARD). Insert MMC/SD CARD. 2. ON-SCREEN DISPLAY 41 CEC signal bus makes possible global controls based on "plug & play" automation to minimize the number of IR remotes and keypresses required for your AV system. Auto Input change and Auto Play Condition : While the Plasma TV is complete. Unplug the AC power cord or press the POWER SWITCH when the UPGRADE is in Standby mode. Use CURSOR PAD ▲,▼ to HDMI input. Select...
Owners Guide
Page 43
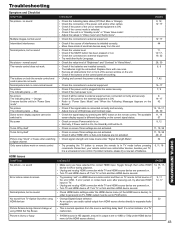
...; Turn TV and HDMI device off . Turn TV on both the remote control and control panel do not work. Troubleshooting Symptom and Checklist SYMPTOM No picture - The buttons on first and then HDMI device second. • Check HDMI Audio settings under HDMI device menu (of batteries. 6, 11, 18 HDMI Issues SYMPTOM No picture - Normal picture but no sound No sound from TV Optical Out when using HDMI devices Picture flickers during playback. • Unplug and re-plug HDMI connection while TV and HDMI source device...
...; Turn TV and HDMI device off . Turn TV on both the remote control and control panel do not work. Troubleshooting Symptom and Checklist SYMPTOM No picture - The buttons on first and then HDMI device second. • Check HDMI Audio settings under HDMI device menu (of batteries. 6, 11, 18 HDMI Issues SYMPTOM No picture - Normal picture but no sound No sound from TV Optical Out when using HDMI devices Picture flickers during playback. • Unplug and re-plug HDMI connection while TV and HDMI source device...
Owners Guide
Page 46
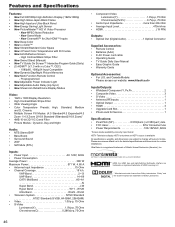
... (Digital Audio 1 Optical Connector Supplied Accessories: • Remote Control • Batteries (AAA) • 6' AC Power cord cable • Operating Guide • TV Guide Daily User Manual • Easy Graphic Guide • Warranty Cards Optional Accessories: • For U.S. W+28 Ultra Band W+29 - and Canada Models: Please access our website: www.hitachi.us /tv for detailed specifications and dimensions for Consumer Use • Power Requirements 108-132VAC, 60Hz 1 Screen mode availability varies by input format HDTV Televisions display HDTV only when an HDTV source is...
... (Digital Audio 1 Optical Connector Supplied Accessories: • Remote Control • Batteries (AAA) • 6' AC Power cord cable • Operating Guide • TV Guide Daily User Manual • Easy Graphic Guide • Warranty Cards Optional Accessories: • For U.S. W+28 Ultra Band W+29 - and Canada Models: Please access our website: www.hitachi.us /tv for detailed specifications and dimensions for Consumer Use • Power Requirements 108-132VAC, 60Hz 1 Screen mode availability varies by input format HDTV Televisions display HDTV only when an HDTV source is...
Owners Guide
Page 50
... SUPPLEMENTARY LICENSE THAT MAY ACCOMPANY SUCH UPGRADE, (A) DO NOT USE ANY HITACHIPROVIDED FLASH CARD OR OTHER MEDIA, (B) DO NOT PERFORM INSTALL ANY HITACHI-PROVIDED UPGRADE SOFTWARE ON YOUR DTV, AND (C) PROMPTLY RETURN SUCH FLASH CARD OR OTHER MEDIA TO HITACHI. 11. c. You understand and agree that is licensing the Software for HITACHI DTV Software END USER LICENSE AGREEMENT FOR HITACHI DTV SOFTWARE IMPORTANT - The Software is '' condition and any express...
... SUPPLEMENTARY LICENSE THAT MAY ACCOMPANY SUCH UPGRADE, (A) DO NOT USE ANY HITACHIPROVIDED FLASH CARD OR OTHER MEDIA, (B) DO NOT PERFORM INSTALL ANY HITACHI-PROVIDED UPGRADE SOFTWARE ON YOUR DTV, AND (C) PROMPTLY RETURN SUCH FLASH CARD OR OTHER MEDIA TO HITACHI. 11. c. You understand and agree that is licensing the Software for HITACHI DTV Software END USER LICENSE AGREEMENT FOR HITACHI DTV SOFTWARE IMPORTANT - The Software is '' condition and any express...
Owners Guide
Page 58
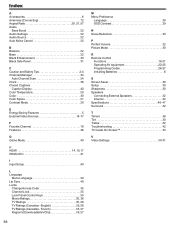
... 30 Black Side Panel 31 C Caution and Safety Tips 2-4 Channel Manager 34 Auto Channel Scan 34 Clock 38 Closed Captions Caption Display 40 Color Temperature 30 Color 30 Color Space 31 Contrast Mode 30 E Energy Saving Features 5 External Video Sources 14-17 F Favorite Channel 18 Features 46 G Game Mode 40 H HDMI 14, 15,17 HDMI-CEC 41 I Input Setup 40 L Language Menu Language 39 Lip Sync 40 Locks Change Access Code 35 Channel Lock 35 Lock Panel Control Keys 35 Movie Ratings 35, 36 TV...
... 30 Black Side Panel 31 C Caution and Safety Tips 2-4 Channel Manager 34 Auto Channel Scan 34 Clock 38 Closed Captions Caption Display 40 Color Temperature 30 Color 30 Color Space 31 Contrast Mode 30 E Energy Saving Features 5 External Video Sources 14-17 F Favorite Channel 18 Features 46 G Game Mode 40 H HDMI 14, 15,17 HDMI-CEC 41 I Input Setup 40 L Language Menu Language 39 Lip Sync 40 Locks Change Access Code 35 Channel Lock 35 Lock Panel Control Keys 35 Movie Ratings 35, 36 TV...


