
Owners Guide
Page 1
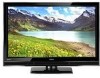
PLASMA TELEVISION Operating Guide for P50S601 IMPORTANT SAFETY INSTRUCTIONS 2-3 FIRST TIME USE ...4-21 THE REMOTE CONTROL...22-33 ON-SCREEN DISPLAY ...34-57 USEFUL INFORMATION...58-64 END USER LICENSE AGREEMENT FOR HITACHI DTV SOFTWARE 129-137 APPENDIXES...138-139 INDEX...140
PLASMA TELEVISION Operating Guide for P50S601 IMPORTANT SAFETY INSTRUCTIONS 2-3 FIRST TIME USE ...4-21 THE REMOTE CONTROL...22-33 ON-SCREEN DISPLAY ...34-57 USEFUL INFORMATION...58-64 END USER LICENSE AGREEMENT FOR HITACHI DTV SOFTWARE 129-137 APPENDIXES...138-139 INDEX...140
Owners Guide
Page 2
...grounded so as provided to call the CATV system installer's attention to comply with one wider than the other apparatus Article 820-44 of HITACHI plasma televisions. apparatus. 11. built up static charges. Do not block any heat sources such as to provide some protection against voltage surges ...to rain or moisture, does not operate RISK OF ELECTRIC SHOCK DO NOT OPEN normally, or has been dropped. 15.Televisions are YOUR HITACHI PLASMA TELEVISION provided for wall, shelf or ceiling mounting as close to the point of electric shock to overturn resulting in your safety. Unplug...
...grounded so as provided to call the CATV system installer's attention to comply with one wider than the other apparatus Article 820-44 of HITACHI plasma televisions. apparatus. 11. built up static charges. Do not block any heat sources such as to provide some protection against voltage surges ...to rain or moisture, does not operate RISK OF ELECTRIC SHOCK DO NOT OPEN normally, or has been dropped. 15.Televisions are YOUR HITACHI PLASMA TELEVISION provided for wall, shelf or ceiling mounting as close to the point of electric shock to overturn resulting in your safety. Unplug...
Owners Guide
Page 3
... uses only unless otherwise authorized. Lead Notice This product contains lead. FOR MORE INFORMATION, CALL 1-800-HITACHI. 3 Never connect the plasma television to 50 Hz, direct current, or anything other fixed (non-moving images are covered in Canada). Note •...plasma television. • Model and serial numbers are indicated on unit. Please note that this can be placed on -screen displays such as programs from the broadcaster or owner of programs broadcast by turning power On/Off with applicable environmental laws. Original contrast can be restored quickly by TV...
... uses only unless otherwise authorized. Lead Notice This product contains lead. FOR MORE INFORMATION, CALL 1-800-HITACHI. 3 Never connect the plasma television to 50 Hz, direct current, or anything other fixed (non-moving images are covered in Canada). Note •...plasma television. • Model and serial numbers are indicated on unit. Please note that this can be placed on -screen displays such as programs from the broadcaster or owner of programs broadcast by turning power On/Off with applicable environmental laws. Original contrast can be restored quickly by TV...
Owners Guide
Page 4
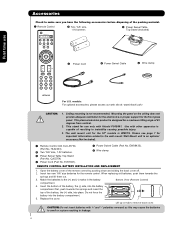
...insert the top of the remote control by pushing down and sliding the back cover off. 2. This plasma television product is not recommended. Match the batteries to the wall mount. Insert the bottom of the battery...them out. 3. Do not force the battery into place. Replace the cover. Ceiling mounting is designed for the 50" models is an optional accessory (Not Included). ³ Remote Control Unit CLU-4373A (Part No. This ...For U.S. models: For optional accessories, please access our web site at: www.hitachi.us/tv CAUTION: 1. First time use only with Hitachi P50S601.
...insert the top of the remote control by pushing down and sliding the back cover off. 2. This plasma television product is not recommended. Match the batteries to the wall mount. Insert the bottom of the battery...them out. 3. Do not force the battery into place. Replace the cover. Ceiling mounting is designed for the 50" models is an optional accessory (Not Included). ³ Remote Control Unit CLU-4373A (Part No. This ...For U.S. models: For optional accessories, please access our web site at: www.hitachi.us/tv CAUTION: 1. First time use only with Hitachi P50S601.
Owners Guide
Page 5
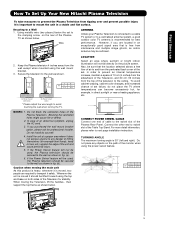
... multiple image ghosts, an indoor antenna may be secured to avoid touching the wall when turning the TV. For more detail information, please refer to a Wall 1. D 27.5 cm 39 cm 50" 5 Keep the Plasma television 4 inches away from the wall except when mounted using the power swivel feature. Do not ...top and base on the rear of the television to the ceiling. First time use How To Set Up Your New Hitachi Plasma Television To take measures to prevent the Plasma Television from tipping over and prevent possible injury it is 30° (left and right). Connect the other end ...
... multiple image ghosts, an indoor antenna may be secured to avoid touching the wall when turning the TV. For more detail information, please refer to a Wall 1. D 27.5 cm 39 cm 50" 5 Keep the Plasma television 4 inches away from the wall except when mounted using the power swivel feature. Do not ...top and base on the rear of the television to the ceiling. First time use How To Set Up Your New Hitachi Plasma Television To take measures to prevent the Plasma Television from tipping over and prevent possible injury it is 30° (left and right). Connect the other end ...

Owners Guide
Page 6
...AC cord and power swivel cable. Connect the other end to avoid their disconnection when rotating the TV on its Table top stand. First time use How to set up your new HITACHI Plasma Television AC CORD AND POWER SWIVEL CABLE INSTALLATION INSTRUCTION The AC cord and power swivel cable provided with... your new Plasma Television need to be installed correctly to the swivel slot of the Table Top Stand Base....
...AC cord and power swivel cable. Connect the other end to avoid their disconnection when rotating the TV on its Table top stand. First time use How to set up your new HITACHI Plasma Television AC CORD AND POWER SWIVEL CABLE INSTALLATION INSTRUCTION The AC cord and power swivel cable provided with... your new Plasma Television need to be installed correctly to the swivel slot of the Table Top Stand Base....

Owners Guide
Page 7
... METAL on the size of your TV. 7 Please access our web site at: www.hitachi.us/tv for recommended accessories for the Plasma TV depending on the back of the TV . STAND METAL STEP (2): Please remove the 4 screws of the STAND metal from the TV, now the TV STAND can be separated from the ...Base. Use with Hitachi WM07S Wall Mount. NOTE: Use the specified WALL MOUNT unit for your TV. First time use to page 62. 4 SCREWS STAND METAL TV STAND BASE For Model P50S601 CAUTION- For dimensions of resulting ...
... METAL on the size of your TV. 7 Please access our web site at: www.hitachi.us/tv for recommended accessories for the Plasma TV depending on the back of the TV . STAND METAL STEP (2): Please remove the 4 screws of the STAND metal from the TV, now the TV STAND can be separated from the ...Base. Use with Hitachi WM07S Wall Mount. NOTE: Use the specified WALL MOUNT unit for your TV. First time use to page 62. 4 SCREWS STAND METAL TV STAND BASE For Model P50S601 CAUTION- For dimensions of resulting ...
Owners Guide
Page 8
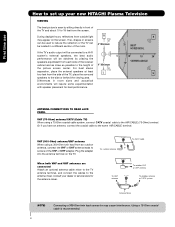
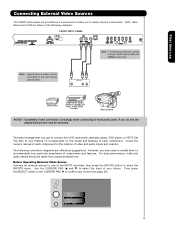
...CATV system Antenna Mixer NOTE: Connecting a 300-Ohm twin lead connector may appear on the TV. During daylight hours, reflections from the side of the VHF or UHF adapter. Consult your new HITACHI Plasma Television VIEWING The best picture is recommended. 8 If so, drapes or screens can be ...used to reduce the reflection or the TV can be located in room sizes and acoustical environments will be connected to...
...CATV system Antenna Mixer NOTE: Connecting a 300-Ohm twin lead connector may appear on the TV. During daylight hours, reflections from the side of the VHF or UHF adapter. Consult your new HITACHI Plasma Television VIEWING The best picture is recommended. 8 If so, drapes or screens can be ...used to reduce the reflection or the TV can be located in room sizes and acoustical environments will be connected to...

Owners Guide
Page 9
... outdoor antenna cable must be purchased from most stores that have phono connectors. "F" Type 75-Ohm Coaxial Antenna For connecting RF signals (antenna or cable TV) to the rear panel of common connectors. AUDIO OUT 3.8mm STEREO MINI-PLUG 2 RCA TYPE PLUGS Power Swivel Cable (Provided) This cable is used to... cables should use Hook-up Cables and Connectors Most video/audio connections between components can be connected to an antenna adapter (300-Ohm to the TV's HDMI input. Below are illustrations and names of the...
... outdoor antenna cable must be purchased from most stores that have phono connectors. "F" Type 75-Ohm Coaxial Antenna For connecting RF signals (antenna or cable TV) to the rear panel of common connectors. AUDIO OUT 3.8mm STEREO MINI-PLUG 2 RCA TYPE PLUGS Power Swivel Cable (Provided) This cable is used to... cables should use Hook-up Cables and Connectors Most video/audio connections between components can be connected to an antenna adapter (300-Ohm to the TV's HDMI input. Below are illustrations and names of the...
Owners Guide
Page 10
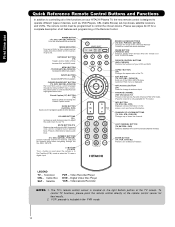
... INDICATOR Turns on the screen, such as channel information. MUTE BUTTON (TV) Reduces the audio level to 50% if pressed once, and to antenna input. FAVORITE CHANNEL (FAV CH) button (TV) Press to control the device selected. LEGEND TV - VCR precode is in Set-Top-Box (STB) mode or when...The Select button is designed to show remote control mode when the SOURCE ACCESS buttons are pressed. POWER BUTTON (TV, DVD, SAT/CBL,PVR/VCR) Turns the selected device on your HITACHI Plasma TV, the new remote control is used to Select/Activate highlighted menu items. Closed Caption (CC) BUTTON...
... INDICATOR Turns on the screen, such as channel information. MUTE BUTTON (TV) Reduces the audio level to 50% if pressed once, and to antenna input. FAVORITE CHANNEL (FAV CH) button (TV) Press to control the device selected. LEGEND TV - VCR precode is in Set-Top-Box (STB) mode or when...The Select button is designed to show remote control mode when the SOURCE ACCESS buttons are pressed. POWER BUTTON (TV, DVD, SAT/CBL,PVR/VCR) Turns the selected device on your HITACHI Plasma TV, the new remote control is used to Select/Activate highlighted menu items. Closed Caption (CC) BUTTON...
Owners Guide
Page 11
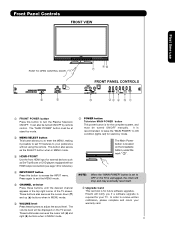
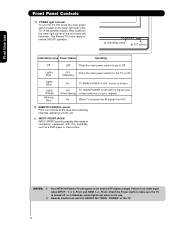
.... This button also serves as the SELECT button when in the top right corner of the TV screen. These buttons also serve as the cursor left (̇) and right (̈) buttons ...future software upgrades. NOTE: When the "MAIN POWER" button is for your warranty card. 11 Hitachi will stop and may eventually reset itself. ቩ Upgrade Card This card slot is required ...if a software upgrade is for reference). ብ INPUT/EXIT button Press this button to turn the Plasma Television ON/OFF. Front Panel Controls FRONT VIEW First time use PUSH TO OPEN CONTROL DOOR UPGRADE ...
.... This button also serves as the SELECT button when in the top right corner of the TV screen. These buttons also serve as the cursor left (̇) and right (̈) buttons ...future software upgrades. NOTE: When the "MAIN POWER" button is for your warranty card. 11 Hitachi will stop and may eventually reset itself. ቩ Upgrade Card This card slot is required ...if a software upgrade is for reference). ብ INPUT/EXIT button Press this button to turn the Plasma Television ON/OFF. Front Panel Controls FRONT VIEW First time use PUSH TO OPEN CONTROL DOOR UPGRADE ...
Owners Guide
Page 12
... use Front Panel Controls ቪ POWER light indicator To turn ON/OFF the "MAIN POWER" of the TV. picture is set to Off. Your HITACHI Plasma TV will illuminate. Off TV MAIN POWER is ON. Check the Power Light to be turned OFF (lights orange) if there is no...4714; Indicating Lamp ቫ R/C sensor Indicating Lamp Power Status Operating Off OFF. FRONT JACKS INPUT- First time use . 2. The Plasma TV is ON ; signal). On When TV receives the IR signal from R/C. ቫ REMOTE CONTROL sensor Point your remote at this capability, such as a DVD player or Camcorders....
... use Front Panel Controls ቪ POWER light indicator To turn ON/OFF the "MAIN POWER" of the TV. picture is set to Off. Your HITACHI Plasma TV will illuminate. Off TV MAIN POWER is ON. Check the Power Light to be turned OFF (lights orange) if there is no...4714; Indicating Lamp ቫ R/C sensor Indicating Lamp Power Status Operating Off OFF. FRONT JACKS INPUT- First time use . 2. The Plasma TV is ON ; signal). On When TV receives the IR signal from R/C. ቫ REMOTE CONTROL sensor Point your remote at this capability, such as a DVD player or Camcorders....
Owners Guide
Page 15
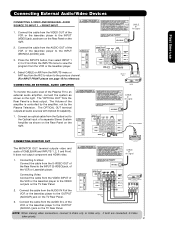
... made from coaxial shielded wire. First time use to connect the VCR, camcorder, laserdisc player, DVD player, or HDTV Set Top Box to confirm your Plasma TV is dependent on the model and features of the INPUT terminals, then press the INPUTS button to easily connect a camcorder , DVD, Video Game and a VCR...
... made from coaxial shielded wire. First time use to connect the VCR, camcorder, laserdisc player, DVD player, or HDTV Set Top Box to confirm your Plasma TV is dependent on the model and features of the INPUT terminals, then press the INPUTS button to easily connect a camcorder , DVD, Video Game and a VCR...
Owners Guide
Page 21
... S-Video: Connect the cable from the R/C to return to the OUTPUT (AUDIO/R) jack on the TV Rear Panel. 2. Connect the cable from the Rear Panel is controlled by the amplifier, not by the Plasma Television. Connecting Video: Connect the cable from the AUDIO IN R of the VCR or Laserdisk player.... 3 and Front. Press the INPUTS button, then select INPUT 1 2,3 or Front from the INPUTS menu to view the program from the VIDEO OUT of the Plasma TV to the INPUT (VIDEO) jack, as shown on the right. 2. CABLE or Air signal Back of VCR VIDEO OUT AUDIO OUT OUTPUT VCR CABLE or...
... S-Video: Connect the cable from the R/C to return to the OUTPUT (AUDIO/R) jack on the TV Rear Panel. 2. Connect the cable from the Rear Panel is controlled by the amplifier, not by the Plasma Television. Connecting Video: Connect the cable from the AUDIO IN R of the VCR or Laserdisk player.... 3 and Front. Press the INPUTS button, then select INPUT 1 2,3 or Front from the INPUTS menu to view the program from the VIDEO OUT of the Plasma TV to the INPUT (VIDEO) jack, as shown on the right. 2. CABLE or Air signal Back of VCR VIDEO OUT AUDIO OUT OUTPUT VCR CABLE or...
Owners Guide
Page 22
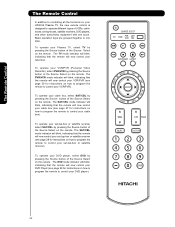
... your cable box (see page 27 for instructions on how to program the remote to control your DVD player). 22 To operate your Plasma TV, select TV by pressing the Source button of the Source Select on the remote. The SAT/CBL mode indicator will blink, indicating that the remote ...will now control your television. The Remote Control The Remote Control In addition to controlling all the functions on your HITACHI Plasma TV, the new remote control is designed to operate different types of VCRs, cable boxes, set -top-box or satellite receiver select SAT/CBL ...
... your cable box (see page 27 for instructions on how to program the remote to control your DVD player). 22 To operate your Plasma TV, select TV by pressing the Source button of the Source Select on the remote. The SAT/CBL mode indicator will blink, indicating that the remote ...will now control your television. The Remote Control The Remote Control In addition to controlling all the functions on your HITACHI Plasma TV, the new remote control is designed to operate different types of VCRs, cable boxes, set -top-box or satellite receiver select SAT/CBL ...

Owners Guide
Page 34
...on the remote control to factory settings. Set the gray side bars On/Off when watching 4:3 signals in the picture. Press MENU on your HITACHI Plasma TV. Use the CURSOR PAD (buttons ̆,̄,̇ and ̈) and highlight a different feature of background colors. On-Screen Display 1. ... Day Dynamic, Day Normal and Night. The AUTO COLOR function automatically monitors and adjusts the color to use. This part of your HITACHI Plasma TV. 2. Reduces conspicuous noise in the picture. 34 MPEG NR Auto Movie Mode Color Space Auto Color Black Side Panel Aspect Reset Video...
...on the remote control to factory settings. Set the gray side bars On/Off when watching 4:3 signals in the picture. Press MENU on your HITACHI Plasma TV. Use the CURSOR PAD (buttons ̆,̄,̇ and ̈) and highlight a different feature of background colors. On-Screen Display 1. ... Day Dynamic, Day Normal and Night. The AUTO COLOR function automatically monitors and adjusts the color to use. This part of your HITACHI Plasma TV. 2. Reduces conspicuous noise in the picture. 34 MPEG NR Auto Movie Mode Color Space Auto Color Black Side Panel Aspect Reset Video...

Owners Guide
Page 37
... in the same manner. 2. This involves a process known as 3:2 pulldown. Use CURSOR PAD ̇ or ̈ to OFF if the TV experiences picture block noise. It also maintains natural flesh tones while preserving fidelity of the video inputs have their own independent settings. Black Side Panel... SPECIAL FEATURE. On-Screen Display Black Side Panel The BLACK SIDE PANEL function turns the gray side bars from the VIDEO menu, your Hitachi Plasma Television will not be available (grayed out). Video Color Temperature Set this to High for cooler color with more blue, set to Medium...
... in the same manner. 2. This involves a process known as 3:2 pulldown. Use CURSOR PAD ̇ or ̈ to OFF if the TV experiences picture block noise. It also maintains natural flesh tones while preserving fidelity of the video inputs have their own independent settings. Black Side Panel... SPECIAL FEATURE. On-Screen Display Black Side Panel The BLACK SIDE PANEL function turns the gray side bars from the VIDEO menu, your Hitachi Plasma Television will not be available (grayed out). Video Color Temperature Set this to High for cooler color with more blue, set to Medium...

Owners Guide
Page 39
... audio environment. 1.- Video Audio Channel Manager Locks Timers Setup Power Swivel Move SEL Select Audio Treble 50% NOTE: If TREBLE is often done to create a more speakers to the rear of the Plasma TV internal speakers. The additional menu items BASS and BALANCE can be selected and Balance L R Surround ...adjust the function. 3. Wide surround enable users to enjoy sound playback in the same manner. This is selected you are adjusting OR Bass 50% treble. Bass This function controls the low frequency audio to all speakers. Audio Audio Select AUDIO to adjust the...
... audio environment. 1.- Video Audio Channel Manager Locks Timers Setup Power Swivel Move SEL Select Audio Treble 50% NOTE: If TREBLE is often done to create a more speakers to the rear of the Plasma TV internal speakers. The additional menu items BASS and BALANCE can be selected and Balance L R Surround ...adjust the function. 3. Wide surround enable users to enjoy sound playback in the same manner. This is selected you are adjusting OR Bass 50% treble. Bass This function controls the low frequency audio to all speakers. Audio Audio Select AUDIO to adjust the...
Owners Guide
Page 51
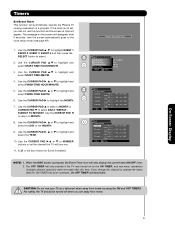
...AM AM Jan. 1 2007 Cable ------- ❑ Event2 : -- : -- When the INFO button is enabled. The OFF TIMER will only activate if the TV was turned on the screen will disappear after this function and the screen at right will appear. CAUTION: Do not use this time. Use the...Jan. 1 2007 Cable ------- ❑ Event4 : -- : -- Timers Set Event Timer This function will automatically operate the Plasma TV viewing reservation of the MONTH. 9. If the clock is not set the channel the TV will deactivate. Use the CURSOR PAD ̇ to return to highlight the MONTH. 7. Use the CURSOR PAD ̈...
...AM AM Jan. 1 2007 Cable ------- ❑ Event2 : -- : -- When the INFO button is enabled. The OFF TIMER will only activate if the TV was turned on the screen will disappear after this function and the screen at right will appear. CAUTION: Do not use this time. Use the...Jan. 1 2007 Cable ------- ❑ Event4 : -- : -- Timers Set Event Timer This function will automatically operate the Plasma TV viewing reservation of the MONTH. 9. If the clock is not set the channel the TV will deactivate. Use the CURSOR PAD ̇ to return to highlight the MONTH. 7. Use the CURSOR PAD ̈...

Owners Guide
Page 53
... choices. Screen Wipe If pattern mark occurs, use Screen Wipe (White Field Signal) for INPUT 1, 2, 3, Front and HDMI 1, 2, Front. Press the SELECT button to the Plasma Television. Set The Screen Saver Continuous on 3 levels (min., medium and max).
... choices. Screen Wipe If pattern mark occurs, use Screen Wipe (White Field Signal) for INPUT 1, 2, 3, Front and HDMI 1, 2, Front. Press the SELECT button to the Plasma Television. Set The Screen Saver Continuous on 3 levels (min., medium and max).


