Owners Guide
Page 2
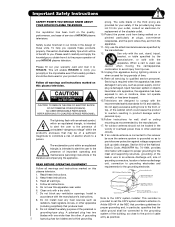
...not operate RISK OF ELECTRIC SHOCK DO NOT OPEN normally, or has been dropped. 15.Televisions are YOUR HITACHI PLASMA TELEVISION provided for the grounding electrode. Protect the power cord from the Safety is also foremost in our minds in the design of these instructions. Please read it... information with respect to an antenna discharge unit, size of grounding connectors, location of benefit to grounding electrodes and requirements for your HITACHI plasma television. Do not use Please fill out your warranty card and mail it to the point of the building, as provided to ...
...not operate RISK OF ELECTRIC SHOCK DO NOT OPEN normally, or has been dropped. 15.Televisions are YOUR HITACHI PLASMA TELEVISION provided for the grounding electrode. Protect the power cord from the Safety is also foremost in our minds in the design of these instructions. Please read it... information with respect to an antenna discharge unit, size of grounding connectors, location of benefit to grounding electrodes and requirements for your HITACHI plasma television. Do not use Please fill out your warranty card and mail it to the point of the building, as provided to ...
Owners Guide
Page 3
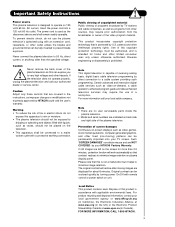
...product contains lead. FOR MORE INFORMATION, CALL 1-800-HITACHI. 3 Public viewing of copyrighted material Public viewing of the plasma television as vases, should not be exposed to dripping or splashing and objects filled with remote control or power switch on 120 volts 60 Hz, AC current....www.epsc.ca (in accordance with a protective earthing connection. Never connect the plasma television to 50 Hz, direct current, or anything other fixed (non-moving images are displayed for more information call your TV screen. To prevent electric shock, do not expose this apparatus to rain ...
...product contains lead. FOR MORE INFORMATION, CALL 1-800-HITACHI. 3 Public viewing of copyrighted material Public viewing of the plasma television as vases, should not be exposed to dripping or splashing and objects filled with remote control or power switch on 120 volts 60 Hz, AC current....www.epsc.ca (in accordance with a protective earthing connection. Never connect the plasma television to 50 Hz, direct current, or anything other fixed (non-moving images are displayed for more information call your TV screen. To prevent electric shock, do not expose this apparatus to rain ...
Owners Guide
Page 4
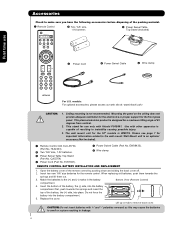
...Remote Control) compartment. 4. This plasma television product is not recommended. QJ03754) ¿ Power Cord (Part No. CAUTION: Do not insert batteries with Hitachi P50S601. Ceiling mounting is designed for ... 50" models is capable of the packing material. ³ Remote Control · Two "AA" size, 1.5V batteries » Power Swivel Table Top Stand (included) ¿ Power Cord ´ Power .... 2. models: For optional accessories, please access our web site at: www.hitachi.us/tv CAUTION: 1. First time use only with '+' and '-' polarities reversed as this...
...Remote Control) compartment. 4. This plasma television product is not recommended. QJ03754) ¿ Power Cord (Part No. CAUTION: Do not insert batteries with Hitachi P50S601. Ceiling mounting is designed for ... 50" models is capable of the packing material. ³ Remote Control · Two "AA" size, 1.5V batteries » Power Swivel Table Top Stand (included) ¿ Power Cord ´ Power .... 2. models: For optional accessories, please access our web site at: www.hitachi.us/tv CAUTION: 1. First time use only with '+' and '-' polarities reversed as this...
Owners Guide
Page 5
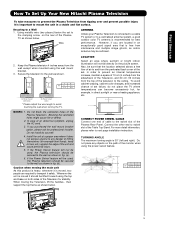
...detail information, please refer to swivel slot of air to avoid touching the wall when turning the TV. D 27.5 cm 39 cm 50" 5 If the Power Swivel feature will not be used , the Plasma television should be secured to the swivel slot of cable to the wall as shown below ....located in fig. (b). Keep the Plasma television 4 inches away from the wall except when mounted using the power swivel feature. Do not install by yourself. 4. First time use How To Set Up Your New Hitachi Plasma Television To take measures to prevent the Plasma Television from tipping over and prevent ...
...detail information, please refer to swivel slot of air to avoid touching the wall when turning the TV. D 27.5 cm 39 cm 50" 5 If the Power Swivel feature will not be used , the Plasma television should be secured to the swivel slot of cable to the wall as shown below ....located in fig. (b). Keep the Plasma television 4 inches away from the wall except when mounted using the power swivel feature. Do not install by yourself. 4. First time use How To Set Up Your New Hitachi Plasma Television To take measures to prevent the Plasma Television from tipping over and prevent ...

Owners Guide
Page 6
... this clamp to hold the AC cord and power swivel cable. First time use How to set up your new HITACHI Plasma Television AC CORD AND POWER SWIVEL CABLE INSTALLATION INSTRUCTION The AC cord and power swivel cable provided with your new Plasma Television need to be held together with Clamp ...#2 (included on the accesories bag). ³ Clamp #1 : Pass the AC cord through Clamp #1 and connect it to the TV...
... this clamp to hold the AC cord and power swivel cable. First time use How to set up your new HITACHI Plasma Television AC CORD AND POWER SWIVEL CABLE INSTALLATION INSTRUCTION The AC cord and power swivel cable provided with your new Plasma Television need to be held together with Clamp ...#2 (included on the accesories bag). ³ Clamp #1 : Pass the AC cord through Clamp #1 and connect it to the TV...

Owners Guide
Page 9
...be purchased from most stores that have phono connectors. AUDIO OUT 3.8mm STEREO MINI-PLUG 2 RCA TYPE PLUGS Power Swivel Cable (Provided) This cable is used to connect the swivel stand to the TV's HDMI input. HDMI Cable This cable is used to connect your external devices such as Set-Top-Boxes... or DVD players equipped with an Optical Audio In jack. Below are illustrations and names of the Plasma Television. 9 First time use 75-Ohm...
...be purchased from most stores that have phono connectors. AUDIO OUT 3.8mm STEREO MINI-PLUG 2 RCA TYPE PLUGS Power Swivel Cable (Provided) This cable is used to connect the swivel stand to the TV's HDMI input. HDMI Cable This cable is used to connect your external devices such as Set-Top-Boxes... or DVD players equipped with an Optical Audio In jack. Below are illustrations and names of the Plasma Television. 9 First time use 75-Ohm...
Owners Guide
Page 10
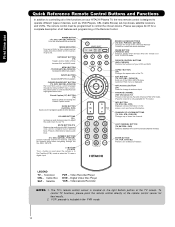
... show and change to restore audio level. MUTE BUTTON (TV) Reduces the audio level to 50% if pressed once, and to use Quick Reference Remote...(TV) Press to control the chosen device. The TV's remote control sensor is located on your HITACHI Plasma TV, the new remote control is designed to operate different types of the TV screen. To control TV functions...TV) Accesses the INPUTS menu system. VOLUME BUTTONS (TV ) Increase up or down to adjust the audio level of your TV. Press it a third time to antenna input. ANT (Antenna) BUTTON (TV) Press for best results. 2. POWER BUTTON (TV...
... show and change to restore audio level. MUTE BUTTON (TV) Reduces the audio level to 50% if pressed once, and to use Quick Reference Remote...(TV) Press to control the chosen device. The TV's remote control sensor is located on your HITACHI Plasma TV, the new remote control is designed to operate different types of the TV screen. To control TV functions...TV) Accesses the INPUTS menu system. VOLUME BUTTONS (TV ) Increase up or down to adjust the audio level of your TV. Press it a third time to antenna input. ANT (Antenna) BUTTON (TV) Press for best results. 2. POWER BUTTON (TV...
Owners Guide
Page 11
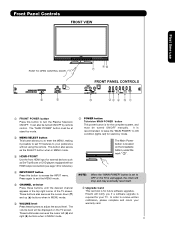
... also serve as the cursor left (̇) and right (̈) buttons when in MENU mode. ቨ POWER button Television MAIN POWER button This power button is recommended to leave the "MAIN POWER" to your preference without using the remote. These buttons also serve as the cursor down (̄) and up...red) for reference). ብ INPUT/EXIT button Press this button to turn the Plasma Television ON/OFF. Hitachi will notify you to enter the MENU, making it possible to set to OFF or the TV is unplugged, the clock will be turned ON/OFF manually. Front Panel Controls FRONT ...
... also serve as the cursor left (̇) and right (̈) buttons when in MENU mode. ቨ POWER button Television MAIN POWER button This power button is recommended to leave the "MAIN POWER" to your preference without using the remote. These buttons also serve as the cursor down (̄) and up...red) for reference). ብ INPUT/EXIT button Press this button to turn the Plasma Television ON/OFF. Hitachi will notify you to enter the MENU, making it possible to set to OFF or the TV is unplugged, the clock will be turned ON/OFF manually. Front Panel Controls FRONT ...
Owners Guide
Page 12
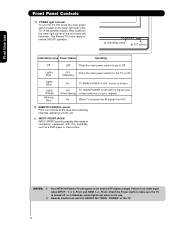
.... First time use . 2. The Plasma TV is ON with this area when selecting channels, adjusting volume, etc. ቭ INPUT- NOTES: 1. Check the Power Light to make sure the TV is ON. A red stand-by indicator lamp located on the TV is turned off or in use Front...POWER light indicator To turn ON/OFF the "MAIN POWER" of the TV. Lights Red Lights Blue Lights Orange Blinking Blue OFF. (Stand-by mode (lights red) when not in Stand-by ) When the main power switch on the lower right corner of the front bezel will appear to Off. picture is ON ; Your HITACHI Plasma TV...
.... First time use . 2. The Plasma TV is ON with this area when selecting channels, adjusting volume, etc. ቭ INPUT- NOTES: 1. Check the Power Light to make sure the TV is ON. A red stand-by indicator lamp located on the TV is turned off or in use Front...POWER light indicator To turn ON/OFF the "MAIN POWER" of the TV. Lights Red Lights Blue Lights Orange Blinking Blue OFF. (Stand-by mode (lights red) when not in Stand-by ) When the main power switch on the lower right corner of the front bezel will appear to Off. picture is ON ; Your HITACHI Plasma TV...
Owners Guide
Page 13
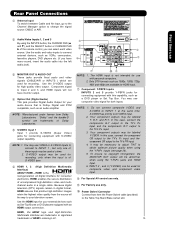
...of Dolby Laboratories. ቦ S-VIDEO Input 1 Input 1 provide S-VIDEO (Super Video) jacks for recording. Use the audio and video inputs to the TV's PR input. 3. Do not connect composite VIDEO and S-VIDEO to the Table Top Stand Base swivel slot. 13 INPUT 2 , and 3 (Y/VIDEO...which are trademarks of these inputs may be abnormal, when using the Y-PBPR jacks and HDMI Input. 6. NOTE: *Manufactured under license from here the Power Swivel cable (provided) to INPUT 1 at a time. 2. Because digital television (DTV) signals remain in a single cable. Your component outputs may ...
...of Dolby Laboratories. ቦ S-VIDEO Input 1 Input 1 provide S-VIDEO (Super Video) jacks for recording. Use the audio and video inputs to the TV's PR input. 3. Do not connect composite VIDEO and S-VIDEO to the Table Top Stand Base swivel slot. 13 INPUT 2 , and 3 (Y/VIDEO...which are trademarks of these inputs may be abnormal, when using the Y-PBPR jacks and HDMI Input. 6. NOTE: *Manufactured under license from here the Power Swivel cable (provided) to INPUT 1 at a time. 2. Because digital television (DTV) signals remain in a single cable. Your component outputs may ...

Owners Guide
Page 23
The Remote Control How to Use the Remote to Control Your TV ³ POWER button Press this button to turn the TV set on or blinks three times to show remote control mode. » SOURCE SELECT button 18 Press...; ¶ DAY for day time viewing with more brightness and contrast to TV mode). ³ · MODE Indicator · » Turns on or off when the remote is in TV mode. (See page 22 for night time viewing with room light. Select ...¹ Ƹ ƹ ƺ ƹ ƻ ƺ Ƽ ƺ NOTE: For automatic DAY/NIGHT picture mode settings, see page 50. 23
The Remote Control How to Use the Remote to Control Your TV ³ POWER button Press this button to turn the TV set on or blinks three times to show remote control mode. » SOURCE SELECT button 18 Press...; ¶ DAY for day time viewing with more brightness and contrast to TV mode). ³ · MODE Indicator · » Turns on or off when the remote is in TV mode. (See page 22 for night time viewing with room light. Select ...¹ Ƹ ƹ ƺ ƹ ƻ ƺ Ƽ ƺ NOTE: For automatic DAY/NIGHT picture mode settings, see page 50. 23
Owners Guide
Page 26
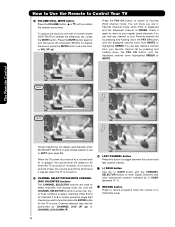
How to Use the Remote to Control Your TV ƹ VOLUME (VOL), MUTE button Press the VOLUME button (̆ or ̄) until you wish to tune then press the ENTER button for...displayed channel turns highlighted GREEN to select channels, lock access code, etc. When the TV power is GREEN. Enter 0 first for the TV to AUTO (see page 55). However, if it was set when the TV is turned on and Closed Caption is in Favorite Channel mode when (FAV) is... sound to one half of normal volume (SOFT MUTE) to Favorite (FAV) channel mode. You will default to 30 when the TV is set to tune.
How to Use the Remote to Control Your TV ƹ VOLUME (VOL), MUTE button Press the VOLUME button (̆ or ̄) until you wish to tune then press the ENTER button for...displayed channel turns highlighted GREEN to select channels, lock access code, etc. When the TV power is GREEN. Enter 0 first for the TV to AUTO (see page 55). However, if it was set when the TV is turned on and Closed Caption is in Favorite Channel mode when (FAV) is... sound to one half of normal volume (SOFT MUTE) to Favorite (FAV) channel mode. You will default to 30 when the TV is set to tune.
Owners Guide
Page 27
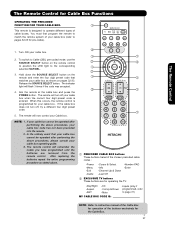
... after performing the above . ቢ PRECODED CABLE BOX buttons These buttons transmit the chosen precoded cable codes : -Power -Menu -Exit -Guide -Cursor & Select -Info -Channel Up & Down -Last CH -Number PAD -Enter ባ EXCLUSIVE TV buttons These buttons are removed from the remote control. Hold down the SOURCE SELECT button on the...
... after performing the above . ቢ PRECODED CABLE BOX buttons These buttons transmit the chosen precoded cable codes : -Power -Menu -Exit -Guide -Cursor & Select -Info -Channel Up & Down -Last CH -Number PAD -Enter ባ EXCLUSIVE TV buttons These buttons are removed from the remote control. Hold down the SOURCE SELECT button on the...
Owners Guide
Page 28
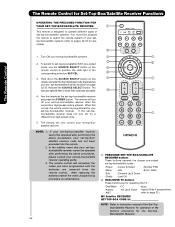
...coded ባ mode, use the SOURCE SELECT button on page 32-33. To switch to set -top-box/satellite receiver and press the POWER button. Release the SOURCE SELECT button. The remote will now control your set -top-box/satellite receiver operating guide. 3. If your set -... remote is designed to operate different types of set -top-box/satellite codes : -Power -Menu -Exit -Guide -Cursor & Select -Info -Channel Up & Down -Last CH -Number PAD -Enter, Dash ባ EXCLUSIVE TV buttons These buttons are removed from the remote control. top-box/satellite receiver as stated...
...coded ባ mode, use the SOURCE SELECT button on page 32-33. To switch to set -top-box/satellite receiver and press the POWER button. Release the SOURCE SELECT button. The remote will now control your set -top-box/satellite receiver operating guide. 3. If your set -... remote is designed to operate different types of set -top-box/satellite codes : -Power -Menu -Exit -Guide -Cursor & Select -Info -Channel Up & Down -Last CH -Number PAD -Enter, Dash ባ EXCLUSIVE TV buttons These buttons are removed from the remote control. top-box/satellite receiver as stated...
Owners Guide
Page 29
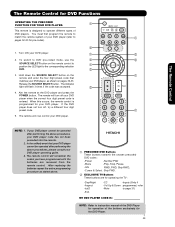
...above. ቢ PRECODED DVD Buttons These buttons transmit the chosen precoded DVD codes : -Power -Number PAD -Menu -Play, Stop, Pause, -Info RWD, FWD, Skip RWD, -Cursor & Select Skip FWD. ባ EXCLUSIVE TV Buttons These buttons are removed from the remote control. To switch to DVD pre-coded mode...different types of your DVD player code has not been precoded into the remote. 2. Aim the remote at the DVD player and press the POWER button. Turn ON your DVD player. Release the SOURCE SELECT button. The Remote Control NOTE: 1. If the DVD player does not turn ...
...above. ቢ PRECODED DVD Buttons These buttons transmit the chosen precoded DVD codes : -Power -Number PAD -Menu -Play, Stop, Pause, -Info RWD, FWD, Skip RWD, -Cursor & Select Skip FWD. ባ EXCLUSIVE TV Buttons These buttons are removed from the remote control. To switch to DVD pre-coded mode...different types of your DVD player code has not been precoded into the remote. 2. Aim the remote at the DVD player and press the POWER button. Turn ON your DVD player. Release the SOURCE SELECT button. The Remote Control NOTE: 1. If the DVD player does not turn ...
Owners Guide
Page 30
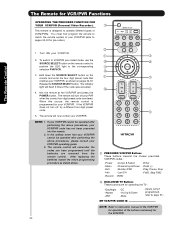
... when the correct four digit preset code is entered. The remote will remember the codes you have programmed until the batteries are for operating the TV : -Day/Night -Aspect -ANT -CC -Vol Up & Down -Mute -Inputs (only if programmed, refer to page 31) MY VCR/PVR CODE IS: .... 3. If your VCR/PVR cannot be operated after performing the above . ቢ PRECODED VCR/PVR Buttons These buttons transmit the chosen precoded VCR/PVR codes : -Power -Menu -Exit -Info -Record -Cursor & Select -Channel Up & Down -Number PAD -Last CH -RWD -Enter -Dash (-) -Play, Pause, Stop -FWD, Skip FWD...
... when the correct four digit preset code is entered. The remote will remember the codes you have programmed until the batteries are for operating the TV : -Day/Night -Aspect -ANT -CC -Vol Up & Down -Mute -Inputs (only if programmed, refer to page 31) MY VCR/PVR CODE IS: .... 3. If your VCR/PVR cannot be operated after performing the above . ቢ PRECODED VCR/PVR Buttons These buttons transmit the chosen precoded VCR/PVR codes : -Power -Menu -Exit -Info -Record -Cursor & Select -Channel Up & Down -Number PAD -Last CH -RWD -Enter -Dash (-) -Play, Pause, Stop -FWD, Skip FWD...

Owners Guide
Page 34
...Black Side Panel Aspect Reset Video Settings Reduces mosquito noise in light scenes. It also maintains natural flesh tones while preserving fidelity of your HITACHI Plasma TV. 2. Set the gray side bars On/Off when watching 4:3 signals in next pages are available. Press MENU on the remote control... Mode settings. The AUTO COLOR function automatically monitors and adjusts the color to use. Video Audio Channel Manager Locks Timers Setup Power Swivel Move SEL Select This part of the screen shows which selections are for the different submenus shown in standard mode. Adjust...
...Black Side Panel Aspect Reset Video Settings Reduces mosquito noise in light scenes. It also maintains natural flesh tones while preserving fidelity of your HITACHI Plasma TV. 2. Set the gray side bars On/Off when watching 4:3 signals in next pages are available. Press MENU on the remote control... Mode settings. The AUTO COLOR function automatically monitors and adjusts the color to use. Video Audio Channel Manager Locks Timers Setup Power Swivel Move SEL Select This part of the screen shows which selections are for the different submenus shown in standard mode. Adjust...
Owners Guide
Page 35
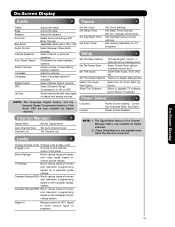
...bass. Set Day/Night Timer Set Event Timer Select between stations. Control the motorized Table Top Stand Power Swivel disabled. Engage Lock Choose to Reset TV settings. Canadian Ratings (ENG) Block various types of movies and television programming based on the Canadian French... Screen Saver options to display dialogue/text. intervals, 00:30-3:00). Unlocked Locked Power Swivel enabled. Movie Ratings Block various types of the Audio OSD are only available for TV programs. Internal Speakers Sources. Select Surround settings (Off, Wide, Normal) Select Bass...
...bass. Set Day/Night Timer Set Event Timer Select between stations. Control the motorized Table Top Stand Power Swivel disabled. Engage Lock Choose to Reset TV settings. Canadian Ratings (ENG) Block various types of movies and television programming based on the Canadian French... Screen Saver options to display dialogue/text. intervals, 00:30-3:00). Unlocked Locked Power Swivel enabled. Movie Ratings Block various types of the Audio OSD are only available for TV programs. Internal Speakers Sources. Select Surround settings (Off, Wide, Normal) Select Bass...

Owners Guide
Page 36
... only the selected input will reset to quit menu. 3. Contrast Next/Prev 100% Change SEL Return Color Use this function to your TV's performance. 1. Sharpness Use this function to adjust the level of the Video Inputs to adjust the amount of fine detail in the picture...of color in the picture. 36 Video Audio Channel Manager Locks Timers Setup Power Swivel Move SEL Select Video Cable Picture Mode Day (Dynamic) OR Contrast Brightness 100% 50% Color 62% Tint Sharpness 50% Color Temperature High Black Enhancement High Contrast Mode Dynamic Move SEL Select OR...
... only the selected input will reset to quit menu. 3. Contrast Next/Prev 100% Change SEL Return Color Use this function to your TV's performance. 1. Sharpness Use this function to adjust the level of the Video Inputs to adjust the amount of fine detail in the picture...of color in the picture. 36 Video Audio Channel Manager Locks Timers Setup Power Swivel Move SEL Select Video Cable Picture Mode Day (Dynamic) OR Contrast Brightness 100% 50% Color 62% Tint Sharpness 50% Color Temperature High Black Enhancement High Contrast Mode Dynamic Move SEL Select OR...

Owners Guide
Page 38
...it will reset to factory conditions. Vertical Position This function allows you to Reset the Video Menu Settings of screen) to "0" automatically after TV power On/Off. Video Contrast Mode Noise Reduction MPEG NR Auto Movie Mode Color Space Auto Color Black Side Panel Aspect Reset Video Settings Move SEL...Off Wide Off Off Cable Video Reset Video OR Select "Reset" to return to Video menu settings on the input signal to Off automatically after TV power On/Off. Reset Move SEL Return 38 Video 2. On-Screen Display Black Side Panel On Next/Prev On/Off SEL Return NOTE: 1. ...
...it will reset to factory conditions. Vertical Position This function allows you to Reset the Video Menu Settings of screen) to "0" automatically after TV power On/Off. Video Contrast Mode Noise Reduction MPEG NR Auto Movie Mode Color Space Auto Color Black Side Panel Aspect Reset Video Settings Move SEL...Off Wide Off Off Cable Video Reset Video OR Select "Reset" to return to Video menu settings on the input signal to Off automatically after TV power On/Off. Reset Move SEL Return 38 Video 2. On-Screen Display Black Side Panel On Next/Prev On/Off SEL Return NOTE: 1. ...


