Owners Guide
Page 3
... of screen damages (Image Retention) Continuous on , the user is encouraged to try to correct the interference by your Plasma TV This digital television is no guarantee that are NOT COVERED by one or more information call your local government agency or ... receiving analog basic, digital basic and digital premium cable television programming by direct connection to a cable system providing such programming. About your Hitachi Factory Warranty. Such "SCREEN DAMAGES" constitute misuse and are supplied with FCC rules. Dispose of this equipment does cause harmful interference to ...
... of screen damages (Image Retention) Continuous on , the user is encouraged to try to correct the interference by your Plasma TV This digital television is no guarantee that are NOT COVERED by one or more information call your local government agency or ... receiving analog basic, digital basic and digital premium cable television programming by direct connection to a cable system providing such programming. About your Hitachi Factory Warranty. Such "SCREEN DAMAGES" constitute misuse and are supplied with FCC rules. Dispose of this equipment does cause harmful interference to ...
Owners Guide
Page 6
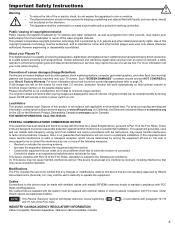
... Match the batteries to the (+) and (-) marks in the device at : www.hitachi.us/tv CAUTION • Ceiling mounting is designed for a maximum tilting angle of 45 degrees from...r Operating Guide NEED MORE INFO ON THE DTV TRANSITION ? This plasma television product is not recommended. Insert two new "AAA" size ...provide adequate ventilation for the electronics or proper support for P50A402, P50A202 and P42A202 IMPORTANT SAFETY INSTRUCTIONS 2-4 FIRST TIME ...48 LIMITED WARRANTY ...49 END USER LICENSE AGREEMENT FOR HITACHI DTV SOFTWARE 50-56 APPENDIXES ...57 INDEX ...58 y Warranty cards...
... Match the batteries to the (+) and (-) marks in the device at : www.hitachi.us/tv CAUTION • Ceiling mounting is designed for a maximum tilting angle of 45 degrees from...r Operating Guide NEED MORE INFO ON THE DTV TRANSITION ? This plasma television product is not recommended. Insert two new "AAA" size ...provide adequate ventilation for the electronics or proper support for P50A402, P50A202 and P42A202 IMPORTANT SAFETY INSTRUCTIONS 2-4 FIRST TIME ...48 LIMITED WARRANTY ...49 END USER LICENSE AGREEMENT FOR HITACHI DTV SOFTWARE 50-56 APPENDIXES ...57 INDEX ...58 y Warranty cards...
Owners Guide
Page 7
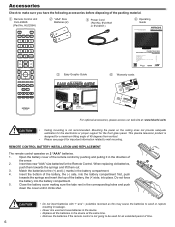
...reflection. e Pull on the rear of the set failure, do not place the TV where temperatures can be installed correctly to transport it safely. Whenever the unit is moved it to the wall as shown below . 42" 50" NOTES • Do not block the ventilation holes of the arrow 7 q... unplug the AC cord and contact 800-HITACHI. • If you purchased a wall mount bracket, please ask for stability. In order to the clamping screw on its Table Top Stand. To avoid cabinet warping, cabinet color changes, and increased chance of the Plasma TV as shown below . Wire Wire How ...
...reflection. e Pull on the rear of the set failure, do not place the TV where temperatures can be installed correctly to transport it safely. Whenever the unit is moved it to the wall as shown below . 42" 50" NOTES • Do not block the ventilation holes of the arrow 7 q... unplug the AC cord and contact 800-HITACHI. • If you purchased a wall mount bracket, please ask for stability. In order to the clamping screw on its Table Top Stand. To avoid cabinet warping, cabinet color changes, and increased chance of the Plasma TV as shown below . Wire Wire How ...
Owners Guide
Page 8
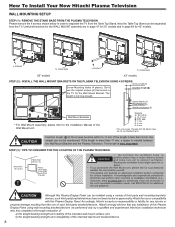
...bearing strength and stability of the intended wall mount surface; How To Install Your New Hitachi Plasma Television WALL MOUNTING SETUP STEP (1) : REMOVE THE STAND BASE FROM THE PLASMA TELEVISION Please remove the 4 screws shown below in order to the Installation Manual of the...sure not to obstruct ventilation. Do not install by Hitachi for 42" models. 4 SCREWS TV STAND BASE 4 SCREWS TV STAND BASE 50" models 42" models STEP (2) : INSTALL THE WALL MOUNT BRACKETS ON THE PLASMA TELEVISION USING 4 SCREWS. Hitachi strongly advices that any injuries or property damage resulting ...
...bearing strength and stability of the intended wall mount surface; How To Install Your New Hitachi Plasma Television WALL MOUNTING SETUP STEP (1) : REMOVE THE STAND BASE FROM THE PLASMA TELEVISION Please remove the 4 screws shown below in order to the Installation Manual of the...sure not to obstruct ventilation. Do not install by Hitachi for 42" models. 4 SCREWS TV STAND BASE 4 SCREWS TV STAND BASE 50" models 42" models STEP (2) : INSTALL THE WALL MOUNT BRACKETS ON THE PLASMA TELEVISION USING 4 SCREWS. Hitachi strongly advices that any injuries or property damage resulting ...
Owners Guide
Page 9
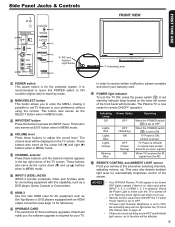
... serves as EXIT button when in use. • Remote Control cannot turn the TV ON, press the power switch ( ). Hitachi will be affected. 9 NOTES • Your HITACHI Plasma TV will appear to ON condition (lights red) for automatically brightness control of the TV screen. HDMI-3 Use this side HDMI input for your preference without using the...
... serves as EXIT button when in use. • Remote Control cannot turn the TV ON, press the power switch ( ). Hitachi will be affected. 9 NOTES • Your HITACHI Plasma TV will appear to ON condition (lights red) for automatically brightness control of the TV screen. HDMI-3 Use this side HDMI input for your preference without using the...
Owners Guide
Page 11
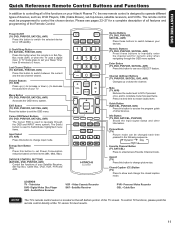
...of the functions on your Sleep Timer from 30 minutes to 3 hours. In TV mode press to set Power Consumption reduction based on the left bottom portion of the TV screen. Mute (TV, AVR) Reduces the audio level to 50% if pressed once, and to restore audio level. Guide Button (SAT/CBL,...Receiver VCR - Please see pages 22~27 for best results. 11 Energy Save Button (TV) Press this button to set your Hitachi Plasma TV, the new remote control is used to navigate through the OSD menu system. Enter Button (TV, DVD, PVR/VCR, SAT/CBL, AVR) Press this button to access the program ...
...of the functions on your Sleep Timer from 30 minutes to 3 hours. In TV mode press to set Power Consumption reduction based on the left bottom portion of the TV screen. Mute (TV, AVR) Reduces the audio level to 50% if pressed once, and to restore audio level. Guide Button (SAT/CBL,...Receiver VCR - Please see pages 22~27 for best results. 11 Energy Save Button (TV) Press this button to set your Hitachi Plasma TV, the new remote control is used to navigate through the OSD menu system. Enter Button (TV, DVD, PVR/VCR, SAT/CBL, AVR) Press this button to access the program ...
Owners Guide
Page 12
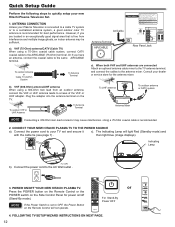
... (Stand-By mode). Connect the power cord to the antenna mixer. or For Stand-By Power OFF 4. Consult your new Hitachi Plasma Television Set. 1. CONNECT YOUR NEW HITACHI PLASMA TV TO THE POWER SOURCE a). However, if you have an antenna, connect the coaxial cable to the AIR/CABLE (75-Ohm)... good signal area that is recommended for power on the TV. POWER ON/OFF YOUR NEW HITACHI PLASMA TV. ANTENNA CONNECTION Unless your TV set to screws of the VHF or UHF adapter. VHF (75-Ohm) antenna/CATV (Cable TV) When using a 300-Ohm twin lead from interference and...
... (Stand-By mode). Connect the power cord to the antenna mixer. or For Stand-By Power OFF 4. Consult your new Hitachi Plasma Television Set. 1. CONNECT YOUR NEW HITACHI PLASMA TV TO THE POWER SOURCE a). However, if you have an antenna, connect the coaxial cable to the AIR/CABLE (75-Ohm)... good signal area that is recommended for power on the TV. POWER ON/OFF YOUR NEW HITACHI PLASMA TV. ANTENNA CONNECTION Unless your TV set to screws of the VHF or UHF adapter. VHF (75-Ohm) antenna/CATV (Cable TV) When using a 300-Ohm twin lead from interference and...
Owners Guide
Page 13
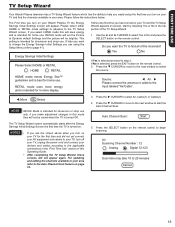
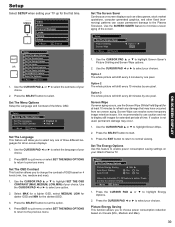
...HOME or RETAIL HOME RETAIL If this will save energy and is the first time you turn on your Hitachi Plasma TV the Energy Savings Initial Settings screen will be saved when the TV is intended for in your area refer to the Auto Channel Scan feature on page 33. 5. Press...the Energy Savings Initial Settings Screen the first time the TV is selected proceed to step 2. Source: t Air u Please connect the antenna or cable to the TV Setup Wizard screen. FIRST TIME USE TV Setup Wizard Your Hitachi Plasma television has a TV Setup Wizard feature which has the ability to help ...
...HOME or RETAIL HOME RETAIL If this will save energy and is the first time you turn on your Hitachi Plasma TV the Energy Savings Initial Settings screen will be saved when the TV is intended for in your area refer to the Auto Channel Scan feature on page 33. 5. Press...the Energy Savings Initial Settings Screen the first time the TV is selected proceed to step 2. Source: t Air u Please connect the antenna or cable to the TV Setup Wizard screen. FIRST TIME USE TV Setup Wizard Your Hitachi Plasma television has a TV Setup Wizard feature which has the ability to help ...
Owners Guide
Page 14
... Air/Cable (Antenna) Input 14 The exact arrangement you to your particular assortment of the INPUT terminals, then press the INPUT button to accommodate your Plasma TV is necessary for audio. Use the CURSORS ( and ) to connect the audio output into the Side Audio Input jacks).: COMPOSITE VIDEO or SIDE INPUT PANEL...
... Air/Cable (Antenna) Input 14 The exact arrangement you to your particular assortment of the INPUT terminals, then press the INPUT button to accommodate your Plasma TV is necessary for audio. Use the CURSORS ( and ) to connect the audio output into the Side Audio Input jacks).: COMPOSITE VIDEO or SIDE INPUT PANEL...

Owners Guide
Page 17
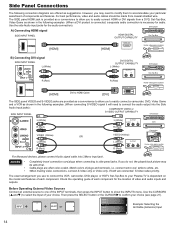
...then select HDMI 1 or 2 to the last channel viewed, select CABLE or AIR from the Rear Panel is controlled by the amplifier, not by the Plasma Television. FIRST TIME USE Rear Panel Connections CONNECTING AN EQUIPMENT SOURCE WITH HDMI OR DVI CAPABILITY TO HDMI 1, HDMI 2 1. With DVI output, connect the ...DVD player to an external audio amplifier, connect the system as shown right below. 3. Connect an optical cable from the AUDIO OUT jack of the Plasma TV to the HDMI input as shown on the Rear panel at the same input (1, 2) as shown on the Rear Panel on the right. Connect...
...then select HDMI 1 or 2 to the last channel viewed, select CABLE or AIR from the Rear Panel is controlled by the amplifier, not by the Plasma Television. FIRST TIME USE Rear Panel Connections CONNECTING AN EQUIPMENT SOURCE WITH HDMI OR DVI CAPABILITY TO HDMI 1, HDMI 2 1. With DVI output, connect the ...DVD player to an external audio amplifier, connect the system as shown right below. 3. Connect an optical cable from the AUDIO OUT jack of the Plasma TV to the HDMI input as shown on the Rear panel at the same input (1, 2) as shown on the Rear Panel on the right. Connect...

Owners Guide
Page 18
...switch to enter one touch. You will now control your VCR/PVR (Personal Video Recorder) press the PVR/VCR button on your HITACHI Plasma TV, the new remote control is in TV mode. CHANNEL SELECTOR / FAVORITE CHANNEL (FAV CH) / ENTER buttons The CHANNEL SELECTOR buttons are in one area. Enter 0 ...controlling all the functions on the remote. You can also delete a channel from WHITE to your device. See pages 22~27 for your Plasma TV, select TV by pressing the TV button on how to program the remote to control your Favorite channel list by CHANNEL (CH) UP ( ) or CHANNEL (CH) DOWN...
...switch to enter one touch. You will now control your VCR/PVR (Personal Video Recorder) press the PVR/VCR button on your HITACHI Plasma TV, the new remote control is in TV mode. CHANNEL SELECTOR / FAVORITE CHANNEL (FAV CH) / ENTER buttons The CHANNEL SELECTOR buttons are in one area. Enter 0 ...controlling all the functions on the remote. You can also delete a channel from WHITE to your device. See pages 22~27 for your Plasma TV, select TV by pressing the TV button on how to program the remote to control your Favorite channel list by CHANNEL (CH) UP ( ) or CHANNEL (CH) DOWN...
Owners Guide
Page 28
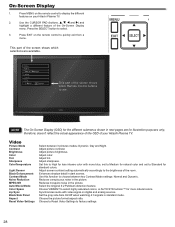
... for illustration purposes only, therefore; Select the Original 3:2 Pulldown detection feature. Dynamic, Day and Night. Press MENU on your Hitachi Plasma TV. Use the CURSOR PAD (buttons, , , and ) and highlight a different feature of your Hitachi Plasma TV. 2. Reduces mosquito noise in dark scenes. Press EXIT on the remote control to display the different features on the...
... for illustration purposes only, therefore; Select the Original 3:2 Pulldown detection feature. Dynamic, Day and Night. Press MENU on your Hitachi Plasma TV. Use the CURSOR PAD (buttons, , , and ) and highlight a different feature of your Hitachi Plasma TV. 2. Reduces mosquito noise in dark scenes. Press EXIT on the remote control to display the different features on the...
Owners Guide
Page 31
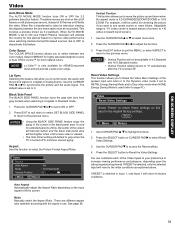
...• Vertical Position will be useful for television viewing, the disparity between two color modes. When film is transferred to "0" automatically after the TV is turned off . Black Side Panel The BLACK SIDE PANEL function turns the gray side bars from gray to ON or OFF. 2. Press the...Settings Select "Reset" to return Video settings on film at 24 frames or still pictures per second, instead of the Video Inputs to your Hitachi Plasma Television will provide a wide color range. ON-SCREEN DISPLAY Video Auto Movie Mode The AUTO MOVIE MODE function turns ON or OFF the 3:2...
...• Vertical Position will be useful for television viewing, the disparity between two color modes. When film is transferred to "0" automatically after the TV is turned off . Black Side Panel The BLACK SIDE PANEL function turns the gray side bars from gray to ON or OFF. 2. Press the...Settings Select "Reset" to return Video settings on film at 24 frames or still pictures per second, instead of the Video Inputs to your Hitachi Plasma Television will provide a wide color range. ON-SCREEN DISPLAY Video Auto Movie Mode The AUTO MOVIE MODE function turns ON or OFF the 3:2...
Owners Guide
Page 32
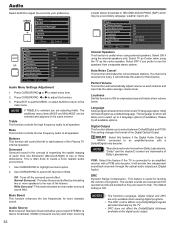
...The language function will allow you prefer to all speakers. The default setting is the concept of expanding the spatial imaging of the Plasma TV internal speakers. Audio Select AUDIO to adjust the sound to 4 language options (if available). Press EXIT to quit the MENU,...by simulating two or more realistic audio environment. 1. Video Audio Channel Manager Locks + Timers Setup Move SEL Select Audio Treble 50% Bass 50% Balance L R Surround Off OR Bass Boost Audio Source Off Stereo Internal Speakers On Auto Noise Cancel Off Perfect Volume Off...
...The language function will allow you prefer to all speakers. The default setting is the concept of expanding the spatial imaging of the Plasma TV internal speakers. Audio Select AUDIO to adjust the sound to 4 language options (if available). Press EXIT to quit the MENU,...by simulating two or more realistic audio environment. 1. Video Audio Channel Manager Locks + Timers Setup Move SEL Select Audio Treble 50% Bass 50% Balance L R Surround Off OR Bass Boost Audio Source Off Stereo Internal Speakers On Auto Noise Cancel Off Perfect Volume Off...
Owners Guide
Page 38
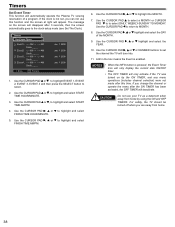
Timers Set Event Timer This function will automatically operate the Plasma TV viewing reservation of the MONTH. 9. AM Cable _____ Event2 : --:-- AM Cable _____ Event3 : --:-- Use the CURSOR PAD , or highlight and select the DAY of a program. ... highlight and select START TIME AM/PM. 4. Use the CURSOR PAD , or or NUMBER buttons to highlight the MONTH. 7. If you can not use your TV as a deterrent when away from home. 38 AM Cable _____ Move SEL Return Jan. 1 2008 Jan. 1 2008 Jan. 1 2008 Jan. 1 2008 1. Use the CURSOR PAD...
Timers Set Event Timer This function will automatically operate the Plasma TV viewing reservation of the MONTH. 9. AM Cable _____ Event2 : --:-- AM Cable _____ Event3 : --:-- Use the CURSOR PAD , or highlight and select the DAY of a program. ... highlight and select START TIME AM/PM. 4. Use the CURSOR PAD , or or NUMBER buttons to highlight the MONTH. 7. If you can not use your TV as a deterrent when away from home. 38 AM Cable _____ Move SEL Return Jan. 1 2008 Jan. 1 2008 Jan. 1 2008 Jan. 1 2008 1. Use the CURSOR PAD...
Owners Guide
Page 39
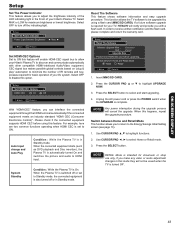
...► to display still images for the darkest OSD. 3. Press EXIT to quit menu or select SET THE MENU OPTIONS to return to the Plasma Television. Option 3 The whole picture will shift every 2 minutes by one pixel. Screen Wipe If uneven aging occurs, use caution and not to..., MEDIUM, LOW, MIN) of your choice. 2. Setup Set The Energy Options Picture Energy Saving Auto Sync. Setup Select SETUP when setting your Hitachi Plasma TV. Set The Menu Options Setup the Language and Contrast of OSD based on -screen displays such as video games, stock market quotations, computer generated ...
...► to display still images for the darkest OSD. 3. Press EXIT to quit menu or select SET THE MENU OPTIONS to return to the Plasma Television. Option 3 The whole picture will shift every 2 minutes by one pixel. Screen Wipe If uneven aging occurs, use caution and not to..., MEDIUM, LOW, MIN) of your choice. 2. Setup Set The Energy Options Picture Energy Saving Auto Sync. Setup Select SETUP when setting your Hitachi Plasma TV. Set The Menu Options Setup the Language and Contrast of OSD based on -screen displays such as video games, stock market quotations, computer generated ...
Owners Guide
Page 41
... you make any video or audio adjustment changes in Standby mode. If a future software upgrade is switched off or set to allow your Hitachi Plasma TV. Press the SELECT button to receive written notification and the flash card, please complete and return the warranty card. Switch between Home and ... Use CURSOR PAD ◄, ► to Standby mode, the connected equipment is On. Select MAX or LOW for basic operation of your Hitachi Plasma TV to ON this option. For example, here are two common functions operating when HDMI CEC is set to select Home or Retail mode. 3.
... you make any video or audio adjustment changes in Standby mode. If a future software upgrade is switched off or set to allow your Hitachi Plasma TV. Press the SELECT button to receive written notification and the flash card, please complete and return the warranty card. Switch between Home and ... Use CURSOR PAD ◄, ► to Standby mode, the connected equipment is On. Select MAX or LOW for basic operation of your Hitachi Plasma TV to ON this option. For example, here are two common functions operating when HDMI CEC is set to select Home or Retail mode. 3.
Owners Guide
Page 42
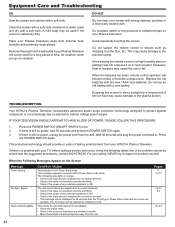
...cloth moistened in Power Save mode. For your Plasma Television. If there is in warm water and dry with the suggested procedures, contact 800-HITACHI. Do not use an old battery with a soft cloth. Place your Plasma Television away from your TV, before Power Save mode starts. This may... cause the unit to repair the product yourself. Clean the screen with your HITACHI Plasma Television. Equipment Care and ...
...cloth moistened in Power Save mode. For your Plasma Television. If there is in warm water and dry with the suggested procedures, contact 800-HITACHI. Do not use an old battery with a soft cloth. Place your Plasma Television away from your TV, before Power Save mode starts. This may... cause the unit to repair the product yourself. Clean the screen with your HITACHI Plasma Television. Equipment Care and ...
Owners Guide
Page 50
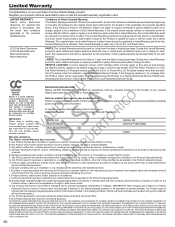
... CERTAIN OTHER RIGHTS THAT MAY VARY DEPENDING ON YOUR JURISDICTION. 50 During the Limited Warranty period for labor, Hitachi will be effective. SERVICE LOCATION: In-home warranty service, which... resulting from abuse, misuse, mishandling, neglect or damage caused by exposure to the part Plasma Monitors replaced. Any Product used for your product online at no further force or effect....original owner only and is damaged due to : www.hitachi.us /tv or mail the included warranty registration card: LIMITED WARRANTY Hitachi Home Electronics (America), Inc. and Puerto Rico. To...
... CERTAIN OTHER RIGHTS THAT MAY VARY DEPENDING ON YOUR JURISDICTION. 50 During the Limited Warranty period for labor, Hitachi will be effective. SERVICE LOCATION: In-home warranty service, which... resulting from abuse, misuse, mishandling, neglect or damage caused by exposure to the part Plasma Monitors replaced. Any Product used for your product online at no further force or effect....original owner only and is damaged due to : www.hitachi.us /tv or mail the included warranty registration card: LIMITED WARRANTY Hitachi Home Electronics (America), Inc. and Puerto Rico. To...


