Instruction Manual
Page 3
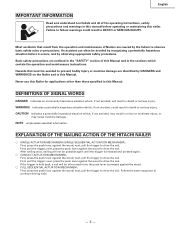
... caused by the failure to drive the nail. Most accidents that must be possible again until the trigger is pressed against the wood. ⅜ FULL SEQUENTIAL ACTUATION MECHANISM : First, press the push lever against the wood; Hazards that result from the operation and maintenance of Nailers are outlined in the "SAFETY" section of the operating instructions, safety precautions and warnings in this...
... caused by the failure to drive the nail. Most accidents that must be possible again until the trigger is pressed against the wood. ⅜ FULL SEQUENTIAL ACTUATION MECHANISM : First, press the push lever against the wood; Hazards that result from the operation and maintenance of Nailers are outlined in the "SAFETY" section of the operating instructions, safety precautions and warnings in this...

Instruction Manual
Page 4
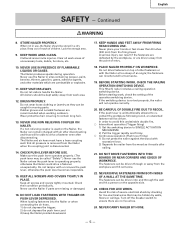
... wear head protection to severe injuries. Use of safety glasses by the handle only. 5. Always assume the Nailer contains fasteners. If fasteners are mistakenly driven, it contains fasteners or not. Never carry the Nailer with the Nailer. EXPLOSION MAY OCCUR. WARNING 3. OPERATORS AND OTHERS IN WORK AREA MUST WEAR SAFETY GLASSES WITH SIDE SHIELDS. KEEP FINGERS AWAY FROM TRIGGER WHEN NOT DRIVING...
... wear head protection to severe injuries. Use of safety glasses by the handle only. 5. Always assume the Nailer contains fasteners. If fasteners are mistakenly driven, it contains fasteners or not. Never carry the Nailer with the Nailer. EXPLOSION MAY OCCUR. WARNING 3. OPERATORS AND OTHERS IN WORK AREA MUST WEAR SAFETY GLASSES WITH SIDE SHIELDS. KEEP FINGERS AWAY FROM TRIGGER WHEN NOT DRIVING...
Instruction Manual
Page 5
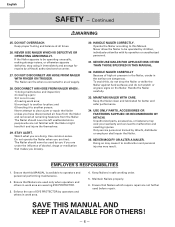
... set properly, the nailer will be called "Safety".) Never use the Nailer in moving parts. Never place your hands or feet closer than 8 inches (200 mm) from the point of unnecessary tools, debris, furniture, etc. 10. Lock the storage area. 9. Do not let visitors handle the Nailer. Keep all work , check the setting of other materials which are missing or damaged. 16. Do not drive...
... set properly, the nailer will be called "Safety".) Never use the Nailer in moving parts. Never place your hands or feet closer than 8 inches (200 mm) from the point of unnecessary tools, debris, furniture, etc. 10. Lock the storage area. 9. Do not let visitors handle the Nailer. Keep all work , check the setting of other materials which are missing or damaged. 16. Do not drive...
Instruction Manual
Page 6
... the Nailer. USE ONLY PARTS, ACCESSORIES OR FASTENERS SUPPLIED OR RECOMMENDED BY HITACHI. Ensure that makes you have disconnected air hose from the Nailer. Never attempt to malfunction and resulting injuries. Use common sense. HANDLE NAILER CORRECTLY. HANDLE NAILER CAREFULLY Because of EYE PROTECTOR by a Hitachi authorized service center. 27. and do not drop the Nailer or strike the Nailer against hard surfaces; Enforce the use ; 4) leaving work area...
... the Nailer. USE ONLY PARTS, ACCESSORIES OR FASTENERS SUPPLIED OR RECOMMENDED BY HITACHI. Ensure that makes you have disconnected air hose from the Nailer. Never attempt to malfunction and resulting injuries. Use common sense. HANDLE NAILER CORRECTLY. HANDLE NAILER CAREFULLY Because of EYE PROTECTOR by a Hitachi authorized service center. 27. and do not drop the Nailer or strike the Nailer against hard surfaces; Enforce the use ; 4) leaving work area...
Instruction Manual
Page 7
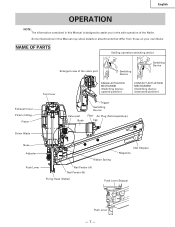
... PARTS Nailing operation switching device Exhaust Cover Piston O-Ring Piston Enlarged view of the Nailer. Some illustrations in the safe operation of the valve part Switching Device Switching Device Top Cover SINGLE ACTUATION MECHANISM (Switching device : upward position) CONTACT ACTUATION MECHANISM (Switching device : downward position) Trigger Switching Device Valve part Filter Air Plug (Sold separetely) Body Cap Driver Blade Nose Adjuster Push Lever Ribbon Spring Nail Stopper Magazine Nail Feeder (A) Nail Feeder (B) Firing Head (Outlet) Push Lever...
... PARTS Nailing operation switching device Exhaust Cover Piston O-Ring Piston Enlarged view of the Nailer. Some illustrations in the safe operation of the valve part Switching Device Switching Device Top Cover SINGLE ACTUATION MECHANISM (Switching device : upward position) CONTACT ACTUATION MECHANISM (Switching device : downward position) Trigger Switching Device Valve part Filter Air Plug (Sold separetely) Body Cap Driver Blade Nose Adjuster Push Lever Ribbon Spring Nail Stopper Magazine Nail Feeder (A) Nail Feeder (B) Firing Head (Outlet) Push Lever...
Instruction Manual
Page 8
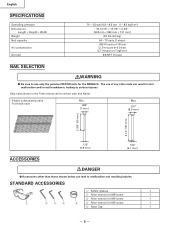
... this Nailer. STANDARD ACCESSORIES 1 Safety glasses 1 2 Allen wrench for M8 screw 1 3 Allen wrench for M6 screw 1 1 234 5 4 Allen wrench for the NR90AC3. The use only the genuine HITACHI nails for M5 screw 1 5 Nose Cap 1 - 8 - Plastic-collated strip nails Full-head nails Min. .286" (7 mm) Max. .327" (8.3 mm) 2-3/8" (60 mm) 3-1/2" (90 mm) .113" (2.9 mm) .162" (4.1 mm) ACCESSORIES DANGER ⅷ Accessories other nails can lead to serious injuries. Only nails shown in the Table below...
... this Nailer. STANDARD ACCESSORIES 1 Safety glasses 1 2 Allen wrench for M8 screw 1 3 Allen wrench for M6 screw 1 1 234 5 4 Allen wrench for the NR90AC3. The use only the genuine HITACHI nails for M5 screw 1 5 Nose Cap 1 - 8 - Plastic-collated strip nails Full-head nails Min. .286" (7 mm) Max. .327" (8.3 mm) 2-3/8" (60 mm) 3-1/2" (90 mm) .113" (2.9 mm) .162" (4.1 mm) ACCESSORIES DANGER ⅷ Accessories other nails can lead to serious injuries. Only nails shown in the Table below...
Instruction Manual
Page 9
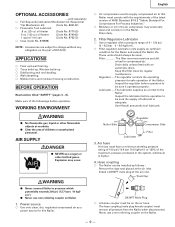
... compressed air. Power source ⅜ Use only clean, dry, regulated compressed air as follows : Remove the dust seal placed at the air inlet. English OPTIONAL ACCESSORIES ... BEFORE OPERATION Read section titled "SAFETY" (pages 4 - 6). WORKING ENVIRONMENT WARNING ⅷ No flammable gas, liquid or other bottled gases. Regulator ..... Hose coupling ⅜ The Nailer can (Code No. 876212) ⅜ Case (Code No. 878898) NOTE : Accessories are subject to this Nailer. ⅜ Air compressors used .
... compressed air. Power source ⅜ Use only clean, dry, regulated compressed air as follows : Remove the dust seal placed at the air inlet. English OPTIONAL ACCESSORIES ... BEFORE OPERATION Read section titled "SAFETY" (pages 4 - 6). WORKING ENVIRONMENT WARNING ⅷ No flammable gas, liquid or other bottled gases. Regulator ..... Hose coupling ⅜ The Nailer can (Code No. 876212) ⅜ Case (Code No. 878898) NOTE : Accessories are subject to this Nailer. ⅜ Air compressors used .
Instruction Manual
Page 10
... - Air consumption table psi Operating pressure (bar) (kgf/cm2) Air consumption ft3/cycle (ltr/cycle) 80 (5.5) (5.6) .078 (2.2) 90 (6.2) (6.3) .088 (2.5) 100 (6.9) (7) .095 (2.7) Air compressor size formula Amount of air required =number of Nailers × average nails driven each minute per Nailer × air consumption at given air pressure × safety factor (always 1.2) Example : 2 Nailers operating at high pressure. These lubricants will wear prematurely. ⅜ Use Hitachi pneumatic tool lubricant. WARNING ⅷ Never use detergent oil or...
... - Air consumption table psi Operating pressure (bar) (kgf/cm2) Air consumption ft3/cycle (ltr/cycle) 80 (5.5) (5.6) .078 (2.2) 90 (6.2) (6.3) .088 (2.5) 100 (6.9) (7) .095 (2.7) Air compressor size formula Amount of air required =number of Nailers × average nails driven each minute per Nailer × air consumption at given air pressure × safety factor (always 1.2) Example : 2 Nailers operating at high pressure. These lubricants will wear prematurely. ⅜ Use Hitachi pneumatic tool lubricant. WARNING ⅷ Never use detergent oil or...

Instruction Manual
Page 11
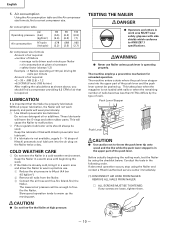
... the trigger. Ⅺ THE NAILER MUST OPERATE. 2 Hold the trigger back while separating the push lever from the wood. Ⅺ The nailer will remain in operated status (the driver blade will remain at the bottom). 3 Remove the finger from the trigger. Ⅺ Nailer operation will end (the driver blade will not operate properly.) Ⅺ THE NAILER MUST NOT LEAK AIR. (3) Remove the finger from the wood. Set the switching device to...
... the trigger. Ⅺ THE NAILER MUST OPERATE. 2 Hold the trigger back while separating the push lever from the wood. Ⅺ The nailer will remain in operated status (the driver blade will remain at the bottom). 3 Remove the finger from the trigger. Ⅺ Nailer operation will end (the driver blade will not operate properly.) Ⅺ THE NAILER MUST NOT LEAK AIR. (3) Remove the finger from the wood. Set the switching device to...
Instruction Manual
Page 12
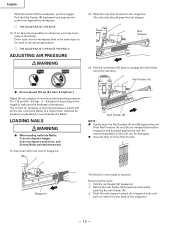
... be used in the actual application. Ⅺ THE NAILER MUST OPERATE PROPERLY. Adjust the air pressure at a higher than 5 nails. 5 Magazine The Nailer is observed, you may load nails in the magazine. Nail Feeder (B) NOTE : ⅷ Quietly push the Nail Feeders (A) and (B) against the nail. ADJUSTING AIR PRESSURE WARNING (2) Slide the nail strip forward in the Nailer. English With the Nailer off the workpiece, pull the trigger. The correct air pressure is the same type...
... be used in the actual application. Ⅺ THE NAILER MUST OPERATE PROPERLY. Adjust the air pressure at a higher than 5 nails. 5 Magazine The Nailer is observed, you may load nails in the magazine. Nail Feeder (B) NOTE : ⅷ Quietly push the Nail Feeders (A) and (B) against the nail. ADJUSTING AIR PRESSURE WARNING (2) Slide the nail strip forward in the Nailer. English With the Nailer off the workpiece, pull the trigger. The correct air pressure is the same type...

Instruction Manual
Page 13
Before starting work , make sure that the switching device is not set . If the switching device is properly set properly, the nailer will not operate correctly. ⅷ Never place your hands or feet closer than 8 inches (200 mm) from both sides of Operation" below. ⅷ Before starting work , check the nailing operation switching device. Part no. 884142. next, pull the trigger to drive the nail. Please read and understand "Methods of...
Before starting work , make sure that the switching device is not set . If the switching device is properly set properly, the nailer will not operate correctly. ⅷ Never place your hands or feet closer than 8 inches (200 mm) from both sides of Operation" below. ⅷ Before starting work , check the nailing operation switching device. Part no. 884142. next, pull the trigger to drive the nail. Please read and understand "Methods of...
Instruction Manual
Page 14
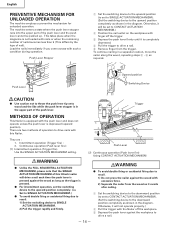
... operate unless the push lever is completely depressed. 4 Pull the trigger to drive a nail. 5 Remove finger from the wood as the trigger is not loaded with excessive force. 2) Separate the nailer from the trigger. Set to SINGLE ACTUATION MECHANISM.) ⅷ To avoid double firing or accidental firing due to recoil. 1) Set the switching device to the upward position completely. (i.e. Push Lever (2) Continuous operation (Push lever fire) Using...
... operate unless the push lever is completely depressed. 4 Pull the trigger to drive a nail. 5 Remove finger from the wood as the trigger is not loaded with excessive force. 2) Separate the nailer from the trigger. Set to SINGLE ACTUATION MECHANISM.) ⅷ To avoid double firing or accidental firing due to recoil. 1) Set the switching device to the upward position completely. (i.e. Push Lever (2) Continuous operation (Push lever fire) Using...
Instruction Manual
Page 15
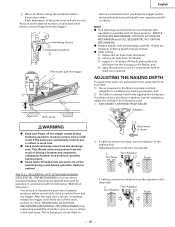
... handle nails and package carefully. NOTE : ⅷ If all warnings and instructions are driven too deep, turn the adjuster to the deep side. 2 Turn Adjuster Too Shallow Flush - 15 - Adjuster 15 Disconnect air hose 2 If nails are followed, safe operation is less likely to the Nailer remains constant (requlator is installed and working properly), and 2) the Nailer is driven, completely release the trigger and lift the tool off the trigger...
... handle nails and package carefully. NOTE : ⅷ If all warnings and instructions are driven too deep, turn the adjuster to the deep side. 2 Turn Adjuster Too Shallow Flush - 15 - Adjuster 15 Disconnect air hose 2 If nails are followed, safe operation is less likely to the Nailer remains constant (requlator is installed and working properly), and 2) the Nailer is driven, completely release the trigger and lift the tool off the trigger...
Instruction Manual
Page 16
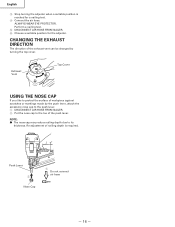
... lever, attach the accessory nose cap to the push lever. 1 DISCONNECT AIR HOSE FROM NAILER. 2 Put the nose cap to its thickness. English 3 Stop turning the adjuster when a suitable position is required. Re-adjustment of nailing depth is reached for the adjuster. CHANGING THE EXHAUST DIRECTION The direction of the push lever. Push Lever 2 Nose Cap 1 Do not connect air hose - 16 - ALWAYS WEAR EYE PROTECTOR. Perform a nailing test. 5 DISCONNECT AIR HOSE FROM NAILER...
... lever, attach the accessory nose cap to the push lever. 1 DISCONNECT AIR HOSE FROM NAILER. 2 Put the nose cap to its thickness. English 3 Stop turning the adjuster when a suitable position is required. Re-adjustment of nailing depth is reached for the adjuster. CHANGING THE EXHAUST DIRECTION The direction of the push lever. Push Lever 2 Nose Cap 1 Do not connect air hose - 16 - ALWAYS WEAR EYE PROTECTOR. Perform a nailing test. 5 DISCONNECT AIR HOSE FROM NAILER...
Instruction Manual
Page 17
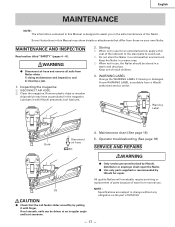
... nail feeder slides smoothly by Hitachi for an extended period, apply a thin coat of the lubricant to the steel parts to change without any obligation on your own Nailer. Lubricate it with Hitachi pneumatic tool lubricant. 2. Keep out of HITACHI. - 17 - WARNING ⅷ Disconnect air hose and remove all nails from a Hitachi authorized service center. MAINTENANCE AND INSPECTION Read section titled "SAFETY" (pages 4 - 6). Inspecting the magazine 1 DISCONNECT AIR HOSE...
... nail feeder slides smoothly by Hitachi for an extended period, apply a thin coat of the lubricant to the steel parts to change without any obligation on your own Nailer. Lubricate it with Hitachi pneumatic tool lubricant. 2. Keep out of HITACHI. - 17 - WARNING ⅷ Disconnect air hose and remove all nails from a Hitachi authorized service center. MAINTENANCE AND INSPECTION Read section titled "SAFETY" (pages 4 - 6). Inspecting the magazine 1 DISCONNECT AIR HOSE...
Instruction Manual
Page 18
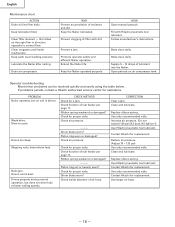
... Hitachi pneumatic tool lubricant. Clean and lubricate. Clean and lubricate. Replace ribbon spring. Prevent clogging of air hose. Slow to normal flow. Nails jam. Check air pressure. Piston ring cut or heavily worn? Use larger air hose. - 18 - Drain air compressor. Promote operator safety and efficient Nailer operation. Keep the Nailer operated properly. Operator troubleshooting Most minor problems can be resolved quickly and easily using the table below. Ribbon spring weakend or damaged? Check for proper nails. Contact Hitachi...
... Hitachi pneumatic tool lubricant. Clean and lubricate. Clean and lubricate. Replace ribbon spring. Prevent clogging of air hose. Slow to normal flow. Nails jam. Check air pressure. Piston ring cut or heavily worn? Use larger air hose. - 18 - Drain air compressor. Promote operator safety and efficient Nailer operation. Keep the Nailer operated properly. Operator troubleshooting Most minor problems can be resolved quickly and easily using the table below. Ribbon spring weakend or damaged? Check for proper nails. Contact Hitachi...

Instruction Manual
Page 56
C99124561 N Printed in Japan Shinagawa Intercity Tower A, 15-1, Konan 2-chome, Minato-ku, Tokyo 108-6020, Japan Distributed by Hitachi Koki Co., Ltd. Norcross, GA 30093 Hitachi Koki Canada Co. 6395 Kestrel Road Mississauga ON L5T 1Z5 306 Code No. Issued by Hitachi Koki U.S.A., Ltd. 3950 Steve Reynolds Blvd.
C99124561 N Printed in Japan Shinagawa Intercity Tower A, 15-1, Konan 2-chome, Minato-ku, Tokyo 108-6020, Japan Distributed by Hitachi Koki Co., Ltd. Norcross, GA 30093 Hitachi Koki Canada Co. 6395 Kestrel Road Mississauga ON L5T 1Z5 306 Code No. Issued by Hitachi Koki U.S.A., Ltd. 3950 Steve Reynolds Blvd.

