Instruction Manual
Page 3
... from the operation and maintenance of this Manual. NOTE emphasizes essential information. next, pull the trigger to continue driving nails. - 3 - DEFINITIONS OF SIGNAL WORDS DANGER indicates an imminently hazardous situation which , if not avoided, may result in minor or moderate injury, or may cause machine damage. First, press the push lever against the workpiece; Basic safety precautions are...
... from the operation and maintenance of this Manual. NOTE emphasizes essential information. next, pull the trigger to continue driving nails. - 3 - DEFINITIONS OF SIGNAL WORDS DANGER indicates an imminently hazardous situation which , if not avoided, may result in minor or moderate injury, or may cause machine damage. First, press the push lever against the workpiece; Basic safety precautions are...
Instruction Manual
Page 4
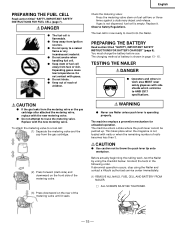
... with dispensers for combustible gas which are listed in work area. 2. OPERATORS AND OTHERS IN WORK AREA MUST WEAR SAFETY GLASSES WITH SIDE SHIELDS. NEVER USE IN PRESENCE OF FLAMMABLE LIQUIDS OR GASES. DO NOT TOUCH AROUND THE EXHAUST OUTLET. The fuel cell is powered by the Nailer operator and others in this instruction manual. Do not pierce or burn the...
... with dispensers for combustible gas which are listed in work area. 2. OPERATORS AND OTHERS IN WORK AREA MUST WEAR SAFETY GLASSES WITH SIDE SHIELDS. NEVER USE IN PRESENCE OF FLAMMABLE LIQUIDS OR GASES. DO NOT TOUCH AROUND THE EXHAUST OUTLET. The fuel cell is powered by the Nailer operator and others in this instruction manual. Do not pierce or burn the...

Instruction Manual
Page 5
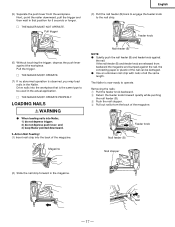
... and battery should be called "Safety".) Never use the Nailer if parts are deflected by the handle only. 7. When loading fasteners into the Nailer, 1) do not depress the trigger; 2) do not depress the push lever; Look the atorage area. 11. Always wear head protection to its original position. Do not inhale. 9. Remove fuel cell and battery, and then make sure the push lever operates properly...
... and battery should be called "Safety".) Never use the Nailer if parts are deflected by the handle only. 7. When loading fasteners into the Nailer, 1) do not depress the trigger; 2) do not depress the push lever; Look the atorage area. 11. Always wear head protection to its original position. Do not inhale. 9. Remove fuel cell and battery, and then make sure the push lever operates properly...
Instruction Manual
Page 6
..., stop using it to another person. Turn off the breaker switch to clear a jam or repair the Nailer unless you have taken fuel cell and battery out of an angle; Keep proper footing and balance at too steep of the Nailer and removed all times. 23. and 6) handing it immediately and arrange for better and safer performance. 30. STAY ALERT. USE ONLY PARTS, ACCESSORIES...
..., stop using it to another person. Turn off the breaker switch to clear a jam or repair the Nailer unless you have taken fuel cell and battery out of an angle; Keep proper footing and balance at too steep of the Nailer and removed all times. 23. and 6) handing it immediately and arrange for better and safer performance. 30. STAY ALERT. USE ONLY PARTS, ACCESSORIES...
Instruction Manual
Page 8
... of battery charger as a standard accessory. take it to damage or stress. 8. REMEMBER: USE ONLY HITACHI BATTERY TYPE EB714S. An extension cord should not be stepped on it will not reduce this case, please confirm Instruction Manual of batteries may result in a risk of electric shock, unplug charger from improper or unsafe use the Nailer. Do not operate battery charger with damaged cord or plug-replace them immediately. 10. English SAFETY - That wire size...
... of battery charger as a standard accessory. take it to damage or stress. 8. REMEMBER: USE ONLY HITACHI BATTERY TYPE EB714S. An extension cord should not be stepped on it will not reduce this case, please confirm Instruction Manual of batteries may result in a risk of electric shock, unplug charger from improper or unsafe use the Nailer. Do not operate battery charger with damaged cord or plug-replace them immediately. 10. English SAFETY - That wire size...
Instruction Manual
Page 9
... USERS AND OWNERS OF THIS TOOL! - 9 - ALWAYS disconnect the power cord from direct sunlight and use a booster transformer when charging. 10. NEVER disassemble the battery. 2. ALWAYS wait at least 15 minutes between charges to operators and personnel performing maintenance. 2. The battery must explode if it is available to avoid overheating the charger. 14. Using the charger on standard household electrical power (120 volts). NEVER short-circuit the battery...
... USERS AND OWNERS OF THIS TOOL! - 9 - ALWAYS disconnect the power cord from direct sunlight and use a booster transformer when charging. 10. NEVER disassemble the battery. 2. ALWAYS wait at least 15 minutes between charges to operators and personnel performing maintenance. 2. The battery must explode if it is available to avoid overheating the charger. 14. Using the charger on standard household electrical power (120 volts). NEVER short-circuit the battery...
Instruction Manual
Page 10
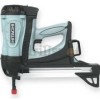
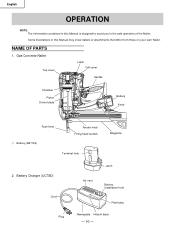
Gas Concrete Nailer Top cover Latch Cell cover Handle Chamber Piston Driver blade Trigger Battery Knob Push lever ⅜ Battery (EB714S) Feeder knob Firing head (outlet) Terminal hole Magazine 2. English OPERATION NOTE: The information contained in the safe operation of the Nailer. Some illustrations in this Manual is designed to assist you in this Manual may show details or attachments that differ from those on your own Nailer. Battery Charger (UC7SD) Cord Plug Latch Air vent Battery installation hole Pilot lamp Nameplate Hitachi label - 10 - NAME OF PARTS 1.
Gas Concrete Nailer Top cover Latch Cell cover Handle Chamber Piston Driver blade Trigger Battery Knob Push lever ⅜ Battery (EB714S) Feeder knob Firing head (outlet) Terminal hole Magazine 2. English OPERATION NOTE: The information contained in the safe operation of the Nailer. Some illustrations in this Manual is designed to assist you in this Manual may show details or attachments that differ from those on your own Nailer. Battery Charger (UC7SD) Cord Plug Latch Air vent Battery installation hole Pilot lamp Nameplate Hitachi label - 10 - NAME OF PARTS 1.
Instruction Manual
Page 11
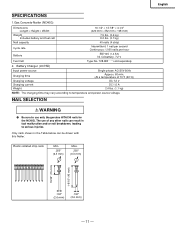
... nails can result in the Table below can be driven with this Nailer. Only nails shown in tool malfunction and/or nail breakdown, leading to serious injuries. Plastic collated strip nails Min. .250" (6.3 mm) Max. .250" (6.3 mm) English 19/32" (15 mm) 1-9/16" (40 mm) .102" (2.6 mm) .102" (2.6 mm) - 11 - SPECIFICATIONS 1.Gas Concrete Nailer (NC40G) Dimensions Length × Height × Width Weight Includes battery...
... nails can result in the Table below can be driven with this Nailer. Only nails shown in tool malfunction and/or nail breakdown, leading to serious injuries. Plastic collated strip nails Min. .250" (6.3 mm) Max. .250" (6.3 mm) English 19/32" (15 mm) 1-9/16" (40 mm) .102" (2.6 mm) .102" (2.6 mm) - 11 - SPECIFICATIONS 1.Gas Concrete Nailer (NC40G) Dimensions Length × Height × Width Weight Includes battery...

Instruction Manual
Page 13
... than indicated on the name plate. REMOVAL AND INSTALLATION METHOD OF BATTERY ⅜ How to concrete Handle Battery Latch Insert Pull out CHARGING METHOD NOTE: Before plugging into the receptacle, charging will commence and the pilot lamp will light on. English ACCESSORIES DANGER ⅷ Accessories other than indicated on the nameplate, the charger will burn up. ⅷ Do not use the electrical cord if damaged.
... than indicated on the name plate. REMOVAL AND INSTALLATION METHOD OF BATTERY ⅜ How to concrete Handle Battery Latch Insert Pull out CHARGING METHOD NOTE: Before plugging into the receptacle, charging will commence and the pilot lamp will light on. English ACCESSORIES DANGER ⅷ Accessories other than indicated on the nameplate, the charger will burn up. ⅷ Do not use the electrical cord if damaged.

Instruction Manual
Page 14
... is present. ⅷ This Nailer is recharged immediately after use the tool and exhaust the electric current, the battery may be shortened. Disconnect battery charger from the battery charger. Remove the battery from the receptacle. If you feel that the power of the failures. Leave the battery and recharge it after use . CAUTION ⅷ When the battery charger has been continuosly used for an extended period is...
... is present. ⅷ This Nailer is recharged immediately after use the tool and exhaust the electric current, the battery may be shortened. Disconnect battery charger from the battery charger. Remove the battery from the receptacle. If you feel that the power of the failures. Leave the battery and recharge it after use . CAUTION ⅷ When the battery charger has been continuosly used for an extended period is...
Instruction Manual
Page 15
.... Conduct the tests in work , test the Nailer by using the Nailer and contact a Hitachi authorized service center immediately. (1) REMOVE ALL NAILS, FUEL CELL AND BATTERY FROM NAILER. Ⅺ ALL SCREWS MUST BE TIGHTENED. - 15 - Expanding gases cause low temperatures. Replace with side shields which conforms to reuse the metering valve. Observe Safety Regulations. Check the metering valve: Press the metering valve stem on the rear of...
.... Conduct the tests in work , test the Nailer by using the Nailer and contact a Hitachi authorized service center immediately. (1) REMOVE ALL NAILS, FUEL CELL AND BATTERY FROM NAILER. Ⅺ ALL SCREWS MUST BE TIGHTENED. - 15 - Expanding gases cause low temperatures. Replace with side shields which conforms to reuse the metering valve. Observe Safety Regulations. Check the metering valve: Press the metering valve stem on the rear of...

Instruction Manual
Page 16
... cell into nailer. OFF: The battery is flashing red, the battery doesn't have enough power and it needs to be charged. Do not pull trigger Depress push lever Feeder knob - 16 - Adapter Stem Fuel cell Adapter Stem Fuel cell Insert Pull out BATTERY INDICATOR LIGHT Flashing GREEN: Enough power remaining (The light turns steady during operation). Fuel cell Feeder knob Push lever (2) Installing the battery. Make sure the battery indicator light is flashing...
... cell into nailer. OFF: The battery is flashing red, the battery doesn't have enough power and it needs to be charged. Do not pull trigger Depress push lever Feeder knob - 16 - Adapter Stem Fuel cell Adapter Stem Fuel cell Insert Pull out BATTERY INDICATOR LIGHT Flashing GREEN: Enough power remaining (The light turns steady during operation). Fuel cell Feeder knob Push lever (2) Installing the battery. Make sure the battery indicator light is flashing...
Instruction Manual
Page 17
... engage the feeder knob to operate. (5) Separate the push lever from the back of the magazine. Feeder knob (6) Without touching the trigger, depress the push lever against the nail. Drive nails into the workpiece that position for 5 seconds or longer. Ⅺ THE NAILER MUST NOT OPERATE. The Nailer is the same type to be damaged. ⅷ Use an unbroken nail strip with nails of all the...
... engage the feeder knob to operate. (5) Separate the push lever from the back of the magazine. Feeder knob (6) Without touching the trigger, depress the push lever against the nail. Drive nails into the workpiece that position for 5 seconds or longer. Ⅺ THE NAILER MUST NOT OPERATE. The Nailer is the same type to be damaged. ⅷ Use an unbroken nail strip with nails of all the...

Instruction Manual
Page 18
... off the trigger. 2 Hold the Nailer at right angles to drive a nail. 4 Remove finger from Nailer when: 1) it to throw the push lever tip onto workpiece when the push lever cannot be pushed up . Nails can ricochet and hurt someone . ⅷ Never drive nails from firing head when using. and 4) handing it is not loaded with nails or when the remaining number of nails becomes less than 8 inches (200 mm...
... off the trigger. 2 Hold the Nailer at right angles to drive a nail. 4 Remove finger from Nailer when: 1) it to throw the push lever tip onto workpiece when the push lever cannot be pushed up . Nails can ricochet and hurt someone . ⅷ Never drive nails from firing head when using. and 4) handing it is not loaded with nails or when the remaining number of nails becomes less than 8 inches (200 mm...
Instruction Manual
Page 19
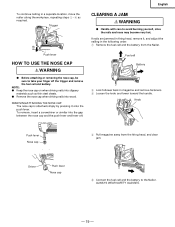
... the Nailer. ALWAYS WEAR SAFETY GLASSES. - 19 - English To continue nailing in magazine and remove fasteners. 3 Loosen the knob and lower toward the handle. To remove, insert a screwdriver or similar into the gap between the nose cap and the push lever and lever off the trigger and remove the fuel cell and battery. NOTE: ⅷ Keep the nose cap on when driving nails into wood. Driver Push lever...
... the Nailer. ALWAYS WEAR SAFETY GLASSES. - 19 - English To continue nailing in magazine and remove fasteners. 3 Loosen the knob and lower toward the handle. To remove, insert a screwdriver or similar into the gap between the nose cap and the push lever and lever off the trigger and remove the fuel cell and battery. NOTE: ⅷ Keep the nose cap on when driving nails into wood. Driver Push lever...
Instruction Manual
Page 20
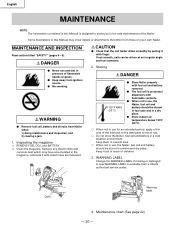
... stored in tool case and in a dry place. ⅷ Store indoors at an irregular angle and hurt someone. 2. English MAINTENANCE NOTE: The information contained in this Manual may have accumulated in a warm and dry place. CAUTION ⅷ Check that differ from Nailer when: 1) doing maintenance and inspection; Cloth Warning label 4. Inspecting the magazine 1 REMOVE FUEL CELL and BATTERY. 2 Clean...
... stored in tool case and in a dry place. ⅷ Store indoors at an irregular angle and hurt someone. 2. English MAINTENANCE NOTE: The information contained in this Manual may have accumulated in a warm and dry place. CAUTION ⅷ Check that differ from Nailer when: 1) doing maintenance and inspection; Cloth Warning label 4. Inspecting the magazine 1 REMOVE FUEL CELL and BATTERY. 2 Clean...

Instruction Manual
Page 21
... repair or other maintenance. NOTE: Specifications are constantly being improved and modified to change without prior notice. English - 21 - This Parts List will eventually require servicing or replacement of parts because of HITACHI. Operator troubleshooting (See page 22) 6. In the operation and maintenance of Hitachi Power Tools must be changed without any obligation on the part of wear from normal use. Service parts list A: Item No. code numbers and/or design) may be observed. MODIFICATIONS: Hitachi Power Tools...
... repair or other maintenance. NOTE: Specifications are constantly being improved and modified to change without prior notice. English - 21 - This Parts List will eventually require servicing or replacement of parts because of HITACHI. Operator troubleshooting (See page 22) 6. In the operation and maintenance of Hitachi Power Tools must be changed without any obligation on the part of wear from normal use. Service parts list A: Item No. code numbers and/or design) may be observed. MODIFICATIONS: Hitachi Power Tools...
Instruction Manual
Page 22
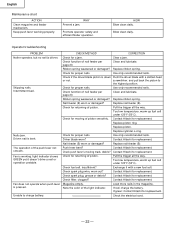
... function of the push lever not smooth. Use only recommended nails. Exchange it doesn't drive a nail or operation unstable. Blow clean daily. Replace nail feeder (B). Check the electrical cord. - 22 - Ribbon spring weakened or damaged? is working properly. Replace ribbon spring. Check for returning of the light indicator. Nail feeder (B) worn or damaged? If green: Contact Hitachi for replacement. Contact Hitachi for replacement. Replace piston. Keep push lever working , light indicator shows GREEN yet...
... function of the push lever not smooth. Use only recommended nails. Exchange it doesn't drive a nail or operation unstable. Blow clean daily. Replace nail feeder (B). Check the electrical cord. - 22 - Ribbon spring weakened or damaged? is working properly. Replace ribbon spring. Check for returning of the light indicator. Nail feeder (B) worn or damaged? If green: Contact Hitachi for replacement. Contact Hitachi for replacement. Replace piston. Keep push lever working , light indicator shows GREEN yet...
Instruction Manual
Page 69
...) WASHER SWITCH MOUNT (B) SWITCH ARM LEAD WIRE ASS'Y (B) SPRING SWITCH LEVER (B) TENSION PLATE (C) TRUSS HEAD TAPPING SCREW M3 PRISM TRIGGER SPRING (A) TRIGGER ROLL PIN D2.5×10 CHAMBER LOCK BAR LOCK BAR SPRING CONTROLLER ASS'Y TAP.SCREW D4 W/F WIRING COVER D4 FLAT TAPPING SCREW HANDLE (A) BATTERY ASS' Y DUST COVER WASHER TAPPING SCREW D4×12 WASHER (B) SHAFT (B) TAPPING SCREW (W/FLANGE) D4×14 WASHER NAIL STOPPER SPRING (C) SQ.NUT M6 MAGAZINE MAGAZINE COVER SHAFT(C) WASHER SPRING WASHER M5 KNOB HEX.SOCKET BUTTON BOLT M6 RIBBON SPRING ASS'Y PIN D3...
...) WASHER SWITCH MOUNT (B) SWITCH ARM LEAD WIRE ASS'Y (B) SPRING SWITCH LEVER (B) TENSION PLATE (C) TRUSS HEAD TAPPING SCREW M3 PRISM TRIGGER SPRING (A) TRIGGER ROLL PIN D2.5×10 CHAMBER LOCK BAR LOCK BAR SPRING CONTROLLER ASS'Y TAP.SCREW D4 W/F WIRING COVER D4 FLAT TAPPING SCREW HANDLE (A) BATTERY ASS' Y DUST COVER WASHER TAPPING SCREW D4×12 WASHER (B) SHAFT (B) TAPPING SCREW (W/FLANGE) D4×14 WASHER NAIL STOPPER SPRING (C) SQ.NUT M6 MAGAZINE MAGAZINE COVER SHAFT(C) WASHER SPRING WASHER M5 KNOB HEX.SOCKET BUTTON BOLT M6 RIBBON SPRING ASS'Y PIN D3...
Parts List
Page 4
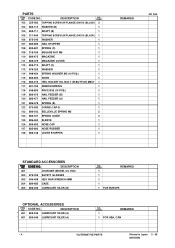
...-454 SPRING WASHER M5 (10 PCS.) 1 115 885-694 KNOB 1 116 884-215 HEX. SOCKET HD. BAR WRENCH 4MM 504 886-485 CASE * 505 886-036 LUBRICANT OILER (B) OPTIONAL ACCESSORIES ITEM NO. CODE NO. CODE NO. DESCRIPTION * 601 885-246 LUBRICANT OILER (A) * 601 885-546 LUBRICANT OILER (A) NO. CODE NO. BOLT (W/BUTTON) M6X7 1 117 881-755 RIBBON SPRING 1 118 949-890 PIN...
...-454 SPRING WASHER M5 (10 PCS.) 1 115 885-694 KNOB 1 116 884-215 HEX. SOCKET HD. BAR WRENCH 4MM 504 886-485 CASE * 505 886-036 LUBRICANT OILER (B) OPTIONAL ACCESSORIES ITEM NO. CODE NO. CODE NO. DESCRIPTION * 601 885-246 LUBRICANT OILER (A) * 601 885-546 LUBRICANT OILER (A) NO. CODE NO. BOLT (W/BUTTON) M6X7 1 117 881-755 RIBBON SPRING 1 118 949-890 PIN...


