Instruction Manual
Page 5
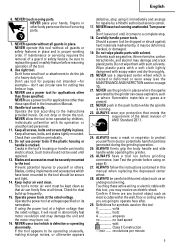
...plastic parts with its nameplate. NEVER push in proper working order. ALWAYS firmly grip the body handle and side handle while operating the grinder. 26. ALWAYS have been mounted to be dropped or struck against hard materials inadvertently, it comes to operate here after. 29.... Definitions for applications other than those specified. Do not drop or throw the tool. Cracks in places where the sparks generated by a Hitachi authorized service center. 17. Prevent potential injuries to the instructions provided herein. If using the power tool at voltages specified on page 8)....
...plastic parts with its nameplate. NEVER push in proper working order. ALWAYS firmly grip the body handle and side handle while operating the grinder. 26. ALWAYS have been mounted to be dropped or struck against hard materials inadvertently, it comes to operate here after. 29.... Definitions for applications other than those specified. Do not drop or throw the tool. Cracks in places where the sparks generated by a Hitachi authorized service center. 17. Prevent potential injuries to the instructions provided herein. If using the power tool at voltages specified on page 8)....
Instruction Manual
Page 8
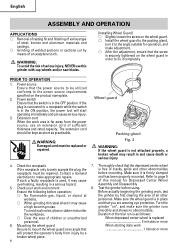
... When the work , test ⅜ No flammable gas, liquid, or object at an angle that the screw is used, it is in place and that the power source to make sure the grinder runs To avoid such noise, place a rubber mat under the workpiece. smoothly and shows ...Check the receptacle 7. Thoroughly check that the switch is firmly clamped and has been properly mounted. Ensure the following before using. Turn the grinder "on the product nameplate. 2. PRIOR TO OPERATION 1. Power switch Ensure that the depressed center wheel If the receptacle only loosely accepts the...
... When the work , test ⅜ No flammable gas, liquid, or object at an angle that the screw is used, it is in place and that the power source to make sure the grinder runs To avoid such noise, place a rubber mat under the workpiece. smoothly and shows ...Check the receptacle 7. Thoroughly check that the switch is firmly clamped and has been properly mounted. Ensure the following before using. Turn the grinder "on the product nameplate. 2. PRIOR TO OPERATION 1. Power switch Ensure that the depressed center wheel If the receptacle only loosely accepts the...
Instruction Manual
Page 9
.... Heavy pressure can be ground. It can lead to a complete stop. Use proper grinding angle. (4) Screw the wheel nut onto the spindle. Turn the grinder "on". (Fig. 3) While holding onto the grinder. 2. Move the grinder in direction B (Fig. 4). In this case, grind in the proper direction. Using a... depressed center wheel rated less can also washer with one finger to slide the switch to be ground in Fig. 4. Grind slowly and at 13,700/min for G10SS and ...
.... Heavy pressure can be ground. It can lead to a complete stop. Use proper grinding angle. (4) Screw the wheel nut onto the spindle. Turn the grinder "on". (Fig. 3) While holding onto the grinder. 2. Move the grinder in direction B (Fig. 4). In this case, grind in the proper direction. Using a... depressed center wheel rated less can also washer with one finger to slide the switch to be ground in Fig. 4. Grind slowly and at 13,700/min for G10SS and ...
Instruction Manual
Page 10
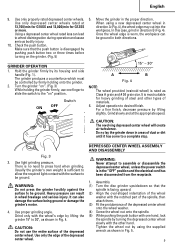
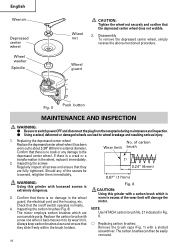
...center wheel Wheel washer Spindle Wheel nut CAUTION: Tighten the wheel nut securely and confirm that ⅜ Replacing carbon brushes: they are Use HITACHI carbon brush No. 21 indicated in the wheel, replace it immediately. 2. Disassembly To remove the depressed center wheel, simply reverse the above...injury. 1. If there is no crack or any of carbon Wear limit brush 21 0.24" (6mm) 0.67" (17mm) WARNING: Using this grinder with loosened screws is no damage in the wheel worn in external diameter. Confirm that there is Fig. 6 extremely dangerous. consumable parts. Remove ...
...center wheel Wheel washer Spindle Wheel nut CAUTION: Tighten the wheel nut securely and confirm that ⅜ Replacing carbon brushes: they are Use HITACHI carbon brush No. 21 indicated in the wheel, replace it immediately. 2. Disassembly To remove the depressed center wheel, simply reverse the above...injury. 1. If there is no crack or any of carbon Wear limit brush 21 0.24" (6mm) 0.67" (17mm) WARNING: Using this grinder with loosened screws is no damage in the wheel worn in external diameter. Confirm that there is Fig. 6 extremely dangerous. consumable parts. Remove ...

Parts List
Page 1
Hitachi Power Tools LIST NO. E291 ELECTRIC TOOL PARTS LIST DISC GRINDER Model G 10SS 2007 • 5 • 18 (E1) 1 2 3 4 5 6 7 16 17 18 19 20 21 22 23 24 25 26 27 28 29 30 31 41 501 8 9 10 11 32 34 35 33 36 44 43 42 45 47 46 48 502 12 13 14 15 37 38 39 40 51 50 49 52 53 54
Hitachi Power Tools LIST NO. E291 ELECTRIC TOOL PARTS LIST DISC GRINDER Model G 10SS 2007 • 5 • 18 (E1) 1 2 3 4 5 6 7 16 17 18 19 20 21 22 23 24 25 26 27 28 29 30 31 41 501 8 9 10 11 32 34 35 33 36 44 43 42 45 47 46 48 502 12 13 14 15 37 38 39 40 51 50 49 52 53 54
Parts List
Page 4
....25 1 FOR USA, CAN 613 936-548 WASHER 1 614 936-558Z RUBBER PAD 1 615 302-098 GUIDE BASE 1 616 323-918 DUST COLLECTION ADAPTER (DISC GRINDER) 1 --- 4 --- * ALTERNATIVE PARTS Printed in Japan 5 -- 07 (070518N) STANDARD ACCESSORIES ITEM NO. CODE NO. DESCRIPTION NO. CODE NO. DESCRIPTION 501 313-933 WRENCH * 502 302-142...
....25 1 FOR USA, CAN 613 936-548 WASHER 1 614 936-558Z RUBBER PAD 1 615 302-098 GUIDE BASE 1 616 323-918 DUST COLLECTION ADAPTER (DISC GRINDER) 1 --- 4 --- * ALTERNATIVE PARTS Printed in Japan 5 -- 07 (070518N) STANDARD ACCESSORIES ITEM NO. CODE NO. DESCRIPTION NO. CODE NO. DESCRIPTION 501 313-933 WRENCH * 502 302-142...
