Owners Guide
Page 2
...(RCA-type) at least. CONTENTS Accessories E2 Safety Certification E3 For Safe and Efficient Operation E3 Controls E4 Multi-Brand TV Remote Control E5 Basic Connections E7 Speaker Connections E7 Speaker Placement E8 Antenna Connections E9 Conventional TV Connections E10 Progressive-scan TV Connections ...to the Radio E34 Automatic/Manual Tuning E34 To Preset Stations E34 Listening to Preset Stations E35 Timer Operation (Using the Remote Control E36 Using the Wake Up Timer E36 Using the Sleep Timer E37 Maintenance E37 Troubleshooting Guide E38 Specifications E39 Please Read...
...(RCA-type) at least. CONTENTS Accessories E2 Safety Certification E3 For Safe and Efficient Operation E3 Controls E4 Multi-Brand TV Remote Control E5 Basic Connections E7 Speaker Connections E7 Speaker Placement E8 Antenna Connections E9 Conventional TV Connections E10 Progressive-scan TV Connections ...to the Radio E34 Automatic/Manual Tuning E34 To Preset Stations E34 Listening to Preset Stations E35 Timer Operation (Using the Remote Control E36 Using the Wake Up Timer E36 Using the Sleep Timer E37 Maintenance E37 Troubleshooting Guide E38 Specifications E39 Please Read...

Owners Guide
Page 3
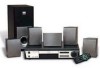
... 4 7 TIMER 0 CLOCK TU/BAND 2 A.REPLAY 5 AUDIO 8 ADJUST 3 ZOOM 6 SLEEP 9 SET/CLEAR +10 SOURCE PRESET FM MODE TEST TONE SURROUND BASS SOUND MUTE VOLUME DV-RM522 ACCESSORIES DV-RM522 wireless remote control AM loop antenna FM indoor antenna lead wire Video cable Audio cable Front right speaker cable Length: Approx. 20 feet (Black and...
... 4 7 TIMER 0 CLOCK TU/BAND 2 A.REPLAY 5 AUDIO 8 ADJUST 3 ZOOM 6 SLEEP 9 SET/CLEAR +10 SOURCE PRESET FM MODE TEST TONE SURROUND BASS SOUND MUTE VOLUME DV-RM522 ACCESSORIES DV-RM522 wireless remote control AM loop antenna FM indoor antenna lead wire Video cable Audio cable Front right speaker cable Length: Approx. 20 feet (Black and...

Owners Guide
Page 5
.... ENGLISH CONTROLS 1 2 34 5 6 7 8 9 POWER/STANDBY PHONES q OPEN/ CLOSE FM MODE a k n f /TUNE - Skip/Next/Previous/Tuning buttons (f/TUNE-, e/TUNE+) 4. FM mode/Pause/Step button (FM MODE/k) 7. Remote sensor 16. Dolby Pro Logic indicator (DOLBY PL) 2. DTS indicator (DTS) 3. Repeat mode indicators (ALL, 1, REP.) 7. Kilohertz indicator (kHz) 12. Megahertz indicator (MHz) 13. FM...
.... ENGLISH CONTROLS 1 2 34 5 6 7 8 9 POWER/STANDBY PHONES q OPEN/ CLOSE FM MODE a k n f /TUNE - Skip/Next/Previous/Tuning buttons (f/TUNE-, e/TUNE+) 4. FM mode/Pause/Step button (FM MODE/k) 7. Remote sensor 16. Dolby Pro Logic indicator (DOLBY PL) 2. DTS indicator (DTS) 3. Repeat mode indicators (ALL, 1, REP.) 7. Kilohertz indicator (kHz) 12. Megahertz indicator (MHz) 13. FM...

Owners Guide
Page 6
MULTI-BRAND TV REMOTE CONTROL SET ITLE SET ITLE NU TOP M NU TOP M 1 LAST MEMO REPEAT DISPLAY SEARCH MODE RETURN PROG TV POWER TV CH TV VOL TV/VIDEO ...
MULTI-BRAND TV REMOTE CONTROL SET ITLE SET ITLE NU TOP M NU TOP M 1 LAST MEMO REPEAT DISPLAY SEARCH MODE RETURN PROG TV POWER TV CH TV VOL TV/VIDEO ...

Owners Guide
Page 7
... - While holding down [TV POWER], enter the 2-digit code using the number buttons [0 - 9], then release [TV POWER]. • The remote control is now set the remote control code for the Hitachi TV This remote control can be re-entered. e /TUNE + d /PRESET c /MEMO SURROUND BASS SOUND SOURCE VOLUME Within approx. 20 feet (7 meters) 30°...
... - While holding down [TV POWER], enter the 2-digit code using the number buttons [0 - 9], then release [TV POWER]. • The remote control is now set the remote control code for the Hitachi TV This remote control can be re-entered. e /TUNE + d /PRESET c /MEMO SURROUND BASS SOUND SOURCE VOLUME Within approx. 20 feet (7 meters) 30°...

Owners Guide
Page 15
... set accurately by pressing [ADJUST] while holding [SHIFT] down to the original display. Press [NEXT/TUNE+] or [PREV/-TUNE] to set "PM 6:30" (Using the remote control) 1. To display the clock during operation Press [CLOCK] while holding [SHIFT] down . UP ME SET ITLE NU TOP M SHIFT SHIFT REV SLOW ENTER ENU...
... set accurately by pressing [ADJUST] while holding [SHIFT] down to the original display. Press [NEXT/TUNE+] or [PREV/-TUNE] to set "PM 6:30" (Using the remote control) 1. To display the clock during operation Press [CLOCK] while holding [SHIFT] down . UP ME SET ITLE NU TOP M SHIFT SHIFT REV SLOW ENTER ENU...

Owners Guide
Page 16
...TU/BAND 2 A.REPLAY 5 AUDIO 8 ADJUST 3 ZOOM 6 SLEEP 9 SET/CLEAR +10 SOURCE PRESET FM MODE TEST TONE SURROUND BASS SOUND MUTE VOLUME DV RM522 SOURCE SOUND p VOLUME o Selecting the sound mode Press [SOUND] to select the sound mode matching the source to be listened to. The STANDBY ... time, the volume-reset feature automatically sets the initial volume level.) To turn the power off, press [POWER/STANDBY] (or [z/I ] on the remote control. (The volume control illumination blinks.) To restore the previous volume setting, press [MUTE] again. Adjusting the volume Rotate [VOLUME] (or press ...
...TU/BAND 2 A.REPLAY 5 AUDIO 8 ADJUST 3 ZOOM 6 SLEEP 9 SET/CLEAR +10 SOURCE PRESET FM MODE TEST TONE SURROUND BASS SOUND MUTE VOLUME DV RM522 SOURCE SOUND p VOLUME o Selecting the sound mode Press [SOUND] to select the sound mode matching the source to be listened to. The STANDBY ... time, the volume-reset feature automatically sets the initial volume level.) To turn the power off, press [POWER/STANDBY] (or [z/I ] on the remote control. (The volume control illumination blinks.) To restore the previous volume setting, press [MUTE] again. Adjusting the volume Rotate [VOLUME] (or press ...
Owners Guide
Page 18
Please use the remote control at each function respectively. -E17- Surround mode DOLBY PL THEATHER HALL DOLBY 3 FL display (Speaker) FL (Front...to select the desired surround mode ("DOLBY PL", "DOLBY 3", "THEATER" or "HALL"). (See "Selecting the Surround Mode" on the remote control. But, depending on the size of the room and the placement of the volume level. Press [SURROUND] repeatedly to turn the test...BAND 2 A.REPLAY 5 AUDIO 8 ADJUST 3 ZOOM 6 SLEEP 9 SET/CLEAR +10 SOURCE PRESET FM MODE TEST TONE SURROUND BASS SOUND MUTE VOLUME DV-RM522 1 3, 5 TEST TONE 4, 6 VOLUME 4.
Please use the remote control at each function respectively. -E17- Surround mode DOLBY PL THEATHER HALL DOLBY 3 FL display (Speaker) FL (Front...to select the desired surround mode ("DOLBY PL", "DOLBY 3", "THEATER" or "HALL"). (See "Selecting the Surround Mode" on the remote control. But, depending on the size of the room and the placement of the volume level. Press [SURROUND] repeatedly to turn the test...BAND 2 A.REPLAY 5 AUDIO 8 ADJUST 3 ZOOM 6 SLEEP 9 SET/CLEAR +10 SOURCE PRESET FM MODE TEST TONE SURROUND BASS SOUND MUTE VOLUME DV-RM522 1 3, 5 TEST TONE 4, 6 VOLUME 4.

Owners Guide
Page 20
...k n f /TUNE - "READING" appears on the TV and select the video input source. ENTER Note: For more details, please refer to set the remote control code for more details.) • There may be explained in "INITIAL SETTINGS" on Page E31.) Basic Playback Notes: • Do not touch the disc... • "OPEN" appears and the disc tray opens. • "HITACHI" logo appears on the disc tray one at a time. Note: To open close the disc tray, be operated using this remote control. Place the disc with this remote control. (Refer to select the video input source. 3. You may start ...
...k n f /TUNE - "READING" appears on the TV and select the video input source. ENTER Note: For more details, please refer to set the remote control code for more details.) • There may be explained in "INITIAL SETTINGS" on Page E31.) Basic Playback Notes: • Do not touch the disc... • "OPEN" appears and the disc tray opens. • "HITACHI" logo appears on the disc tray one at a time. Note: To open close the disc tray, be operated using this remote control. Place the disc with this remote control. (Refer to select the video input source. 3. You may start ...
Owners Guide
Page 35
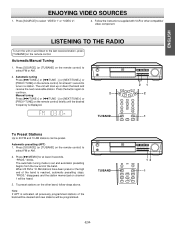
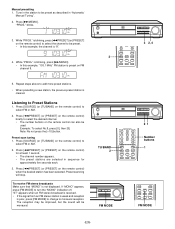
... again to 20 FM and 10 AM stations can be preset. Manual tuning Press [e/TUNE+] or [f/TUNE -] (or [NEXT/TUNE+] or [PREV/-TUNE] on the remote control) to select "VIDEO 1" or "VIDEO 2". 2. e /TUNE + d /PRESET c /MEMO SURROUND BASS SOUND SOURCE 2 TU/BAND -TUNE PREV PAUSE/STEP 21 NEXT TUNE+ 2 1... [SOURCE] to select FM or AM. 2. blinks. Automatic tuning Press [e/TUNE+] or [f/TUNE -] (or [NEXT/TUNE+] or [PREV/-TUNE] on the remote control) for at least 1 second to the last received station, press [TU/BAND] on the other compatible/ video component. MHz POWER/STANDBY PHONES q OPEN/...
... again to 20 FM and 10 AM stations can be preset. Manual tuning Press [e/TUNE+] or [f/TUNE -] (or [NEXT/TUNE+] or [PREV/-TUNE] on the remote control) to select "VIDEO 1" or "VIDEO 2". 2. e /TUNE + d /PRESET c /MEMO SURROUND BASS SOUND SOURCE 2 TU/BAND -TUNE PREV PAUSE/STEP 21 NEXT TUNE+ 2 1... [SOURCE] to select FM or AM. 2. blinks. Automatic tuning Press [e/TUNE+] or [f/TUNE -] (or [NEXT/TUNE+] or [PREV/-TUNE] on the remote control) for at least 1 second to the last received station, press [TU/BAND] on the other compatible/ video component. MHz POWER/STANDBY PHONES q OPEN/...
Owners Guide
Page 36
... + d /PRESET c /MEMO SURROUND BASS SOUND SOURCE VOLUME FM MODE TU/BAND SOURCE PRESET FM MODE TEST TONE SURROUND BASS SOUND MUTE VOLUME DV-RM522 FM MODE -E35- Press [c/MEMO]. PROG. PROG. Preset scan tuning 1. To receive FM stereo broadcasts Make sure that "MONO" is ...BASS SOUND MUTE VOLUME 21 Number buttons 1 q OPEN/ CLOSE FM MODE a k n f /TUNE - MHz 5. Press [d/PRESET] (or [PRESET] on the remote control) when the desired station has been selected. e /TUNE + d /PRESET c /MEMO SURROUND BASS SOUND SOURCE VOLUME TIMER 0 CLOCK TU/BAND ADJUST SET/CLEAR ...
... + d /PRESET c /MEMO SURROUND BASS SOUND SOURCE VOLUME FM MODE TU/BAND SOURCE PRESET FM MODE TEST TONE SURROUND BASS SOUND MUTE VOLUME DV-RM522 FM MODE -E35- Press [c/MEMO]. PROG. PROG. Preset scan tuning 1. To receive FM stereo broadcasts Make sure that "MONO" is ...BASS SOUND MUTE VOLUME 21 Number buttons 1 q OPEN/ CLOSE FM MODE a k n f /TUNE - MHz 5. Press [d/PRESET] (or [PRESET] on the remote control) when the desired station has been selected. e /TUNE + d /PRESET c /MEMO SURROUND BASS SOUND SOURCE VOLUME TIMER 0 CLOCK TU/BAND ADJUST SET/CLEAR ...

Owners Guide
Page 37
...] down so that the clock is released. ON x ON Set the minutes in step 3. The STANDBY indicator lights. SET ITLE ENGLISH TIMER OPERATION (Using the Remote Control) Before setting the timer, make sure that the display blinks. 3. The timer will start with the selected source at the off the power. Set...
...] down so that the clock is released. ON x ON Set the minutes in step 3. The STANDBY indicator lights. SET ITLE ENGLISH TIMER OPERATION (Using the Remote Control) Before setting the timer, make sure that the display blinks. 3. The timer will start with the selected source at the off the power. Set...

Owners Guide
Page 39
No power plug connection at the remote sensor sensor window. The video cable is poor. Turn up the volume. Connect the speaker wires firmly to the Hitachi DVD product limited warranty. The playback picture is not connected. Load a disc. The disc is loaded. Clean the disc or ... No disc is dirty. Select the correct input function on the disc now. Faulty speaker connections. Picture is not aimed at the remote Aim the remote control at the AC wall outlet. The selected function does not operate on the TV. An unplayable disc is loaded. "RESET" ...
No power plug connection at the remote sensor sensor window. The video cable is poor. Turn up the volume. Connect the speaker wires firmly to the Hitachi DVD product limited warranty. The playback picture is not connected. Load a disc. The disc is loaded. Clean the disc or ... No disc is dirty. Select the correct input function on the disc now. Faulty speaker connections. Picture is not aimed at the remote Aim the remote control at the AC wall outlet. The selected function does not operate on the TV. An unplayable disc is loaded. "RESET" ...


