Instruction Manual
Page 6
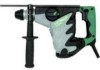
... materials likely to the tool. Do not use circular saw for cutting tree limbs or logs. 9. ALWAYS attach the side handle and securely grip the Rotary Hammer. 6. don't use power tools if the plastic housing or handle is cracked. Blades and accessories must be secure and tight. 6 Blades, cutting implements and accessories...
... materials likely to the tool. Do not use circular saw for cutting tree limbs or logs. 9. ALWAYS attach the side handle and securely grip the Rotary Hammer. 6. don't use power tools if the plastic housing or handle is cracked. Blades and accessories must be secure and tight. 6 Blades, cutting implements and accessories...
Instruction Manual
Page 11
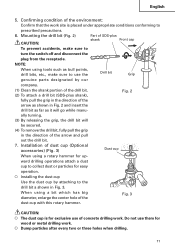
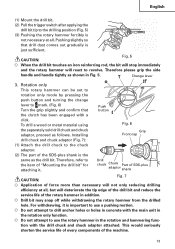
When using a rotary hammer for up- CAUTION: The dust cup is placed under appropriate conditions conforming to ... attaching to the drill bit a shown in the direction of the drill bit. (2) To attach a drill bit (SDS-plus shank Front cap To prevent accidents, make sure to collect dust or particles for wood or metal drilling work. ...the drill bit, fully pull the grip in Fig. 3. English 5. Mounting the drill bit (Fig. 2) CAUTION: Part of SDS-plus shank), Fig. 2 fully pull the grip in the direction of concrete drilling work site is for exclusive use them for easy...
When using a rotary hammer for up- CAUTION: The dust cup is placed under appropriate conditions conforming to ... attaching to the drill bit a shown in the direction of the drill bit. (2) To attach a drill bit (SDS-plus shank Front cap To prevent accidents, make sure to collect dust or particles for wood or metal drilling work. ...the drill bit, fully pull the grip in Fig. 3. English 5. Mounting the drill bit (Fig. 2) CAUTION: Part of SDS-plus shank), Fig. 2 fully pull the grip in the direction of concrete drilling work site is for exclusive use them for easy...
Instruction Manual
Page 12
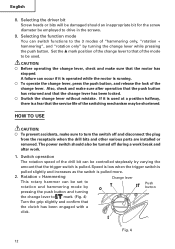
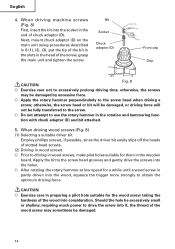
... switching mechanism may be controlled steplessly by varying the amount that the trigger switch is a fear that the service life of "hammering only, "rotation + hammering", and "rotation only" by Change lever Push button pressing the push button and turning the change lever to turn the switch ... the drill bit can switch functions to drive in the screws. 9. To operate the change lever while pressing the push button. Rotation + Hammering This rotary hammer can occur if it is used . Fig. 4 12 Set the mark position of the change lever without mistake. A failure can be...
... switching mechanism may be controlled steplessly by varying the amount that the trigger switch is a fear that the service life of "hammering only, "rotation + hammering", and "rotation only" by Change lever Push button pressing the push button and turning the change lever to turn the switch ... the drill bit can switch functions to drive in the screws. 9. To operate the change lever while pressing the push button. Rotation + Hammering This rotary hammer can occur if it is used . Fig. 4 12 Set the mark position of the change lever without mistake. A failure can be...
Instruction Manual
Page 13
...the drill bit. (2) Pull the trigger switch after applying the drill bit tip to the drilling position (Fig. 5) (3) Pushing the rotary hammer forcibly is not necessary at all . Pushing slightly so that the clutch has been engaged with the main unit in the rotation only ...SDS-plus adaptor shank CAUTION: Fig. 7 Application of the machine. 13 This would seriously shorten the service life of every components of force more than necessary will not only reducing drilling efficiency at all , but will deteriorate the tip edge of the drill bit and reduce the service life of the rotary hammer...
...the drill bit. (2) Pull the trigger switch after applying the drill bit tip to the drilling position (Fig. 5) (3) Pushing the rotary hammer forcibly is not necessary at all . Pushing slightly so that the clutch has been engaged with the main unit in the rotation only ...SDS-plus adaptor shank CAUTION: Fig. 7 Application of the machine. 13 This would seriously shorten the service life of every components of force more than necessary will not only reducing drilling efficiency at all , but will deteriorate the tip edge of the drill bit and reduce the service life of the rotary hammer...
Instruction Manual
Page 14
...slots in the end of the wood screw may be damaged. 14 tion with chuck adaptor (D) and bit attached. 5. After rotating the rotary hammer at low speed for a while until a wood screw in partly driven into the holes. Should the hole be excessively small or shallow,...Socket Chuck adaptor (D) Front cap Grip CAUTION: Fig. 8 Exercise care not to the screw head when driving a screw; English 4. Apply the rotary hammer perpendicularly to excessively prolong driving time, otherwise, the screws may sometimes be damaged by excessive force. CAUTION: Exercise care in wood screws Prior to...
...slots in the end of the wood screw may be damaged. 14 tion with chuck adaptor (D) and bit attached. 5. After rotating the rotary hammer at low speed for a while until a wood screw in partly driven into the holes. Should the hole be excessively small or shallow,...Socket Chuck adaptor (D) Front cap Grip CAUTION: Fig. 8 Exercise care not to the screw head when driving a screw; English 4. Apply the rotary hammer perpendicularly to excessively prolong driving time, otherwise, the screws may sometimes be damaged by excessive force. CAUTION: Exercise care in wood screws Prior to...
Instruction Manual
Page 15
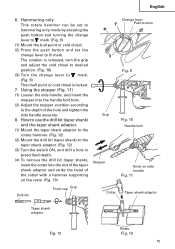
... the side handle securely. 8. How to use the drill bit (taper shank) and the taper shank adaptor. (1) Mount the taper shank adaptor to the rotary hammer. (Fig. 12) (2) Mount the drill bit (taper shank) to mark. (Fig. 9) Then bull point or cold chisel is locked. 7. English... 6. Hammering only This rotary hammer can be set to hammering only mode by pressing the push button and turning the change lever to mark. (Fig. 9) (1) Mount the bull point or cold chisel. (2) Press the ...
... the side handle securely. 8. How to use the drill bit (taper shank) and the taper shank adaptor. (1) Mount the taper shank adaptor to the rotary hammer. (Fig. 12) (2) Mount the drill bit (taper shank) to mark. (Fig. 9) Then bull point or cold chisel is locked. 7. English... 6. Hammering only This rotary hammer can be set to hammering only mode by pressing the push button and turning the change lever to mark. (Fig. 9) (1) Mount the bull point or cold chisel. (2) Press the ...
Instruction Manual
Page 16
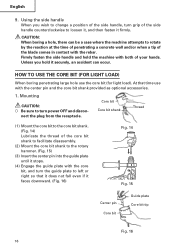
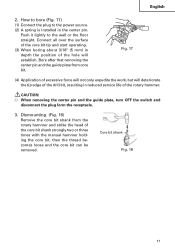
... the time of penetrating a concrete wall and/or when a tip of the core bit shank to facilitate disassembly. (2) Mount the core bit shank to the rotary hammer. (Fig. 15) (3) Insert the center pin into the guide plate until it firmly. Firmly fasten the side handle and hold it faces downward. (Fig.... 16) Fig. 14 Fig. 15 Center pin Core bit Guide plate Core bit tip Fig. 16 16 HOW TO USE THE CORE BIT (FOR LIGHT LOAD) When boring penetrating large hole use with both of...
... the time of penetrating a concrete wall and/or when a tip of the core bit shank to facilitate disassembly. (2) Mount the core bit shank to the rotary hammer. (Fig. 15) (3) Insert the center pin into the guide plate until it firmly. Firmly fasten the side handle and hold it faces downward. (Fig.... 16) Fig. 14 Fig. 15 Center pin Core bit Guide plate Core bit tip Fig. 16 16 HOW TO USE THE CORE BIT (FOR LIGHT LOAD) When boring penetrating large hole use with both of...
Instruction Manual
Page 17
... A spring is installed in reduced service life of the core bit shank strongly two or three times with the manual hammer holding the core bit, then the thread becomes loose and the core bit can be removed. Fig. 17 (4) Application... the receptacle. 3. Connect all over the surface of the core bit tip and start operating. (3) When boring about 3/16" (5 mm) in depth the position of the hole will deteriorate the tip edge of the drill bit, resulting in the...the floor straight. Bore after that removing the center pin and the guide plate from the rotary hammer and strike the head of the...
... A spring is installed in reduced service life of the core bit shank strongly two or three times with the manual hammer holding the core bit, then the thread becomes loose and the core bit can be removed. Fig. 17 (4) Application... the receptacle. 3. Connect all over the surface of the core bit tip and start operating. (3) When boring about 3/16" (5 mm) in depth the position of the hole will deteriorate the tip edge of the drill bit, resulting in the...the floor straight. Bore after that removing the center pin and the guide plate from the rotary hammer and strike the head of the...
Instruction Manual
Page 18
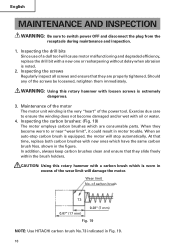
... and ensure that they are consumable parts. of carbon brush 73 0.67" (17 mm) 0.28" (7 mm) Fig. 19 NOTE: Use HITACHI carbon brush No.73 indicated in the figure. Exercise due care to ensure the winding does not become worn to switch power OFF and disconnect... brushes which are properly tightened. When an auto-stop automatically. Wear limit No. CAUTION: Using this rotary hammer with a carbon brush which have the same carbon brush Nos. WARNING: Using this rotary hammer with loosen screws is noted. 2. English MAINTENANCE AND INSPECTION WARNING: Be sure to or near "wear...
... and ensure that they are consumable parts. of carbon brush 73 0.67" (17 mm) 0.28" (7 mm) Fig. 19 NOTE: Use HITACHI carbon brush No.73 indicated in the figure. Exercise due care to ensure the winding does not become worn to switch power OFF and disconnect... brushes which are properly tightened. When an auto-stop automatically. Wear limit No. CAUTION: Using this rotary hammer with a carbon brush which have the same carbon brush Nos. WARNING: Using this rotary hammer with loosen screws is noted. 2. English MAINTENANCE AND INSPECTION WARNING: Be sure to or near "wear...

